


AFTER SALES SUPPORT
0151 649 1500
1890 946244
www.einhell.co.uk
41
25cc Petrol Grass Trimmer – GLPT 2538
Maintenance and servicing
AFTER SALES SUPPORT
0151 649 1500
1890 946244
www.einhell.co.uk
40
25cc Petrol Grass Trimmer – GLPT 2538
Cleaning
Cleaning
Carrying out any cleaning work
– The equipment should be cleaned thoroughly every time after it has been used.
This applies particularly to the cutting tool and the guard hoods.
– Keep the air vents and the motor housing free of dirt and dust as far as possible.
Wipe the equipment with a clean damp cloth or blow it down with compressed air
at low pressure.
– It is easiest to remove dirt and grass immediately after use.
– Clean the equipment regularly with a damp cloth and some soft soap. Do not use
cleaning agents or solvents; these may be aggressive to the plastic parts in the
equipment. Ensure that no water can get into the interior of the equipment.
Maintenance and servicing
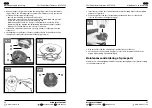
Grinding the safety hood blade
You will need a No 2PH cross point screwdriver to remove the screw, and a flat file to
sharpen the bade.
The safety hood blade (Fig. 7a/Item R) can become blunt over time. When you notice
this, undo the screw holding the safety hood blade to the safety hood. Clamp the
blade in a vice. Sharpen the blade with a flat file and make sure that the angle of the
cutting edge is not altered in the process. File in one direction only.
Carburettor settings
NOTICE!
Settings on the carburettor may only be made by authorized
customer service personnel. The air filter cover must be
removed before any work on the carburettor, as shown in
Figures 10a and 10b.
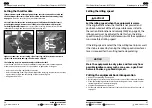
Replacing the line spool/cutting line
1. Unscrew the retainer screw (Fig. 6a/Item G) in a counter-clockwise direction and
remove (Fig. 6b). If you fail to do this by hand, use the key (Fig. 2/Item 10). You may
require no tools for this part of the maintenance, but if the spool retainer screw is
too tight, then use the supplied plastic key (Fig. 2/Item 10 & Fig. 5d).
Fig. 6b
Fig. 6a
G
Содержание GLPT 2538
Страница 29: ......


