background image

3. Assembly


WARNING:

 Stop the unit and unplug the extension cord before opening the 

inlet cover or attempting to install or remove the blower tube or vacuum tubes. 

Themotormustbestoppedandtheimpellerbladesnolongerturningtoavoid

seriousinjuryfromtherotatingblades.

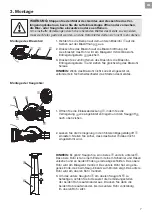
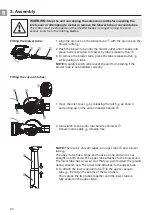
Fittingtheblowertube:

2

3

1

1.  Align the grooves on the blower tube 

1

 with the grooves on the 

blower outlet 

2

.

2.  Push the blower tube onto the blower outlet until it snaps into 

place; tube is secured to blower by tube release button 

3

.

3.  To remove the blower tube, press the tube release button 

3


while pulling on tube.

NOTE: A safety switch will prevent the unit from starting if the 

blower tube is not installed correctly.

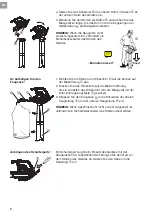
Fittingthevacuumtubes:

8

4

5

7

6

1.  Open the inlet cover 

4

 by releasing the latch 

5

 as shown 

and pulling up on the vacuum assist handle 

6

.

2.  Allow latch to snap into rear handle of blower 

7

Ensure mains cable 

remains free.

9

0

NOTE: There are 2 vacuum tubes, an upper tube 

9

 and a lower 

tube 

0

.

The upper tube has a hinge and hooks on one end and is cut 

straight on both ends. The upper tube attaches to the blower unit. 

The lower tube has a curved end that you point toward the ground 

during vacuum use. The lower tube attaches to the upper tube.
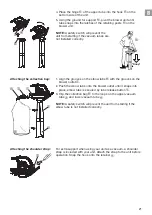
3.  To attach the lower vacuum tube 

9

 to the upper vacuum 

tube 

0

, first align the seams of the two tubes. 

Then, press the two tubes together until the lower tube is  

fully seated in the upper tube.

20

GB

Содержание 9332-20

Страница 1: ...CZ Návod k obsluze Fukar vysavač SK Návod na obsluhu Fukač vysávač GR Οδηγίες χρήσης Φυσητήραj αναρροφητήραj RUS Инструкция по эксплуатации Воздуходувка вакуумная SLO Navodilo za uporabo Puhalnik sesalnik HR Upute za uporabu Puhač usisavač SRB Uputstvo za rad BIH Duvač usisavač UA Інструкція з експлуатації Повітродувка вакууму RO Instrucţiuni de utilizare Refulator aspirator TR Kullanma Kılavuzu Ü...

Страница 2: ...rvice Garantie 14 1 Einsatzgebiet Ihres GARDENA ErgoJet 3000 Korrekte Verwendung als Blasgerät Der GARDENA ErgoJet 3000 eignet sich dazu Schmutzpartikel oder Grasabschnitte von Gehwegen Einfahrten Innenhöfen usw fortzublasen bzw dazu Gasabschnitte Stroh oder Blätter zu Häufen zusammen zu blasen oder dazu Schmutzpartikel aus Ecken Fugen oder Lücken zwischen Ziegeln oder Mauersteinen zu entfernen Ko...

Страница 3: ...rodukts speziell eingewiesen worden Kinder sollten beaufsichtigt werden um sicherzugehen dass sie nicht mit dem Produkt spielen Es ist möglich dass regio nale Vorschriften ein Mindestalter für die Benutzung des Produkts vorschreiben Dieses Produkt darf nicht von Kindern oder von Personen welche die vorliegende Anlei tung nicht gelesen haben benutzt werden Hochleistungswerkzeuge sind gefährliche In...

Страница 4: ...prüfen Die Verwendung einer RCD Vorrichtung verringert das Risiko eines Elektroschocks 3 Persönliche Sicherheit a Seien Sie stets wachsam passen Sie auf was Sie tun und gehen Sie im Umgang mit einem Elektrowerkzeug mit gesundem Men schenverstand vor Arbeiten Sie nicht mit einem Elektrowerkzeug wenn Sie müde oder unter dem Einfluss von Drogen Alkohol oder Medikamenten sind Ein Moment der Unauf merk...

Страница 5: ...sind auf unzureichend gewartete Hochleistungswerkzeuge zurück zu führen g Benutzen Sie das Hochleistungswerkzeug und den Zubehör ausschließlich in Überein stimmung mit diesen Anweisungen und zie hen Sie dabei stets die Arbeitsbedingungen und die auszuführende Arbeit mit in Betracht Arbeiten Sie nur bei Tageslicht oder bei ein wandfreier künstlicher Beleuchtung mit die sem Gerät Der Einsatz eines H...

Страница 6: ...re Flüssigkeiten aufzusaugen Falls Wasser oder andere Flüssigkeiten in das Gerät eindringen erhöht sich das Risiko eines Elektroschocks Benutzen Sie dieses Gerät niemals wenn die korrekte Ausrüstung nicht angebracht ist Wird das Gerät mit der Saugfunktion verwendet sind zunächst grundsätzlich die Saugrohre und der Fangsack zu installieren Stellen Sie immer sicher dass der Reißver schluss des Fangs...

Страница 7: ...rohr nicht korrekt eingesetzt ist verhindert ein Sicherheitsschalter das Starten des Gerätes Montage der Saugrohre 8 4 5 7 6 1 Öffnen Sie die Einlassabdeckung 4 indem Sie die Verriegelung 5 wie abgebildet entriegeln und den Sauggriff 6 nach oben ziehen 2 Lassen Sie die Verriegelung in den hinteren Blasgerätegriff 7 einrasten Stellen Sie sicher dass das Kabel 8 dabei nicht eingeklemmt wird 9 0 HINW...

Страница 8: ... Kerben am Winkelrohr t auf die Kerben auf der Blasöffnung 2 aus 2 Drücken Sie das Winkelrohr auf die Blasrohröffnung bis sie einrastet das Winkelrohr wird am Blasgerät mit der Rohr Entriegelungstaste 3 gesichert 3 Klippsen Sie den Fangsack z in die Schlaufen der oberen Saugleitung 9 und der unteren Saugleitung 0 ein HINWEIS Wenn das Winkelrohr nicht korrekt eingesetzt ist verhindert ein Sicherhei...

Страница 9: ...der der Fangsack nicht korrekt angebracht sind um zu vermeiden dass Schmutzpartikel und oder der Kontakt mit den Rotorblättern zu ernsthaften Verletzungen führt Tragen Sie stets Handschuhe und eine Schutzbrille zum Schutz vor Steinen oder Schmutz die in die Augen oder in das Gesicht geweht werden und zum Verlust des Augenlichts bzw zu schweren Verletzungen führen können Kabel Verwenden Sie nur Kab...

Страница 10: ...Sie regulieren den Luftstrom indem Sie die Ausblasöff nung des Rohrs stärker nach unten oder zu einer Seite richten Bewegen Sie sich bei der Arbeit immer von festen Objekten wie Bordsteinen Gehwegen großen Steinen Fahrzeugen und Zäunen weg Ecken reinigen Sie am besten indem Sie sich von der Ecke nach außen bewegen Dadurch vermeiden Sie dass Ihnen Schmutz ansammlungen ins Gesicht geweht werden Seie...

Страница 11: ...ie sämtlichen Staub Gras Blätter und Schmutz der sich dort angesammelt hat Prüfen Sie das Blasrohr und alle anderen Rohre Schließen Sie die Abdeckung und prüfen Sie dass sie eingerastet ist 4 Benutzen Sie zum Reinigen der Lufteinlassöffnungen von Schmutz eine weiche Bürste Verwenden Sie kein Wasser 5 Lagern Sie dieses Gerät und das Verlängerungskabel nach Möglichkeit abgedeckt zur Vermeidung der A...

Страница 12: ...Stellen Sie sicher dass der Motor stoppt starten Sie dann den Motor neu und fahren Sie fort Einlassabdeckung Brechen Sie die Verwendung des Gerätes ab wenn die Einlassabdeckung nicht korrekt verriegelt oder irgendwie beschädigt ist NACH JEDEM GEBRAUCH Prüfen und reinigen Sie das Gerät und alle Aufkleber Inspizieren Sie das Gerät nach jedem Gebrauch umfassend auf gelockerte oder schadhafte Bauteile...

Страница 13: ...rät in Betrieb sein muss Um ernsthafte Verletzungen durch die rotierenden Blätter des Geräts zu vermeiden muss der Motor gestoppt werden und die Rotorblätter dürfen sich nicht mehr drehen Störung Mögliche Ursache Abhilfemaßnahme Gerät funktioniert nicht 1 Schalter in Position AUS OFF 0 1 Schalter in Position EIN I schieben 2 Verlängerungskabel nicht angeschlossen 2 Verlängerungskabel wieder anschl...

Страница 14: ... bei Störung Reklamation durch unseren Technischen Service Schnelle und kostengünstige Ersatzteilversorgung durch unseren Zentralen Ersatzteil Service Bearbeitungsdauer in unserem Haus max 2 Arbeitstage Service Anschrift GARDENA Manufacturing GmbH Service Hans Lorenser Str 40 D 89079 Ulm Ihre direkte Verbindung zum Service Telefon Fax E Mail D in Deutschland 07 31 4 90 Durchwahl www gardena de ser...

Страница 15: ... Empfehlungen in der Betriebsanleitung behandelt Es wurde weder vom Käufer noch von einem Dritten versucht das Gerät zu reparieren Das Blasrohr und die Saugrohre sind Verschleißteile und sind nicht durch die Garantie abgedeckt Diese Hersteller Garantie berührt die gegenüber dem Händler Verkäufer bestehenden Gewährleistungsansprüche nicht Im Garantiefall schicken Sie bitte das defekte Gerät zusamme...

Страница 16: ...5 7 Troubleshooting 26 8 Technical data 27 9 Service warranty 27 1 Area of application of your GARDENA ErgoJet 3000 EJ3000 Proper use as blower The GARDENA ErgoJet 3000 EJ3000 is suitable when used as a blower for sweeping debris or grass clippings from driveways sidewalks patios etc and for blowing grass clippings straw or leaves into piles or removing debris from corners around joints or between...

Страница 17: ...ildren or pets are nearby Distractions can cause you to lose control c Never blow debris in the direction of bystanders The operator or user is responsible for accidents or hazards occurring to other people or their property d Keep work area clean and well lit Cluttered or dark areas invite accidents e Do not operate power tools in explosive atmospheres such as in the presence of flammable liquids...

Страница 18: ...oose clothing or jewellery Keep your hair clothing and gloves away from moving parts Loose clothes jewellery or long hair can be caught in moving parts 4 Power tool use and care a Only use the product in the manner and for the functions described in these instructions Always direct the cord to the rear away from the product Do not force the power tool Use the correct power tool for your applicatio...

Страница 19: ...ty warnings Stop the motor and disconnect the extension cord before opening the air inlet door or attempting to insert or remove the vacuum tubes The motor must be stopped and the impeller blades no longer turning to avoid serious injury from the rotating blades Inspect the area before using the unit Hard objects can be thrown through the collection bag or the housing and become dangerous missiles...

Страница 20: ...ll prevent the unit from starting if the blower tube is not installed correctly Fitting the vacuum tubes 8 4 5 7 6 1 Open the inlet cover 4 by releasing the latch 5 as shown and pulling up on the vacuum assist handle 6 2 Allow latch to snap into rear handle of blower 7 Ensure mains cable 8 remains free 9 0 NOTE There are 2 vacuum tubes an upper tube 9 and a lower tube 0 The upper tube has a hinge ...

Страница 21: ...grooves on the elbow tube t with the grooves on the blower outlet 2 2 Push the elbow tube onto the blower outlet until it snaps into place elbow tube is secured by tube release button 3 3 Clip the collection bag z to the loops on the upper vacuum tube 9 and lower vacuum tube 0 NOTE A safety switch will prevent the unit from starting if the elbow tube is not installed correctly Attaching the should...

Страница 22: ...e the unit without the tubes or collection bag properly attached to avoid flying debris and or impeller contact which can cause serious injury Always wear gloves and use eye protection to prevent rocks or debris from being blown or ricocheting into the eyes and face which can result in blindness or serious injury Cables Use only 1 00mm2 size cable up to 40 metres length maximum Maximum rating 1 00...

Страница 23: ...eed during blower use Direct air flow by directing the blower tube down or to one side Always work away from solid objects such as walks large stones vehicles and fences Clean corners by starting in corners and moving outward This will help prevent an accumulation of debris which could fly into your face Be careful when working near plants The force of the air could damage tender plants Vacuum mod...

Страница 24: ... storage 3 Open inlet cover and clean any dirt grass or debris that has collected Inspect the blower and all tubes Close and make sure the cover is latched 4 Use a soft brush to clean air vents and air inlet of debris Do not use water 5 Store your unit and extension cord in a well ventilated area and covered if possible to prevent dust and dirt accumulation Do not cover with plastic Plastic cannot...

Страница 25: ...the OFF position Make sure motor stops then restart motor and continue Inlet Cover Discontinue use of unit if inlet cover fails to latch properly or if it is damaged in any way AFTER EACH USE Inspect and clean unit and labels After each use inspect complete unit for loose or damaged parts Clean the unit using a damp cloth Wipe off unit with a clean dry cloth Clean collection bag IMPORTANT THE COLL...

Страница 26: ...t to be operating The motor must be stopped and the impeller blades no longer turning to avoid serious injury from the rotating blades Problem Possible cause Remedy Unit fails to operate 1 Switch in the OFF 0 position 1 Slide switch to ON I position 2 Extension cord disconnected 2 Reconnect extension cord 3 Circuit breaker tripped or fuse blown 3 Reset circuit breaker or fuse 4 Blower tube elbow t...

Страница 27: ...ranty we will either replace the unit or repair it free of charge if the following conditions apply The unit must have been handled properly and in keeping with the requirements of the operating instructions Neither the purchaser or a non authorised third party have attempted to repair the unit The blower tube and vacuum tubes are wearing parts and are not covered by the guarantee This manufacture...

Отзывы: