12
G
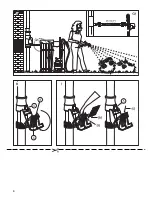
5. Use a measuring tape to meas-
ure 42 cm (for
∅
65 - 75 mm)
or 43 cm (for
∅
76 - 95 mm)
downwards from the top and
mark this position (fig. D).
6. Slide the installation aid down
to this marked position and
mark the lower edge for instal-
lation, again, if possible over
the entire diameter, of the
downpipe (fig. D).
7. Use a suitable saw to cut out
the marked section from the
downpipe. Ensure that the cut
is clean and straight (fig. E).
Use a file to deburr the cut
edges.
Installation
(fig. A / F / G)
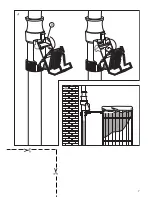
1. Turn the nut of the Rain Water
Collection Filter
1
clockwise
as shown in fig. F 2 (a).
2. Insert the lower reducing cou-
pling
7
at the top of the down-
pipe as shown in fig. F 2 (b).
3. Insert the Upper Reducing
Coupling
6
at the top of the
Rain Water Collection Filter
as shown in fig. F 2 (c).
4. Insert the Rain Water Collec-
tion Filter between the cut
downpipe sections as shown
in fig. F 2 (d) and tighten up
the Rain Water Collection
Filter by turning the nut
1
between both ends of the
downpipe (e).
5. Connect the Rain Water
Collection Filter and the
GARDENA Rain Water Tank
using a 25 mm (1
”
) hose and
the GARDENA Connecting
Set 3815 (fig. G / G 1).
By using the connecting
sleeves
3
, there is also the
possibility of connecting up a
commercially available DN 50
pipe, e.g. for the supply from
rain water cisterns or other
types of rain water vessels.
Tip:
The 33 mm (G 1)
thread
2
at the outlet of the
Rain Water Collection Filter
also enables the connection of
the GARDENA Threaded Tap
Connector 902 as well as the
GARDENA “Profi” Maxi-Flow
System Threaded Tap Con-
nector 2802.
The condition of the fine mesh
filter
8
can be determined by
looking through the transparent
filter hood
4
. The fine mesh filter
is practically a self cleaning filter,
larger items such as leaves are
held back from the flow by the
coarse filter at the filter inlet and
pass down the downpipe.
Cleaning the coarse filter
To clean the coarse filter (block-
age by larger items e.g. leaves)
remove the Rain Water Collection
Filter reversing the installation
procedure. Then remove all block-
ing items and reinstall the Rain
Water Collection Filter.
Tip :
If your gutter tends to block,
we recommend the installation of
a leaf collector box at the upper
entrance to the downpipe.
Cleaning the fine mesh filter
Should however the fine mesh
filter become blocked, it can be
cleaned as follows:
1. Open the Rain Water Collection
Filter by unfolding the filter
hood
4
forwards (fig. H).
2. Remove the fine mesh filter
insert as shown in fig. I by
pressing (a) forwards and
then lifting the insert (b) up-
wards.
3. Clean the fine mesh filter
under running water, insert (c)
(along the guide knobs) again
and close the filter hood by
pulling the snap fastener
5
upwards and folding back the
filter hood.
3. Cleaning the filter
(fig. H / I)
Before the frost period begins
or if the Rain Water Tank is full,
the collection of water can be
shut off as follows:
1. Open the filter hood
4
as
shown in fig. H.
2. Turn the outlet bypass
9
downwards and away from
you (fig. J) and close the filter
hood again.
The water then flows directly
through the downpipe into
the drainage system and not
through the filter into the Rain
Water Tank.
Advantage:
It is not necessary
to dismantle the Rain Water
Collection Filter for the winter
or during rainy periods.
4. Shutting off the collection of water
(fig. H / J)
If the outlet of the Rain Water
Collection Filter is installed at the
same height as the Rain Water
Tank, the water automatically
flows back into the downpipe
when the Rain Water Tank is full.
Tip:
If the distance is 50 cm or
more we recommend to create
a 10 % gradient for the inlet pipe
5. Integrated overflow
(fig. K)

