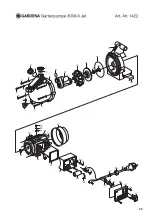
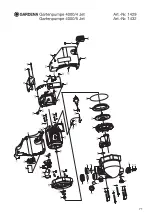
background image

11

GB

3. Initial Operation

Setting up your Garden Pump:

The site must be firm and solid in order to ensure safe and sturdy
operating conditions for the pump.

Position the pump at a safe distance from the liquid to be
pumped.

Connecting hose 

Don’t use any hose connection system fittings on the suction side!

to suction side:

A vacuum-resistant suction hose must be used 

The connection pieces on the intake and output sides must 
only be tightened by hand !

e.g. GARDENA Suction Unit, 

art. no. 1411

.

In order to reduce the suction time, it is advisable to use a suction
hose with backflow preventer avoiding automatic draining of the
suction hose when the pump is stopped. 

1. Screw a vacuum-resistant suction hose airtight onto the con-

nector 


on the suction side of the pump 

.

2. For suction heights exceeding 4 m also secure the suction

hose (e.g. by fastening it to a wooden post). 

This relieves the pump of the weight of the suction hose. 

Connection hose 

Both pump connectors

3a

are equipped with a 33.3 mm (G1)

to delivery side:

thread to which 13 mm (1/2”), 19 mm (3/4”) and 16 mm (5/8”)
hoses can be connected by using GARDENA hose connection 
system fittings. The back pump connector is closed with an end

cap. Unscrew the end cap for connecting two hoses.

Best results regarding the delivery capacity of the pump are achie-
ved when connecting 19 mm (3/4”) hoses in conjunction with e.g. 

•  GARDENA Pump Connection Set, 

art. no. 1752

,

or when using 25 mm (1”) hoses with fittings available from your 
sanitary dealer. 

Connect the pressure hose to the connector

3a

on the delivery

side 

.

When connecting simultaneously more than 2 hoses/accessories
we recommend application of the 

·

GARDENA Twin-Tap Connector or Four Channel Water
Distributor 

art. no. 1210 / 1194

which can be screwed directly onto the delivery side connection 

.

4. Operation

Filling the pump:

Warning ! Electric shock !
Risk of injury due to electric shock. 

Disconnect from the mains before filling the
Garden Pump.

Dry-Running

Before each operation, fill the pump to over-
flowing with approx. 2 to 3 l of the liquid to be 
pumped!

1. Unscrew the screw fitting

of the filler cap 

by hand. 

2. Fill the pump via the filler cap 

to overflowing with approx. 

2 to 3 l of the liquid to be pumped. 

3. Tighten the screw fitting 

of the filler cap 

by hand (do not

use pliers).

3a

3a

Содержание 1422

Страница 1: ...rosage NL Gebruiksaanwijzing Beregeningspomp S Bruksanvisning Bevattningspump I Istruzioni per l uso Pompa da giardino E Manual de instrucciones Bomba para jard n P Instru es de utiliza o Bomba de Jar...

Страница 2: ...around the house and garden When using the pump for pressure intensification the max per missible internal pressure of 6 bar on the delivery side must not be exceeded The increased delivery pressure...

Страница 3: ...not have a smaller diameter than rubber sheathed cables described with letter symbols H07 RNF Don t use the power cable for carrying the pump or for plugging off 2 For Your Safety In Austria In Austri...

Страница 4: ...2 19 mm 3 4 and 16 mm 5 8 hoses can be connected by using GARDENA hose connection system fittings The back pump connector is closed with an end cap Unscrew the end cap for connecting two hoses Best re...

Страница 5: ...ia the suction hose 5 Maintenance The GARDENA Garden Pump is essentially maintenance free Cleaning your Garden Pump The pump must be cleaned after pumping chlorinated swimming pool water 1 Rinse the G...

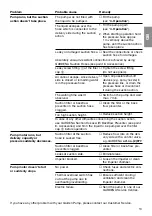
Страница 6: ...to be pumped over the filler cap before operation Suction filter at the suction hose is sucked free Suction filter or backflow preventer clogged Leaks at suction side Impeller blocked No power Therma...

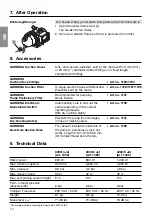
Страница 7: ...no 1739 Manometric Switch pump depending on the current operating pressure With dry running safety GARDENA Prevents the pump from damages Art no 1741 Dry Running Safety in case of missing liquid GARDE...

Страница 8: ...eping with the requirements of the operating instructions Neither the purchaser or a non authorised third party have attempted to repair the unit The impeller is a wearing part and is not covered by t...

Страница 9: ...dukten om skadan beror p att produkten har reparerats felaktigt eller om vid repa ration eller utbyte andra n Original GARDENA reservdelar har anv nts Samma sak g ller f r kompletteringsdelar och till...

Страница 10: ...de seguridad se refiere En caso de realizar cualquier modifi caci n en la presente mercanc a sin nuestra previa autorizaci n esta declara ci n pierde su validez Certificado de conformidade da UE Os a...

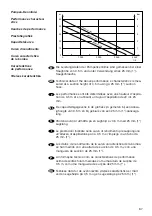
Страница 11: ...resuppongono un altezza di aspirazione pari a 0 5 m e l impiego di un tubo da 25 mm 1 Los datos de rendimiento de la curva caracter stica de la bomba se han medido con una altura de succi n de 0 5 m y...

Страница 12: ...Ventilator covering 22 1481 00 900 32 Gummiformdichtung Rubber from washer 23 1422 00 900 14 Schaltergeh use schwarz Switch cover black 24 1426 00 900 17 Scheibe Disc 25 1426 00 900 22 Schraube M5x13...

Страница 13: ...69...

Страница 14: ...426 00 900 15 Gummischeibe Rubber washer 33 Elektromotor Electric Motor 34 1481 00 900 32 Gummiformdichtung Rubber form washer 35 1426 00 900 17 Scheibe Disc 36 2180 00 600 43 Klemmscheibe A4 F Clampi...

Страница 15: ...71...

Страница 16: ...m rk utca 22 1158 Budapest Iceland Heimilistaeki hf Saetun 8 P O Box 5340 125 Reykjavik Republic of Ireland Michael McLoughlin Sons Hardware Limited Long Mile Road Dublin 12 Italy GARDENA Italia S p A...

Отзывы: