Ganz LED-19 Скачать руководство пользователя страница 7


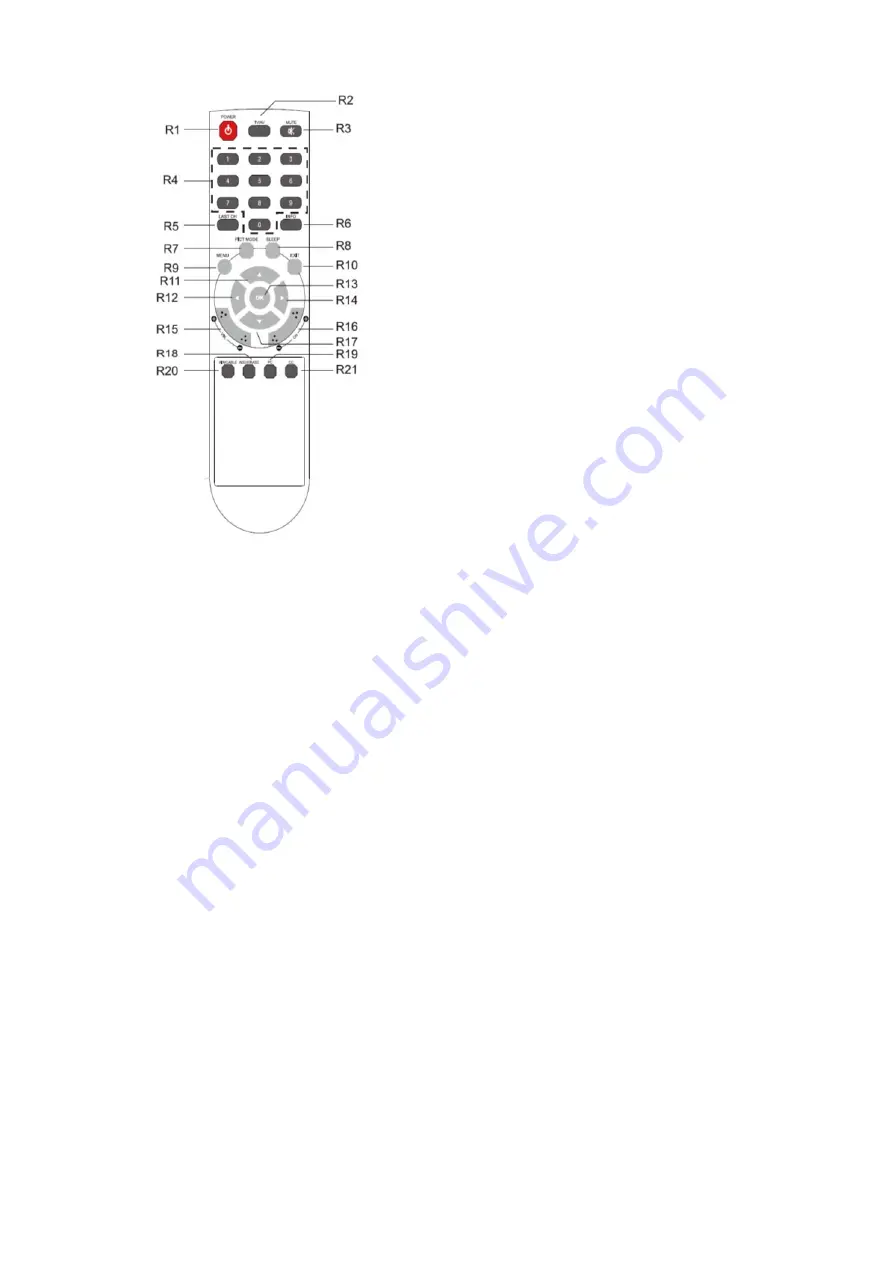
Remote control (27” only) 


R1   POWER 

Turn the monitor on from stand-by or off to 
stand-by mode. 

R2   TV/AV 

Select input signal source.


R3   MUTE(optional) 

Mute or Unmute sound


R4   NUMBER Button 

Press the buttons in order of MENU,7,8,9,0 to 
unlock the remote control lock.(27” only) 

 R5 LAST CH 

 Not used. 

 R6 INFO 

Information display. 

 R7 PICT MODE 

Selects your preferred picture settings. 

R8 SLEEP 

Set the sleep timer. 

R9   MENU 

Display a main menu. 

R10 EXIT 

Turns the OSD window off and moves from 
sub Menu to top menu in the OSD window. 

R11/R17 UP/DOWN 

/

 Button 

Press UP/DOWN button to enter the Function 
menu. 

R12/R14 LEFT/RIGHT 

/

 Button 

Press LEFT/RIGHT Button to adjust the 
volume. 

R13 OK 

Select menu items.


R15 VOL +/- (optional) 

Adjust the sound level. 

R16 PR +/- 

Not used.  

R18 ADD/ERASE 

Not used. 

R19 PC 

Select PC mode. 

R20 AIR/CABLE 

Not used. 

R21 CC 

Not used.  

Inserting batteries into the remote control unit 

Open the battery compartment of the remote 
control. Insert the batteries (two 1.5 V type R03 or 
AAA). Make sure that the polarity matches with the 
(+) and (-) marks inside of the battery compartment. 

Note

: To avoid damage from possible battery 

leakage, remove the batteries if you do not plan to 
use the remote control handset for an extended 
period of time. 


Changing a monitor parameter 

1.   Press the 

MENU

 button on the front panel to 

obtain the OSD menu screen. 

2.   Use UP-DOWN buttons to select the menu. 

3.   Use AUTO button to select the submenus. 

4.   Use Up-Down buttons to select a submenu 

function. 

5.   Press AUTO/SELECT button, then using left-

right buttons you can make adjustments as 
necessary 

6.   To exit, press 

MENU


Содержание LED-19

Страница 1: ...CCTV Monitor User Manual...

Страница 2: ...bling the monitor 3 Connections 3 Front panel controls 3 Control panel 3 17 3 19 W 22 24 3 27 3 19 4 Remote control 27 only 5 Inserting batteries into the remote control unit 5 Changing a monitor para...

Страница 3: ...tilated area to prevent the unit from overheating Only use accessories specified by the manufacturer or those sold with the product Avoid operating or placing the monitor in the following environments...

Страница 4: ...lay Data Channel DDC specification for Plug and Play compatibility Advanced micro circuitry makes setup and configuration fast and effortless The monitor features Advanced Color Controls for fine tuni...

Страница 5: ...om of the stand by turning it clockwise three to four turns 4 After fully tightening the screw bend the knob of the screw onto the bottom of the stand Caution Incomplete tightening of the screw may ca...

Страница 6: ...d off HOT KEY 19 1 POWER Switches the monitor on and off 2 Right Arrow Moves cursor to the right in the OSD window and increases the value of any selected menu 3 Left Arrow Decreases the value of any...

Страница 7: ...15 VOL optional Adjust the sound level R16 PR Not used R18 ADD ERASE Not used R19 PC Select PC mode R20 AIR CABLE Not used R21 CC Not used Inserting batteries into the remote control unit Open the bat...

Страница 8: ...different preset color temperatures or set your own customized color parameters Normal Warm Cool User 4 Advanced Setting 4 1 Noise Reduction Not used 4 2 Back Light Adjust the back light to be bright...

Страница 9: ...Music User 2 Balance Adjust the sound balance of the left and right speakers 3 Bass When you select the user mode adjust the bass sound 4 Treble When you select the user mode adjust the treble sound 5...

Страница 10: ...ness Adjust the brightness of the image 3 Contrast Adjust the contrast of image the difference between light and dark areas on the screen 4 Color Mode Adjust Color of image 5 Sharpness Adjust the disp...

Страница 11: ...uage Select language for OSD 2 Screen Format Select the aspect ratio FULL 16 9 4 3 ZOOM1 ZOOM2 3 OSD Time out Adjust the display of the OSD menu 4 OSD Transparency Adjust the OSD Transparency 5 Power...

Страница 12: ...s No Signal Out of Range or None Supported No Signal screen is displayed when the D Sub signal connector is connected but the status of the monitor is on DPMS mode Out of Range screen is displayed whe...

Страница 13: ...al cable is suitable to the video card Image is not centered too small or too large Adjust Clock or H V Center to get the proper image icture bounces or a wave pattern is present in the picture Keep t...

Страница 14: ...195mm x 358mm 15 12in x 7 68in x 14 1in 444mm x 172mm x 337mm 17 5in x 6 8in x13 3in W x H x D box 411mm x 130mm x 377mm 16 2in x 5 12in x 14 84in 498mm x 102mm x 390mm 19 6in x 4 0in x 15 4in Weight...

Страница 15: ...195mm x 388mm 16 6in x7 68in x15 28in 511 x 203 x 392 mm 20 1 x 8 0 x 15 4 in W x H x D box 470mm x 132mm x 389mm 18 5in x 5 2in x 15 31in 564 x 436 x 144 mm 22 2 x 17 2 x 5 7 in Weight Net with stan...

Страница 16: ...m 22in x 15 7in x 8 6in 647mm x 447 mm x 249mm 25 5in x 17 6in x 9 8in W x H x D box 614mm x 445mm x 109mm 24 2in x 17 5in x 4 3in 703mm x 502mm x 110mm 27 7in x 19 8in x 4 3in Weight Net with stand 4...

Страница 17: ...20 75 030 All models 1152 x 864 67 500 75 000 17 19 22 24 27 1280 x 1024 63 981 60 020 17 19 22 24 27 1280 x 1024 79 974 75 024 17 19 22 24 27 1360 x 768 47 712 59 790 19 W 22 24 27 1680 x 1050 65 290...

Страница 18: ...MEMO...

Страница 19: ...MEMO...

Страница 20: ...SN 99786W0685...

Отзывы: