background image

25

ADDITIONAL  FEATURES

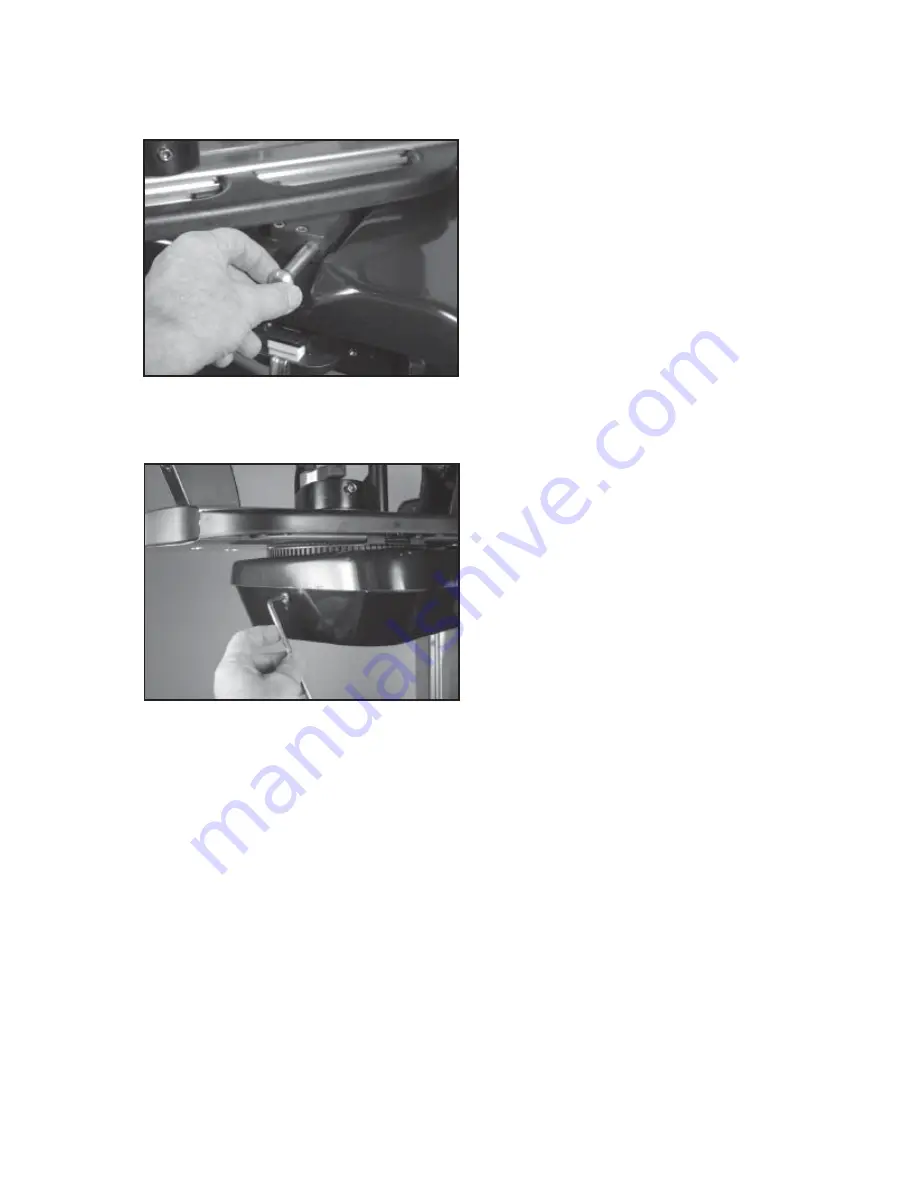
Turntable Brake

The Turntable may be locked in any position.  

To lock the Turntable Brake pull the brake 
lock pin OUT. 

To release the Turntable Brake push the 
brake lock pin IN.   

Turntable Clutch

To adjust the free rotation of the turntable, turn 
the Turntable Clutch bolt located on the left 
end of the base clockwise to add friction and 
restrict rotation or turn the Turntable Clutch 
bolt counter-clockwise to reduce the friction 
and allow the turntable to rotate more freely.

Содержание 9900 Els

Страница 1: ...OWNER S MANUAL Issue 1 June 2015 STRINGING MACHINE 9900 Els 2 PT SC MOUNTING ...

Страница 2: ...procedures listed on page 29 GAMMA s obligation under this warranty is limited to repair or replacement of defective EQUIPMENT and no one is authorized to promise any other liability GAMMA shall in no event be liable for any incidental or consequential damages To return defective EQUIPMENT a return authorization RA must be obtained from a GAMMAcustomer service representa tive The RA must be marked...

Страница 3: ...onal Two Point Self Centering Racquet Mounting System Accommodates All Racquets Auto Release Cam Lock Swivel Base Clamps 4 Tooth Universal String Clamps High Strength Extruded Aluminum Frame with Durable FRP Finish and Convenient Deep Padded Tool Tray Unique Turntable Clutch to Customize Rotation Friction Convenient Foot Actuated Tensioner Switch String Length Meter MACHINE FEATURES ...

Страница 4: ...tons are opened remove all inner cartons and check to be sure that all parts are present and accounted for Contents of Electric Floor Stand MMU3 20 1 Column Assembly 4 Legs 4 Leveling Feet 4 M8 x 30 Flat Head Screws 4 M8 x 35 Cap Screws 4 M6 x 20 Cap Screws 1 String Reel Holder M8 Threaded Pin 1 Knob 8 Spacers 2 M8 Washers Contents of Mounting System Carton MMU3 28 1 Turntable Assembly w String Cl...

Страница 5: ...NS Mounting the Floor Stand to the Machine Base The Floor Stand can be mounted to the ma chine base by laying the machine on the floor to align the 4 holes in the flange plate to the machinebaseorbysettingthemachineontop of the upright Floor Stand Note If mounting the machine base to the top of the upright Floor Stand use the help of an assistant to balance the machine base while aligning and tigh...

Страница 6: ...ioner housing into the socket on the Floor Stand column Floor Stand Height Adjustment The electric floor stand permits height adjust ments from 39 to 49 The machine height can be raised or lowered by depressing the rocker switch Up or Down When the desired height is reached set the rocker switch to the neutral position ...

Страница 7: ...e floor AC Power Adapter Storage Shelf To mount the Storage Shelf to the underside of the base align the holes in the storage shelf bracket with the holes in the base Use a 6 mm hex wrench to tighten the two hex head cap screws NOTE Toavoidriskofdamagingthethreads in the base DO NOT OVERTIGHTEN AC Power Adapter Storage Shelf PlacetheACPowerAdapterintotheStorage Shelf Coil the pin connector cable a...

Страница 8: ...string depending on the size of the string reel Before placing the first reel on the rod slide two spacers over the pin and slide them to the connector on the Lower Column After the first reel is placed onto the rod place two spacers between each reel to provide enough space between reels to allow them to turn freely without rubbing against one another To provide a smooth feed to the String Length...

Страница 9: ...ing Clamp Installation The post of the String Clamp and tube of the String Clamp Base may be treated with grease to provide protection against corro sion during shipping and while in storage Remove any excessive grease with a clean cloth prior to use The post and tube may also be cleaned with isopropyl alcohol After this type of thorough cleaning the post and tube should be treated with a light co...

Страница 10: ...the back side below the tensioner Plug the male end of the power cord into a grounded power outlet When using extension cords use grounded heavy duty extension cords rated for 15 AMP service Insert one end of floor stand power cord into the Floor Stand Power Socket F and the other end into the power socket next to the rocker switch on the top column of the floor stand Connect the Foot Pedal Switch...

Страница 11: ...ngs Screen to view and make changes to any of the machine settings Pressing and holding the F1 button for 5 seconds will display the Information Screen which includes the total number of strings pulled on the machine Pressing the ESC or RETURN button will exit from the Information Screen MAIN CROSS String Button Press to select and display the Main String Tension Setting or the Cross String Tensio...

Страница 12: ...ves from left to right and back to the left The diagnostic checks will appear on the display in the selected language Settings Screen PressingtheF1buttonwillopentheSettings Screen to view all current machine settings on the same screen and to quickly make changes to any of the settings If no buttons are pressed within 10 seconds the Settings Screen will revert to the Stringing Screen Stringing Scr...

Страница 13: ...nd KG at any time and the tension setting will be displayed accordingly Setting Different Tensions for Main Strings and Cross Strings To preset Tension Settings for the Main Strings and Cross Strings press the MAIN CROSS String Button to toggle between the Main String and Cross String tension settings TosetthetensionvaluefortheMainStrings press the MAIN CROSS String Button and when the Main String...

Страница 14: ...ctions on the previous and following pages Basic Stringing Mode ABasic Stringing Mode can also be enabled by pressing and holding the Memory Button for 5 seconds When enabled the Blue LED illuminates next to the Memory Button and an M0 appears on the screen above the Speed Icon The M0 Basic Stringing Mode is used when you do not wish to use or alter any of the permanent Memory Settings that were p...

Страница 15: ...ettings Screen TochangethePullingSpeedSettingfromthe Settings Screen first press F1 to display the Settings Screen After the Settings Screen appears on the display press the PULLING SPEEDbuttontohighlightthePullingSpeed Setting above the Pulling Speed Icon Press any of the F2 F3 or F4 buttons to increase thePullingSpeedSettingin10 increments and any of the F6 F7 or F8 buttons to decrease Pulling S...

Страница 16: ...gain until the Pre stretch Setting is highlighted Press any of the F2 F3 or F4 keys to increase the Pre stretch Setting in 1 increments and any of the F6 F7 or F8 keys to decrease the Pre stretch Setting in 1 increments When the desired Pre stretch Setting is displayed press ENTER to save the Pre stretch Setting for the active Memory Setting NOTE Selectable Pre stretch Settings range from 0 to 30 ...

Страница 17: ... is highlighted above the Knot Icon Press any of the F2 F3 or F4 keys to increase the Knot Setting in 1 increments and any of the F6 F7 or F8 keys to decrease the Knot Setting in 1 incre ments When the desired Knot Setting is displayed press ENTER to save the Knot Setting for the active Memory Setting NOTE Selectable Knot Settings range from 0 to 30 in 1 increments Setting the Knot Tension from th...

Страница 18: ...tringperpendicular to the gripper plates As the gripper jaws begin moving forward they will engage the sensor built into the front of the gripper housing and the gripper will automatically pull tension To release tension on the string depress the tension lever switch or use the foot pedal switch For adjustment of the parallel plates see Setting the Gripper Plate Spacing on page 27 STRING GRIPPER O...

Страница 19: ...t at the head and throat Turning the knobs in the opposite direction will move the Mounting Stands closer together and will allow the Racquet Supports to move away from the racquet frame Adjusting the Inner Racquet Supports The white Racquet Supports are adjustable to accom modate all racquets and provide maximum support to the racquet frame Screw the pads up or down so they contact the frame at a...

Страница 20: ...ent pressure to securethestringwhensubjectedtothedesired pulling tension The textured surface of the teeth provide for increased friction between the clamps and the string to allow for reduced clamping pressure while securing and holding the string under tension Note that excessive pressure can damage both the strings and String Clamp Clamp Base Operation TolocktheClampBasetotheTurntable rotate th...

Страница 21: ...es located in the throat bridge If there are 2 or 6 holes start main strings at the center 2 holes of the throat bridge If there are 4 or 8 holes start the main strings at the center 2 holes at the tip of the racquet To begin stringing the main strings thread the two ends of the string through the two center holes at the appropriate end of the frame and continue through the opposite center holes T...

Страница 22: ...help disengage and release the string from the Gripper Plates NOTE The tensioner has a built in safety that will shut down the motor if a string is not released within 60 seconds from the time the tensioner is activated After 30 seconds an alarm will sound and a 30 second count down will begin on the display An alarm will sound again at 20 seconds and at every second from 10 until zero After 60 se...

Страница 23: ...plicable tie the first cross string using an appropriate starting knot Weaving the Cross Strings Weave the cross strings over and under the main strings being careful to alternate the weave of each consecutive cross string to be opposite of the previously installed cross string Completing the String Job Once the final cross string is tensioned and clamped tie off at the appropriate hole specified ...

Страница 24: ...measurements When the end of the string exits through the hole on the right press the ENTER button to Zero the String Length Meter and the length of string will be measured from the point on the string located at the edge of the exit hole Pull the end of the string at a slow steadyrateandtheSLMwillbeginmeasuring the length of string as it is pulled through the SLM and indicate the measurement on t...

Страница 25: ...elease the Turntable Brake push the brake lock pin IN Turntable Clutch Toadjustthefreerotationoftheturntable turn the Turntable Clutch bolt located on the left end of the base clockwise to add friction and restrict rotation or turn the Turntable Clutch bolt counter clockwise to reduce the friction and allow the turntable to rotate more freely ...

Страница 26: ... in the same manner as for traditional awls The Pathfinder Awl must be in the closed position before insertion Once the awl is inserted pull the handle of the awl outward while holding the tip section in place This leaves the outer sheath in the grommet hole Insert the end of the string into the outer sheath While holding the string slowly pull the sheath out of the grommet hole to leave the free ...

Страница 27: ...changed at any time by pressing the LB KG Button Using a Tension Calibrator apply tension tothecalibratorandadjustthevalueonthe displayupordowntomatchthereadingon the calibrator Press the ENTER button to confirm and release the tension on the calibrator When the Gripper returns to the home position the display will now show 44 lbs or 20 kgs Apply tension to the calibrator and adjust the value on t...

Страница 28: ...ld be adjusted by turning the Adjustment Knob counter clockwise to increase the gap between the jaws NOTE Due to the bearings used in the clamp lever the action of the clamp lever is very light making it easy to apply excessive clamping pressure Clamps that are set too tight can damage the string as well as the string clamp jaws The clamp jaws should be cleaned periodically to be free from dirt oi...

Страница 29: ...n if necessary Electrical system does not function Check power source Check power cord connections CARE CLEANING With time and use the clamping surfaces of your machine may become oily or dirty and result in string or clamp slippage while stringing Periodic cleaning of the String Clamps String Clamp Base and String Gripper is recommended The supplied Cleaning Stone or a knife sharpening stone work...

Страница 30: ...LS FRP UPPER COVER 403 9900 ELS BASE FRAME 404 9900 ELS FRP LOWER COVER 405 9900 ELS TOOL TRAY PAD 406 TT CLUTCH BOLT 407 TT CLUTCH SPRING 409 REEL HOLDER KNOB wGRIP 410 ELECTRIC FL STND COLUMN ASSY 411 LEG FOR EXTRUDED FLOOR STAND 412 M8X30 FLAT HEAD SCREW 413 M8X35 CAP SCREW 414 9900 ELS BRAKE BOX E89 KEY PAD ELECTRONICS MARC10 AUTO RELEASE CLAMP BASE MMSC13 4T UNIVERSAL STRING CLAMP 109 NEEDLE ...

Страница 31: ...31 PARTS DRAWING E89 398 406 401 315 399 121 410 411 362 320 289 400 412 403 327 414 299 389 311 405 MMSC13 313 314 312 310 285 283 286 309 304 MARC10 409 211 210 402 404 194 407 413 390 ...

Страница 32: ...MMA SPORTS 200 Waterfront Drive Pittsburgh Pennsylvania 15222 Phone 800 333 0337 Fax 412 323 0317 Visit our website at www gammasports com Copyright 2015 GAMMA Sports All Rights Reserved MMAN 53 MG992 10 ...

Отзывы: