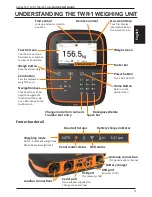
background image

 2 

Gallagher TWR-1 Weigh Scale

 Quick Start Guide

English

CHARGING THE BATTERY

To ensure optimum performance of the TWR-1, the internal battery may need to 

be charged for up to 16 hours before first time use.

Important:  

If the TWR-1 is to be stored for an extended period, this should be 

in a cool dry place with a fully charged battery.

1. 

Connect the power adapter at the base of the unit and plug the TWR-1 into a 

power outlet and switch 

ON

.

SPECIFICATIONS

Operating Temperature

-20

o

 to 50

o

C

-5

o

 to 120

o

F

Environmental Protection Rating

IP67

Input Voltage

12 V DC

Estimated battery run time

at 10

0% brightness

at 60% brightness

Weigh only

12 hours

16 hours

Weigh/Read

6 hours

8 hours

Read only

3 hours

4 hours

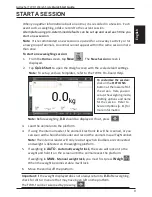
The charging icon will display on the screen. 


2. 

When the charge shows 100% the TWR-1 is ready to use with or without the 

power adapter.

Note:

• 

When the TWR-1 is in use, the battery icon 


will display and show remaining charge. 

• 

When using the scale and the charge level falls below 10% the battery icon 

will flash with a red outline. You will have about 30 minutes to complete the 

weighing session before the TWR-1 must be charged.

• 

When the charge level becomes critical the unit will shut down.

• 

To check remaining run time at current settings, from the Home screen, go to  


Settings   > About > Battery

.

Содержание TWR-1

Страница 1: ...ains Carry Bag TWR 1 weighing unit 110V 230V Mains AC adapter USB cable USB flash drive 12V battery cable with alligator clips Mini Serial Adapter 2M1709 Mounting bracket and mounting hardware TWR 1 Q...

Страница 2: ...Voltage 12 V DC Estimated battery run time at 100 brightness at 60 brightness Weigh only 12 hours 16 hours Weigh Read 6 hours 8 hours Read only 3 hours 4 hours The charging icon will display on the s...

Страница 3: ...TANDING THE TWR 1 WEIGHING UNIT Touch Screen Tap the screen icons field names or buttons to view or enter data Weigh button Records animal weight Zero button Sets the displayed weight to zero Home But...

Страница 4: ...on a flat vertical surface a round post or a rail To mount the bracket on a flat vertical surface or a round wooden post use the 4 x tek screws included with the unit To mount the bracket on either a...

Страница 5: ...o shim the loadbars or platform to ensure there are no twisting pressures within the platform Weights should be evenly distributed over the top of the weigh bars 4 Connect the loadbar cables to the ba...

Страница 6: ...tant Use the defined mounting holes because drilling through the Antenna Panel will damage the antenna Attaching the TWR 1 to the Antenna Panel 1 Ensure the TWR 1 is turned OFF 2 On the Antenna Panel...

Страница 7: ...he right of the Home screen For more information about this screen or any TWR 1 screen tap displayed in the top right corner of the screen This will display the On screen Help with more information ab...

Страница 8: ...g the internal reader a successful connection will show as in the footer bar Note A mini serial adapter is included with the TWR 1 if a female serial connection is required Important The TWR 1 can als...

Страница 9: ...al onto the platform 4 If using the internal reader the animal s Electronic ID will be scanned or you can scan with a hand held reader and record the animal s Visual Tag Number Note The internal reade...

Страница 10: ...ory Tap this box to override the drafting decision By default the scale will automatically zero any debris left on the platform between 2 5kg depending on the capacity of your loadbars This can be alt...

Страница 11: ...ngs for the current session From this screen tap the required option to change the session name turn drafting On or Off change the weight lock mode and configure Advanced settings Tap Save to keep any...

Страница 12: ...om the session s Weigh screen To view information about all the animals in the session tap All Animals tap Tap to view weight range of animals To view information about an individual animal weighed ta...

Страница 13: ...am gallagher com downloads Follow the steps below to update the Weigh Scale software 1 Download the updater file from the website and save to a USB flash drive 2 Turn the TWR 1 off 3 Insert the USB fl...

Страница 14: ...undesired operation This equipment has been tested and found to comply with the limits for a Class B digital device pursuant to part 15 of the FCC Rules These limits are designed to provide reasonable...

Страница 15: ...only operate using an antenna of a type and maximum or lesser gain approved for the transmitter by Industry Canada To reduce potential radio interference to other users the antenna type and its gain s...

Страница 16: ...www gallagher com Gallagher Private Bag 3026 Hamilton New Zealand 3E4847 08 18...

Отзывы: