OPERATION MANUAL
RADIO PROJECTION CLOCK
EAN 4 0 1 7 8 0 5 4 2 4 9 7 5
8
Interrupting the alarm (SNOOZE), switching off the alarm clock for the current day.
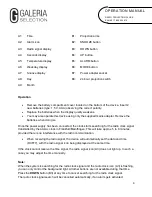
1. Once the alarm sounds, it can be cancelled by pressing the SNOOZE (B2) button.
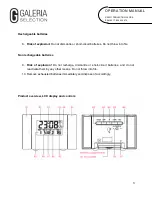
The “zZ” icon (A7) is flashing in the display. The alarm repeat functions has been set to
5 minutes by default. The alarm sounds again after 5 minutes.
2. Press any other button to turn off the alarm for the current day. The alarm sounds the
next day at the preset alarm time. The alarm time symbol (A2) lights up steadily in the
display.
Other functions
Temperature display
In order to switch a temperature value from °Celsius to °Fahrenheit, press the
DOWN
button (B3) when in normal time display mode.
Backlight
Press on top of the radio clock or press the
SNOOZE
(B2) button to turn on the
backlight. After approx. 5 seconds, the light will turn off again.
Projection
The alarm clock features 2 projection arms, left and right from the main body. The arms
can be swiveled to the front by up to 90°. Adjust the sharpness of the projection by
moving the device accordingly.
Press on the top of the radio clock to turn on the projection light. After approx. 5
seconds, the light will turn off again.
Connecting the included power adapter to the adapter socket (B7) on the back of the
device allows for continuous projection. To do so, first remove the batteries from the
device and
set the “24H PROJECTION” switch (B8) on the bottom of the device to “ON”
position.
WHEN USING THE POWER ADAPTER, ALWAYS REMOVE THE BATTERIES AND
SET THE “24H PROJECTION TO “ON” POSITION IN ORDER TO ACTIVATE
CONTINUOUS PROJECTION.
Troubleshooting, maintenance and care
Do not install the device near interfering sources (TVs, computers, or similar).
Avoid placing the device next to or on metal plates.
We do not recommend using the device in location such as airports, basements, high-
rise buildings or factories. Do not start radio reception while in a moving vehicle such as
a car or train.


