background image

20

en-us

    Loading the Dishwasher

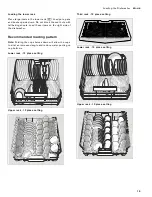
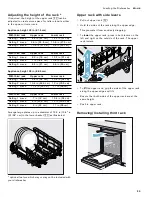
Third rack - 10 place setting

Loading the silverware basket*

Place knives and sharp utensils with their handles up 
and forks and spoons with their handles down. If large 
or oddly-shaped items are loaded in the silverware 
basket, be sure they do not nest together.

9

WARNING

Risk of injury!

The sharp points and edges of knives and other 
sharp utensils can cause serious injury. Load 
knives and other sharp utensils with edges down. 
Do not allow children to handle or play near 
knives and sharp utensils.

* optional feature which may or may not be included with 
your dishwasher

Suggested loading patterns

Rack accessories

Third rack*

The third rack 

1*

 horizontally positions knives, 

spatulas and other oversized tools for improved 
cleaning and easier loading and unloading. Arrange 
cutlery in third rack 

1*

 as illustrated.

1

Salad fork

2

Teaspoon

3

Dinner fork

4

Knife

5

Tablespoon

6

Serving spoon

7

Serving fork

Содержание DF 280

Страница 1: ...DJJHQDX en us Operating instructions fr ca Notice d utilisation Dishwasher DF 280 281...

Страница 2: ...2...

Страница 3: ...the height of the rack 23 Upper rack with side levers 23 Removing Installing third rack 23 Removing Installing upper rack 24 Removing Installing lower rack 25 Detergent 26 Adding detergent 26 Combinat...

Страница 4: ...f Warranty Product 46 Warranty Exclusions 46 How to Obtain Warranty Service 47 Installation and connection 47 Parts included 47 Safety instructions 47 Delivery 47 Technical specifications 48 Installat...

Страница 5: ...KHUHLQ LV YHU LPSRUWDQW 7R OHDUQ HYHQ PRUH DERXW RXU GLVKZDVKHU DQG DYDLODEOH DFFHVVRULHV DV ZHOO DV PDQ RWKHU WRS TXDOLW 3OHDVH FRQWDFW XV LI RX KDYH DQ TXHVWLRQV RU FRPPHQWV ZKR GHPDQG TXLHW DQG VX...

Страница 6: ...a result of non observance of this warning 9 CAUTION This indicates that minor or moderate injuries may occur as a result of non observance of this warning NOTICE This indicates that damage to the app...

Страница 7: ...er covered in this manual is incorrectly installed or if the dishwasher has been improperly grounded Do not use the dishwasher covered in this manual unless you are certain the electrical supply has b...

Страница 8: ...ertified residential dishwashers are not intended for licensed food establishments Child Safety To reduce risk of injury do not allow children to play in or on the dishwasher When children become old...

Страница 9: ...hut off the incoming water supply and the procedure to shut off the incoming power supply See the Installation Instructions or contact your installer for more information 9 WARNING State of California...

Страница 10: ...al or plastic or abrasive cloths paper towels to clean your dishwashers exterior door panel Your dishwasher s exterior door panel can be damaged by doing so To avoid dishwasher damage do not load the...

Страница 11: ...11 Getting Started en us Getting Started GettingStartedAppliance overview 67 57 UHVHW VHF VHF K PLQ UHVHW VHF VHF W...

Страница 12: ...g text is indicated on the display window at the top Scroll with Set with Leave with t 3 sec 4 Keep pressing button until the time setting is indicated on the display window at the top 5 Make the sett...

Страница 13: ...r 2 Switch on ON OFF switch 3 Press Info button 8 for 3 seconds until the following text is indicated on the display window at the top Scroll with Set with Leave with t 3 sec 4 Keep pressing button un...

Страница 14: ...onsumption Auto Power Off Off Appliance automatically switches off at end of rinsing process Emotion Light On Interior light Front display On The front display can be selected Remaining time proj On W...

Страница 15: ...s 1 Ask your local water utility company for the water hardness value of the tap water 2 Required setting can be found in the water hardness table 3 Open the door 4 Switch on ON OFF switch 5 Press Inf...

Страница 16: ...l panel or the text on the display window at the top enough salt for x rinse cycles the displays can be switched off Proceed as described under Setting water softening system and set the value to 0 8...

Страница 17: ...8 for 3 seconds until the following text is indicated on the display window at the top Scroll with Set with Leave with t 3 sec 4 Keep pressing button until the rinse aid dispenser is indicated on the...

Страница 18: ...s or anything other than normal dishwasher safe dishware and kitchenware Loading the upper rack Ensure items do not protrude through the bottom of the racks and block the spray arms Note When pushing...

Страница 19: ...tall baking sheets Load these items on the right side of the dishwasher Recommended loading pattern Note Folding the cup shelves down will allow the cups to sit at an increased angle and reduce water...

Страница 20: ...harp utensils can cause serious injury Load knives and other sharp utensils with edges down Do not allow children to handle or play near knives and sharp utensils optional feature which may or may not...

Страница 21: ...the height of the cup shelves as follows 1 Position the cup shelf vertically and pull upwards 2 Push cup shelf at a slight angle downwards to the required height 1 2 or 3 3 Engage cup shelf Cup shelf...

Страница 22: ...ide or center Ensure that the dishwasher is always operated with upper rack 12 or extra tall item sprinkler To ensure that the spray jet can reach all parts arrange the baking sheets as illustrated ma...

Страница 23: ...ide of the rack The upper rack lowers 4 To lift the upper rack grip the sides of the upper rack along the upper edge and lift 5 Ensure that both sides of the upper rack are at the same height 6 Push i...

Страница 24: ...doing so note the position of the detent pins as illustrated in Step 2 3 Lift third rack slightly and insert rear detent pins into the lower locking hooks on the rails 3 4 Lower third rack and press t...

Страница 25: ...s 3 4 Lower upper rack and press into the front notch 4 Upper rack clicks into position 5 Push in upper rack Removing Installing lower rack Removing lower rack 1j 1 Pull out lower rack all the way 1 2...

Страница 26: ...such that they do not come in contact with the cover insert a detergent tab flat not on its side Note Do not place detergent tabs in the tab tray 1B Place tabs or other detergent forms directly in the...

Страница 27: ...by using single function detergents and applying salt and rinse aid separately If wash cycles are short detergent tabs may not have full cleaning effect due to different dissolving properties and the...

Страница 28: ...3 122 F This cycle is appropriate for delicate dishwasher items It is optimised according to the soiling with the aid of sensors all Regular see note at bottom of table Recommended for daily regular o...

Страница 29: ...the amount of food soil and the incoming water temperature The Smart Control makes decisions that can cause the cycle time and water usage to adjust intermittently Wash cycle times are based on 120 F...

Страница 30: ...115 110 120 N A N A 65 N A Water cons in L gal 9 3 12 5 2 5 3 3 10 2 16 5 2 7 4 4 17 9 4 8 10 9 14 2 9 3 7 N A N A 12 3 2 N A Rinse temp in F C 144 62 158 70 162 72 156 69 N A N A 140 60 N A Extra Dr...

Страница 31: ...s wipe them with a dry or slightly damp cloth Opening the door To open the door press the upper middle part of the door The appliance opens automatically If you have activated the child proof lock pre...

Страница 32: ...selected wash cycle is briefly displayed in the digital display AutoPowerOff Switching off automatically after the end of the wash cycle AutoPowerOff To save energy the dishwasher is switched off 1 mi...

Страница 33: ...n 5 Close the door Wash cycle sequence starts Note Your dishwasher is protected against unintentional operation If the appliance door remains open for more than 4 seconds after pressing the Start butt...

Страница 34: ...ill be paused Press the Start button again and close the appliance door Terminating the wash cycle Reset Terminatingthewashcycle 1 Open the door 2 Press the START button and hold for 3 seconds The dig...

Страница 35: ...less steel make sure the rinse agent is full and functioning properly Clean the door seal regularly with a damp cloth to remove food particles that may collect from normal loading and cause odor A soi...

Страница 36: ...ote do not use abrasive brushes or steel wool etc as they may damage the filter 4 Reinstall the filter system in reverse sequence and lock into place by screwing the Large Object Trap until the markin...

Страница 37: ...ign objects 7 Place pump cover in the original position 2 and press down until it engages 3 8 Place cover in the original position press down and engage 9 Reinstall filters 10 Re insert racks Note The...

Страница 38: ...example Filter system soiled E22 Clean filters optional feature which may or may not be included with your dishwasher Fault table Fault Cause Remedial action Error code is lit Supply hose kinked Inst...

Страница 39: ...Aid Water softening system special salt There is still enough special salt rinse aid available Check refill indicator levels Water is left in the appliance at the end of the wash cycle Filter system o...

Страница 40: ...ed Insert and engage filters correctly Rinse wash cycle too weak Select a more intensive rinse cycle Increase sensitivity of the sensors Dishes precleaned too intensely sensors therefore decide on wea...

Страница 41: ...ng setting Washable or water soluble coatings in the container or on the door Detergent substances are deposited These coatings cannot usually be removed with chemicals appliance cleaner Change deterg...

Страница 42: ...d during the service life of the dishwasher Discoloration is normal and will not impair the function of the dishwasher Plastic parts discolored Too low rinsing temperature Select wash cycle with highe...

Страница 43: ...Door may not be properly latched Press the main power switch to turn unit on Unit may not be turned on Shut door completely Delay start may be engaged To reset refer to Delay start section in this man...

Страница 44: ...the spray arms can rotate freely The detergent dispenser was damp when filled Pour detergent into the dry detergent dispenser only Appliance stops in the wash cycle or wash cycle is interrupted Door n...

Страница 45: ...st using purchaser provided that the Product was purchased for your normal household non commercial use and has in fact at all times only been used for normal household purposes new at retail not a di...

Страница 46: ...ake the service call Out of Warranty Product Gaggenau is under no obligation at law or otherwise to provide you with any concessions including repairs pro rates or Product replacement once this warran...

Страница 47: ...ting by an officer of BSH How to Obtain Warranty Service To obtain warranty service for your Product you should contact the nearest Gaggenau authorized service center Installation and connection Insta...

Страница 48: ...must be secured to prevent it from overturning e g by screwing it to the wall or by installing it under a continuous worktop which is screwed to adjacent cupboards The appliance can easily be install...

Страница 49: ...outlet must be near the appliance and freely accessible after the installation If the plug is not freely accessible an allpole disconnector with a contact opening of at least 3 mm must be fitted on t...

Страница 50: ...er Note Transport appliance upright only This prevents residual water from running into the machine control and damaging the wash cycle sequence Securing the appliance against frost If the appliance i...

Страница 51: ...du panier 71 Panier sup rieur avec leviers lat raux 72 Retirer installer le troisi me panier 72 Retirer installer le panier sup rieur 73 Retirez installez le panier inf rieur 74 D tergent 75 Ajout de...

Страница 52: ...it hors garantie 97 Exclusions de garantie 97 Comment b n ficier d un service de garantie 98 Installation et raccordement 99 Pi ces incluses 99 Consignes de s curit 99 Livraison 99 Donn es techniques...

Страница 53: ...HW O LQIRUPDWLRQ FRQWHQXH LFL HVW WUqV LPSRUWDQWH 3RXU HQ FRQQDvWUH G DYDQWDJH VXU OH ODYH YDLVVHOOH HW OHV DFFHVVRLUHV GLVSRQLEOHV DLQVL TXH VXU OHV DXWUHV 3RXU WRXWH TXHVWLRQ RX WRXW FRPPHQWDLUH UH...

Страница 54: ...en cas de non respect de cette mise en garde 9 ATTENTION Ceci indique des risques de blessures mineures ou de gravit moyenne en cas de non respect de cette mise en garde AVIS Ceci indique un risque d...

Страница 55: ...ures graves ou endommager l quipement Tous les travaux de r paration doivent tre effectu s par un technicien d entretien qualifi utilisant uniquement des pi ces de rechange d origine 9 AVERTISSEMENT R...

Страница 56: ...bjets tranchants pour viter qu ils n endommagent le joint de la porte les couteaux et autres ustensiles tranchants doivent tre plac s debout les POIGN ES EN HAUT afin de r duire le risque de coupures...

Страница 57: ...mmes nues ce moment Retirez la porte du lave vaisselle menant au compartiment de nettoyage lors du retrait d un ancien lave vaisselle dans le cadre de l entretien ou de la mise au rebut Pour viter d e...

Страница 58: ...ues ou plastiques ou des ponges essuie tout abrasifs pour nettoyer le panneau de porte ext rieure de votre lave vaisselle Ceci peut endommager le panneau de porte ext rieur de votre lave vaisselle Afi...

Страница 59: ...59 Mise en route fr ca Mise en marche MiseenrouteVue d ensemble de l appareil 67 57 UHVHW VHF VHF K PLQ UHVHW VHF VHF W...

Страница 60: ...tre d affichage sup rieure Faites d filer avec Choisissez avec Maintenez durant t 3 sec 4 Maintenez le bouton enfonc jusqu ce que l heure soit affich e dans la fen tre d affichage sup rieure 5 Effectu...

Страница 61: ...ce que le message suivant soit affich dans la fen tre d affichage sup rieure Faites d filer avec Choisissez avec Maintenez durant t 3 sec 4 Appuyez sur le bouton jusqu ce que le param tre d sir soit a...

Страница 62: ...tion d eau et d lectricit Extinction automatique Arr t L appareil s teint automatiquement la fin du rin age clairage d ambiance Marche clairage int rieur Affichage de devant Marche L affichage de deva...

Страница 63: ...duret de votre eau courante votre fournisseur d eau 2 Le r glage effectuer se trouve dans le tableau de duret de l eau 3 Ouvrez la porte 4 Appuyez sur le bouton MARCHE ARR T 5 Appuyez sur le bouton In...

Страница 64: ...rieure suffisamment de sels pour X rin ages il est possible de d sactiver ces affichages Proc dez tel que d crit dans R glage du syst me d adoucissement de l eau et d finissez la valeur entre 0 et 8...

Страница 65: ...econdes jusqu ce que le message suivant soit affich dans la fen tre d affichage sup rieure Faites d filer avec Choisissez avec Maintenez durant t 3 sec 4 Maintenez le bouton enfonc jusqu ce que le dis...

Страница 66: ...rez les objets base de m taux diff rents Veillez ne pas bloquer les bras gicleurs Recommand Aluminium L aluminium anodis et color peut se d colorer au fil du temps Les min raux pr sents dans l eau peu...

Страница 67: ...insertion du panier sup rieur 12 dans le lave vaisselle poussez le jusqu ce qu il se bute contre la paroi arri re du bac laver Ainsi le bras gicleur du panier sup rieur 1 se connecte l alimentation en...

Страница 68: ...ntassent pas 9 AVERTISSEMENT Risque de blessures Les points et bords tranchants des couteaux et autres ustensiles coupants peuvent causer des blessures graves Lors du chargement les pointes des coutea...

Страница 69: ...avec votre lave vaisselle tag re tasses Les tag res tasses ainsi que l espace qui se trouve sous celles ci peuvent tre utilis s pour les petites tasses et les verres ainsi que les articles d argenter...

Страница 70: ...ssiettes creuses assiettes d ner peuvent tre nettoy s avec cette t te de lavage Ins rez la t te de lavage comme ceci 1 Retirez le panier sup rieur 12 2 Ins rez la t te de lavage comme montr dans l ill...

Страница 71: ...ajust e pour lib rer plus d espace pour les ustensiles de grande taille dans le panier sup rieur comme inf rieur Hauteur de l appareil 81 5 cm 32 po Hauteur de l appareil 86 5 cm 32 po Avec le troisi...

Страница 72: ...viter toute chute soudaine 3 Pour abaisser le panier sup rieur appuyez sur les deux leviers gauche et droite l ext rieur de celui ci Le panier sup rieur s abaisse 4 Pour soulever le panier sup rieur...

Страница 73: ...le troisi me panier puis appuyez sur les crans l avant 4 Le troisi me panier s encliquette alors dans sa position 5 Ins rez le troisi me panier en le poussant Retirer installer le panier sup rieur Re...

Страница 74: ...en le poussant Retirez installez le panier inf rieur Retirez installez le panier inf rieur 1j 1 Sortez le panier inf rieur jusqu au bout 1 2 Soulevez le panier sup rieur d abord par le devant puis pa...

Страница 75: ...m s d tergents placez les de telle sorte qu ils n entrent pas en contact avec le couvercle Ins rez les plat et non sur leur c t Remarque Ne placez pas les comprim s d tergents dans le compartiment d t...

Страница 76: ...de s chage en utilisant des d tergents classiques ainsi que de sels et un agent de rin age de mani re s par e Si les cycles de lavage sont courts les comprim s d tergents peuvent ne pas avoir assez de...

Страница 77: ...ure gr ce l aide des capteurs tout AUTO d licat 45 50 C Ce cycle convient aux ustensiles d licats Il est optimis selon le degr de souillure gr ce l aide des capteurs tout Normal voir la note au bas du...

Страница 78: ...ge Pour conomiser de l nergie ce lave vaisselle dispose d un syst me EcoSense dans lequel les capteurs du lave vaisselle ajustent automatiquement les variations de longueur de temp rature et d eau du...

Страница 79: ...3 16 3 20 5 4 3 5 5 16 6 21 1 4 4 5 6 s o s o 13 3 3 5 s o Temp de rin age en C F 63 145 72 162 72 162 69 156 s o s o 60 140 s o Chargement partiel Temps de cycle en min 75 80 75 90 115 110 120 s o s...

Страница 80: ...Les boutons sont sensibles et doivent tre l g rement touch s vitez que la graisse ou les particules d aliments ne se d posent sur les boutons cela peut activer le lave vaisselle L essuyage et le netto...

Страница 81: ...e nourriture s ch s Ce r glage est recommand si vous utilisez des d tergents biologiques ou cologiques lesquels contiennent une quantit moindre d agents actifs La consommation en nergie et en eau est...

Страница 82: ...fichage du logo de la marque R glages d usine Vous pouvez restaurer les r glages d usine pour tous les param tres Mise sous tension de l appareil 1 Ouvrez le robinet fond 2 Ouvrez la porte 3 Appuyez s...

Страница 83: ...marche involontaires Si la porte de l appareil reste ouverte durant plus de 4 secondes apr s que vous ayez appuy sur le bouton D marrer l op ration est suspendue Appuyez de nouveau sur le bouton D ma...

Страница 84: ...ieurs du panneau int rieur de la porte afin d liminer les r sidus d pos s lors du chargement normal Si des taches apparaissent sur l acier inoxydable assurez vous que l agent de rin age est rempli et...

Страница 85: ...aque cycle de lavage 2 D vissez le filtre gros l ments tel qu illustr et retirez tout le syst me de filtration 3 Retirez tout r sidu et nettoyez les filtres en les rin ant l eau claire Remarque n util...

Страница 86: ...irez compl tement le couvercle 6 Contr lez le compartiment interne et liminez tout objet tranger 7 Placez le couvercle de la pompe sa position initiale 2 appuyez jusqu ce qu il s encliquette 3 8 Place...

Страница 87: ...insi que sur l affichage frontal Des solutions possibles ces probl mes sont fournies par exemple Syst me de filtration souill E22 Nettoyez les filtres option facultative qui peut tre ou ne pas tre inc...

Страница 88: ...st affich sur l affichage digital Une d faillance technique a probablement eu lieu Mettez l appareil hors tension en appuyant sur le bouton MARCHE ARR T Remettez l appareil sous tension apr s un court...

Страница 89: ...e celui ci avant de retirer la vaisselle L agent de rin age cologique a des propri t s de s chage m diocres Utilisez un agent de rin age classique Les produits cologiques peuvent avoir une efficacit l...

Страница 90: ...que le plus gros des souillures Augmentez la sensibilit des capteurs Le cycle de lavage Normal ou Intensif est recommand Les r cipients longs et troits ne sont pas bien rinc s lorsqu ils sont dans les...

Страница 91: ...tergent est en morceaux Changez de d tergent Taches d eau sur les parties en plastique La formation de gouttelettes sur les surfaces en plastique est physiquement impossible viter Des traces d eau son...

Страница 92: ...difficiles ou impossibles enlever sur les parois ou sur la vaisselle en acier inoxydable Pellicule form e partir de l gumes chou c leri pommes de terre p tes etc ou de l eau du robinet mangan se Peut...

Страница 93: ...sselle Utilisez des verres adapt s au lavage en lave vaisselle vitez l exposition prolong e la vapeur phase ayant lieu une fois le cycle de lavage termin Utilisez un cycle de lavage basse temp rature...

Страница 94: ...ermez la porte La port e est rest e ouverte durant plus de 4 secondes apr s avoir appuy sur le bouton D MARRER Appuyez nouveau sur le bouton D MARRER et fermez la porte de l appareil dans les 4 second...

Страница 95: ...e la porte et l emp che de fermer correctement V rifiez si le panneau arri re est ventuellement comprim par exemple par une prise ou un support de flexible n ayant pas t retir Coupure d alimentation l...

Страница 96: ...ie limit e fournie par BSH Home Appliances Gaggenau dans cet nonc de garantie limit e s applique seulement l appareil Gaggenau le Produit qui vous a t vendu titre de premier acheteur dans la mesure qu...

Страница 97: ...pendantes et non des agents partenaires soci t s affili es ou repr sentants de Gaggenau Nonobstant ce qui pr c de Gaggenau n encourra aucune responsabilit pour le Produit si ce dernier est utilis dans...

Страница 98: ...TRE RECOURS EXCLUSIF QUANT AU PRODUIT QUELLE QUE SOIT LA NATURE DE LA D CLARATION QU IL S AGISSE D UN CONTRAT OU D UN PR JUDICE INCLUANT LA RESPONSABILIT ABSOLUE OU LA N GLIGENCE OU AUTREMENT CETTE GA...

Страница 99: ...ave vaisselle Consignes de s curit Veuillez vous r f rer aux Consignes importantes de s curit pour l installation incluses dans le manuel s par Consignes d installation compris avec votre lave vaissel...

Страница 100: ...ture de l eau eau froide Eau chaude Temp rature maximale de 60 C 140 F Raccordement d eau chaude Raccordementd eauchaude Le lave vaisselle peut tre raccord une arriv e d eau froide ou chaude jusqu 60...

Страница 101: ...Si celui ci est mont retirez le panneau de socle 6 Sortez l appareil tirez avec pr caution sur le flexible l arri re Transport de l appareil Videz le lave vaisselle et s curisez les pi ces mobiles Vi...

Страница 102: ......

Страница 103: ......

Страница 104: ...DJJHQDX 0DLQ 6WUHHW 6XLWH UYLQH 86 3KRQH 1 8 LQIR JDJJHQDX XVD FRP ZZZ JDJJHQDX XVD FRP 9001046140 9001046140 9509...

Отзывы: