


Operating the appliance
en
33
Operating the appliance
Operating the appliance
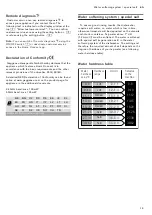
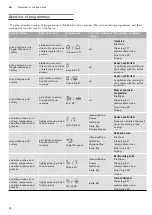
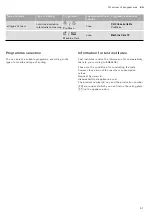
Programme data
The programme data (consumption values) can be found
in the summary of instructions. They refer to normal
conditions and the water hardness set value °E 16 - 20
medium. Different influencing factors such as water
temperature or line pressure may result in deviations.
Changing the settings
The dishwasher has been preset with certain settings
for your convenience. You can change these factory
settings.
Change the setting as follows:
1.
Open the door.
2.
Switch on ON/OFF switch
(
.
3.
Press Info button
{8
for 3 seconds until the
following text is indicated on the display window at
the top
@
:
Scroll with
< >
Set with
- +
Leave with Setup 3 sec.
4.
Keep pressing button
>
)R
until the required setting
is indicated on the display window at the top
@
.
5.
Make the setting with setting buttons
+ -
`
.
6.
Press and hold the Info button
{8
for 3 seconds.
The chosen setting has now been stored.
Tip:
If you change several settings, first make all
changes in succession. Now press the Info button
{
8
for 3 seconds. This saves all set values in the
appliance.
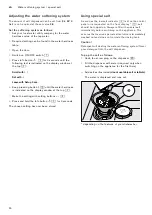
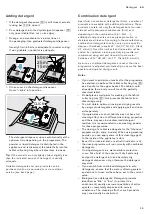
AquaSensor *
AquaSensor
* depending on the features of your dishwasher
The Aqua sensor is an optical measuring device (light
barrier) which measures the turbidity of the rinsing
water.
The AquaSensor is used according to the programme. If
the AquaSensor is active, “clean” rinsing water can be
transferred to the next rinse bath and water
consumption can be reduced by 3–6 litres. If
the turbidity is greater, the water is drained and
is replaced with fresh water. In the automatic
programmes the temperature and running time can also
be adjusted to the degree of soiling.
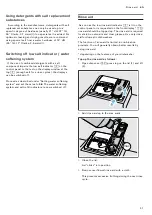
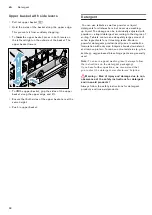
Zeolith drying
¼
Zeolith drying
:
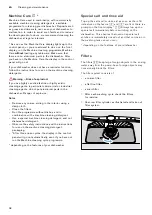
Warning – Risk of burns from touching the blow
opening
1R
!
Never touch the blow opening. The blow opening
becomes hot and, furthermore, any damage will result in
a chargeable callout by customer service.
Caution!
Please ensure that the intake opening
1J
is not
obstructed and do not place any temperature-sensitive
utensils in the lower basket at the rear right side above
the blow opening
1R
.
The appliance features a Zeolith container. Zeolith is a
mineral which can store moisture and heat energy
and release them again.
During the washing step this heat energy is used to dry
the mineral and heat up the rinsing water.
During the drying phase moisture from the rinsing
compartment is stored in the mineral and heat energy
is released. This released heat energy is blown into
the rinsing compartment with dry air. This accelerates
and improves drying.
These processes therefore save a great deal of energy.


