


Getting to know your appliance
en
13
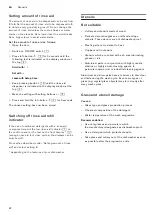
Settings
The dishwasher has been preset with certain settings
for your convenience. You can change this factory
setting.
Change the setting as follows:
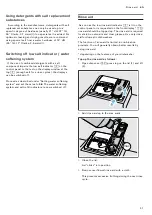
1.
Open the door.
2.
Switch on ON/OFF switch
(
.
3.
Press Info button
{
8
for 3 seconds until the
following text is indicated on the display window at
the top
@
:
Scroll with
< >
Set with
- +
Leave with Setup 3 sec.
4.
Keep pressing button
>
)R
until the required setting
is displayed.
5.
Make the setting with setting buttons
+ -
`
.
6.
Press and hold the Info button
{8
for 3 seconds.
The chosen setting has now been stored.
You have the option of resetting all changed settings
back to the original factory settings.
Note:
When you reset your dishwasher to the factory
settings, you are taken directly to the settings for
switching on the appliance for the first time.
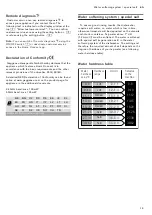
Setting
Factory setting
Infotext
by pressing Info button
{
Time setting
12:00
Set the current time.
Time format
24h
12h or 24h.
Time display
Time
Show end of programme with display "Finish
in" or "Finish at".
Language
Deutsch
Language selection.
Water hardness
°E 16 - 20 medium
Setting water hardness. When using
Multitabs, select the lowest setting.
Rinse aid disp.
Level 5
Amount of rinse aid affects drying. When
using Multitabs, select setting 0.
Sensor setting
Standard
Adjustment of soiling detection for optimum
cleaning result.
Extra dry
Off
Improved drying for glasses and
plasticware.
Water connection *
Cold water
Connection to hot water (40-60°C) or cold
water (<40°C) possible.
Eco forecast
Off
Show the water and energy consumption.
Auto Power Off
after 1 min.
Appliance automatically switches off at end
of rinsing process.
Emotion Light *
On
Interior light.
Front display *
On
The front display can be selected.
Remaining time proj. *
On
While programme is running, status
information is projected onto floor.
Infolight *
On
Light is projected to signal an active
cleaning cycle.
Start programme
Eco 50° C
When switching on, the last selected
programme appears.
Tone volume *
Level 2
Volume of signal at end of programme.
Button volume
Level 2
Volume when using buttons.
* depending on the features of your dishwasher


