Gaggenau AC230101 Скачать руководство пользователя страница 73

73

 Installatie      

nl

3

Geurfiltercassette openen.

4

Zijdelingse afdekkingen naar binnen schuiven en 
verwijderen. 

5

Geurfiltercassette sluiten.
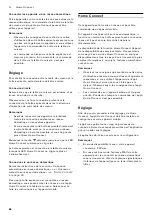
Apparaat ophangen

1

Apparaat op de hoeken optillen en omdraaien.

2

Bouwzijdige kabel in het gemarkeerde bereik van 
het apparaat positioneren.
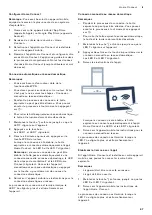
3

Bouwzijdige kabel door de opening voeren en 
apparaat in de bevestigingsschroeven aan het 
plafond inhaken.

4

Apparaat tot aan de aanslag in de vier 
sleutelgatopeningen met de geleidehulzen 
inschuiven.

5

Apparaat zo verschuiven en weer laten zakken, dat 
de kraagmoeren aan de kant van de geleidehulzen 
aanliggen.

6

Diagonaal tegenover elkaar liggende moeren 
voorzichtig aandraaien tot het apparaat vlak tegen 
het plafond aanligt.

Aanwijzing: 

Moeren per stuk aantrekken zodat het 

apparaat niet kantelt.

1

2

Содержание AC230101

Страница 1: ...tallation and use nl Gebruiksaanwijzing en installatievoorschrift fr Notice d utilisation et de montage it Istruzioni per l uso e il montaggio AC230101 Deckenl ftung Ceiling ventilation Plafondventila...

Страница 2: ...bindung zur cksetzen 12 Hinweis zum Datenschutz 13 Konformit tserkl rung 13 2Reinigen und warten 13 Batterien der Fernbedienung wechseln 16 3St rungen was tun 17 4Kundendienst 18 Zubeh r 18 MONTAGEANL...

Страница 3: ...enung Dieses Ger t ist f r eine Nutzung bis zu einer H he von maximal 2000 Metern ber dem Meeresspiegel bestimmt Dieses Ger t kann von Kindern ab 8 Jahren und Personen mit reduzierten physischen senso...

Страница 4: ...istung von zwei Gasbrennern m Warnung Verbrennungsgefahr Die zug nglichen Teile werden im Betrieb hei Nie die hei en Teile ber hren Kinder fernhalten m Warnung Verletzungsgefahr Bauteile innerhalb des...

Страница 5: ...ndienst rufen Stromschlaggefahr Eindringende Feuchtigkeit kann einen Stromschlag verursachen Ger t nur mit einem feuchten Tuch reinigen Vor der Reinigung Netzstecker ziehen oder Sicherung im Sicherung...

Страница 6: ...densat zu verringern Umweltgerecht entsorgen Entsorgen Sie die Verpackung umweltgerecht Batterien entsorgen Entsorgen Sie gebrauchte Batterien umweltgerecht Betriebsart BetriebsartDieses Ger t ist f r...

Страница 7: ...aus LED Anzeige Ger t ein und ausschalten Einschalten Taste dr cken Der L fter startet auf L fterstufe 2 LED 2 am Ger t leuchtet Ausschalten 1 Taste dr cken Der L fternachlauf wird aktiviert LED 6 am...

Страница 8: ...Taste r dr cken LED 6 am Ger t leuchtet und die optimale L ftung wird ber einen Sensor automatisch eingestellt Ausschalten Den Automatikbetrieb mit der Taste r beenden Das Ger t schaltet in die zuvor...

Страница 9: ...Filter leuchtet 4 Taste Taste A dr cken bis LED 1 am Ger t f r die elektronische Steuerung wieder auf Betrieb ohne Umluftfilter umgestellt ist 5 Tasten und ca 3 Sekunden gedr ckt halten um die Einste...

Страница 10: ...bedienen Die Bedienung an der Dunstabzugshaube hat jederzeit Vorrang In dieser Zeit ist die Bedienung ber die kochfeldbasierte Haubensteuerung nicht m glich Einrichten Um die Verbindung zwischen Kochf...

Страница 11: ...Endger t ausgestattet mit der aktuellen Version des jeweiligen Betriebssystems 1 ffnen Sie auf Ihrem mobilen Endger t den App Store Apple Ger te bzw Google Play Store Android Ger te 2 Geben Sie den S...

Страница 12: ...t z B Optimierung Fehlerbehebung sicherheitsrelevante Updates Vorausgesetzt ist Sie sind registrierter Home Connect Nutzer haben die App auf Ihrem mobilen Endger t installiert und sind mit dem Home Co...

Страница 13: ...Produktseite ihres Ger tes bei den zus tzlichen Dokumenten 2 4 GHz Band 100 mW max 5 GHz Band 100 mW max 2Reinigen und warten Reinigenundwartenm Warnung Stromschlaggefahr Eindringende Feuchtigkeit ka...

Страница 14: ...Fettfilter waagerecht halten um ein Abtropfen von Fett zu vermeiden 5 Zug ngliche Geh useteile reinigen Ger t von innen reinigen 6 Fettfilter reinigen und vor dem Einbau trocknen lassen Bereich Reini...

Страница 15: ...aben keinen Einfluss auf die Funktion der Fettfilter Haushalts blichen Geschirrreiniger verwenden Stark verschmutzte Fettfilter nicht zusammen mit Geschirr reinigen Die Fettfilter locker in die Geschi...

Страница 16: ...rfen nur Batterien des angegebenen Typs verwendet werden Unterschiedliche Batterietypen sowie neue und gebrauchte Batterien d rfen nicht zusammen verwendet werden Verletzungsgefahr Es d rfen keine wie...

Страница 17: ...oniert nicht Stecker ist nicht eingesteckt Ger t am Stromnetz anschlie en Stromausfall Pr fen ob andere K chenger te funkti onieren Sicherung defekt Im Sicherungskasten pr fen ob die Sicherung f r das...

Страница 18: ...gelegenen Kundendienst finden Sie hier bzw im beiliegenden Kundendienst Verzeichnis Reparaturauftrag und Beratung bei St rungen Vertrauen Sie auf die Kompetenz des Herstellers Sie stellen somit sicher...

Страница 19: ...rauch gew hrleistet Der Installateur ist f r das einwandfreie Funktionieren am Aufstellungsort verantwortlich Nur ein konzessionierter Fachmann darf Ger te ohne Stecker anschlie en Bei Sch den durch f...

Страница 20: ...e en der Scharniere Nicht in den beweglichen Bereich der Scharniere greifen Verletzungsgefahr Die Filterabdeckung kann schwingen Filterabdeckung immer langsam ffnen und schlie en Darauf achten dass di...

Страница 21: ...en Montagearbeiten muss das Ger t spannungslos sein Der Ber hrungsschutz muss durch den Einbau gew hrleistet sein 5Installation InstallationInstallation vorbereiten Der Kochdunst wird mit zunehmendem...

Страница 22: ...m f r die Befestigung bohren Achtung Stellen Sie sicher dass sich im Bereich der Bohrungen keine Stromleitungen Gas oder Wasserrohre befinden 5 Befestigungsschrauben in Decke einschrauben 6 Gewindesta...

Страница 23: ...r Decke anliegt Hinweis Muttern st ckweise anziehen damit das Ger t nicht verkantet Ger t anschlie en Auf geeignete Absicherung der Hausinstallation achten Spannung und Frequenz des Ger tes m ssen mit...

Страница 24: ...zum Anschluss des Ger ts muss eingehalten werden Das Kabel muss doppelt isoliert bleiben Vor der Anschlussklemme nur so kurz wie n tig abisolieren 2 Bauseitiges Kabel in die Anschlussklemme einstecke...

Страница 25: ...ngsgefahr Bauteile innerhalb des Ger tes k nnen scharfkantig sein Schutzhandschuhe tragen m Warnung Verletzungsgefahr Klemmgefahr beim ffnen und Schlie en der Scharniere Nicht in den beweglichen Berei...

Страница 26: ...ur geeignete Hilfsmittel verwenden 1 Ger t vom Stromnetz trennen 2 Auf Verriegelungen der Filterabdeckung dr cken Hinweis Filterabdeckung ist schwer Filterabdeckung mit beiden H nden greifen und festh...

Страница 27: ...Installation de 12 Bauseitiges Kabel aus der Anschlussklemme l sen 13 Diagonal gegen berliegende Schrauben vorsichtig l sen 14 Ger t aus der Schl sselloch ffnung l sen 15 Ger t langsam ablassen 1 1 1...

Страница 28: ...stics 37 Resetting the connection 37 About data protection 38 Declaration of Conformity 38 2Cleaning and maintenance 38 Replacing the batteries in the remote control 41 Trouble shooting 42 4Customer s...

Страница 29: ...e for damage after unpacking it Do not connect the appliance if it has been damaged in transport This appliance is not intended for operation with an external clock timer or a remote control m Importa...

Страница 30: ...nge batteries without supervision Risk of injury Batteries may explode Do not charge or short circuit the batteries Do not throw batteries into a fire Risk of injury The connection terminals must not...

Страница 31: ...w appliance is particularly energy efficient Here you can find tips on how to save even more energy when using the appliance and how to dispose of your appliance properly Saving energy Adjust the fan...

Страница 32: ...pply to your appliance If your appliance has Home Connect more functions are only available in the Home Connect app Note Switch on the extractor hood when you start cooking and switch it off again sev...

Страница 33: ...ting 2 2 Press the button twice in order to set intensive mode 2 Note Intensive mode 1 is only available via the Home Connect app The corresponding LEDs light up on the appliance Note After approx 6 m...

Страница 34: ...ilter LED 2 flashes Grease filter and odour filter LEDs 1 and 2 flash The grease filters should now be cleaned or the odour filter needs to be replaced Cleaning and maintenance on page 38 The saturati...

Страница 35: ...trols on the hob If the appliance is being operated by means of the controls on the extractor hood this mode of operation always has priority It is not possible to use the hood controls on the hob dur...

Страница 36: ...app Note Your mobile device must have the latest version of the operating system it uses 1 On your mobile device go to the App Store Apple devices or to the Google Play Store Android devices 2 Enter...

Страница 37: ...g for the purpose of optimisation troubleshooting or security updates To do this you need to be a registered Home Connect user have installed the app on your mobile device and be connected to the Hom...

Страница 38: ...liance in the additional documents 2 4 GHz band max 100 mW 5 GHz band max 100 mW 2Cleaning and maintenance Cleaningandmaintenancem Warning Risk of electric shock Penetrating moisture may result in an...

Страница 39: ...el to prevent fat from dripping out 5 Clean the accessible parts of the housing Clean the inside of the appliance 6 Clean the grease filter and let it dry before refitting Area Cleaning agent Stainles...

Страница 40: ...domestic dishwashing detergents Do not clean heavily soiled grease filters together with tableware Place the grease filters in the dishwasher leaving plenty of space around them Do not the wedge the g...

Страница 41: ...Only batteries of the specified type may be used Different types of batteries or old and new batteries must not be mixed together Risk of injury Rechargeable batteries must not be used Caution Damage...

Страница 42: ...nto the mains Connect the appliance to the power supply Power cut Check whether other kitchen appliances are working The fuse is faulty Check in the fuse box to make sure that the fuse for the applian...

Страница 43: ...es in the enclosed customer service list To book an engineer visit and product advice Trust the expertise of the manufacturer and rest assured that the repair will be carried out by trained service te...

Страница 44: ...censed professional may connect appliances without plugs Damage caused by incorrect connection is not covered under warranty The surfaces of the appliance are easily damaged Avoid damaging them during...

Страница 45: ...over does not swing out after it is released m Warning Risk of electric shock Components inside the appliance may have sharp edges These may damage the connecting cable Do not kink or pinch the connec...

Страница 46: ...the further away they are from the hob We recommend a distance of at least 700 mm and a maximum of 1500 mm So that cooking vapours are optimally drawn in install the extractor hood in the middle of t...

Страница 47: ...he grease filter to avoid causing damage 2 Loosen the screws on the side covers 3 Open the odour filter cartridge 4 Push the side covers inwards and remove them 5 Close the odour filter cartridge Atta...

Страница 48: ...ver installation work is being carried out When the appliance is installed protection against contact must be provided Only a licensed professional may connect the appliance They are subject to the re...

Страница 49: ...away from the hinges 1 Open the odour filter cartridge 2 Insert the side covers 3 Push the side covers slightly in the direction of the appliance frame and screw firmly in place 4 Take the odour filte...

Страница 50: ...supply Removing the appliance m Warning Risk of injury Components inside the appliance may have sharp edges Wear protective gloves m Warning Risk of injury Risk of trapping body parts when opening and...

Страница 51: ...screws on the side covers 10 Remove the side covers 11 Close the odour filter cartridge 12 Detach the on site cable from the connecting terminal 13 Carefully loosen the diagonally opposite screws 14...

Страница 52: ...agnose 62 Verbinding terugzetten 62 Aanwijzing voor gegevensbeveiliging 63 Conformiteitsverklaring 63 2Reinigen en onderhouden 63 Batterijen van de afstandsbediening vervangen 66 3Wat te doen bij stor...

Страница 53: ...apparaat is bestemd voor gebruik tot op hoogten van maximaal 2 000 meter boven zeeniveau Dit apparaat kan worden gebruikt door kinderen vanaf 8 jaar en door personen met beperkte fysieke sensorische o...

Страница 54: ...wok komt overeen met het vermogen van twee gasbranders m Waarschuwing Risico van verbranding Tijdens het gebruik worden de toegankelijke onderdelen heet De hete onderdelen nooit aanraken Zorg ervoor d...

Страница 55: ...ing Kans op een elektrische schok Een defect toestel kan een schok veroorzaken Een defect toestel nooit inschakelen De netstekker uit het stopcontact halen of de zekering in de meterkast uitschakelen...

Страница 56: ...Uw nieuwe apparaat is bijzonder energie effici nt Hier krijgt u tips over de manier waarop u bij het gebruik van uw apparaat nog meer kunt besparen op energie en het apparaat op de juiste manier afvoe...

Страница 57: ...an toepassing zijn op uw apparaat Als uw apparaat over Home Connect beschikt zijn bijkomende functies uitsluitend in de Home Connect app beschikbaar Aanwijzing Schakel de afzuigkap in zodra u begint m...

Страница 58: ...branden Aanwijzing Na ca zes minuten schakelt de afzuigkap zelfstandig terug naar ventilatorstand 3 Intervalventilatie Inschakelen Bij de intervalventilatie schakelt de ventilatie gedurende ca 6 minut...

Страница 59: ...rden vervangen Reinigen en onderhouden op pagina 63 Terwijl de verzadigingsindicaties knipperen kunnen ze worden gereset Hiervoor op de toets drukken Instellingen voor gebruik van het geurfilter 1 Bij...

Страница 60: ...a de afzuigregeling van de kookplaat bedient De bediening op de afzuigkap heeft altijd voorrang Gedurende deze tijd is bediening via de afzuigregeling van de kookplaat niet mogelijk Instellen Om de ve...

Страница 61: ...Aanwijzing U heeft een mobiel eindapparaat nodig uitgerust met de actuele versie van het betreffende besturingssysteem 1 Open op uw mobiele eindapparaat de App Store Apple apparaten of de Google Play...

Страница 62: ...imalisatie verhelping van fouten of veiligheidsrelevante updates Voorwaarde is dat u een geregistreerde Home Connect gebruiker bent de app op uw mobiele eindapparaat hebt ge nstalleerd en verbonden be...

Страница 63: ...internet onder www gaggenau com op de productpagina van uw apparaat bij de aanvullende documenten 2 4 GHz band 100 mW max 5 GHz band 100 mW max 2Reinigen en onderhouden Reinigenenonderhoudenm Waarsch...

Страница 64: ...gankelijke behuizingsonderdelen schoonmaken Apparaat van binnen reinigen 6 Vetfilter reinigen en voor de inbouw laten drogen Gebied Schoonmaakmiddelen Roestvrij staal Warm zeepsop Met een schoonmaakdo...

Страница 65: ...de werking van de vetfilters Gebruik een gangbaar vaatwasmiddel Sterk verontreinigde vetfilters niet samen met serviesgoed reinigen Plaats de metalen vetfilters los in de vaatwasmachine De vetfilters...

Страница 66: ...een batterijen van het opgegeven type worden gebruikt Verschillende batterijtypes alsook nieuwe en gebruikte batterijen mogen niet samen worden gebruikt Gevaar voor letsel Er mogen geen heroplaadbare...

Страница 67: ...k Oplossing Apparaat werkt niet Stekker is niet in het stopcontact gesto ken Apparaat aansluiten op het elektriciteits net Stroomuitval Controleer of andere keukenapparaten functioneren Zekering defec...

Страница 68: ...De contactgegevens in alle landen vindt u in de bijgesloten lijst met Servicedienstadressen Verzoek om reparatie en advies bij storingen Vertrouw op de competentie van de producent Zo bent u er zeker...

Страница 69: ...er het apparaat na het uitpakken Niet aansluiten in geval van transportschade De veiligheid is alleen gewaarborgd bij een deskundige montage volgens de montagehandleiding De installateur is verantwoor...

Страница 70: ...Geen wijzigingen aan de elektrische of mechanische opbouw aanbrengen Risico van letsel Risico van vallen tijdens het werk aan het apparaat Stabiele ladders gebruiken Gevaar voor letsel Klemgevaar bij...

Страница 71: ...pening van minstens 3 mm De vaste aansluiting mag alleen door een elektricien worden aangelegd Wij adviseren een aardlekschakelaar FI schakelaar in de stroomkring naar het apparaat te installeren m Wa...

Страница 72: ...nnen plafond is vastgemaakt Het apparaat mag niet direct in gipskartonplaten of gelijksoortig licht bouwmateriaal van een vrij hangend plafond worden gemonteerd Voor een juiste montage dient u materia...

Страница 73: ...ge kabel door de opening voeren en apparaat in de bevestigingsschroeven aan het plafond inhaken 4 Apparaat tot aan de aanslag in de vier sleutelgatopeningen met de geleidehulzen inschuiven 5 Apparaat...

Страница 74: ...derbreker met een contactopening van minstens 3 mm De vaste aansluiting mag alleen door een elektricien worden aangelegd Wij adviseren een aardlekschakelaar FI schakelaar in de stroomkring naar het ap...

Страница 75: ...m Waarschuwing Risico van letsel Bepaalde onderdelen in het toestel kunnen scherpe randen hebben Veiligheidshandschoenen dragen m Waarschuwing Gevaar voor letsel Klemgevaar bij het openen en sluiten v...

Страница 76: ...Alleen geschikte hulpmiddelen gebruiken 1 Apparaat loskoppelen van het stroomnet 2 Druk op de vergrendelingen van de filterafdekking Aanwijzing De filterafdekking is zwaar Filterafdekking met beide ha...

Страница 77: ...nl 12 Bouwzijdige kabel uit de aansluitklem losmaken 13 Diagonaal tegenover elkaar liggende schroeven voorzichtig losdraaien 14 Apparaat uit de sleutelgatopening losmaken 15 Apparaat langzaam laten z...

Страница 78: ...istance 88 R initialiser la connexion 88 Remarque li e la protection des donn es 88 D claration de conformit 88 2Nettoyage et maintenance 89 Changer les piles de la commande distance 91 3Anomalies que...

Страница 79: ...on u pour une utilisation jusqu une altitude maximale de 2 000 m Cet appareil peut tre utilis par des enfants de 8 ans ou plus et par des personnes dot es de capacit s physiques sensorielles ou mental...

Страница 80: ...an de plusieurs foyers gaz il y a une forte production de chaleur Un appareil de ventilation mont au dessus peut tre endommag ou prendre feu Ne faites jamais fonctionner en m me temps deux foyers gaz...

Страница 81: ...ecteur ou enlever le fusible dans le bo tier fusibles Appeler le service apr s vente Risque de choc lectrique Tenter de r parer vous m me l appareil est dangereux Seul un technicien du service apr s v...

Страница 82: ...plus besoin Nettoyez le filtre graisse et le filtre odeurs aux intervalles indiqu s ou remplacez les pour augmenter l efficacit de la ventilation et viter tout risque d incendie Utilisez un couvercle...

Страница 83: ...ventilateur d marre la vitesse de ventilation 2 La LED 2 s allume sur l appareil D sactivation 1 Appuyez sur la touche La poursuite du ventilateur est activ e la LED 6 clignote sur l appareil Le vent...

Страница 84: ...ventilation r gl e auparavant Le ventilateur s arr te automatiquement si le capteur ne d tecte plus de modification de la qualit de l air ambiant La dur e de marche du mode automatique est de 4 heure...

Страница 85: ...appuyez sur les touches et A pendant environ 3 secondes La LED du r glage actuellement s lectionn s allume 2 Appuyez sur la touche ou A pour modifier le r glage Les bips des touches sont activ s lors...

Страница 86: ...estique ou Connexion manuelle au r seau domestique Home Connect la page 86 D s que la hotte aspirante est connect e au r seau domestique vous pouvez cr er la connexion via l appli Home Connect la tabl...

Страница 87: ...la LED de la vitesse de ventilation 2 et la LED Home Connect clignotent Connectez l appareil manuellement au r seau domestique ou appuyez sur la touche A pour d marrer de nouveau la connexion automati...

Страница 88: ...iser les connexions enregistr es avec le r seau domestique et Home Connect tout moment Maintenez les touches r et enfonc es jusqu ce que la LED 7 s teigne sur l appareil Un signal sonore retentit Rema...

Страница 89: ...pectez l ensemble des notices et des mises en garde accompagnant les produits de nettoyage D montage des filtres graisse m Mise en garde Risque de blessures Utilisez un escabeau stable et assurez vous...

Страница 90: ...lement leur fixation du filtre graisse dans l appareil au moyen d un chiffon humide Vous pouvez laver les filtres graisse au lave vaisselle ou la main Nous vous recommandons de les nettoyer la main la...

Страница 91: ...l es par les enfants Rangez les piles hors de port e des enfants N autorisez pas les enfants changer les piles sans surveillance Risque de blessures Les piles peuvent exploser Ne chargez et ne court c...

Страница 92: ...possible Solution L appareil ne fonctionne pas La fiche n est pas connect e Connecter l appareil au secteur Coupure de courant V rifier si d autres appareils de cuisine fonctionnent Fusible d fectueux...

Страница 93: ...de contact pour tous les pays dans l annuaire ci joint du service apr s vente Demande de r paration et conseils en cas de dysfonctionnement Faites confiance la comp tence du fabricant Ainsi vous tes a...

Страница 94: ...ge Le monteur est responsable du fonctionnement correct sur le lieu o l appareil est install Seul un expert agr peut raccorder l appareil sans fiche La garantie ne couvre pas les dommages r sultant d...

Страница 95: ...dans la zone mobile des charni res Risque de blessures Le capot du filtre peut osciller Ouvrez et fermez toujours lentement le capot du filtre Ce faisant veillez ce que le capot du filtre n oscille pa...

Страница 96: ...Il est plus difficile de traiter la vapeur de cuisson une distance sup rieure Un cart d au moins 700 mm et d un maximum de 1500 mm est recommand Pour que la vapeur de cuisson puisse tre trait e de man...

Страница 97: ...raisse afin d viter tout endommagement 2 Desserrez les vis sur les capots lat raux 3 Ouvrez la cartouche de filtre odeurs 4 Glissez les couvercles lat raux vers l int rieur et retirez les 5 Fermez la...

Страница 98: ...montage l appareil doit tre hors tension L encastrement doit garantir la protection contre les contacts accidentels Seul un sp cialiste agr est habilit raccorder l appareil Il doit appliquer les r gl...

Страница 99: ...e posez jamais les doigts dans la zone mobile des charni res 1 Ouvrez la cartouche de filtre odeurs 2 Mettez les fermetures lat rales en place 3 Appuyez l g rement sur les fermetures lat rales en dire...

Страница 100: ...lectrique D monter l appareil m Mise en garde Risque de blessure Des pi ces l int rieur de l appareil peuvent pr senter des ar tes vives Porter des gants de protection m Mise en garde Risque de bless...

Страница 101: ...rs 9 Desserrez les vis des capots lat raux 10 Retirez les fermetures lat rales 11 Fermez la cartouche du filtre odeurs 12 D branchez le c ble de la borne de raccordement 13 Desserrez avec pr caution l...

Страница 102: ...12 Ripristino del collegamento 112 Avvertenze sulla tutela dei dati 113 Dichiarazione di conformit 113 2Pulizia e manutenzione 113 Sostituzione delle batterie del telecomando 116 3Malfunzionamento che...

Страница 103: ...o errato Questo apparecchio progettato solo per l utilizzo fino ad un altezza di massimo 2000 metri sul livello del mare Questo apparecchio pu essere utilizzato da bambini dagli 8 anni di et e da per...

Страница 104: ...iato sopra una stoviglia Pericolo di incendio Quando sono in funzione contemporaneamente pi zone di cottura a gas si sviluppa molto calore Un dispositivo di ventilazione montato sopra pu subire danni...

Страница 105: ...ttivare il fusibile nella scatola dei fusibili Rivolgersi al servizio di assistenza clienti Pericolo di scariche elettriche Gli interventi di riparazione effettuati in modo non conforme rappresentano...

Страница 106: ...fficacia del sistema di aspirazione ed evitare il rischio di incendio Applicare il coperchio per ridurre la formazione di vapori di cottura e condensa Smaltimento ecocompatibile Si prega di smaltire l...

Страница 107: ...io Attivazione Premere il tasto La ventola si avvia al livello di aspirazione 2 il LED 2 si accende sull apparecchio Disattivazione 1 Premere il tasto Il post funzionamento ventola viene attivato il L...

Страница 108: ...recedentemente impostato La ventola si disattiva automaticamente se il sensore non percepisce pi alcuna modifica della qualit dell aria nell ambiente Il tempo di esecuzione del funzionamento automatic...

Страница 109: ...accendere o spegnere soltanto il tono tasti Il tono tasto dell apparecchio non pu essere spento 1 Ad apparecchio spento tenere premuti contemporaneamente i tasti e A per circa 3 secondi Si accende il...

Страница 110: ...ollegamento tra il piano di cottura e la cappa di aspirazione la cappa deve essere spenta Collegamento diretto Accertarsi che il piano cottura sia acceso e che si trovi in modalit di ricerca A tal pro...

Страница 111: ...za Si necessita di un terminale mobile che disponga di un sistema operativo aggiornato all ultima versione 1 Aprire l App Store dispositivi Apple o Google Play Store dispositivi Android dal proprio te...

Страница 112: ...ne di guasti aggiornamenti rilevanti per la sicurezza essenziale essere registrati come utenti di Home Connect che l app sia installata sul proprio dispositivo mobile e che sia stato effettuato il col...

Страница 113: ...100 mW max 5 GHz di banda 100 mW max 2Pulizia e manutenzione Puliziaemanutenzionem Avviso Pericolo di scossa elettrica L infiltrazione di umidit pu provocare una scarica elettrica Pulire l apparecchio...

Страница 114: ...nto accessibili Pulire l apparecchio dall interno 6 Pulire il filtro grassi e lasciarlo asciugare prima di rimontarlo Campo Detergenti Acciaio inox Soluzione di lavaggio calda pulire con un panno spug...

Страница 115: ...izzare un detersivo per piatti di tipo comune Non lavare il filtro grassi molto sporco insieme alle altre stoviglie Riporre i filtri grassi nella lavastoviglie senza fissarli Non incastrare i filtri g...

Страница 116: ...tocircuito Pericolo di lesioni Devono essere utilizzate esclusivamente batterie del tipo indicato Non utilizzare insieme batterie nuove e usate oppure batterie di tipo diverso fra loro Pericolo di les...

Страница 117: ...ossibile causa Soluzione L apparecchio non funziona La spina non inserita Collegare l apparecchio alla corrente Interruzione dell alimentazione elettrica Controllare se gli altri elettrodomestici funz...

Страница 118: ...durante il periodo di garanzia Trovate i dati di contatto di tutti i paesi nell accluso elenco dei centri di assistenza clienti Ordine di riparazione e consulenza in caso di guasti Fidatevi della com...

Страница 119: ...a tecnica riportate nelle istruzioni di montaggio L installatore responsabile del corretto funzionamento nel luogo di installazione L allacciamento senza spina dell apparecchio pu essere effettuato so...

Страница 120: ...pu oscillare Aprire e chiudere lentamente la copertura filtro Accertarsi che una volta rilasciata la copertura filtro non si apra completamente m Avviso Pericolo di scossa elettrica Alcuni componenti...

Страница 121: ...to pi difficilmente con una distanza maggiore rispetto alla zona cottura Si consiglia una distanza minima di 700 mm e massima di 1500 Affinch il vapore di cottura venga rilevato in maniera ottimale mo...

Страница 122: ...itare di danneggiarlo 2 Allentare le viti dalle coperture laterali 3 Aprire il vano del filtro antiodore 4 Spingere verso l interno le coperture laterali e rimuoverle 5 Chiudere il vano del filtro ant...

Страница 123: ...essere garantita tramite il montaggio L allacciamento dell apparecchio pu essere effettuato solo da un tecnico autorizzato che dovr rispettare le disposizioni dell azienda regionale erogatrice dell en...

Страница 124: ...lle cerniere Non toccare mai la zona mobile delle cerniere 1 Aprire il vano del filtro antiodore 2 Applicare le coperture laterali 3 Premere leggermente le coperture laterali in direzione del telaio d...

Страница 125: ...rrente Smontaggio dell apparecchio m Avviso Pericolo di lesioni Alcuni componenti all interno dell apparecchio possono essere affilati Indossare guanti protettivi m Avviso Pericolo di lesioni Pericolo...

Страница 126: ...delle coperture laterali 10 Rimuovere le coperture laterali 11 Chiudere il vano del filtro antiodore 12 Allentare il cavo sul lato di montaggio dal morsetto di collegamento 13 Allentare attentamente l...

Страница 127: ......

Страница 128: ...DJJHQDX DXVJHUlWH PE DUO HU 6WUD H 0 QFKHQ 50 1 ZZZ JDJJHQDX FRP 9001442507 9001442507 990501 de en fr nl it...

Отзывы: