PORTABLE BUT INDUSTRIAL LASER MARKING MACHINE
37
VIII
.
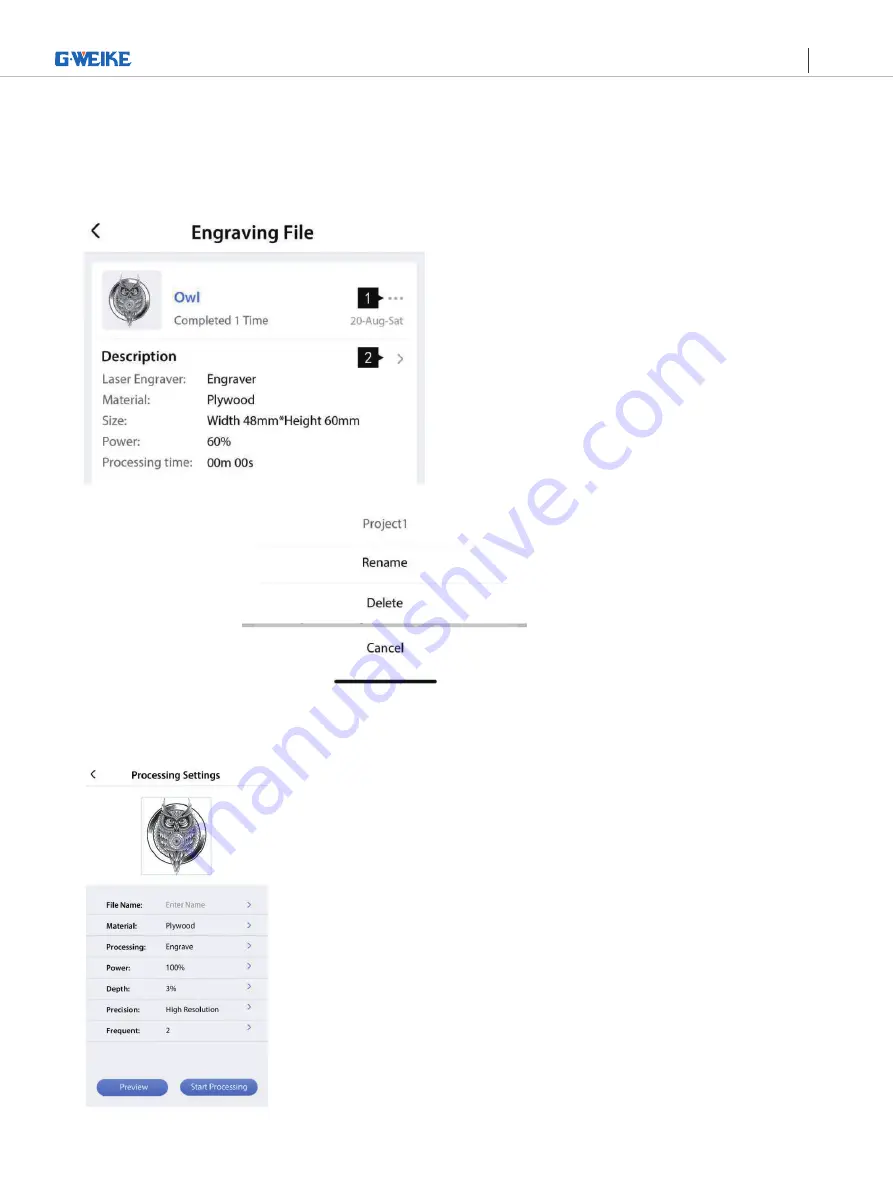
Engraving Files
Set up
Rename/delete/cancel
Details (optional document processing)
Страница 1: ...of the stand to ensure the focal length is 211mm 261mm 211mm for the 110 eld lens and 261mm for the 150 eld lens Each machine may have a slight deviation Please refer to the red dot focusing measureme...
Страница 2: ...nd Indicators Instructions 02 03 Installation Instructions 03 04 G2 PC Software Guidance 08 05 G2 Mobile Software Lite 25 06 Daily Cleaning Maintenance 39 07 Product Specification 39 08 Usage Safety G...
Страница 3: ...re USB Flash Disk L shaped Connecting Plate USB Cable Safety Shield Chuck Rotary Roller Rotary List Of Standard Product Accessories List Of Optional Product Accessories Focal Length Measuring Ruler Br...
Страница 4: ...ter PCsoftware connection interface 11 Smoke exhaust fan power port 14 Reset button 13 Indicator 12 Field lens 19 Fixed knob 20 Laser source signal interface 16 17 Laser signal interface DC power inte...
Страница 5: ...be engraved adjust the knob on the upper end of the lifting stand and adjust the distance between the lower end of the main engine and the surface of the workpiece by 211mm 261mm Adjust the knob on th...
Страница 6: ...over Take It Off When Working 1 Signal Wire Plug In As Shown 2 Laser Source Power And Laser Head Power laser source power on laser head power on pulled out 3 L A S E R SOURCE P O W E R L A S E R SOURC...
Страница 7: ...PORTABLE BUT INDUSTRIAL LASER MARKING MACHINE 05 Connect the rotaries Connect DC power supply Connect the laser signal Product connection mode Connect the ports...
Страница 8: ...t can be loosened to adjust the main engine to a suitable angle Hold the handle of the main engine directly and aim at the surface of the object to be engraved for engraving 1 2 Focus to the surface o...
Страница 9: ...h allows it to work on objects with higher heights and you can adjust the height according to your processing needs Fix the head and the riser and tighten them with the screws Installation Done Fix th...
Страница 10: ...o the computer 1 I Software Installation Driver installation completed Follow the prompts to complete the installation Enabling software This software is green and can be run after decompression Find...
Страница 11: ...tware Installation 04 G2 PC Software Guidance MacOS 2 Drag Glaser to the application Download the G2 MacOS zip file from the website and then unzip it to your computer 3 Open the computer s Launchpad...
Страница 12: ...ing Windows use the debugging parameters directly Screenshots from the flash drive For MacOS click this link https api gweikecloud com static service MacOS conf pdf and follow the steps to configure t...
Страница 13: ...run the software the main interface style is as follows 1 2 7 8 9 6 3 4 5 Tip For details please refer to the G LASE PC detailed version manual Object list window Object Properties window View Toolbar...
Страница 14: ...BUT INDUSTRIAL LASER MARKING MACHINE 12 Picture Processing Settings Click Draw Picture Files Select file type Select the picture you want to mark Open the picture and import the canvas Bitmap Import 1...
Страница 15: ...he picture Center the picture on the canvas If the image is outside the canvas select the picture and click in the center of the canvas to find the picture Set the picture size 4 Picture parameter set...
Страница 16: ...indicates that the current file is continuously processed with out pause Automatic red light Parts Download to the board Download the current data to the board cache to start offline marking mode Red...
Страница 17: ...ort the canvas Parameters Used to set the parameters of the device Enable continuous red light processing mode After selecting this function click Red light indication or press F1 the following dialog...
Страница 18: ...phics on the canvas If the image is outside the canvas select the image and click in the center of the canvas to find the image After setting the graphic size click apply Fill in the settings and clic...
Страница 19: ...nd facilitate the user to locate the work piece This function is used for marking machines with red indicator light Press F1 on the keyboard to execute this command Mark F2 Start processing Press F2 o...
Страница 20: ...Speed mm s 1000mm s 1000mm s 1000mm s 1000mm s 1000mm s 1000mm s 1000mm s 1000mm s Power 40 75 70 20 15 70 10 25 Frequency Khz 30 30 30 30 30 30 30 30 Line Spacing 0 1 0 001 0 1 0 001 0 1 0 001 0 1 0...
Страница 21: ...the axis of rotation then adjust the focal length according to the field lens the 110 field mirror with a focal length of 211mm 150 field mirror with a focal length of 261mm then import the file Set m...
Страница 22: ...eversal 1 Take the direction of Y axis expansion as an example Check reversal 2 Take the direction of X axis expansion as an example Uncheck reversal Select mode Roller Click OK to confirm the complet...
Страница 23: ...PORTABLE BUT INDUSTRIAL LASER MARKING MACHINE 21 Chuck Rotary Setting 2 Figure 1 Figure 2 8 1 2 VIII Rotary Axis Processing...
Страница 24: ...p up a page Set reversal 3 Take the direction of Y axis expansion as an example Check revers 4 Take the direction of X axis expansion as an example Uncheck reversal Select mode Roller Click OK to conf...
Страница 25: ...of processing times can be adjusted appropriately accord ing to the processing depth Pen number reference value Speed 1000mm s Power 80 Frequency 30khz Complete the setting and start engraving process...
Страница 26: ...angle can be adjusted by 90 or 45 as needed or cross filled 4 Pass times marking times The number of passes of the same color block also affects the color change 5 You can set parameters by setting d...
Страница 27: ...to reset the indicator is green Settings Line card connection Settings Go to network configuration and configure as prompted Then turn on the WLAN to connect to the extranet WiFi to obtain and set the...
Страница 28: ...G MACHINE 26 To set WiFi information click Settings Before configuring the network you need to connect the WiFi of the device The WiFi name of the device is G Laser Turn on WLAN and find G Laser Enter...
Страница 29: ...f the device The WiFi name of the device is G Laser WiFi setting is successful please connect to the external network WiFi extranet WiFi information and then click Connect device Configure the extrane...
Страница 30: ...tings Board Link Settings Engraving File Recent engraving files Fill selected object Camera Take pictures with the camera for engraving Android phones need to allow camera permission Text Edit the tex...
Страница 31: ...III Image engraving operation import image camera shooting Customize Crop the picture in originalproportion freescale Rectangle Multiple rectangle proportions to crop the picture Round Multiple rectan...
Страница 32: ...selected object Scale Scale the selected object proportionally Size lock scale Enter a numeric value and scale the size equally W sets the engraving width H sets the engraving height Trimming If ther...
Страница 33: ...Fonts Multiple font options Style Solid Hollow Italic Alignment style Left center right within the text box Settings Forward Inverts the black and white colors of the image Grayscale Gray tones the i...
Страница 34: ...PORTABLE BUT INDUSTRIAL LASER MARKING MACHINE 32 IV Search for device device connection successful...
Страница 35: ...les Settings The APP has built in materials you can directly select the material to use and the system will automatically change to the appropriate engraving parameters If the carving materi al is not...
Страница 36: ...th of engraving determines the speed of carving Precision Engraving accuracy determines the clarity of the engraved image Times The number of repeated engravings can be set Preview Preview the engravi...
Страница 37: ...g Note Do not move your device Do not process unattended Do not lock the screen or put GLaser in the background otherwise it may cause the device to be disconnected and cause abnormal processing You h...
Страница 38: ...ABLE BUT INDUSTRIAL LASER MARKING MACHINE 36 VII Engraving completed Engraving time The time it takes to engrave the image Reprocess Repeat processing with current parameters Back Return to the home p...
Страница 39: ...PORTABLE BUT INDUSTRIAL LASER MARKING MACHINE 37 VIII Engraving Files Set up Rename delete cancel Details optional document processing...
Страница 40: ...Roller mode you can rotate 360 engraving can carve cups lipstick pens and other cylindrical items Chuck Mode Connect the rotary and open the chuck mode which can be used to carve rings bracelets pens...
Страница 41: ...Supported Document Formats Connection Operating system Input power Working temperature Working Humidity Safety certification Laser head 222 4 82 4 132 5mm Bracket 250 200 322mm 12kg 1064nm 20W 110mm 1...
Страница 42: ...the marking machine to directly irradiate the skin or eyes of the human body or pets to avoid irreversible damage 08 Usage Safety Guide Please read the Safety Guide in detail and remember all the con...
Страница 43: ...ter the replacement and Gweike Co Ltd will give the longer warranty of the two Due to factors such as laws and regulations safety regulations tariffs maintenance technology and spare parts inventory i...