G-RAID
3
Product Guide
Page 11
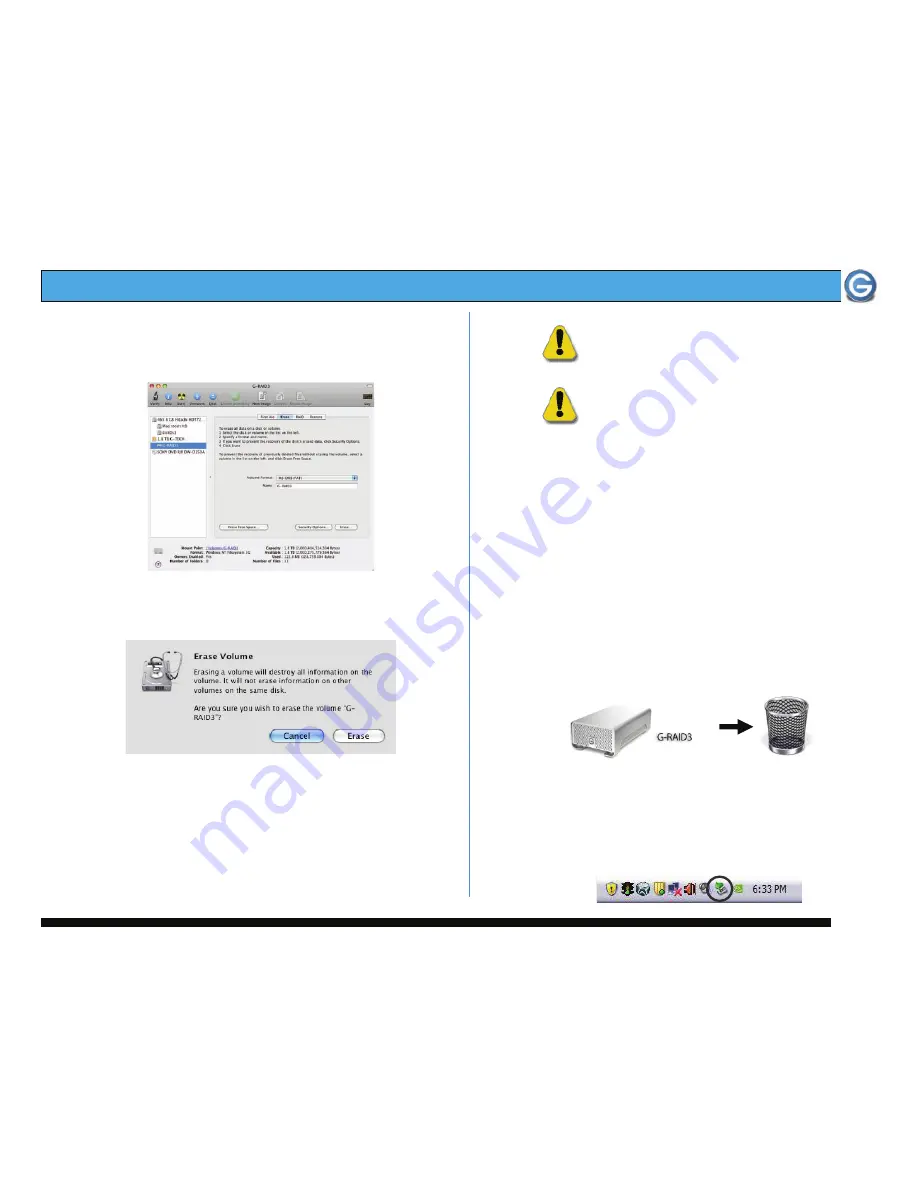
2.
Select G-RAID
3
from the left-hand column, then select
the “Erase” button at the top as shown. Select MS-DOS
File System from the drop down menu and Enter
“G-RAID3” in the Name field.
3.
Click on the erase button and the screen on the next
page will appear.
4.
Click “Erase” and your drive will be formatted to its full
capacity as FAT32. With this format, you will be able to
READ/WRITE on both windows (2000/XP) and MAC OS
machines. (NOTE: You could format your drive on a
Windows machine FAT32, however Windows currently
limits FAT32 partitions to 32GB in size)
WARNING
:
THIS WILL ERASE ALL DATA ON YOUR DRIVE.
NOTE
: The 'MS-DOS File System' cannot write
files over 4 GB. If you are working with files over
4 GB, you may want to choose a software option
like MacDrive. MacDrive is Windows software that
enables the Windows OS to mount MAC formatted
drives. (www.macdrive.com)
8. UNMOUNTING/DISCONNECTING G-RAID
3
A great feature of G-RAID
3
is its ability to be connected and
disconnected while your computer is running. To prevent
failures and/or data loss it is important to follow the steps
below when unmounting/disconnecting G-RAID
3
from your
computer.
8.1
Mac OS X Computers
1. Before powering down and disconnecting G-RAID
3
, you
must unmount it from the system by dragging the G-RAID
3
icon to the trash located in the dock, or by selecting the
icon and pressing apple+E on the keyboard.
2. It is now safe to power off and remove G-RAID
3
from
your system.
8.2
Windows Computers
1. Before powering down and disconnecting G-RAID
3
,
left-click on the “Safely Remove Hardware” icon shown below.
Содержание G-RAID3
Страница 2: ...G RAID3 Product Guide Page 2...
Страница 3: ...G RAID3 Product Guide Page 3...


