background image

Using RAID Modes

p.22

Configure the RAID Mode for Mac

You can easily configure G-RAID Studio’s RAID mode with the following steps. 

Important Note: Changing the RAID level will erase all data on the drive. Be sure all of 
the data and files you want to save are backed up to separate media.

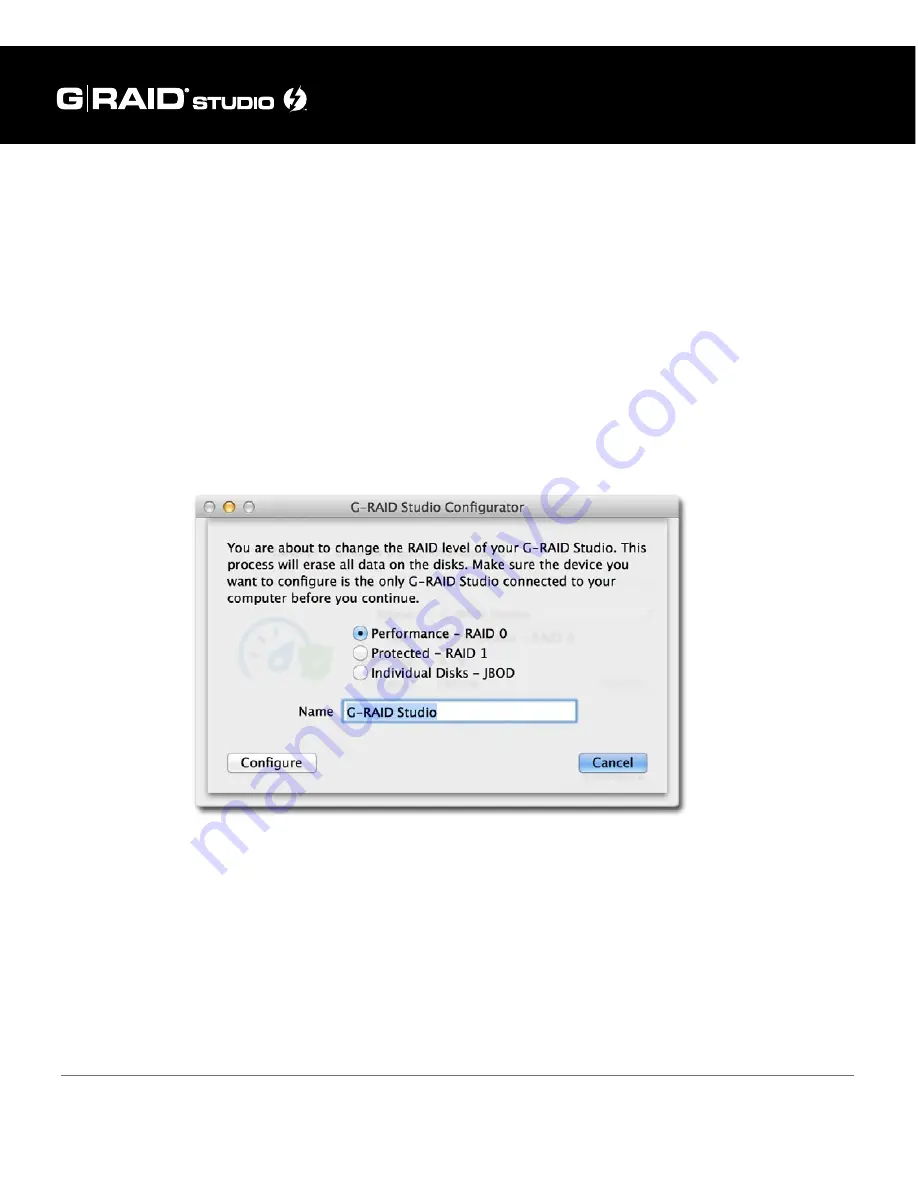
1.  In the G-RAID Studio Configuration Utility, click on the Configure button. A dialog 

window will pop up with three options for configuring your disk set, as shown 
below. The dialog window also will warn you that when you configure your RAID set, 
all data in the drive will be erased. 


2.  Select your desired configuration with the RAID 0 (Performance), RAID 1 (Protected), 

or JBOD radio buttons. Then click the Configure button to continue. 

3.  Two warning windows will appear, both letting you know that the following step will 

erase all of your data. Click the Yes buttons to continue. 

Содержание G-RAID Studio

Страница 1: ...g technology com High performance Thunderbolt 2 storage system with hardware RAID USER MANUAL...

Страница 2: ...Technology Assistant Utility 19 Recommended Installation 19 G Technology Assistant Menu 20 The RAID Configuration Utility 21 Configure the RAID Mode for Mac 22 RAID 1 Degraded Mode and Rebuild for Mac...

Страница 3: ...Safety General Use Safety Precautions p 4 Backup Your Data p 5...

Страница 4: ...reduce the risk of damage do not expose this drive to rain or moisture Do not use it in damp or wet conditions Never place objects containing liquids on the drive as they may spill into its openings V...

Страница 5: ...ruption or destruction of data while using a G Technology drive is the sole responsibility of the user Make Two Backups To help prevent possible data loss we highly recommend keeping TWO copies of you...

Страница 6: ...About Your G RAID Studio Introduction p 7 What s in the Box p 8 System Requirements p 8 Overview of the Drive p 9 Activity Failure LED p 10 Daisy Chaining withTBTechnology p 11...

Страница 7: ...durability style and performance reach new heights Thunderbolt 2 technology enables blazing fast concurrent data streams capable of data transfer rates over 1300 MB s This opens up incredible time sa...

Страница 8: ...al DC power supply and cable Quick Start Guide If any items are missing please contact G Technology at www g technology com support System Requirements G RAID Studio supports the following operating s...

Страница 9: ...owcases a sleek high quality black enclosure with integrated cooling and smart fan technology two Thunderbolt 2 ports a DC power input and a soft touch on off switch on the rear panel The G logo acts...

Страница 10: ...a Failed Drive Module If configured in fail safe RAID 1 Protected mode data stored on the G RAID Studio will still be intact If configured in JBOD mode only the data on the faulty drive will be lost b...

Страница 11: ...de up to two compatible displays along with up to four G RAID Studios Important Note Starting from your computer all the way downstream in your daisy chain if one of the devices is capable of handling...

Страница 12: ...Using Your Drive on Mac Easy Installation for Mac p 13 Use withTime Machine p 14 Disconnect the Drive p 16...

Страница 13: ...rge protector or wall outlet Press and hold down the power but ton until the unit turns on The drive will auto matically mount on the desktop if you are running Mac OS 10 9 or above Important Note If...

Страница 14: ...c file backup The following steps will quickly set up G RAID Studio with Time Machine When you attach your G RAID Studio for the first time the Time Machine dialog box should automatically appear Clic...

Страница 15: ...Use Disk button Make sure the Time Machine switch is set to ON You can set its options by clicking the Options button Do this to choose volumes folders or files you do NOT want to backup G RAID Studio...

Страница 16: ...and disconnecting the drive unmount the system by simply dragging the G RAID Studio icon to the trash located in the dock Keyboard shortcut Select the drive icon and hit Command E 2 It is safe to rem...

Страница 17: ...ogy Assistant Utility p 19 G Technology Assistant Menu p 20 G RAID Studio Configuration Utility p 21 Configure the RAID Mode for Mac p 22 RAID 1 Degraded Mode and Rebuild Mac p 24 Configure the RAID M...

Страница 18: ...speed of a single drive In RAID 1 the array will be at 50 percent of its total physi cal capacity since the same data is written mirrored to both drives simultaneously JBOD JBOD is great for maximum c...

Страница 19: ...rt Note that the utility has an auto update feature for your convenience Recommended Installation When you first set up G RAID Studio you will want to install the GTA on your computer The utility prov...

Страница 20: ...ar in your menu bar By selecting this icon the G Technology Assistant menu will appear Unmount All Volumes Unmounts supported G Technology drives attached to the system You will need to confirm your s...

Страница 21: ...r computer The RAID Configurator utility is available for download from the G Technology website at g technology com support There are both Mac and Windows version of the utility Please download the r...

Страница 22: ...ity click on the Configure button A dialog window will pop up with three options for configuring your disk set as shown below The dialog window also will warn you that when you configure your RAID set...

Страница 23: ...sk 5 Changing the RAID mode of G RAID Studio will require you to re initialize the disk with the Disk Utility application The Disk Insertion dialog below should appear Click the Initialize button to l...

Страница 24: ...curs or if a member of the RAID 1 set is removed then the active drive will operate in degraded mode What is Degraded Mode In a two drive RAID 1 if one of the drives fails or if one of the drives is r...

Страница 25: ...utomatically launch allowing you to format the drive If this replacement drive is formatted then you are ready to rebuild the RAID set 4 Once you click on the Rebuild button two back to back warning w...

Страница 26: ...dll file Click on the exe file and follow the simple instructions to install the configuration utility Once you install and launch the RAID Configuration Utility the tool shows the current status and...

Страница 27: ...on with the RAID 0 Performance RAID 1 Protected or JBOD radio buttons Then click the Configure button to continue 3 Two warning windows will appear both letting you know that the following step will e...

Страница 28: ...ext window will confirm that your G RAID Studio is configured in RAID 0 RAID 1 or JBOD mode 5 Changing the RAID mode of G RAID will require you to re initialize the disk For helpful information on ini...

Страница 29: ...e in place of the failed or removed drive Note While replacing the failed drive make sure the G RAID Studio is powered off If this new drive is not formatted then the Disk Utility function will automa...

Страница 30: ...Maintenance for Your Drive Initialize Drive for Mac p 31 Restore the Drive Icon p 34 Reformat with Partitions p 36 Replace a Failed Drive Module p 40...

Страница 31: ...sk Utility application Disk Utility is located on your system under Applications Utilities Disk Utility The window below will appear Your G RAID Studio will be displayed in the left hand column 2 Sele...

Страница 32: ...OS Mac OS Extended Use this format for best performance and media storage To select it click the Format drop down menu and its option for Mac OS Extended 5 In the Name field you can input a volume na...

Страница 33: ...ter the drive reinitializes you should automatically see the Time Machine dialog box Click the Use as Backup Disk button if you want to use the drive with Time Machine Click the Don t Use or Decide La...

Страница 34: ...er desktop look more accurate and intui tive 1 To get the G Technology icon package go to g technology com support and navi gate to your product There will be a link for downloading icons on the produ...

Страница 35: ...pens its Get Info window see below left 5 Select the default icon in the Get Info window below left 6 Press Command V to paste the custom G RAID Studio icon into the Get Info window below right The ic...

Страница 36: ...you might seg ment user data from backup data set up a multi boot environment with different op erating systems or create a dedicated capture scratch disk for programs such as Final Cut Pro Avid Medi...

Страница 37: ...icon not the bottom icon by clicking it in the left column 3 Click on the Partition button in the main window 4 Select the number of partitions you would like from the Volume Scheme menu Below we hav...

Страница 38: ...partition From the Format menu choose your desired disk format If you will use your drive primarily on Mac OS it is recommended to use Mac OS Extended or Mac OS Ex tended Journaled In the Size field...

Страница 39: ...will show you the disk s reformatting progress 9 When partitioning is complete the multiple partitions will be displayed in Disk Util ity s left panel 10 Quit the Disk Utility program After reinitiali...

Страница 40: ...ith G RAID Studio powered up the RED LED under the top lid will indicate which drive module failed For more information see Activity and Failure LEDs 2 Remove the failed drive by pressing its module r...

Страница 41: ...lete G RAID Studio will be back to protecting your valu able data and displaying a solid white G to show that all is well 6 If your G RAID Studio was setup in RAID 0 mode then you have to build a new...

Страница 42: ...Using Your Drive on Windows Windows Use p 43 Cross Platform Use p 44...

Страница 43: ...io is set up at the factory for use with Mac OS systems A simple initialization will prepare your drive for use with Windows 7 8 and 8 1 systems For helpful information on configuring and using your d...

Страница 44: ...AT 1 First open the Disk Utility program This application is located on your hard drive under Applications Utilities Disk Utility The window below will appear Your G RAID Studio will be displayed in t...

Страница 45: ...NOTE You may need to rename the drive because exFAT does not support more than 11 letters in the drive name WARNING THIS NEXT STEP WILL ERASE ALL DATA ON YOUR DRIVE 5 Click the Erase button in the lo...

Страница 46: ...k s reformatting Your drive will be formatted to its full capacity as exFAT 7 Quit the Disk Utility program You are finished 8 After reinitializing the custom icon for the G RAID Studio will be erased...

Страница 47: ...Support Warranty Technical Support p 48 Limited Warranty p 49 Copyright p 51...

Страница 48: ...and support If you encounter any difficulties while installing or using G RAID please contact G Technology Technical Support at g technology com support Helpful information for support When contacting...

Страница 49: ...sured from the date of sale from HGST to the authorized distributor What does this limited warranty not cover The limited warranty does not cover damage resulting from commercial use misuse accident m...

Страница 50: ...rrier at HGST shipping point You are responsible for importation of the replaced product if applicable HGST will not return the original drive to consumers therefore the consumer is responsible for mo...

Страница 51: ...byte GB is equal to one billion bytes when referring to hard drive capacity Accessible capacity will vary depending on the operating environment and formatting Thunderbolt and the Thunderbolt logo are...

Отзывы: