background image

Bare Metal Recovery

The term “bare metal recovery” comes from the idea that you are restoring a device to working
order after a catastrophic failure. While the process will get your G-RACK 12 in working order it
does not restore data that was on the drives. For that you will have to run your backup/restore
software against the backups you were taking all along.

What you need to get started.

There is a list of items you need to complete this task:
•  G-RACK 12 with all the electronic components in place and properly working. This process fails if you 

do not have the drives in the unit.

•  A G-Technology provided USB key with the restoration software pre-loaded.
•  USB Keyboard
•  Monitor

Connections

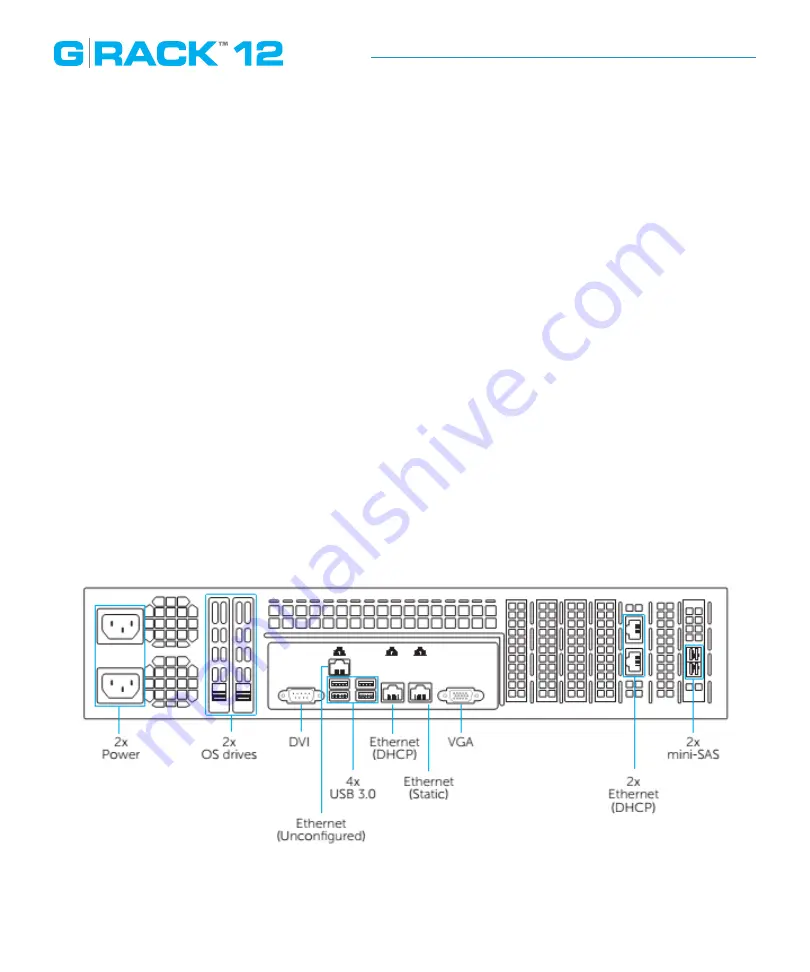
•  With the unit powered off attach the keyboard and USB Key to the USB ports on the rear of the unit.
•  Attach the monitor to either the VGA or the DVI ports.
•  Make sure you have power cords attached to the power supplies
•  To aid in the recovery process you should also have the Ethernet cable attached to either the
•  DHCP or Static ports

Содержание G Rack 12

Страница 1: ...g technology com High Performance NAS BARE METAL RECOVERY ESSENTIAL GUIDE ...

Страница 2: ...Bare Metal Recovery ...

Страница 3: ...ACK 12 in any occasions Improper dissemblance of the product may expose you to electric shock or other risks For any inquiries please contact the distributor 10 Do NOT use the G RACK 12 near water for example in a wet basement or near a swimming pool 11 Do NOT place any object on the power cord Do NOT locate the G RACK 12 where it can be stepped on or tripped over 12 Do NOT install use or service ...

Страница 4: ...items you need to complete this task G RACK 12 with all the electronic components in place and properly working This process fails if you do not have the drives in the unit A G Technology provided USB key with the restoration software pre loaded USB Keyboard Monitor Connections With the unit powered off attach the keyboard and USB Key to the USB ports on the rear of the unit Attach the monitor to ...

Страница 5: ...ellent change the BIOS is not set to boot of the USB key If this is the case you will need to reboot and enter the BIOS screen Select USB boot as an option Save the BIOS configuration and reboot once more Once you are configured to boot from USB you will see the OS install process start 1 The first screen you see should look very much like this 2 Using your keyboard scroll down to the second optio...

Страница 6: ... install process starts 4 As it progresses you will see the update bar change 5 If you see this screen you have successfully installed the software The server is ready to reboot Remove the USB key from the back of the unit and press Enter ...

Страница 7: ...e to remove the USB keyboard and the monitor from the connectors 8 At this point you can use the Administration software using a web browser The screen above indicates the IP address you can enter in your URL bar 9 Normal operation can resume If you have an available backup of the configuration files and data you can now follow the process in the User s Guide to reload the data on to the G RACK 12...

Отзывы: