background image

SETTING THE LANGUAGE

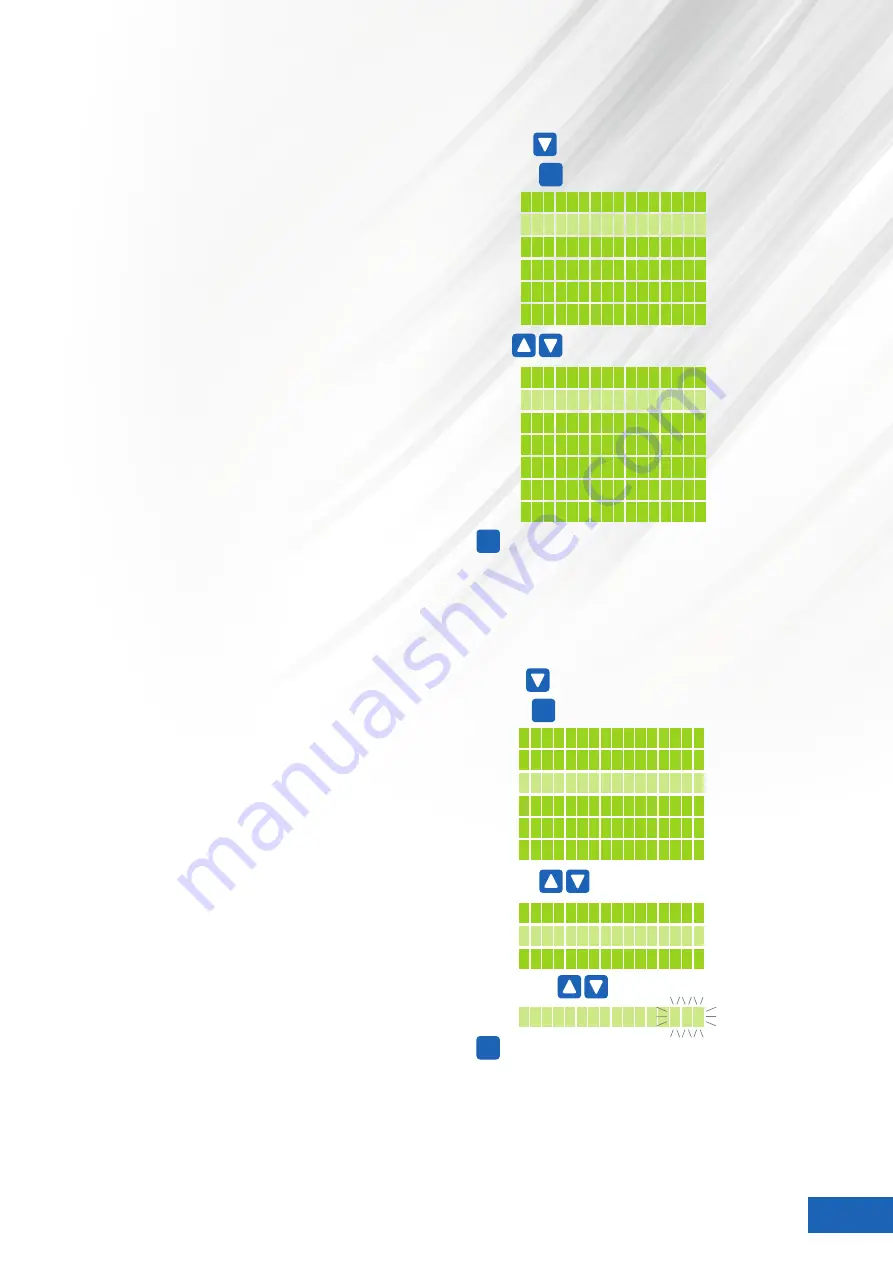
From the 

General Settings Menu 

(see page 6),


press 

DOWN


and scroll down to 

‘Set Language’.

With 

‘Set Language’ 

blinking, press 

ENTER

 to 

access the language settings. 

Use the


UP


and


DOWN


arrows to select your 

chosen 

Language.

Press 

SAVE EXIT

 to save your information, and to go 

back to the previous sub menu.

SETTING THE PHOTOSENSOR

This menu shows the current Photosensor level 

at the top. You can adjust the value for the 

switch between day and night. The switch time 

is the delay before the controller changes 

mode from day to night, or night to day. 

This is to stop the controller changing all the 

environmental conditions if you open the door 

of the grow room.

From the 

General Settings Menu 

(see page 6),


press 

DOWN


and scroll down to 

‘Set photosensor’.

With 

‘Set photosensor’ 

blinking, press 

ENTER

 to 

access the photosensor settings. 

Press the


UP


or


DOWN


arrows to select ‘

Switch at’

 or 

Switch Time’

 and then press


ENTER

 to select

.

Press the


UP


or


DOWN


arrows to change the value 

and then press


SAVE EXIT

 to save your information, 

and to go back to the previous sub menu.

7

Set Display

EC fan signal

Res. factory set 

Set photosensor

LANGUAGE MENU

Select General Settings as detailed on page 6

to access Language Settings

Press

Set Time
Set Language

Set language
         English

         Deutsch
       Françiais
        Italiano
         Espańol

      Nederlands 

Press

to scroll to your chosen language

Pressing 

will save your entry and go back to the previous menu

Press

to scroll down to Set Language

ENTER

SAVE

EXIT

Set Display

EC fan signal

Res. factory set 

Set photosensor

PHOTOSENSOR MENU

Select General Settings as detailed on page 6

Set Time
Set Language

Photosensor  35%
Switch at:   70%

Switch time   1s

Switch at:   

70%

Press

to make your selection

Press

to change value

to access Photosensor Settings

Press

ENTER

Pressing 

will save your entry and go back to the previous menu

SAVE

EXIT

Press

to scroll down to Set Photosensor

Содержание ENVIRO

Страница 1: ... CONTROLLER EC OUTTAKE EC INTAKE Exit 1 Max Load 13 AMP Exit 2 Temp Humidity Day Night Fan powered by SAVE EXIT ENTER EXIT 2 Max Load 2200W EXIT 1 Max Load 2200W AC FAN INTAKE AC FAN OUTTAKE GLOBAL AIR SUPPLIES UK 13 AMP ENVIRO CONTROLLER ...

Страница 2: ... LED S 5 CONTROL KEYS 5 MAIN MENU 5 GENERAL SETTINGS 6 FAN SETTINGS MENU 9 EXIT 1 AND 2 MENU 12 Operating Voltage 230V 50 Hz Max Amp 13 Loading of the individual outputs Intake Fan Max 10A 2300W Outtake fan Max 10A 2300W Exit 1 Max 10A 2300W Exit 2 Max 10A 2300W Make sure the unit is unplugged Screw the mounting brackets to the unit and screw the unit to the wall PLEASE NOTE Mount the unit on a no...

Страница 3: ... connects to AC FAN INTAKE To connect your EC fans connect the EC signal cable to the controller and to the signal cable on your fans EC INTAKE connects to your intake fan and EC OUTTAKE to your outtake fan PLEASE NOTE Never connect the mains power lead from EC fans to the AC fan plug sockets Serious damage will occur to your EC fans DO NOT drop or hit the sensor KEEP AWAY from water and aerosols ...

Страница 4: ... AMP ENVIRO CONTROLLER 1 2 3 5 4 6 1 1 13 12 14 7 10 9 8 KEY 1 LCD information display 2 LED indication lights 3 AC fan outtake plug socket 4 AC Fan Intake plug socket 5 Programmable Exit 1 plug socket 6 Programmable Exit 2 plug socket 7 Menu up key 8 Menu down key 9 Menu enter key 10 Menu save and exit key 1 1 Power supply 12 Sensor cable for the humidity light and temperature sensor 13 EC outtak...

Страница 5: ...ve set temperature Humidity Grow room is above set humidity Day Night Blinking LED indicates night time or lights are off Solid LED indicates day time or lights are on Exit 1 Exit 1 power supply is on Exit 2 Exit 2 power supply is on 5 MAIN MENU HOME SCREEN When the controller is turned on the main menu home screen is displayed This shows your room temperature relative humidity fan setting and the...

Страница 6: ...ress SAVE EXIT to save your information and to go back to the previous sub menu 6 Press to scroll down the sub menus Press to scroll down to General Settings Set Display EC fan signal Res factory set Set photosensor Fan settings Set exit 1 Set exit 2 General settings Room 23 C RH 60 Set19 C 09 13 Start from the Main Menu Home Screen ACCESSING GENERAL SETTINGS to access the first sub menu Press ENT...

Страница 7: ...ress the UP or DOWN arrows to select Switch at or Switch Time and then press ENTER to select Press the UP or DOWN arrows to change the value and then press SAVE EXIT to save your information and to go back to the previous sub menu 7 Set Display EC fan signal Res factory set Set photosensor LANGUAGE MENU Select General Settings as detailed on page 6 to access Language Settings Press Set Time Set La...

Страница 8: ...and the display with change to the Main Menu Home Screen Your controller has now been reset to factory defaults Set Display EC fan signal Res factory set Set photosensor DISPLAY MENU Select General Settings as detailed on page 6 to access Display Settings Press Set Time Set Language Pressing will save your entry and go back to the previous menu Press to scroll to your chosen setting ENTER SAVE EXI...

Страница 9: ...ER SAVE EXIT Press to scroll down to EC Fan Signal Set EC Signal 0 10V Revolution 0 5V Hyper fan PWM output Make sure you get the correct signal type for your fan FAN SETTINGS MENU This menu allows you to change your fan settings such as Temperature Bandwidth Humidity Settings Minimum Fan Speed Dump Override TO ACCESS THE FAN SETTINGS MENU From the Main Menu Home Screen press ENTER to access the s...

Страница 10: ...lection Press to change value to access Temperature Settings Press ENTER to highlight the corresponding value Press ENTER Pressing will save your entry and go back to the previous menu SAVE EXIT Dump Override Set fan Speed Set temperature Set humidity Day 24 0 C Night 20 0 C Band width 3 0 C FAN HUMIDITY MENU Select Fan Settings as detailed on page 9 to highlight the corresponding value Press ENTE...

Страница 11: ...press DOWN and scroll down to Dump Override With Dump Override blinking press ENTER to access the dump override settings Use the UP and DOWN arrows to select your chosen setting from 1 to 23 With your chosen selection blinking press ENTER to highlight the corresponding ON TIME value Use the UP and DOWN arrows to change the value and press ENTER to highlight the next value Once you have your chosen...

Страница 12: ... Screen ACCESSING EXIT 1 AND EXIT 2 SETTINGS to access the first sub menu Press ENTER ENTER to access Exit 1 or Exit 2 Press ENTER to access functions Press Choose function is displayed Choose function Humidify Timer Dehumidify Heat Power POWER ON OFF SETTING From the Set exit 1 or Set exit 2 Settings Menu as detailed above press DOWN and scroll down to Power With Power blinking press ENTER to acc...

Страница 13: ... access Heat Settings Press ENTER Pressing will save your entry and go back to the previous menu SAVE EXIT Press to scroll down to Heat Exit1 Temp Heat day 24 0 C Heat Day 24 0 C Heatnight 20 0 C Band width 2 C to highlight the corresponding value Press ENTER Press to make your selection Press to change value Humidify Timer Dehumidify Heat Power EXIT 1 AND EXIT 2 HUMIDIFY MENU Select Set exit 1 or...

Страница 14: ...fy Exit1 Dehumidify Dehumidi day 60 Dehumidi day 60 Dehumi night 50 Band width 10 to highlight the corresponding value Press ENTER Press to make your selection Press to change value SET TIMER FUNCTION Allows you to programme Exit 1 or Exit 2 to turn off at a specific time You must specify on time and off time NOT ON TIME DURATION The timer works on a 24 hour clock and you can set 23 different time...

Страница 15: ...15 ...

Страница 16: ...Distributed in the UK by Global Air Supplies UK Ltd www globalairsupplies co uk Official Dealer ...

Отзывы: