


9
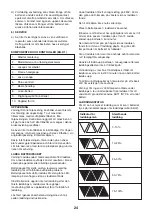
CHARGE STATUS
To display the amount of charge left in the battery,
press the charge level indicator button, Fig.2.
ASSEMBLY
Note: Before carrying out any assembly or
disassembly of the unit please ensure that the battery
is disconnected from the machine.
SELECTING BLADES
Selecting the correct type of blade is important in
order to obtain the best performance from the saw.
Select the blade based on the application and on the
material you wish to cut. Selecting the right blade will
give you a smoother, faster cut and prolong the life of
the blade.
Blades with fewer teeth, 10 teeth per inch (TPI) are
typically used for cutting wood, while blades with
more teeth are better for cutting metal or plastic. We
recommend 14 TPI for plastics and soft metals and 18
TPI for hard metals.
The saw is suitable for the following purposes:
Cutting all types of wood products including lumber,
plywood, paneling, composition board and hard
wood.
Cutting drywall
Cutting plastic
Cutting metals such as sheet steel, pipe, steel rods,
aluminium, brass and copper.
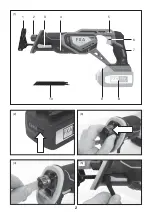
INSTALLING BLADES
Remove battery pack.
Note: There is a small hole machined in the machine
end of the blade, which locates on a small peg on the
reciprocating spindle. Choose a new blade that is
suitable for the task.
Rotate the blade clamp and release mechanism
anticlockwise, Fig.3.
Keeping the blade clamp and release mechanism fully
rotated, insert the blade inside the spindle, Fig.4.
Release the blade clamp and release mechanism and
assure the blade is securely fitted.
Caution: The blade must be inserted with the teeth
turned downwards and its hole must be inserted on
the plug located inside the spindle for a proper and
safe fixing.
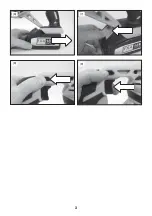
HINGED SHOE ASSEMBLY ADJUSTMENT
The hinged shoe assembly can be adjusted to vary
the depth of cut. To adjust turn the hinged shoe
locking lever downwards, Fig.5, and move the hinged
shoe assembly to the desired position. Lock the
hinged shoe assembly by moving the hinged shoe
locking lever upwards.
INSTALLING THE BATTERY PACK
Warning!
Always remove battery pack from your tool
when you are assembling parts, making adjustments,
cleaning, carrying, transporting or when not in use.
Removing battery pack will prevent accidental starting
that could cause serious personal injury.
NOTE: To avoid serious personal injury, always
remove the battery pack and keep hands clear of the
lock-out button when carrying or transporting the tool.
Slide the battery pack into the tool base, Fig.6. (Note
the battery has raised ribs which allows it to fit into
the pole saw only one way). Make sure the battery
pack snaps into place and that battery pack is
secured in the tool before beginning operation.
Improper installation of the battery pack can cause
damage to internal components.
REMOVING THE BATTERY PACK
Locate the battery release catch on the top of the
battery and press downwards, Fig.7. Whilst holding
down the battery release catch slide the battery pack
away from the tool.
STARTING AND STOPPING
To start the machine, press in the lock-off switch Fig.8
then depress and hold in the trigger, Fig.9. There is no
need to hold the lock-off switch in as it remains in
place as long as the trigger is depressed. To stop the
saw, release the trigger, which allows the lock-off
switch to return to the locked position. Do not attempt
to jam the lock-off switch.
NOTE: You can depress the lock-off button from either
the left or right side.
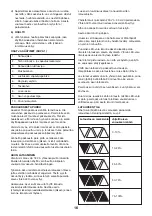
Charge level indicator
Amount of charge
remaining
0-10%
10-25%
25-50%
50-75%
75-100%
Содержание XCLICK FXAJD5218
Страница 2: ...2 1 7 1 5 3 2 9 8 6 10 4 5 3 2 4...
Страница 3: ...3 8 9 7 6...
Страница 37: ...37 2 FXA XCLICK FXADL1051 FXAJDB180Li FXAJDB180Li II...
Страница 38: ...38 ANSI Z87 1 10 25 35...
Страница 39: ...39 30 90 3 5 7 9 30 30 30 45 30 45 5 3...
Страница 40: ...40 1 2 3...
Страница 41: ...41 4 5 a b c d 6...
Страница 42: ...42 1 18 230 50 60 30 1 2 3 4 5 6 7 8 9 10...
Страница 43: ...43 2 10 14 18 3 4 5 6 0 10 10 25 25 50 50 75 75 100...
Страница 44: ...44 7 8 9 15...
Страница 45: ...45 18 0 3000 25 4 80 10 LpA 81 A K 3 A LWA 92 A K 3 A 8 3 2 K 1 5 2 WEEE...
Страница 46: ...46 130 Li ion...
Страница 73: ...73...
Страница 74: ...74...
Страница 75: ...75...


