


51839915X18NXS_V_1_1.DOC
44/90
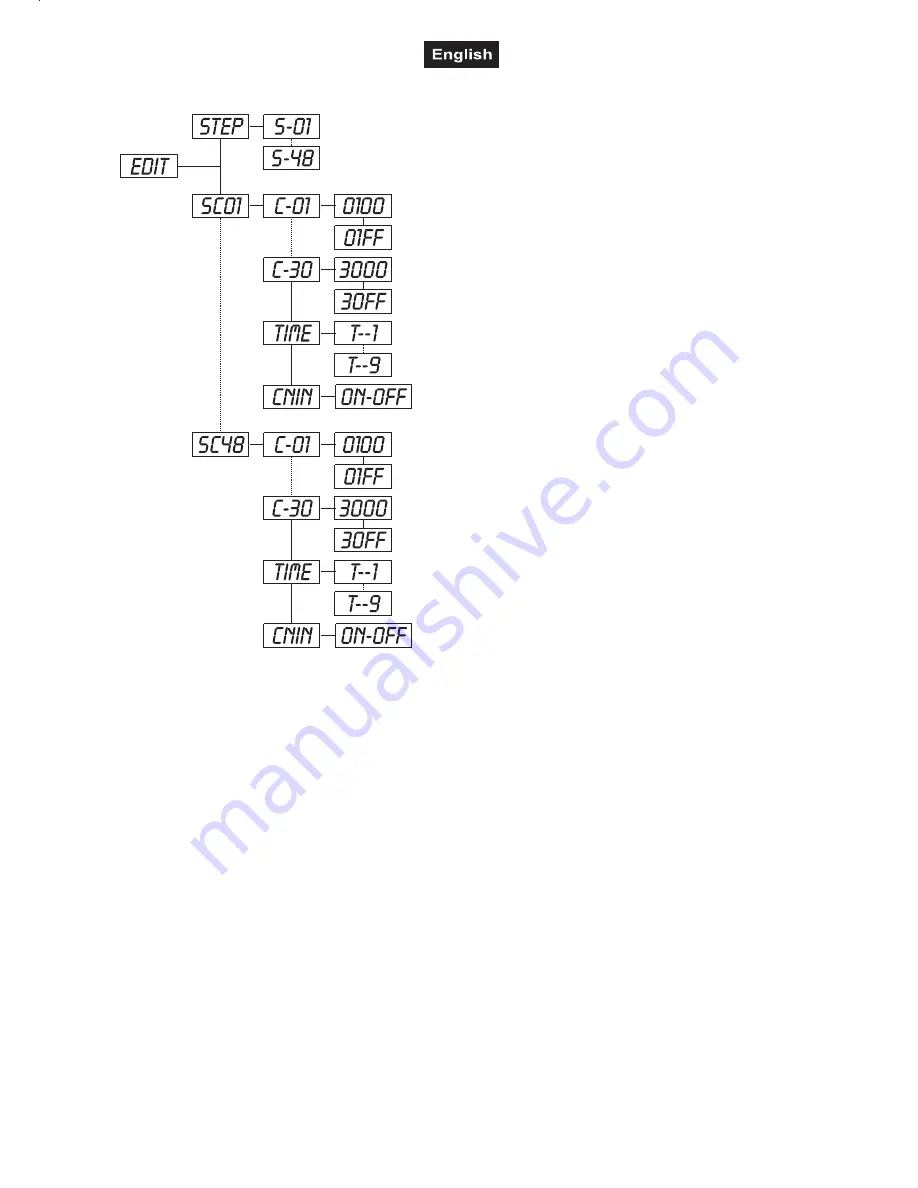
a) Editing via the Control Board
♦
Select
“SC01”
by pressing
[UP]
button.
♦
Press
[ENTER]
, the display shows
“SCXX”
, “X” stands
for the scene no. to be edited.
♦
Change the scene no. by pressing
[UP]
.
♦
Press
[ENTER]
, the display shows
“C-XX”
, “XX” stands
for the channel no. Such as
“C-01”
, it means you are
editing channel 1 of the selected scene.
♦
Select the channel no. you would like to edit by pressing
[UP]
.
♦
Press
[ENTER]
to enter editing for the selected channel
, the fixture reacts to your settings. The display shows the
DMX value of the edited channel. Such as “ 11XX”, it
stands for channel 11 of the current scene, the DMX value
is XX , XX is a hexadecimal number value “01-FF”.
♦
Adjust the desired DMX value by pressing
[UP]
or
[DN]
.
♦
Press
[ENTER]
in order to edit other channels of this
scene.
♦
Repeat steps 5-9 until you finish setting all the DMX
values for all channels of this scene.
♦
Once all the channels completed, the display will flash
“tIME”
.
♦
Press
[ENTER]
to edit the time needed, the display
shows “t--X”,“X” stands for the time needed to run the
current scene, value “1-9”. For example, “t--2” means you
need 2 seconds to run the current scene.
♦
Adjust the desired time by pressing
[UP]
.
♦
Press
[ENTER]
to save the settings for the scene you
are editing, the display will change to the next scene
automatically.
♦
Repeat step 3-14 to edit and other scenes, you can edit
and save a maximum of 48 scenes.
♦
Press
[EXIT/DN]
to exit. The number of steps can be
defined under
“STEP”
and the scenes can be called up
under
“RUN”
b) Editing via the external controller
♦
Call up the first scene in your controller now.
♦
Select
“SC01”
by pressing
[UP]
button.
♦
Press
[ENTER]
, the display shows
“SC01”
.
♦
Press
[ENTER]
, the display shows
“C-01”
.
♦
Select
"CNIN"
by pressing
[UP]
.
♦
Press
[ENTER]
, the display shows
"OFF"
.
♦
Press
[UP]
, the display shows
"ON"
.
♦
Press
[ENTER]
, the display shows
"SC02"
. You successfully downloaded the first scene.
♦
Adjust the Step-time as described above under point 12.
♦
Call up the second scene in your controller now.
♦
Repeat steps 5-11 until all desired scenes are downloaded.
♦
Press
[EXIT/DN]
to exit. The number of steps can be defined under
“STEP”
and the scenes can be called
up under
“RUN”


