


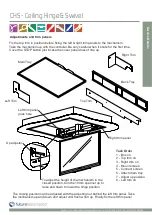


Installation:
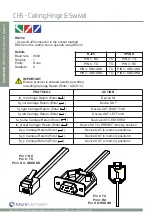
Electrical Connection
Page 14 of 18 // email [email protected] tel: +44 (0) 1438 833577 fax: +44 (0) 1438 833565
CHS - Ceiling Hinge & Swivel
SLQV
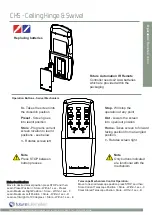
Contact Closure
- Use an RJ45 connector in the CCI
socket on the control box to operate
via contact closure
LED 1
LED 2
LED 3
LED 4
LED 5
CONTACT CLOSURE INPUT
NOTE:
Earlier versions of the control board
may not have these contact closure
LED indicators.
Any contact closure input
whilst the mechanism is in
motion will stop the movement
and all other contact closure
commands will be disabled for
1 second.
568A
568B
1
12V SUPPLY
12V SUPPLY - CURRENT LIMITED
W/G
W/O
2
PIN 2 NOT USED
G
O
3
GROUND
GROUND
W/O
W/G
4
PIN 4 NOT USED
BL
BL
5
DEVICE LEFT
Momentary short to GROUND (pin 3), will
make device go OUT LEFT limit.
W/BL
W/BL
LED 4
6
DEVICE RIGHT
Momentary short to GROUND (pin 3), will
make device go OUT RIGHT limit.
O
G
LED 3
7
DEVICE HOME
Momentary short to GROUND (pin 3),
makes device go OUT CENTERED.
W/BR
W/BR
LED 2
8
DEVICE IN
Momentary short to GROUND (pin 3),
makes device go IN.
BR
BR
LED 1
PIN
DESCRIPTION
ACTION
WIRE / CABLE
CONTACT CLOSURE
LED INDICATOR


