background image

19

Before Using

Charging the Ni-cad Battery

Charging

1. Plug the transmitter cord of the

special charger into the charg-
ing jack on the rear of the trans-
mitter.

2. Plug the charger into an AC out-

let.

3. Check that the charging LED

lights.

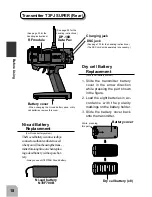
Charger

Transmitter charging
LED

Cord to transmitter
charging jack

When charging the NT8F700B Ni-cad battery with the special charger, allow about
15 hours for charging. If the transmitter has not been used for some time, cycle the
battery by charging and discharging it two or three times.

Diode Protection

The transmitter charging circuit is equipped with a 1.5A diode to prevent short cir-
cuits. If the battery is charged with a quick charger for other than digital proportional
R/C sets, it may not be fully charged and the circuits inside the transmitter may be
damaged.

Always use the special charger or a quick charger for digital pro-
portional R/C sets to charge a digital proportional R/C set Ni-cad
battery.

Overcharging a Ni-cad battery can result in burns, fire, injuries, or loss of sight due to
overheating, breakage, or electrolyte leakage.

Never try to recharge a dry cell bat-
tery.

The transmitter may be damaged or the battery
electrolyte may leak or the battery may break.

When the charger is not in use, dis-
connect it from the AC outlet.

Do this to prevent accidents and to avoid overheat-
ing.

Caution

Never plug it into an outlet other
than indicated voltage.

Plugging the charger into the wrong outlet may re-
sult in an explosion, sparking, or fire.

Do not insert and remove the
charger when you hands are wet.

It may cause an electric shock.

Warning

Use the

special

charger.

AC outlet

Содержание 3PJ Super

Страница 1: ...R ...

Страница 2: ...ions a When this product is exported from Japan its use is to be approved by the Radio Law of the country of the destination b Use of this product with other than models may be restricted by Export and Trade Control Regulations An application for export approval must be submit ted 3 Modification adjustment and replacement of parts Futaba is not responsible for unauthorized modification adjustment ...

Страница 3: ...e spent battery to Futaba for recycling purposes You may also contact your local recycling center for information on where to return the spent battery Please call 1 800 8 BATTERY for information on Ni Cd battery recycling in your area Futaba Corporation of America s involvement in this program is part of its commitment to protecting our environment and conserving natural re sources RBRCTM is a tra...

Страница 4: ...ts Before Using 12 Features 12 Set Contents 14 Nomenclature 15 Installation 27 Receiver and Servo Connections 27 Installation Safety Precautions 28 Initial Set Up 29 Preparations Transmitter 29 Direct Mode Functions 32 Function Map 32 Steering ATV 33 Throttle ATV 35 Channel 3 ATV 37 Steering EXP 39 Throttle EXP EXP2 CRV 40 Model Select 44 Custom Key 45 Select Mode Functions 46 Function Map 46 Subt...

Страница 5: ...h 89 Fail Safe PCM Mode Only 91 Battery Fail Safe PCM Mode Only 92 PCM PPM Select 93 LCD Contrast Adjustment 94 Audible Alarm Tone 95 Model Reset 96 Model Copy 97 Throttle Curve Selection 98 Rate Display Selection 99 Reference 100 Ratings 100 Optional Parts 101 Troubleshooting 104 Error Displays 105 When requesting repair For U S A 107 Glossary 108 Glossary LCD Display 109 3PJ SUPER Data Sheet 110...

Страница 6: ...mustbeobserved Danger Indicates a procedure which could lead to a dangerous situ ation and may cause death or serious injury if ignored and not performed properly Warning Indicates procedures which may lead to dangerous situa tions and could cause death or serious injury as well as su perficial injury and physical damage Caution Indicates procedures that may not cause serious injury but could lead...

Страница 7: ...l could result in serious injury Do not operate this R C system when you are tired not feeling well or under the influence of alcohol or drugs Your judgment is impaired and could result in a dan gerous situation that may cause serious injury to yourself as well as others Mandatory Procedures Extend the transmit ter antenna to its full length If the transmitter antenna is not fully extended the ope...

Страница 8: ...ous situation When operating your model always display a frequency flag on your transmitter an tenna When adjusting the transmitter on land while preparing to run cruise take measures so that the wind will not knock over the transmitter If the transmitter is knocked over the throttle stick may be accidentally set to the operating position and you may lose control Failsafefunction Before running cr...

Страница 9: ...Prohibited Items Do not use commercial AA size Nicad batteries Quick charging may cause the battery contacts to overheat and damage the battery holder Do not short circuit the Nicad battery terminals Causing a short circuit across the battery terminals may cause abnormal heating fire and burns Do not drop the Nicad battery or ex pose it to strong shocks or vibrations The battery may short circuit ...

Страница 10: ... the recommended time Nicad Battery Electrolyte The electrolyte in Nicad batteries is a strong alkali Should you get even the smallest amount of the electrolyte in your eyes DO NOT RUB wash immedi ately with water seek medical attention at once The electrolyte can cause blind ness If electrolyte comes in contact with your skin or clothes wash with water immediately Caution Prohibited Procedures Do...

Страница 11: ...il and exhaust will pen etrate and damage the plastic Always use only genuine Futaba transmitters receivers servos FET a m p s e l e c t r o n i c s p e e d controls Nicad batteries and other optional accessories Futaba will not be responsible for problems caused by the use of other than Futaba genuine parts Use the parts specified in the instruction manual and catalog Mandatory Procedures ...

Страница 12: ...ke System A B S Function A B S Allowsbrakingwithoutthetireslosingtheirgriponthetrackevenwhenbrakinggas powered cars on corners Throttle Acceleration TH ACC Gaspoweredcarshavealagtimebeforetheclutchisengagedorthebrakesare applied Thisfunctionminimizesthislagtime Traction Control TRAC Whentriggeroperationisperformedsuddenlyonslicksurfaces thewheelsmerely spinandthecardoesnotacceleratesmoothly Bysett...

Страница 13: ...servotravel Trim Function Selection Allowsyoutoassignvariousfunctionstothetrimmers digitaltrim gripdial knob Allthetrimsaredigital sotheydonothavetoberepositionedforeachmodel Switch Function Selection Allowsyoutoassignvariousfunctionstothetwoswitches Left Hand Reversible Black Transmitter Antenna New Light Weight Design and Extraordinary Balance Tension Adjustment Steeringwheelspringtensioncanbead...

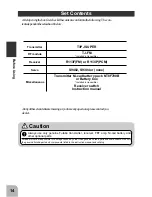
Страница 14: ... Servo S9402 S9304 or none Miscellaneous Transmitter Ni cad battery pack NT8F700B or Battery box Installed in transmitter Receiver switch Instruction manual Installed in transmitter Always use only genuine Futaba transmitter receiver FET amp Ni cad battery and other optional parts Futaba will not be responsible for damage caused by other than genuine Futaba parts and components Use only the genuin...

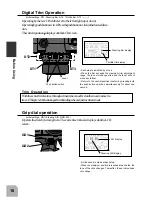
Страница 15: ...thintwosecondsafter thedatawaschanged thenewdatawillnotbewrittentomemory Antenna Throttle trim DT2 Edit keys Steering wheel Steering trim DT1 LCD screen Timer switch PSH Power switch Digital trim 3 DT3 Pilot lamp CH3 knob KNOB Traction control switch SLD Mechanical ATL adjusting screw Throttle trigger See page 16 for the operating instructions See page 16 for the operating instructions See page 17...

Страница 16: ...e any farther Return to the neutral position center by pressing both the push button switches simultaneously for about one second Trim Operation Withthecentertrimfeature trimadjustmentshavenoeffectonthemaximumservo travel Thispreventsthelinkagesfrombindingwhenadjustmentsaremade DT2 DT1 Grip dial operation Initial settings GD1 Steering D R GD2 ATL Operatethedialsbyturningthem Thecurrentsetvalueisdi...

Страница 17: ...omakethethrottletriggerbrake back side stroke narrower Wheel Tension Adjustment Makethisadjustmentwhenyouwanttochangethesteeringwheelspringtension Adjustment Turn the screw inside the adjusting hole using a 1 5mm hex wrench Caution Ifturnedtoofarcounterclockwise theadjustingscrewmayfallout Tension adjusting screw Turning the adjusting screw clockwise increases the spring tension Mechanical ATL adj...

Страница 18: ...ge 20 for the handling instructions Dry cell Battery Replacement For dry cell battery system 1 Slide the transmitter battery cover in the arrow direction while pressing the part shown in the figure 2 Load the eight batteries in ac cordance with the polarity markings on the battery holder 3 Slide the battery cover back onto the transmitter Battery cover Dry cell battery x8 RF module DP 16K Data Pac...

Страница 19: ...fullychargedandthecircuitsinsidethetransmittermaybe damaged Always use the special charger or a quick charger for digital pro portional R C sets to charge a digital proportional R C set Ni cad battery Overcharging a Ni cad battery can result in burns fire injuries or loss of sight due to overheating breakage or electrolyte leakage Never try to recharge a dry cell bat tery The transmitter may be da...

Страница 20: ...datafor8unitscanbestoredinthe3PJSUPERtransmitterbodyandtheset datafor8moreunitscanbestoredinaDP 16K Option removabledatapack Data pack DP 16K Option Data pack insertion slot Graspthedustproofcapandinsert thedatapackfully Inserting and removing the data pack Alwaysturnoffthetransmitterpowerbeforeremovingandinsertingthedatapack Data pack initialization Whenthedatapackisusedandthepoweristurnedonforth...

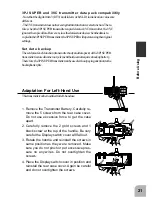
Страница 21: ...3PJSUPERtransmittercanbeusedwithoutpayingattentiontothe backupbatterylife Adaptation For Left Hand Use Thistransmittercanbemodifiedforleft handuse CHG DSC 1 Remove the Transmitter Battery Carefully re move the 5 screws from the rear case cover Do not use excessive force to get the case apart 2 Carefully remove the 2 gold screws and 1 black screw at the top of the handle Be very careful the Display...

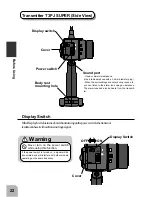
Страница 22: ...ncy IftheDisplaySwitchisturnedonwithoutturningonthepowerswitch thetransmit terdatacanbesetwithouttransmittingasignal Display Switch Warning OFF ON DT 2 OFF ON DISPLAY SW ON POWER Display switch Power switch Cover Body rest mounting hole Sound port Use a commercial earphone Use a radio earphone with a 3 5mm diameter plug When the surroundings are noisy during races etc you can listen to the alarm t...

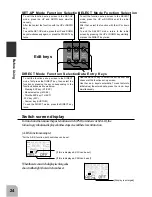
Страница 23: ...l No is displayedforaboutone second the LCD will switch to the model name display Afterthemodelnameis displayed for several seconds the LCD will switchtothetimerand voltage display Model name 6 characters D R function rate display ATL function rate display Channel 3 position display Select mode menu PCM PPM display Steering trim display RF output monitor Throttle trim display Channel selection dis...

Страница 24: ... key then select the function by pressing the key corresponding to the function desired as shown below Steering EXP key ST EXP Model select key M SEL Throttle EXP key TH EXP ATV key ATV Custom key CUSTOM To end the DIRECT mode press the DIRECT key twice Data Entry Keys Use the SELECT key to select the set up item and channel at the function set up screen Use the and keys to enter data To reset ret...

Страница 25: ...o bright or too dark temperature changes and lighting conditions may cause the screen to become difficult to read Contrast Adjustment 1 Turn on the transmitter power 2 Press the DIRECT key twice 3 Press the UP and DOWN keys simultaneously 4 Press the DOWN key six times 5 If the screen is too dark adjust the screen to the point where it can be easily read If the screen is too dark press the key If ...

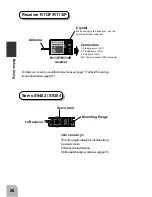
Страница 26: ... Throttle servo CH2 3 CH3 servo CH3 B C Power connector DSC connector R113F R113iP receiver Forthereceiver servos andotherconnections seepage27 FortheDSCcord op tion connections seepage103 Servo S9402 S9304 to Receiver Servo horn Mounting flange Accessory Thefollowingitemsareprovidedforsetting Spareservohorn Partsforservoinstallation Fortheinstallationprecautions seepage28 ...

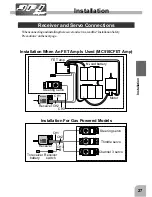
Страница 27: ...3 servo Receiver Receiver CH1 CH1 CH2 CH2 CH3 CH3 B Receiver switch To receiver battery Installation Receiver and Servo Connections Installation When An FET Amp Is Used MC510CFET Amp Whenconnectingandinstallingthereceiverandservos readthe InstallationSafety Precautions onthenextpage Installation For Gas Powered Models ...

Страница 28: ... lead wires Keep the receiver antenna at least 1 inch away from the motor and battery and wires that handle heavy current loads Cutting bundling or routing the receiver antenna near any devise that produce noise will reduce the operat ing range of the system and result in loss of control Alsoroutethereceiverantennaawayfrommetal carbonfiberandotherpartsthatconductelectric ity Thesepartscantransmith...

Страница 29: ...umber usetheModelSelectfunction page44 Turn on the transmitter power The model number is displayed for about one second Model No The model name is displayed for about two seconds Model name The total timer and voltage dis play initial screen is displayed Total timer voltage display 1 RF Output Check If signals are output normally RF output monitor RF willbedisplayedonthescreen IfRFisnotdisplayed c...

Страница 30: ...rcheckingthetrim setthetrim displaytothecenter N position Throttle trim Trim 2 check At initial set up throttle trim Trim 2 is assigned to digital trim DT2 at the left side of the steering wheel OperatetheDT2leverandcheckifthethrottletrimdis playonthescreenchanges Aftercheckingthetrim set thetrimdisplaytothecenter N position Steering dual rate D R check Atinitialset up steeringdualrate D R isassig...

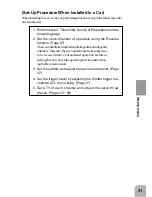
Страница 31: ... function Page 87 Theservoinstallationmethodandlinkagedirectiondepends onthekit Therefore theservooperationdirectionmayhave tobereversedrelativetotransmitteroperation Beforein stallingtheservo checktheoperatingdirectionandsetitus ingtheReversefunction 3 Set the subtrim and adjust the servo neutral point Page 47 4 Set the trigger travel by adjusting the throttle trigger me chanical ATL to you likin...

Страница 32: ...edirectlyandquicklycalledwiththespecialkeyfor eachfunction Ofthefivefunctions onecanbefreelyselectedastheUserCustom function Function Map DIRECT mode functions Steering ATV Page 33 Throttle ATV Page 35 Channel 3 ATV Page 37 Steering EXP Page 39 Throttle EXP Page 40 Model Select Page 44 User Custom function Page 45 Key layout DIRECT M SEL ST EXP UP DOWN ATV CUSTOM SELECT TH EXP Arbitrary screen Thr...

Страница 33: ...DIRECT mode by pressing the DIRECT key 2 Call the ATV function set up screen by pressing the ATV key 3 To set the steering right side turn the steering wheel fully clockwise and increase and decrease the servo throw with the and keys Setting range 30 120 Return to the initial value 100 by pressing the and keys simultaneously for about one second 4 To set the steering left side turn the steering wh...

Страница 34: ...emaximumtravelmayexceedthetravel rangesetbytheATVfunction Anytimeadjustmentsaremadetothefollowing functions check you linkage installation Steering subtrim Programmable mixing When steering set to slave side Tilt mixing Note WhenD Ris100 andtheservothrowisinsufficientevenwhenATVisincreased to120 theservothrowcanbeincreasedsomewhatbyusingtheprogrammable mixingfunction Seepage84 DIRECT ST EXP M SEL ...

Страница 35: ...TV key 3 Call the Throttle ATV function set up screen by pressing the SELECT key Setting range 0 120 4 To adjust the throttle forward side pull the throttle trigger all the way to the forward side and adjust the percentage with the and keys How ever when using an FET amp set the per centage to 100 Return to the initial value 100 by pressing the and keys simultaneously for about one second Warning ...

Страница 36: ...reen Maximum travel ThethrottleATVfunctiondeterminesthemaximumservotravel However whenthe followingfunctionsareadjusted themaximumtravelmayexceedthelimitsetbythe ATV Besuretoinspectyourlinkageinstallationafteranyadjustmentismade Throttle subtrim Programming When throttle is set to slave side Idle up Throttle preset Note WhenthetravelisinsufficientevenwhenATVisincreasedupto120 itcanbe increased som...

Страница 37: ... the ATV function set up screen by pressing the ATV key 3 Call the Channel 3 ATV func tion set up screen by press ing the SELECT key twice 2 times 4 To adjust the CH3 down side set the CH3 dial to full down 0 and adjust the rate with the and keys Return to the initial value 100 by pressing the and keys simultaneously for about one second Setting range 0 100 Warning 0 Blink Blink Blink DIRECT ST EX...

Страница 38: ...CH3ATVdeterminestheCH3maximumservotravel However whenthefunc tionsbelowareadjusted themaximumtravelmayexceedthelimitsetbytheATV Besuretoinspectyoulinkageinstallationafteranyadjustmentismade CH3 subtrim Programmable mixing When CH3 is set to the slave side Tilt mixing Note WhentheCH3servotravelisinsufficientevenwhenATVwasincreasedtoDOWN 100 andUP100 thetravelcanbeincreasedsomewhatbyusingprogrammabl...

Страница 39: ...ge 100 0 100 3 To make the servo movement more sensitive quick adjust with the key To make the servo movement less sensi tive mild adjust with the key Return to the initial value 0 by pressing the and keys simul taneously for about one second Quick Mild Servo travel Servo travel 0 normal 1 100 quick 0 normal 1 100 mild Steering wheel travel Steering wheel travel 4 At the end of adjustment press th...

Страница 40: ...HEXP key 3 EXP curve 1 For forward adjustment when you want to increase the sen sitivity of the servo pull the throttle trigger to the forward side and adjust with the key When you want to de crease the sensitivity of the servo pull the throttle trigger to the forward side and adjust with the key 2 For brake side adjustment when you want to increase the sensitivity of the servo push the throttle t...

Страница 41: ... point with the and keys Setting range 20 80 Return to the initial value 50 by pressing the and keys si multaneously for about one sec ond 4 When you want to increase the brake side servo sensitiv ity push the throttle trigger to the brake side and adjust with the key When you want to decrease the brake side servo sen sitivity push the throttle trig ger to the brake side and ad just with the key S...

Страница 42: ...5 Point position display The trigger position to which the currently set point corresponds blinks Trigger position display When the throttle trigger is operated its po sition is displayed Correspond it with the point position display above Throttle curve Initial value normal curve Set value Trigger point The graph form shown on page 111 is convenient when setting the throttle curve Example Initial...

Страница 43: ...ivity push the throttle trig ger to the brake side and ad just with the key Setting range 100 0 100 To return to the initial value 0 press the and keys simulta neously for about one second 4 At the end of adjustment press the DIRECT key twice Returns to the initial screen 2 times DIRECT ST EXP M SEL UP SETUP RESET SELECT DOWN TH EXP ATV CUSTOM DIRECT ST EXP M SEL UP SETUP RESET SELECT DOWN TH EXP ...

Страница 44: ... or PPM PCM Afterthenewmodeliscalled signalsarestilloutputintheoldmodelmodulation modeuntilthetransmitterpoweristurnedoff Beforeusingthenewmodulation mode turnthepoweroffandon DP 16K Data Pac Option ForthetransmittertousetheDataPac itmustbeinitializedwhenthepoweristurned onforthefirsttime If CAM INI isdisplayedonthescreenwhenthepoweris turnedon pressthe key Thisautomaticallyinitializesthetransmitt...

Страница 45: ...ressing the DIRECT key 2 Call the set up screen of the assigned function by pressing the CUSTOM key Assigned function set up screen 3 For a description of subsequent operation see the description of the func tion you have assigned to the CUSTOM key 4 At the end of adjustment press the DIRECT key twice Returns to the initial screen 2 times DIRECT ST EXP M SEL UP SETUP RESET SELECT DOWN TH EXP ATV C...

Страница 46: ...tion Map Idle up Throttle acceleration Start Traction control Step Steering speed This mode uses the UP or DOWN key to sequentially call the set up screens from the initial screen The 10 functions printed around the top of the LCD screen can be called Timer Subtrim Function name printed on LCD screen Model name Initial screen Keys layout Select mode functions Subtrim Page 47 Steering speed Page 49...

Страница 47: ...Setting range L100 0 R100 L Left side R Right side Turnonthereceiver setthesteeringservoneutral position andinstalltheservohornasdescribedin thekitinstructionmanual 3 Settheservohorntotheneu tral position with the or key Return to the initial value 0 by pressing the and keys simulta neously for about one second 4 Throttlesetting Press the SELECT key once The display switches to the throttleset ups...

Страница 48: ...e kit in structionmanual thesameassteeringandthrottle 7 Adjust the CH3 servo neutral position with the or key Return to the initial value 0 by pressing the and keys simulta neously 8 At the end of adjustment presstheDOWNkeyonce or press the DIRECT key twice Thedisplayreturnstotheini tialscreen Blink DIRECT ST EXP M SEL UP SETUP RESET SELECT DOWN TH EXP ATV CUSTOM DIRECT ST EXP M SEL UP SETUP RESET...

Страница 49: ...f the steering wheel is turned slowerthanthesetspeed thesteer ingservoisnotaffected Time 1 TURNdirectionsetting Call the steering speed func tion set up screen by press ingtheUPkeytwiceattheini tialscreen 2 times Setting range 1 100 At 100 there is no delay At 1 the delay is approximately 1 5 seconds Servo operation is delayed 2 Adjust the steering servo TURNdirectiondelaywiththe or key The RETN d...

Страница 50: ...T key twice Thedisplayreturnsto theinitialscreen 2 times Setting example Steering servo S9402 Setting criteria OnroadTURNside Approx 50 80 RETNside Approx 60 100 OffroadTURNside Approx 70 100 RETNside Approx 80 100 Affect on each direction WhentheTURNdirectionisset theRETNdirectionsettingalsochanges WhentheRETNdirectionisset theTURNdirectionsettingisnotaffected DIRECT ST EXP M SEL UP SETUP RESET S...

Страница 51: ...thout A B S With A B S 1 A B S function ON OFF set ting Call the A B S function set upscreenbypressingtheUP key three times at the initial screen 3 times 2 Turn on the A B S function with the or key 3 Brakereturnamountsetting AB P Press the SELECT key once Thebrakereturnamountset upscreeniscalled 4 Adjust the brake return amount with the or key Setting range 0 100 Return to the initial value 50 by...

Страница 52: ... The delay set up screen is called Blink 10 Adjustthedelaywiththe or key Delay Functionthatincreasesthetime beforeA B S isactivatedwhen the throttle trigger is pushed to thebrakeside Setting range 0 100 Return to the initial value 0 by pressing the and keys simul taneously for about one second Note Whenthrottletriggerpushedtobrakeside DLY 0 A B S activatedimmediately DLY 10 A B S activatedafter0 1...

Страница 53: ...et up screeniscalled 14 Adjust the steering mixing operationrangewiththe or key Setting range OFF N10 N100 E10 E100 Return to the initial value OFF by pressing the and keys simultaneously for about one second Steering mixing The range over which the A B S function reacts to operation of the steering wheel when the throttle trigger is pushed to the brake side canbeset Whenthesteeringwheelwasoper at...

Страница 54: ...activated theFSU 1LEDwillflasheachtimetheservooperates Thereason forthisisthattheFSU 1respondstosuddendatachangescausedbyA B S function pumpingoperation Itdoesnotmeanthatthefailsafefunctionisactivated Theservo willnotbeaffected Example of A B S function setting when S9402 used There will be a slight difference depending on the state of the linkage Basicsetting AB P Approx 30 Ifthisvalueistoohigh t...

Страница 55: ... times or press the DIRECT key twice Thedisplayreturnsto theinitialscreen 4 times 4 times Setting Amount Thestandardvalue 100 point ofthissettingisunrelatedtothetravelsetbythe throttleATVfunction Itis50 oftheforwardsideandbrakesidetotalservothrow fromtheservoneutralposition Switch Setting Selecttheidle upfunctionON OFFswitchwiththefunctionselectswitchfunction Page89 PSH orSLDcanbeselected Operatio...

Страница 56: ...r key Setting range 0 100 Return to the initial value 0 by pressing the and keys simulta neously for about one second 3 Backsidesetting Call the back side set up screen by pressing the SE LECT key once 4 Adjust the back side with the or key Setting range 0 100 Return to the initial value 0 by pressing the and keys simulta neously for about one second 5 times Blink Blink A slight clearance is requi...

Страница 57: ...DOWN key 5 times or press the DIRECT key twice Thedisplayreturnsto theinitialscreen 5 times Setting Amount Thestandardvalue 100 point ofthissettinghasanaffectonthetravelsetbythe throttle ATV function DIRECT ST EXP M SEL UP SETUP RESET SELECT DOWN TH EXP ATV CUSTOM ...

Страница 58: ...osition Whenthethrottlestickisoperatedslowlysothatthewheelswillnotspin thecar automaticallyacceleratestothesetspeed Thisfunctioniseffectiveonlyforthefirstthrottletriggeroperationatstarting This functionhastobeactivatedbeforeeverystart When the throttle trigger is returned slightly the Start function is automatically deactivatedandthesetreturnstonormalthrottletriggeroperation Operation by Switch Wh...

Страница 59: ...Triggeroperationwait Press the SELECT key once The display switches to the throttletriggeroperationwait set upscreen 7 Press the and keys simul taneously for about one sec ond Thescreenshownatthe right will appear and the trig geroperationwaitstateisset The RDY charactersflash Ifthethrottletriggerismovedtothesetpositionwhile RDY isflashing thethrottle servowillmovetothesetposition Thethrottleopera...

Страница 60: ...Press the DOWN key five timesattheinitialscreen The startfunctionsetupscreenis called Whenthepush buttonswitch was pressed the display changes from OFF to ON 3 Presetpositionsetting Press the SELECT key two times The display switches to the preset position setup screen 4 Set the preset postion with the and keys 5 At the end of adjustment press the UP key five times or press the DIRECT key two time...

Страница 61: ...iontothesetpoint delaypoint Highsidetractioncontrol Usedtoapplyadelayatthehighsidefromthesetpoint 1 Callthetractioncontrolfunc tion set up screen by press ing the DOWN key four times attheinitialscreen 4 times 2 Activate the traction control functionbypressingthe or key 3 Delayamountsetting Press the SELECT key once 4 Adjustthedelayamountwith the or key If the delay is too large op erationwillbede...

Страница 62: ...ys simultaneously for about one second RNG L50 Range over which delay applied RNG H50 Throttle trigger neutral position 7 At the end of adjustment press the UP key 4 times or press the DIRECT key twice Thedisplayreturnstotheini tialscreen Range over which delay applied Throttle trigger High side 4 times Switch Setting ThetractioncontrolfunctionisturnedonandoffwithPSHorSLD Functionselect function P...

Страница 63: ...k side 3 Adjust the amount with the or key 4 At the end of adjustment press the UP key 3 times or press the DIRECT key twice Thedisplayreturnstotheini tialscreen 3 times Set Value And Step Amount Steeringtrim throttletrim Settingrange 1 10 When set to minimum 1 the total trim movement is approximately 160 clicks Whensettomaximum 10 thetotaltrimmovementisapproximately16clicks ATL function D R funct...

Страница 64: ...ting Alarm Atoneisheardatthesettime Prealarm Atoneisheardatthesettimefromthealarm Afterstarting thetimeriseffectiveevenifthedisplayisswitchedtoanotherscreen Thetimercanbestoppedbyswitch Down timer function Thisfunctionisusedtomeasurethetimefromstarttostop Theremainingtimeis displayed Thetimerisstartedandstoppedeachtimetheswitchisoperatedandthetimefrom start to stop is counted down and displayed Th...

Страница 65: ...mtimewiththe or key Setting range OFF 1 30s s second Return to the initial value OFF by pressing the and keys si multaneously for about one sec ond 8 At the end of adjustment press the UP key twice or press the DIRECT key twice Thedisplayreturnstotheini tialscreen 2 times Blink Blink Blink Blink DIRECT ST EXP M SEL UP SETUP RESET SELECT DOWN TH EXP ATV CUSTOM DIRECT ST EXP M SEL UP SETUP RESET SEL...

Страница 66: ...USTOM DIRECT ST EXP M SEL UP SETUP RESET SELECT DOWN TH EXP ATV CUSTOM Reset Blink Starting Linked With Throttle Trigger The timer is started by the following method Other operations are the sameastheoperatinginstructionsgivenabove 1 Press the DOWN key two timesattheinitialscreen The timerscreeniscalled UP Up timer DN Down timer 2 Settingthereadystate Press the and keys simul taneously for about o...

Страница 67: ...alarm Afterstarting thetimeriseffectiveevenifthedisplayisswitchedtoanotherscreen Thetimerisstoppedbyswitch Lap Navigation Timer Setting 1 Call the timer screen by pressing the DOWN key twiceattheinitialscreen 2 times 2 Call the timer type selection screen by pressing the SE LECT key once 3 Select LN with the or key 4 Alarmsetting Call the alarm set up screen by pressing the SELECT key once 5 Set t...

Страница 68: ...the or key Setting range 3s 30m s second m minute Return to the initial value 3S by pressing the and keys simulta neously for about one second 10 At the end of adjustment press the UP key twice or press the DIRECT key twice Thedisplayreturnstotheini tialscreen 2 times Blink Blink DIRECT ST EXP M SEL UP SETUP RESET SELECT DOWN TH EXP ATV CUSTOM DIRECT ST EXP M SEL UP SETUP RESET SELECT DOWN TH EXP ...

Страница 69: ...DOWN key two timesattheinitialscreen The timerscreeniscalled LN Lap navigation timer 2 Settingthereadystate Press the and keys simul taneously for about one sec ond at the timer screen READY is displayed and the timerentersthereadystate Blink Blink Sameasdescribedabove DIRECT ST EXP M SEL UP SETUP RESET SELECT DOWN TH EXP ATV CUSTOM 2 times DIRECT ST EXP M SEL UP SETUP RESET SELECT DOWN TH EXP ATV...

Страница 70: ...moriesaresequentiallywritten beginningfromthestartlapmemory number Whenlapmemory100isreached operationreturnstolapmemory1and newtimesaresequentiallywritten When the lap timer is stopped the total time is automatically written to the lap memoryafterthelastlapmemory Thenexttimethelaptimerisused thelaptimesarestoredbeginningfromthelap memoryafterthelapmemorystoringthetotallaptime Example Whenstartedf...

Страница 71: ...the or key Setting range OFF 1 30s s second Return to the initial value OFF by pressing the and keys si multaneously for about one sec ond 8 At the end of adjustment press the UP key twice or press the DIRECT key twice Thedisplayreturnstotheini tialscreen 2 times Blink Blink Blink Blink Blink DIRECT ST EXP M SEL UP SETUP RESET SELECT DOWN TH EXP ATV CUSTOM DIRECT ST EXP M SEL UP SETUP RESET SELECT...

Страница 72: ...DY is displayed and the timerentersthereadystate Blink Blink Sameasdescribedabove DIRECT ST EXP M SEL UP SETUP RESET SELECT DOWN TH EXP ATV CUSTOM 2 times DIRECT ST EXP M SEL UP SETUP RESET SELECT DOWN TH EXP ATV CUSTOM Resetting Start lap update stop When the timer switch initial setting PSH is pressed the timer starts When the timer switch is pressed at each lap the lap times are sequentially me...

Страница 73: ...ssing the and keys si multaneously All the lap timesarereset 6 At the end of adjustment press the UP key twice or press the DIRECT key twice Thedisplayreturnstotheini tialscreen 2 times Blink Blink DIRECT ST EXP M SEL UP SETUP RESET SELECT DOWN TH EXP ATV CUSTOM DIRECT ST EXP M SEL UP SETUP RESET SELECT DOWN TH EXP ATV CUSTOM DIRECT ST EXP M SEL UP SETUP RESET SELECT DOWN TH EXP ATV CUSTOM DIRECT ...

Страница 74: ...lumn you want to change using the SELECT key 3 Change the character using the or key Setting range English characters and Japanese Katakana symbols numbers Set the model name by repeating steps 2 and 3 above 4 At the end of adjustment press the UP or press the DI RECTkeytwice Thedisplay returnstotheinitialscreen Usable Characters Whenthe keyispressed thecharactersshownbelowsequentiallyappear Blink...

Страница 75: ...t mixing Page 85 Servo reverse Function reverse Page 87 Function selection trim Page 88 Function selection switch Page 89 Fail safe Page 91 Battery fail safe Page 92 PCM PPM selection Page 93 LCD contrast Page 94 Audible alarm tone Page 95 Model reset Page 96 Model copy Page 97 Throttle curve selection Page 98 Rate display selection Page 99 Channel 3 position When the UP and DOWN keys are pressed ...

Страница 76: ...ously attheinitialscreen 2 Call the D R function screen by pressing the UP or DOWN keysinfunctionmaporder 3 Adjust the D R amount travel with the or key Setting range 0 100 Return to the initial value 100 by pressing the and keys si multaneously for about one sec ond 4 Second dual rate function setting Cal the set up screen by pressingtheSELECTkey 5 Adjust the D R amount travel with the or key Set...

Страница 77: ...d DOWN keys simultaneously Or press the DIRECT key twice Thedisplayreturnstotheini tialscreen Switch Setting TheSecondDualRatefunctionmustbeassignedtoaswitchinadvanceusingthe functionselectswitch Page89 DIRECT ST EXP M SEL UP SETUP RESET SELECT DOWN TH EXP ATV CUSTOM ...

Страница 78: ... 2 CalltheATLFunctionscreen by pressing the UP or DOWN keysinfunctionmaporder 3 Adjust the ATL amount travel with the or key Setting range 0 100 Return to the initial value 100 by pressing the and keys si multaneously for about one sec ond 4 At the end of adjustment press the UP and DOWN keys simultaneously Or press the DIRECT key twice Thedisplayreturnstotheini tialscreen DIRECT ST EXP M SEL UP S...

Страница 79: ...in function map order 3 Adjusttheservopositionwith the or key Setting range 0 100 Return to the initial value 50 by pressing the and keys si multaneously for about one sec ond 4 At the end of adjustment press the UP and DOWN keys simultaneously Or press the DIRECT key twice Thedisplayreturnstotheini tialscreen DIRECT ST EXP M SEL UP SETUP RESET SELECT DOWN TH EXP ATV CUSTOM DIRECT ST EXP M SEL UP ...

Страница 80: ...e UPorDOWNkeysinfunction maporder 3 Set the servo operation rate with the or key Setting range 5 5 7 3 Return to the initial value 5 5 by pressing the and keys simulta neously for about one second 4 At the end of adjustment press the UP and DOWN keys simultaneously Or press the DIRECT key twice Thedisplayreturnstotheini tialscreen DIRECT ST EXP M SEL UP SETUP RESET SELECT DOWN TH EXP ATV CUSTOM DI...

Страница 81: ...creen by pressing the UP and DOWN keys simultaneously attheinitialscreen 2 Call the Programmable Mix ing 1 or 2 screen by pressing the UP or DOWN keys in functionmaporder 3 Set programmable mixing to ON with the or key Setting range ON OFF 4 Masterchanelsetting Call the MST set up screen by pressing the SELECT key once 5 Select the master channel with the or key Setting range ST Steering TH Thrott...

Страница 82: ...rection mixing rate set up screen by pressing the SELECT key once This setting sets the slave channeloutputforthemaster channelleftsideandforward side or DOWN side opera tion Setting range 100 100 11 Adjust the mixing rate with the or key Return to the initial value 0 by pressing the and keys simulta neously for about one second Operates in the same diredction as master channel operation Operates ...

Страница 83: ...on to master channel operation ON The slave side operates by adding the set value of the related function at the master channel side CH1 Steering speed ATV EXP CH2 Throttle preset ABS ATV EXP throttle acceleration CH3 ATV 18 At the end of adjustment press the UP and DOWN keys simultaneously Or press the DIRECT key twice Thedisplayreturnstotheini tialscreen DIRECT ST EXP M SEL UP SETUP RESET SELECT...

Страница 84: ...V slavechannel ST Mixing is applied to steering and the travel is in creased RIGH 10 Whensubtrimiscentered 0 LEFT 10 Whensubtrimiscentered 0 Trm OFF OFS 0 MIMD ON Full left Full right Zone over which servo does not operate However theoperatingrangeoftheservoisexceeded even if a large value is input at RIGH and LEFT and a zoneoverwhichtheservodoesnotoperateevenwhen thewheelismovedtotheleftorrightis...

Страница 85: ... as steering Operates in the opposite direction of steering 6 Channel3 steeringmixing ratesetting Call the set up screen by pressing the SELECT key once 7 Adjustthemixingratewiththe or key Setting range 100 0 100 Return to the initial value 100 by pressing the and keys simultaneously for about one second Operates in the same direction as channel 3 Operates in the opposite direction of channel 3 DI...

Страница 86: ...ingEXPfunction steeringspeedfunction ordual ratefunctionatthesteeringsidealsoaffectschannel3sideoperation However even ifthereversefunctionissetatthesteeringside channel3isnotreversed When steeringisoperatedatthechannel3side thesesettingsareunrelatedtooperation evenifperformed Slave Channel Output Initial Value Steering channel3side 100 Channel3 steeringside 100 DIRECT ST EXP M SEL UP SETUP RESET ...

Страница 87: ...1 2 Nob Knob PSH Push switch 4 Settheservooperatingdirec tion with the or key Steering throttle channel 3 NORM Normal side REVE Reverse side Grip dial 1 2 knob digital trim 1 2 3 NORM Increases 0 50 100 REVE Decreases 100 50 0 PSH NORM ON while the switch is pushed in the arrow direction OFF when the switch is released ALT ON OFF alternately each time the switch is pushed in the arrow direction Ho...

Страница 88: ...ssing the SELECT key GD1 Grip dial 1 GD2 Grip dial 2 Nob Knob DT1 Digital trim 1 DT2 Digital trim 2 DT3 Digital trim 3 4 Select the function you want to set with the or key D R Dual rate ATL ATL function Trm1 Steering trim Trm2 Throttle trim TRCD Traction control delay AB P A B S function return amount CYCL A B S function cycle CH3 Channel 3 STEX Steering EXP TEXF Throttle EXP forward side TEXB Th...

Страница 89: ...ogrammable mixing 1 ON OFF PMX2 Programmable mixing 2 ON OFF OFF Not used Custom key CTM SUBT Subtrim STSP Steering speed ABS A B S IDLE Idle up ACCE Throttle acceleration STAR Start TRC Traction control STEP Step TIME Timer NAME Model name STEX Steering EXP THEX Throttle EXP MSEL Model select ATV ATV D R Dual rate ATL ATL P3CH Channel 3 position TH N Throttle neutral PMX1 Programmable mixing 1 PM...

Страница 90: ...lideswitch SLD the followingsymbolsaredisplayedonthesetupscreenoftherelaventfunction A B S functionexample For the A B S function both switches can be set If this is displayed SLD can be set If this is displayed PSH can be set Display is enlarged WhentheA B S functionisallocatedtothepush buttonswitchorslideswitchwith thefunctionselectswitchfunction thescreenswitchdisplaychanges becomes larger and ...

Страница 91: ...tionsetting Hold the steering wheel throttle trigger or channel 3 knobinthepositionyouwish them to go to when the fail safefunctionisactivatedand press the and keys simul taneously the set value is displayedontheLCD Setting range NORM 100 0 100 NORM Not used Setting Reset Ifthe or keyispressedwhenasetvaluehasbeeninput thesettingreturnstothe NORM unset state 5 At the end of adjustment press the UP ...

Страница 92: ...ll the Battery Fail Safe function screen by pressing the UP or DOWN keys in functionmaporder 3 FunctionON OFFselection Select ON or OFF with the or key Setting range OFF ON 4 At the end of adjustment press the UP and DOWN keys simultaneously Or press the DIRECT key twice Thedisplayreturnstotheini tialscreen ThisfunctioncanbeusedonlywithPCM1024system receivers DIRECT ST EXP M SEL UP SETUP RESET SEL...

Страница 93: ...nctionmaporder 3 Modeselection Select PCM or PPM by press ing the or key Setting range PPM PCM 4 At the end of adjustment press the UP and DOWN keys simultaneously Or press the DIRECT key twice Thedisplayreturnstotheini tialscreen After the mode is changed signals are output in the new mode when the transmitter power is turned off then back on DIRECT ST EXP M SEL UP SETUP RESET SELECT DOWN TH EXP ...

Страница 94: ...contrast by pressing the or key 8 steps key Darker key Lighter Return to the initial value cen ter by pressing the and keys simultaneously for about one sec ond 4 At the end of adjustment press the UP and DOWN keys simultaneously Or press the DIRECT key twice Thedisplayreturnstotheini tialscreen DIRECT ST EXP M SEL UP SETUP RESET SELECT DOWN TH EXP ATV CUSTOM DIRECT ST EXP M SEL UP SETUP RESET SEL...

Страница 95: ... Audible Alarm Tone function screen by pressing the UP or DOWN keys in functionmaporder 3 Toneadjustment Adjusttheaudiblealarmtone by pressing the or key key Higher key Lower Setting range OFF 1 100 Return to the initial value 75 by pressing the and keys simulta neously for about one second 4 At the end of adjustment press the UP and DOWN keys simultaneously Or press the DIRECT key twice Thedispla...

Страница 96: ... function map order 3 Modelmemoryreset Reset the currently called model memory by pressing the and keys simulta neously for about one sec ond When reset is complete COM PLETE blinks on the screen 4 At the end of adjustment press the UP and DOWN keys simultaneously Or press the DIRECT key twice Thedisplayreturnstotheini tialscreen DIRECT ST EXP M SEL UP SETUP RESET SELECT DOWN TH EXP ATV CUSTOM DIR...

Страница 97: ...y source SLV Copy destination 4 Copyexecution Executecopybypressingthe and keys simultaneously foraboutonesecond When copying is complete COMPLETE blinks on the screen 5 At the end of adjustment press the UP and DOWN keys simultaneously Or press the DIRECT key twice Thedisplayreturnstotheini tialscreen DIRECT ST EXP M SEL UP SETUP RESET SELECT DOWN TH EXP ATV CUSTOM DIRECT ST EXP M SEL UP SETUP RE...

Страница 98: ...c tion screen by pressing the UPorDOWNkeysinfunction maporder 3 Select the curve with the or key Setting range EXP EXP2 CRV 4 At the end of adjustment press the UP and DOWN keys simultaneously Or press the DIRECT key twice Thedisplayreturnstotheini tialscreen DIRECT ST EXP M SEL UP SETUP RESET SELECT DOWN TH EXP ATV CUSTOM DIRECT ST EXP M SEL UP SETUP RESET SELECT DOWN TH EXP ATV CUSTOM DIRECT ST ...

Страница 99: ...ultaneously attheinitialscreen 2 Call the Rate Display Selec tion screen by pressing the UPorDOWNkeysinfunction maporder 3 Select the function you wish to display with the or key 4 At the end of adjustment press the UP and DOWN keys simultaneously Or press the DIRECT key twice Thedisplayreturnstotheini tialscreen DIRECT ST EXP M SEL UP SETUP RESET SELECT DOWN TH EXP ATV CUSTOM DIRECT ST EXP M SEL ...

Страница 100: ... R113iP 3 channels FM receiver PCM re ceiver Receivingfrequencies27 29 40 41 or75MHzband Intermediatefrequency455kHz Powerrequirement4 8Vor6V sharedwithservos Currentdrain18mA Size42 7x28 7x16 0mm 1 69x1 13x0 63in Weight18g 21g 0 63oz 0 74oz Servo S9402 Coreless HighOutputservo Output torque 8 0kg cm 111 1oz in Speed0 10sec 60degree Powerrequirement4 8Vor6V Size40 5x20x37 5mm 1 59x0 78x1 48in Weig...

Страница 101: ...an Futaba crystal will result in decrease of range as well as loss of control Types of Crystals Therearecrystalsfor FMandAM dependingonthemodulationmode andcrystals forsingleconversionanddualconversion dependingonthereceivercircuitry The R113iPandR113FareFMreceivers Usesingleconversioncrystalsetswiththem Transmitter Ni cad Battery WhenpurchasingatransmitterNi cadbatteryasaspare etc usethefollowing...

Страница 102: ...wipe off the case and contacts Caution Check Turn on the power switch and check the LCD battery voltage display When the batteriesarenew thevoltageshouldbeabout12V Ifthevoltagedoesnotrise checkforfaultycontactorincorrectpolarity Processing the Dry Cell Batteries Themethodofprocessinguseddrycellbatteriesdependsontheareainwhichyou reside Processthebatteriesinaccordancewiththeprocessingmethodforyoura...

Страница 103: ...ly To servos Receiver Connected to B C Y Adapter To receiver battery Receiver switch To transmitter DSC jack DSC cord When channel 3 is not used connect the receiver switch to CH3 and con nect the DSC cord to the B C terminal To servos Receiver Connect to B C Connect to CH3 To receiver battery Receiver switch To transmitter DSC jack DSC cord Body rest Ifyouaregoingtousethetransmitterforalongtime t...

Страница 104: ...rdance with the polarity markings Faulty contact Check to see if the contacts are bent and not making good contact Dirty contacts Clean the contacts and check for corrosion Antenna Loose Be sure the antenna is screwed in tightly Not fully extended Fully extend the antenna Receiver Battery Dead battery Replace or recharge Wrong polarity Check connections Antenna Near other wiring Move away from wir...

Страница 105: ...Select Error Warning When a low battery alarm is gener ated cease operation immediately and retrieve the model If the battery goes dead while in operation you will lose control Warning When a backup error is generated immediately stop using the system and request repair from the Futaba Service Center If you continue to use the system the transmitter may malfunction and cause loss of control Ifthep...

Страница 106: ...unds 7 times and stops repeated Memory Error Ifthedatainthetransmitterisnottransferrednormallywhenthepoweristurnedon anaudiblealarmwillsoundand MEMERR willbedisplayedontheLCD To stop the alarm press the and keys simultaneously for about one second Turn the power back on If the alarm is not generated again there is no problem LCD screen Blink Audible alarm Tone sounds 7 times and stops repeated Idl...

Страница 107: ...ontrol servos in proportion to the transmitter operation they are called proportional Servo Horn The part that is installed on the output shaft on the servo to convert to rotating motion of the servo to transmit the linear to a control rod Servo horns come in various shapes Servo Mount Advise used to secure the servo in the model Most often supplied in the model kit Steering ST System to make the ...

Страница 108: ...ction P76 D R S Dual rate function step P63 D R2 Second dual rate P76 DLY Traction control delay P61 DT1 Digital trim 1 P88 DT2 Digital trim 2 P88 DT3 Digital trim 3 P88 DUTY A B S function duty P51 E EXP Steering EXP P39 EXPB Throttle EXP brake back side P40 EXPF Throttle EXP forward side P40 F F S Fail safe function P91 G GD1 Grip dial 1 P88 GD2 Grip dial 2 P88 I IDLE Idle up function P55 L LEFT...

Страница 109: ... CYCL STEX TEXF TEXB TIMER TYPE UP DN LN LP ALRM m PALM s LN m s SET UP MODE D R D R D R2 ATL ATL 3CH 3CH TH N TH N 5 5 7 3 PM1 PM1 OFF ON MST RATE1 TRM OFF ON SLV RATE2 OFS OFF ON MXMD OFF ON PM2 PM2 OFF ON MST RATE1 TRM OFF ON SLV RATE2 OFS OFF ON MXMD OFF ON TILT TILT OFF ON S 3 3 S REV ST NORM REVE TH NORM REVE 3CH NORM REVE GD1 NORM REVE GD2 NORM REVE Nob NORM REVE PSH NORM REVE DT1 NORM REVE...

Страница 110: ...スロットルカーブの初期値 モデルネーム Copy and use Throttle Curve Model No Model Name Set value Trigger point Initial value normal value Throttle curve initial value FUTABA CORPORATION 1998 06 FUTABA CORPORATION Makuhari Techno Garden Bldg B6F 1 3 Nakase Mihama ku Chiba 261 8555 Japan Phone 043 296 5119 Facsimile 043 296 5124 ...

Отзывы: