background image

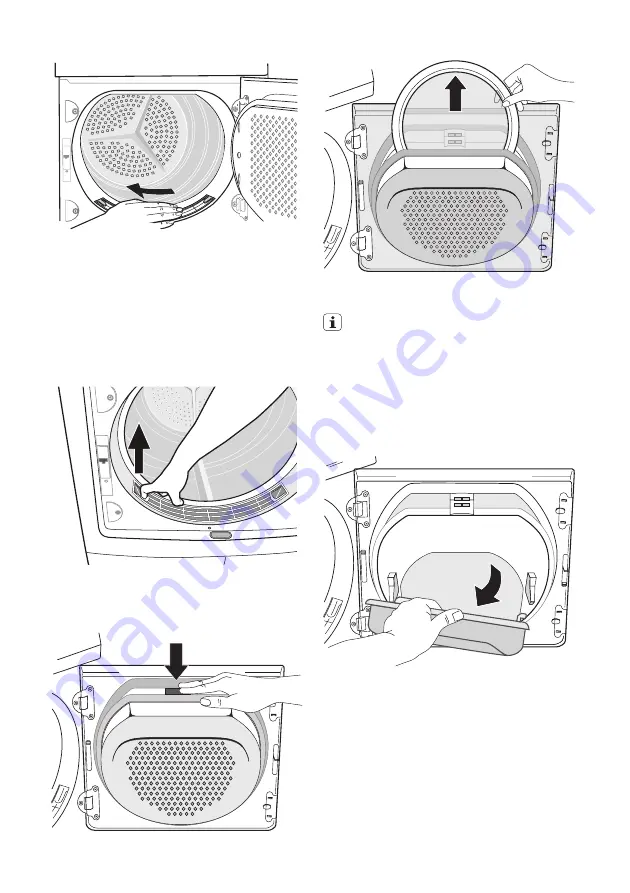
3. After a period of time, a patina due to

detergent residue on laundry forms on
the filters. When this occurs, clean the
filters with warm water using a brush.
Remove the filter from the door pulling it
out. (It can be positioned with the locat-
ing spur facing to the left or to the right).
After cleaning do not forget to put it
back.

4. Push down the unlock button on the

large mesh filter.
The large mesh filter pops up.

5. Take out fine filter.

6. Remove the fluff from fine filter. It is best

to use a damp hand for this purpose.

Clean the entire filter area

The filter area does not have to be
cleaned after every drying cycle, but
should be checked regularly and
cleaned of fluff if necessary.

7. To do this, grip the top of the large mesh

filter and pull it forwards until it comes
loose from the two brackets.

8. Remove fluff from the entire filter area. It

is best to use a vacuum cleaner for this
purpose.

9. Press both journals of the large mesh fil-

ter into the brackets on the loading door
until they snap into place.

10. Re-insert fine filter.
11. Press against the large mesh filter until it

locks into the interlock.

12 


Содержание Novamatic TW 7757

Страница 1: ...www ch TW 7757 User manual Istruzioni per l uso Condenser dryer with heat pump Asciugabiancheria a condensa con pompa di calore 0848 559 111 www fust ch...

Страница 2: ...o avoid danger of fires caused by excessive drying do not use appliance to dry the following items Cushions quilts and the like these items accumulate heat Items such as foam rubber latex foam shower...

Страница 3: ...or domestic use It must not be used for purposes other than those for which it was designed Only wash fabrics which are designed to be machine dried Follow the instructions on each garment label Do no...

Страница 4: ...bstructed Use the loading volumes specified in the programme overview Ensure you have good ventilation in the installation room Clean the micro fine filter and fine strain er after each drying cycle S...

Страница 5: ...l 2 Water reservoir 3 Drum light 4 Fine fluff filter 5 Course fluff filter 6 Fluff filter 7 Rating plate 8 Loading door reversible 9 Heat exchanger door fluff filter heat ex changer 10 Button for open...

Страница 6: ...edium dryness maximal dryness spin speed default minimal spin speed spin speed scope 200 rpm step maximal spin speed iron dry drying phase indica tor light dry drying phase indica tor cupboard dry dry...

Страница 7: ...rd dry Schrank trocken 7 kg Thorough drying of fabrics of even thicknesses e g terry towelling items knitwear towels all except Time Zeit wahl Iron dry B geltrocken 7 kg For normal thickness cotton or...

Страница 8: ...pe of fabric and its finish Place fabrics in the dryer straight after spinning once dried im mediately remove fabrics and place on a clothes hanger all except Time Zeit wahl Easy iron plus Leichtb gel...

Страница 9: ...coming tangled close zips button up duvet covers and tie loose ties or ribbons e g of aprons Empty pockets Remove metal items pa per clips safety pins etc Turn items with double layered fabrics in sid...

Страница 10: ...eps 1 Turn the programme knob to the Time programme Zeitprogramm 2 Press the Time Zeitwahl button repeat edly until the desired programme dura tion is shown in the display e g for a programme of 1 hou...

Страница 11: ...y for about one minute The drying cycles except for the Wool Wolle programme are automatically followed by an anti crease phase which lasts around 30 minutes The drum ro tates at intervals during this...

Страница 12: ...from fine filter It is best to use a damp hand for this purpose Clean the entire filter area The filter area does not have to be cleaned after every drying cycle but should be checked regularly and c...

Страница 13: ...result of the water reservoir being full Press the Start Pause Start Pause but ton to continue the drying cycle The water reservoir has a volume of ap prox 4 litres This is sufficient for around 7 kg...

Страница 14: ...To do this press the pressure points on the sides and pull the filter frame up and out of the housing 1 1 2 6 Remove fluff from the fluff filter with a damp hand If necessary clean the filter under r...

Страница 15: ...Clean heat exchanger 3 Max loading exceeded Respect max loading volume Covered ventilation grill Uncover ventilation grill in base area Residue inside the drum Clean the drum inside High water hardne...

Страница 16: ...Do not use standard bulbs These develop too much heat and may damage the machine Before replacing the bulb disconnect the mains plug with a permanent con nection fully unscrew or deactivate the fuse...

Страница 17: ...gramme 2 Press simultaneously the DRYNESS and TIME buttons and hold down for approx 5 seconds The current setting is on the display low conductivity 300 S cm medium conductivity 300 600 S cm high cond...

Страница 18: ...check that the dryer is absolutely level with the aid of a spirit level If it is not raise or lower the feet until it is The feet must never be removed Do not restrict the floor clearance through deep...

Страница 19: ...ine Door reversal Warning Before changing the door stop disconnect the mains plug 1 A C A B B Open loading door 2 Unscrew hinge A from the front of the machine and take off the loading door 3 Remove c...

Страница 20: ...ailable from your Service Force Centre or your specialist dealer Installation kit for direct draining of con densate into a basin siphon gully etc The condensate tank then no longer has to be drained...

Страница 21: ...Model descrip tion PNC S No 21...

Страница 22: ...iodi viti pietre o altri materiali rigidi pos sono danneggiare gravemente l apparec chio prestare attenzione a non introdurli nella macchina insieme alla biancheria Per evitare il pericolo di incendio...

Страница 23: ...ugatrice installata sopra la lava biancheria deve obbligatoriamente essere utilizzato il kit di montaggio accessorio op zionale Uso Questo apparecchio destinato solo al l uso domestico e non deve esse...

Страница 24: ...ce Non perci necessario utilizzare ammorbidenti o altri additivi du rante il lavaggio Per limitare i consumi dell asciugatrice adottare i seguenti accorgimenti mantenere sempre libere le fessure di ve...

Страница 25: ...di condensa 3 Luce del cestello 4 Microfiltro 5 Filtro a maglie larghe 6 Filtro 7 Targa matricola 8 Porta reversibile 9 Sportello scambiatore di calore filtro scambiatore di calore 10 Pulsante di aper...

Страница 26: ...di asciugatura massimo impostazione automatica ve locit di centrifuga velocit di centrifuga minima intervallo velocit di centrifu ga incrementi di 200 giri min velocit di centrifuga massi ma pronto st...

Страница 27: ...Intensivo Trocknen Plus 7 kg Asciugatura di tessuti spessi es asciugamani di spugna accappatoi tutti tranne Asciug A Tempo Zeit wahl Normale Schranktroc ken 7 kg Asciugatura completa di biancheria di...

Страница 28: ...eria da letto lenzuola singole o doppie federe copriletti copripiumini tutti tranne Asciug A Tempo Zeit wahl Viscosa Vi skose 1 kg Per tessuti sottili viscosa e poliestere che non richiedono stiratura...

Страница 29: ...etichette Le eti chette indicano Asciugatura possibile nell asciugatrice Asciugatura a temperatura normale Asciugatura a temperatura ridotta Asciugatura nell asciugatrice non possibile Importante Non...

Страница 30: ...la guar nizione di gomma 3 Chiudere la porta con decisione fino allo scatto Selezione del programma Usare la manopola di selezione per imposta re il programma appropriato Il tempo stima to richiesto...

Страница 31: ...ogrammi Questa funzione pu essere attivata o disattivata tenendo pre muti contemporaneamente i tasti Extra Anti piega Knitterschutz e Segnale Acustico Signal per 5 secondi Prima dell inizio del progra...

Страница 32: ...l capitolo Manutenzione e pulizia 3 Estrarre la biancheria 4 Ruotare il selettore dei programmi in po sizione Off Aus Importante Dopo ciascun ciclo di asciuga tura Pulire il filtro ultrafine e il filt...

Страница 33: ...ulita rimuovendo se ne cessario la lanugine 7 A tal fine afferrare il filtro a maglia larga dalla parte superiore e tirarlo verso di s fino a che non esce dai supporti 8 Rimuovere la lanugine dall int...

Страница 34: ...lo di asciugatura Il serbatoio dell acqua ha una capacit di ca 4 litri Questi sono sufficienti per asciugare circa 7 kg di biancheria pre cedentemente centrifugata a 1000 giri minuto La condensa pu es...

Страница 35: ...re il telaio sollevandolo verso l alto 1 1 2 6 Togliere i residui dal filtro passandovi so pra con la mano bagnata Se necessario pulire il filtro sotto l acqua corrente con uno spazzolino Raccomandazi...

Страница 36: ...simo superato Rispettare il volume di carico massimo Griglia di ventilazione ostruita Liberare la griglia di ventilazione alla base dell apparecchiatura Residui all interno del cestello Pulire l inter...

Страница 37: ...pletato Sostituzione della lampadina interna Usare solo lampadine speciali per asciuga trici reperibili presso uno dei centri di assi stenza locali Importante Quando l apparecchio acceso la lampadina...

Страница 38: ...giri min Cotoni Pronto Stiro Baumwolle B geltrocken 3 1 8 105 7 kg di carico pre centrifugato a 1000 giri min Tessuti Misti Normale Mischgewebe Schrank trocken 3 0 75 50 3 kg di carico pre centrifuga...

Страница 39: ...sualizzata l impostazione attuale l icona di avvertimento e il messaggio di avvertimento sono spenti l icona di avvertimento e il messaggio di avvertimento sono accesi 1 L acqua contiene calcare e sal...

Страница 40: ...legno o elementi simili per non causare un accumulo di calore che potrebbe interferire con il funzionamento dell apparecchio Importante L aria calda prodotta dall asciugatrice pu raggiungere temperat...

Страница 41: ...ura 4 Con l utensile adatto esercitare pressio ne per liberare il blocco C dal fissaggio estrarlo e inserirlo dall altro lato con una rotazione di 180 5 Svitare la cerniera A dalla porta di carico e r...

Страница 42: ...estare installato nella macchina nella po sizione prevista Leggere attentamente le istruzioni fornite con il kit Piedistallo con cassetto Disponibile presso il Centro di assisten za o il rivenditore P...

Страница 43: ...ung von Nicht Original Teilen Conditions de garantie service apr s vente Nous octroyons sur chaque produit 2 ans de garantie partir de la date de livraison ou de la mise en service au consommateur doc...

Страница 44: ...906 95 00 T l 021 643 09 70 Dipl Ing FUST AG Ing dipl FUST SA Dipl Ing FUST AG Dipl Ing FUST AG Kantonsstrasse 79 Via Campagna 1 Haus Tribolet Mythen Center 3931 Visp Eyholz 6512 Giubiasco Bellinzona...

Страница 45: ...45...

Страница 46: ...46...

Страница 47: ...47...

Страница 48: ...www ch 136909020 00 032009...

Отзывы: