39 |
P a g e
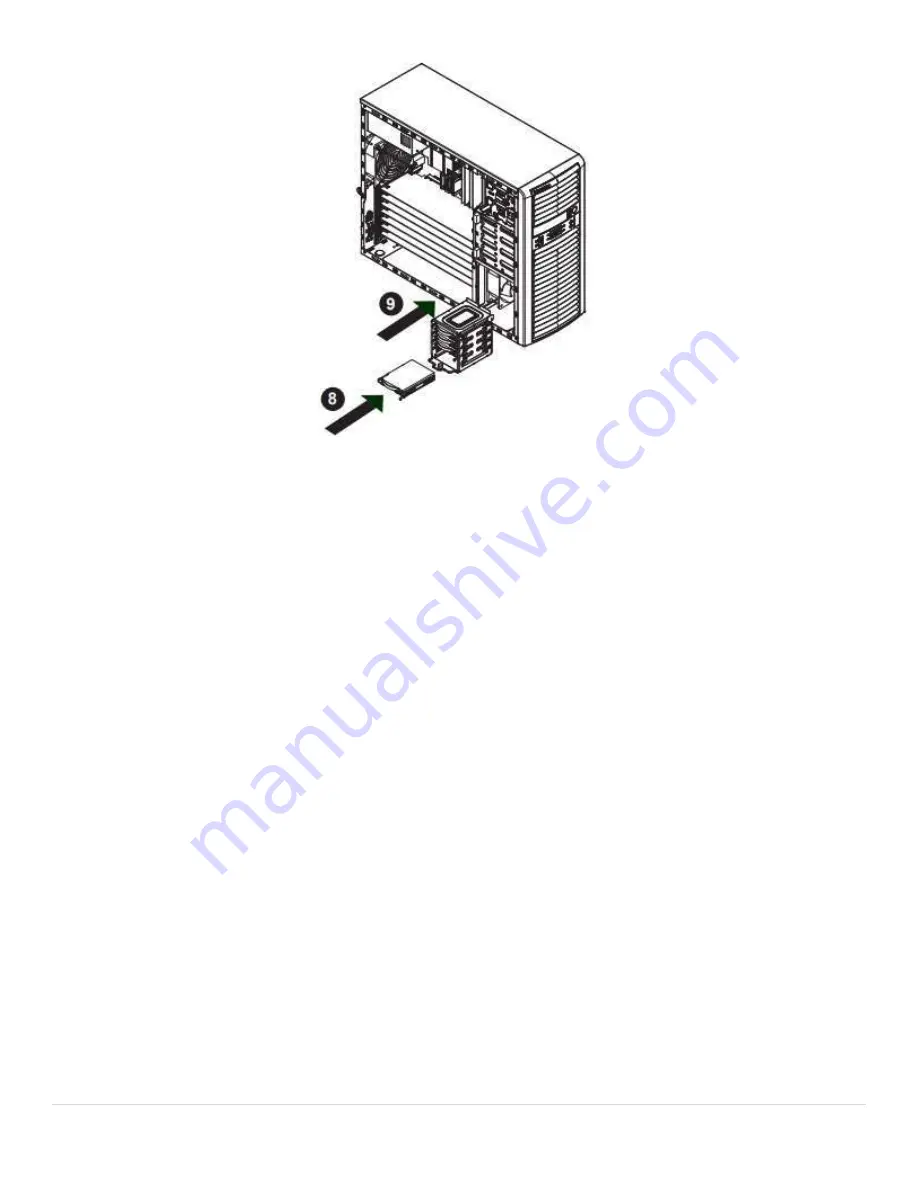
Figure. Installing 2.5" Hard Drives
5. If a hard drive is already present, remove it by carefully pulling the sides of the hard drive carrier outward.
6. Remove the hard drive from the hard drive carrier.
7. Insert the new hard drive into the hard drive carrier.
8. Insert the hard drive carrier into the hard drive cage, sliding it towards the back of the the hard drive cage until it clicks
into a locked position.
9. Slide the 2.5" hard drive cage back into the chassis and tighten the thumb screw to secure the cage.
10. Connect the related cables to the hard drive.
11. Plug the power cord back into the power module, replace the chassis cover and power-up the system
Installing a 3.5" Device (Optional)
The Fusionstor i737e chassis has one 3.5" device slot, which supports an optional device, such as an all-in-one card
reader.
Installing a 3.5" Device
1. Power down the system and remove the power cord from the rear of the power supply. Remove the chassis side cover
as described in Previous Section.
2. Remove the front bezel from the chassis by lifting it upwards from the bottom, and pulling off the front of the chassis.
3. Remove the cover plate from the 3.5" device slot on the front of the chassis.
4. Install the bracket rail (A) which is included in the accessory box, onto one side of the 3.5" device, by inserting the pins
of the bracket into the mounting holes on the sides of the optical device.
5. Slide the 3.5" device into the chassis.
6. Plug the power cord back into the power module, replace the chassis cover and power-up the system.
Содержание INVENTO i737e SERIES
Страница 1: ...FUSIONSTOR INVENTO SERIES INVENTO i737e SERIES MANUAL ...
Страница 2: ...1 P a g e Fusionstor Workstation Invento i737e Series ...
Страница 16: ...15 P a g e ...
Страница 17: ...16 P a g e ...
Страница 18: ...17 P a g e ...
Страница 19: ...18 P a g e ...
Страница 21: ...20 P a g e ...
Страница 24: ...23 P a g e ...
Страница 25: ...24 P a g e ...
Страница 26: ...25 P a g e ...
Страница 27: ...26 P a g e ...
Страница 28: ...27 P a g e ...
Страница 29: ...28 P a g e ...
Страница 30: ...29 P a g e ...
Страница 31: ...30 P a g e ...
Страница 32: ...31 P a g e ...
Страница 33: ...32 P a g e ...
Страница 34: ...33 P a g e ...
Страница 47: ...46 P a g e ...
Страница 48: ...47 P a g e ...
Страница 49: ...48 P a g e ...
Страница 50: ...49 P a g e ...
Страница 51: ...50 P a g e ...
Страница 52: ...51 P a g e ...
Страница 53: ...52 P a g e ...
Страница 54: ...53 P a g e ...
Страница 55: ...54 P a g e ...
Страница 56: ...55 P a g e ...
Страница 57: ...56 P a g e ...
Страница 58: ...57 P a g e ...
Страница 59: ...58 P a g e ...
Страница 60: ...59 P a g e ...
Страница 61: ...60 P a g e ...
Страница 62: ...61 P a g e ...
Страница 63: ...62 P a g e ...
Страница 64: ...63 P a g e ...
Страница 65: ...64 P a g e ...
Страница 66: ...65 P a g e ...
Страница 67: ...66 P a g e ...
Страница 68: ...67 P a g e ...
Страница 69: ...68 P a g e ...
Страница 70: ...69 P a g e Event Logs Use this feature to configure Event Log settings ...
Страница 71: ...70 P a g e ...
Страница 72: ...71 P a g e Boot Settings ...
Страница 73: ...72 P a g e ...
Страница 74: ...73 P a g e ...
Страница 75: ...74 P a g e Save Exit ...
Страница 76: ...75 P a g e ...
Страница 77: ...76 P a g e ...


