background image


1-4

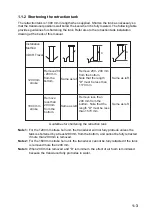
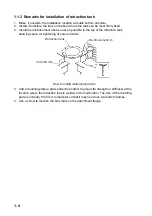
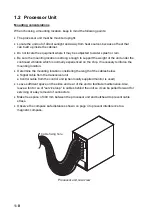
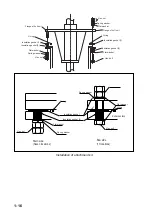
1.1.3  Remarks for installation of retraction tank 

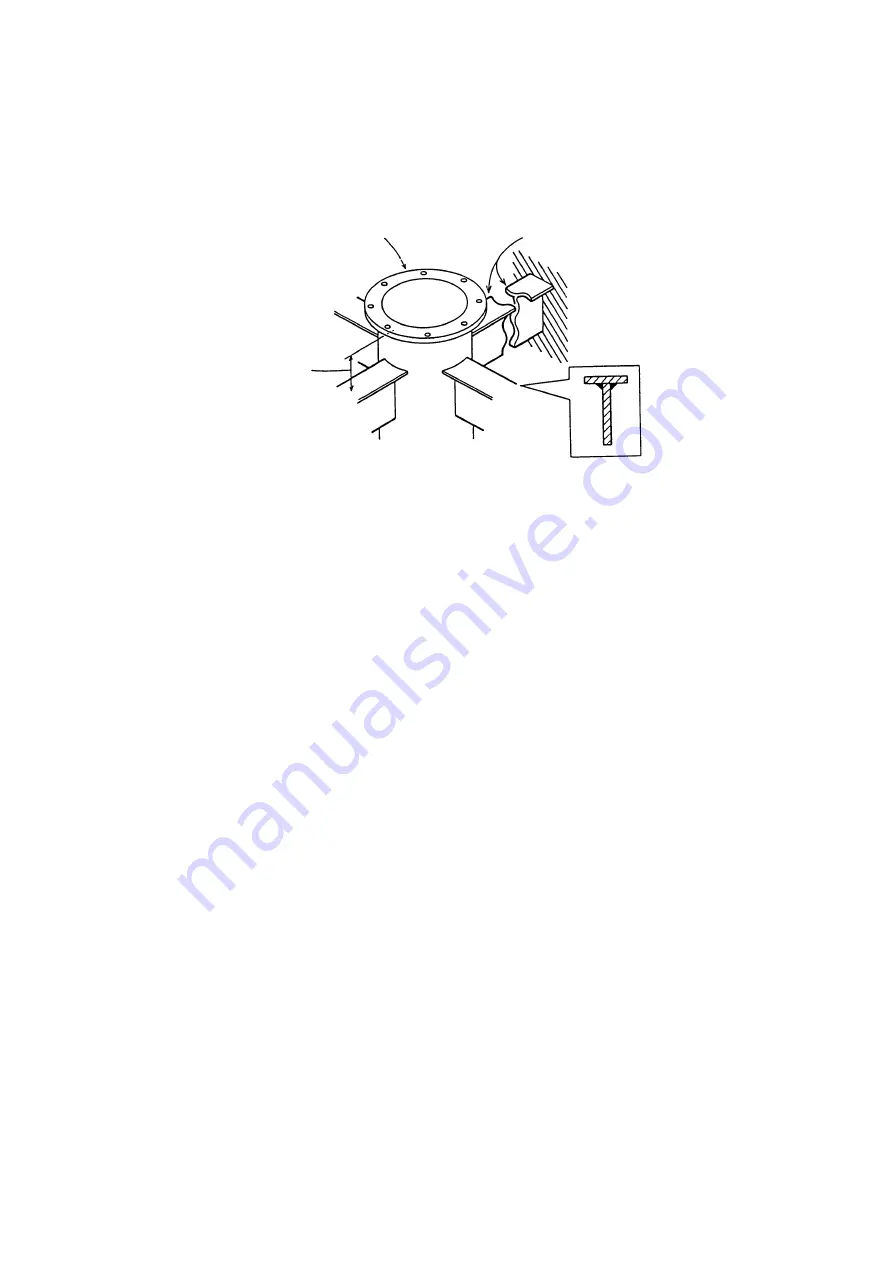
1.  Make, if possible, the installation location a double bottom structure. 
2.  Install, if possible, the tank on the keel where the tank can be most firmly fixed. 
3.  Install the reinforcement ribs as near as possible to the top of the retraction tank, 

allowing space for tightening of nuts and bolts. 

Retraction tank

250-300 mm

Reinforcement rib


How to install reinforcement ribs 

4.  Add a doubling plate (a plate added to another to give extra strength or stiffness) at the 

location where the retraction tank is welded to the hull bottom. The size of the doubling 
plate is normally 1300 mm in diameter so that it may lie across two bottom frames. 

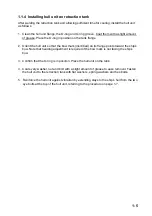
5.  Use a chisel to inscribe the bow mark on the attachment flange.   
 

Содержание FSV-30

Страница 1: ... 8 Installing the Attachment Kit option 1 15 2 WIRING 2 1 2 1 How to Use the Crimping Tool Pin Extractor 2 1 2 2 Wiring 2 2 2 3 Processor Unit 2 4 2 4 Transceiver Unit 2 10 2 5 Cable Extension Kit 2 14 2 6 Input Voltage and Fuses 2 18 3 ADJUSTMENT AND CHECK 3 1 3 1 Hull Unit Check 3 1 3 2 Heading Adjustment 3 5 3 3 Configuring Own Ship Mark 3 7 3 4 Other SYSTEM Menu Items 3 9 3 5 CONE Board Settin...

Страница 2: ...istributor Dealer 9 52 Ashihara cho Nishinomiya 662 8580 JAPAN Telephone 81 0 798 65 2111 Fax 81 0 798 65 4200 A DEC 2003 Printed in Japan All rights reserved F DEC 13 2010 Pub No IME 13230 F 00014857415 00014857415 TATA FSV 30 30S 00014857415 00014857415 0 0 0 1 4 8 5 7 4 1 5 ...

Страница 3: ... Keep away from moving shaft of the hull unit Gears may cause injury WARNING Turn off the power at the switchboard before beginning the installation Fire or electrical shock can result if the power is left on Do not install the equipment where it may get wet from rain or water splash Water can cause fire or electrical shock or damage the equipment Be sure no water leaks in at the trans ducer insta...

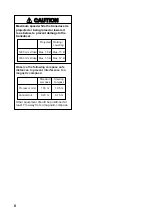
Страница 4: ...Raising Lowering 1200 mm stroke Max 18 kt Max 15 kt 1600 mm stroke Max 15 kt Max 12 kt Observe the following compass safe distances to prevent interference to a magnetic compass Other equipment should be positioned at least 7 m away from a magnetic compass Processor Unit Control Unit Standard compass Steering compass 1 55 m 1 05 m 0 20 m 0 15 m ...

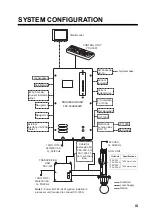
Страница 5: ...Navigator 1 Navigator 2 AD Converter AD 10 Current Indicator Current Indicator Log E S Interface VI 1100A Net Recorder VI 1100A Net Sonde Junction Box CS 170 VI 1100A Net Sonde External Interface CS 120A Note 1 100 110 115 220 230 VAC 1φ 50 60 Hz CONTROL UNIT FSV 3001 Hull unit Specifications FSV 303 FSV 303 R 1200 mm stroke FSV 304 FSV 304 R 1600 mm stroke HULL UNIT Gyrocompass Cable for Extensio...

Страница 6: ...1 set For processor unit Accessories FP10 02201 006 922 390 1 set For control unit Optional Equipment Name Type Code No Qty Remarks Control Unit FSV 3001 1 37 core Cable 10S1258 001 113 000 10 1 Specify length E S Interface VI 1100A 1 Net Sonde Junction Box CS 170 1 Power Supply Kit FSV 2403 000 067 013 1 For connection of CS 120A MJ A6SPF0012 100C 000 154 037 10 1 10 m NMEA 6P 6P NMEA Cable MJ A6...

Страница 7: ...ing noise air bubbles and interference from turbulence are at a minimum Generally the point at 1 3 to 1 2 of the ship s length from the bow on or near the keel is optimum On the keel installation is advantageous for minimizing oil consumption in comparison with off the keel If the hull unit can not be installed on the keel the center of the retraction tank should be within 600 mm of the keel to pr...

Страница 8: ...e no more than 5 m The space shown in the figure on the next page is required around the hull unit for wiring and maintenance If the ambient temperature around the unit will be below 0 C provide the sonar compartment with a heater to keep the temperature above 0 C 650 650 1300 650 Maintenance space example sonar compartment Note After mounting the equipment install anti vibration stays referring t...

Страница 9: ...left Remove 280 290 mm from the bottom Note that the length D must be less than 1170 mm Remove less than 290 mm from the bottom Note that the length D must be less than 1570 mm Same as left Same as left D D Guidelines for shortening the retraction tank Note 1 For the 1200 mm stroke hull unit the transducer will not fully protrude unless the tank is shortened by at least 280 mm from the bottom and ...

Страница 10: ...f the retraction tank allowing space for tightening of nuts and bolts Retraction tank 250 300 mm Reinforcement rib How to install reinforcement ribs 4 Add a doubling plate a plate added to another to give extra strength or stiffness at the location where the retraction tank is welded to the hull bottom The size of the doubling plate is normally 1300 mm in diameter so that it may lie across two bot...

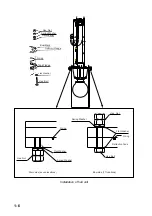
Страница 11: ...scribed on its flange points toward the ship s bow Note that heading adjustment is required if the bow mark is not facing the ship s bow 3 Confirm that the O ring is in position Place the hull unit on the tank 4 Coat every washer nut and bolt with a slight amount of grease to ease removal Fasten the hull unit to the retraction tank with flat washers spring washers and hex bolts 5 Reinforce the hul...

Страница 12: ... Unit Flange O ring Tank Flange Flat Washer Hex Bolt Hex Nut Spring Washer Flat Washer Retraction Tank Hex Bolt O ring O ring Flat Washer Spring Washer Hex Nut Stern side seven locations Bow side 17 locations Bow Mark Installation of hull unit ...

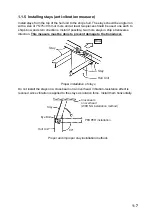
Страница 13: ...e two more stays in ship s transverse direction This measure must be done to prevent damage to the transducer Stay Stay Hull Unit Bow Proper installation of stays Do not install the stays on a crossbeam on an overhead Vibration resistance effect is reduced since vibration is applied to the stays as rotation force Install them horizontally Crossbeam on overhead WRONG installation method PROPER inst...

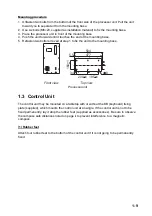
Страница 14: ... on the ship If necessary reinforce the mounting location Determine the mounting location considering the length of the cables below Signal cable from the transceiver unit Control cable from the control unit when locally supplied monitor is used Leave sufficient space on the sides and rear of the unit to facilitate maintenance Also leave a foot or so of service loop in cables behind the unit so it...

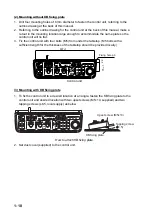
Страница 15: ...at step 1 to fix the unit to the mounting base 504 477 5 5 160 1 34 200 1 195 1 8 Front view Top view Processor unit 1 3 Control Unit The control unit may be mounted on a tabletop with or without the KB keyboard fixing plate supplied which mounts the control unit at an angle If the control unit is not to be fixed permanently lay it atop the rubber feet supplied as accessories Be sure to observe th...

Страница 16: ... control unit with four bolts M5 from under the tabletop M5 bolts with a sufficient length for the thickness of the tabletop should be provided locally 22 75 1 467 1 Fixing hole φ6 FSV 30 Control unit 3 Mounting with KB fixing plate 1 To fix the control unit to a desired location at an angle fasten the KB fixing plate to the control unit and desired location with two upset screws M5 10 supplied an...

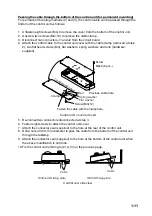
Страница 17: ...ts hardware supplied Control unit cover Previous cable hole Screw M4x8 8 pcs Clamp Screw M4x12 Fasten the cable with the clamp here Nut Spring washer Flat washer Control unit cover removed 5 Re connect two connectors disconnected at step 3 6 Fasten eight screws to attach the control unit cover 7 Attach the connector seal supplied to the hole at the rear of the control unit 8 Drill a hole of 30 mm ...

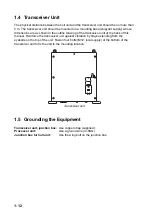
Страница 18: ...the back of this manual Reinforce the transceiver unit against vibration by stays extending from the eyebolts on the top of the unit Fasten four bolts M12 local supply at the bottom of the transceiver unit to fix the unit to the mounting location FUSE CHARGE OV ERR BV ERR Transceiver unit 1 5 Grounding the Equipment Transceiver unit junction box Use copper strap supplied Processor unit Use a groun...

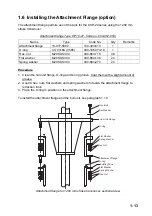
Страница 19: ... Spring washer M20 SUS304 000 864 270 24 Procedure 1 Clean the hull unit flange O ring and O ring groove Coat them with a slight amount of grease 2 Use 48 hex nuts flat washers and spring washers to fasten the attachment flange to retraction tank 3 Place the O ring in position on the attachment flange To install the attachment flange and the hull unit see paragraph 1 1 4 Hex Bolt Flat Washer O rin...

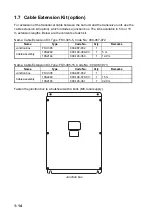
Страница 20: ...Name Cable Extension Kit Type FSV 305 5 Code No 000 067 072 Name Type Code No Qty Remarks Junction box FSV 305 000 067 032 1 10S2240 000 148 369 03 1 5 m Cable assembly 10S2144 000 145 360 1 12 9 m Name Cable Extension Kit Type FSV 305 15 Code No 000 067 073 Name Type Code No Qty Remarks Junction box FSV 305 000 067 032 1 10S2240 000 148 370 03 1 15 m Cable assembly 10S2145 000 145 361 1 22 9 m Fa...

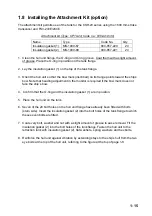
Страница 21: ... heading adjustment in the monitor is required if the bow mark does not face the ship s bow 4 Confirm that the O ring and the insulation gasket 1 are in position 5 Place the hull unit on the tank 6 Seven of the 24 bolt holes on the hull unit flange have already been fitted with bolts stern side Insert the insulation gasket 2 into the bolt holes of the tank flange to which these seven bolts are fit...

Страница 22: ...traction tank Stern side Seven locations Bow side 17 locations O ring Hex bolt Flat washer Flange of hull unit O ring Insulation gasket 1 Insulation gasket 2 Spring washer Flat washer Hex nut Flat washer Flange of hull unit O ring Insulation gasket 1 Insulation gasket 2 Spring washer Hex nut Installation of attachment kit ...

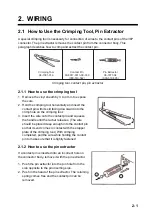
Страница 23: ...ly and insert the contact pin with its slit facing downward into the crimp hole on the crimping tool 3 Insert the wire onto the contact pin and squeeze the handle until the rachet releases The wire should be placed deep enough into the contact pin so that its end comes in contact with the stopper plate of the crimping tool With crimping completed pull the wire while holding the contact pin to make...

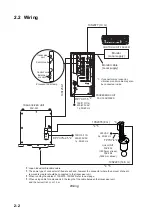
Страница 24: ...p Transceiver unit Control unit Control unit External monitor 220 VAC 3φ 50 60 Hz 10S2077 10 m DPYCY 1 5 2 TPYCY 4 2 3 2 Japan Industrial Standard cable 3 The same type of connector is fitted at each end however the connector where the amount of sheath removed is greater should be connected to the transceiver unit 4 When running the cables of 10S2078 10S2223 refer to next page 5 When using cable f...

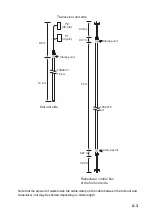
Страница 25: ... 38 m 7 2 m 0 28 m 0 07 m 0 07 m Raise lower control box of the hull unit side Clamp point Clamp point P2 40 pin P1 34 pin Clamp point Note that the amount of cable inside the cable clamp on the cable between the hull unit and transceiver unit may be shorted depending on cable length ...

Страница 26: ...is necessary to prevent cable stress Cable tie 15 cm Processor unit rear view 2 3 1 10S1258 1 cable This cable runs between the processor unit and transceiver unit 8 9 10 11 12 13 14 15 16 17 18 19 7 2 3 4 5 6 Armor Shield 1 BLK 2 BLK BRN 3 BLK RED 4 BLK ORG 5 BLK YEL 6 BLK GRN 7 BLK BLU 8 BLK PPL 9 BLK GRY 10 BLK WHT 11 BRN RED 12 BRN ORG 13 BRN YEL 14 BRN GRN 15 BRN BLU 16 BRN PPL 17 BRN GRY 18 ...

Страница 27: ...e After exposing cores wind shield around the armor Fabrication of cable for connector 00 8016 038 313761HV Guide Pin A Guide Pin B Guide Pin B Small Guide Pin A Large Position No Assembling 38P connector Positioning guide pins Guide pins of the connector identify the mating receptacle They are Guide pin A Large 1 Guide pin B Small 1 ...

Страница 28: ...e processor unit Armor Vinyl sheath Taping Solder lead wire to armor and connect it to 1 pin of connector Conductor S 1 5 mm 1 56 mm 2 Vinyl sheath Armor Cable DPYCY 1 5 Use cable DPYCY 1 5 Japan standard cable or equivalent cable Assembling connector NCS 253 P 2 3 3 Control cable Attach the control cable 10S2074 or 10S2075 to the CN A103 connector in the processor unit ...

Страница 29: ...epth Use the SRCN connectors optionally supplied Type CP10 4801 Code no 006 934 240 to connect equipment to the rear of the processor unit Refer to the interconnection diagram at the back of this manual Cable list Simple w shield Twisted Outline of core Sectional view of cables Shield 14 mm 9 mm Armor Shield CO SPEVV SB C 0 2sq 5P 02S8040 No Color 1 YEL BLK 2 YEL WHT 3 YEL RED 4 YEL BLU 5 YEL GRN ...

Страница 30: ...r unused cores and earh wire to braided shieeld Wind shield tape Solder earth wire Wind vinyl tape Wind vinyl tape Clamp fixing screw Clamp fixing screw Clamp Clamp Set screw Set screw J9 ES1 SRCN6A16 7P J12 ES2 NET SRCN6A16 10P Cable with armor J5 CIF1 SRCN6A13 5P J7 GYRO SRCN6A16 10P J8 LOG SRCN6A13 3P J10 FNZ SRCN6A21 10P J13 EXT KP SRCN6A21 10S Cable without armor Attach conector at shield to ...

Страница 31: ...elow For current driven KP input Processor unit E S Sonar EXT KP EXT KP IN H EXT KP IN C 8 9 KP signal For voltage driven KP 12 V input Processor unit E S Sonar EXT KP EXT 12VKP H 0V 10 7 KP signal Voltage driven KP output Processor unit E S Sonar Current indicator EXT KP INTKP1 GND 1 2 INTKP2 GND 3 4 INTKP3 GND 5 6 KP signal Menu setting See EXT KP INPUT on page 3 9 ...

Страница 32: ...und the armor Fabrication of cable for 00 8016 038 313761HV Shorten the unused wires appropriately and treat their ends with vinyl tape to prevent short circuit Guide Pin A Guide Pin B Guide Pin B Small Guide Pin A Large Position No Assembling 38P connector Positioning guide pins Use the tool shown below to position guide pins Guide Pin A large Connector Guide Pin CN B101 Guide Pin B small 1 1 Too...

Страница 33: ...enance I F601 MAIN J601 220 230 VAC 50 60Hz 1 2 15A L L S605 L L S605 H S603 INPUT TB B101 L 100V H 110V H S603 S604 H S604 L H H L H L H 220V L H 230V H H 115V L Should be OFF operation for Normal Use Only 100 110 115 15A 15A J303 J302 J301 5A 5A J206 J205 J204 J201 J202 J203 6962 6963 CN B202 CN B201 CN B203 CN B205 CN B206 CN B204 CN B208 CN B209 CN B210 CN B207 TRX 2 TRX 1 TRX 3 TRX 5 TRX 6 TR...

Страница 34: ... DPYCYS 2 5 140 35 30 FV2 4 2 pcs Vinyl sheath Amor Anticorrosive sheath Fabrication of cable type DPYCYS 2 5 2 4 3 Hull control cable 10S2078 Connect the hull control cable 10S2078 to the CN B102 in the transceiver unit Note The same type of connector is fitted at each end however the connector which has a larger portion of its sheath removed should be connected to the transceiver unit ...

Страница 35: ... EDS3 EDS3 TB B101 INPUT F602 I MAINTENANCE Maintenance I F601 MAIN J601 220 230 VAC 50 60Hz 1 2 15A L L S605 L L S605 H S603 INPUT TB B101 L 100V H 110V H S603 S604 H S604 L H H L H L H 220V L H 230V H H 115V L Should be OFF operation for Normal Use Only 100 110 115 15A 15A J303 J302 J301 5A 5A J206 J205 J204 J201 J202 J203 6962 6963 CN B202 CN B201 CN B203 CN B205 CN B206 CN B204 CN B208 CN B209...

Страница 36: ...n box Also connect the transducer cable 10S2223 Refer to interconnection diagram for wiring details 1 Open the junction box cover 2 Unfasten the cable clamps Cable clamp 10 9 8 7 6 5 4 3 2 1 10 9 8 7 6 5 4 3 2 1 Signal cables 10S2223 from hull unit Junction box Signal cables 10S2240 from transceiver unit JUNCTION BOX display side JCTN1 Board JCTN2 Board CSK clamp Connect to the J1 in JCTN1 Board J...

Страница 37: ...e clamp and fix cable with appropriate CKS clamp Connect each cable to circuit board as shown in the figure on the previous page Signal cable 10S2240 connects to JUNCTION BOX display side 4 Lay the shield of each cable in the cable clamp 5 Fasten the cable clamps ...

Страница 38: ...ransceiver cable 10S2078 here Conductor S 4 mm2 2 55 mm Vinyl sheath Armor Cable TPYCY 4 Sheath Confirm LED after completing the installation The LED lights in red if power connection is correct If it is off turn off power from the mains switchboard check the cable connection and recheck the LED The hull unit does not work if this connection is wrong Normal phase LED lights in red Phase reversal L...

Страница 39: ...2 17 100 25 20 FV5 5 4 M4 yellow x 3 Sheath Armor Clamp here by cable clamp Vinyl sheath Power cable fabrication ...

Страница 40: ... L H 230 V H H H Default setting Fuses Change the fuse in F601 and F602 according to input voltage referring to the table below Fuse Input TB B101 F601 F602 Default setting 100 V 110 V 115 V 20A 20A 220 V 230 V 10A 10A Default setting WARNING Use the proper fuse Use of a wrong fuse can result in damage to the equipment or cause fire Marking the label After setting toggle switches and changing the ...

Страница 41: ...the MENU key to show the main menu MENU QUIT H SCAN SETTING V SCAN SETTING OTHERS TX PULSE LENGTH H 9 TX POWER H 9 TVG NEAR H 0 TVG MEDIUM H 0 TVG FAR H 0 AGC H 0 2ND AGC H 0 ECHO AVERAGE H 0 COLOR H COLOR 1 COLOR RESPONSE H COLOR CURVE 3 Main menu 2 Use the trackball to choose OTHERS and press the MENU key OTHERS MENU QUIT QUIT ES1 SETTING ES2 SETTING ERASE MARKS DISPLAY SETTING ALARM AUDIO PRESE...

Страница 42: ...A DISPLAY CURRENT VEC WIND NET SONDE SETTING NET SHOOT SETTING TARGET LOCK STABILIZATION TEST INITIALIZATION INITIAL SETTING menu 5 Choose TEST and press the MENU key INITIAL SETTING OTHERS MENU QUIT QUIT BOARD TEST PANEL TEST TEST PATTERN RX TEST NOISE TEST TX OFF QUIT TEST QUIT TEST menu 6 Choose TX and press the MENU key 7 Choose OFF if it is not already selected and press the MENU key 8 Choose...

Страница 43: ...VAC 4 In the raise lower control box set the TEST NORMAL switch to TEST Press the DOWN switch to confirm that the transducer lowers Also while the transducer is being lowered check that the MD LED lights when the MD L SW kicks Note that the MD L SW does not stop the transducer when the TEST NORMAL switch is in the TEST position OFF TEST NORMAL 5V L SW UP MD DN UP DOWN Control unit in hull unit 5 P...

Страница 44: ...ts when the transducer is lowered to the mid position 10 Press the ª switch Confirm that the lamp above the switch blinks while the transducer is being lowered a short beep sounds when the mid limit switch is kicked and the lamp lights when the transducer is fully lowered 11 Press the switch Confirm that the lamp above the switch blinks while the transducer is being raised a short beep sounds when...

Страница 45: ... measure the error and go to step 2 Buoy If target s on screen position is right of ship s bow for example heading is skewed left Heading adjustment 3 Turn off the power and then turn it on again while pressing and holding down the MENU key Release the MENU key after the self test screen appears After the picture appears press the MENU key three times to open the SYSTEM menu SYSTEM MENU QUIT INTER...

Страница 46: ...CK OTHERS menu HEADING ADJUST 6 Choose or to choose direction plus or minus respectively in which to increment or decrement setting and then press the MENU key to set Each pressing of the MENU key changes the setting in increments of 1 The setting range is 180 to 179 7 Choose QUIT to finish the adjustment and press the MENU key 8 Choose QUIT at the top of the menu screen and press the MENU key to ...

Страница 47: ... RX SETTING TX RX SETTING H TX RX SETTING V OTHERS System menu 2 Use the trackball to choose OWN SHIP MARK and press the MENU key OWN SHIP MARK TD POSITION 1 15m MENU QUIT QUIT TD POSITION 2 0 0m SHIP S WIDTH 20m SHIP S LENGTH 75m OWN SHIP MARK menu 3 Use the trackball to choose SHIP S LENGTH 4 Press the MENU key to show the setting window OWN SHIP MARK TD POSITION 1 15m MENU QUIT QUIT TD POSITION...

Страница 48: ...m or TD POSITION 2 10 0 to 10 0 m similarly TD POSITION 1 Set the transducer s distance from the bow TD POSITION 2 Set the transducer s distance from the keel Choose for starboard for port 8 Choose QUIT at the top of the menu screen and press the MENU key to close all menus Ship s Length Ship s Width TD Position 1 TD Position 2 Negative value for port Ship shape description ...

Страница 49: ...e transmission rate for the NMEA 2 port 4800 bps 9600 bps 19200 bps 38400 bps CIF BAUD RATE Set the transmission rate for the CIF port If the CS 120A is connected choose 2400 bps 2400 bps 4800 bps 9600 bps 19200 bps AUX BAUD RATE Set the transmission rate for the AUX port 2400 bps 4800 bps 9600 bps 19200 bps EXT KP INPUT Set the input logic of KP from an external equipment DISABLE POSITIVE NEGATIV...

Страница 50: ...F NMEA LOG PULSE Set the log pulse rate for the log signal 200 p NM 400 p NM SPEED COURSE Choose the input format for ship s speed and course data When choosing the LOG HEADING the heading data is used instead of the course data NONE LOG HEADING CIF NMEA SPEED SENSOR Choose the input format for speed and course data This setting is ineffective when LOG HEADING is selected as speed and course sourc...

Страница 51: ...ourse VTG Speed VBW VHW Current CUR VDR Depth DBS DBT DPT Temperature MTW Wind MWV Date Time ZDA GPS gyro Att FURUNO proprietary data sentence NMEA Output Position TLL FURUNO proprietary data sentences all output Fish school speed FKV Relative bearing range depth and speed of fish school TFM Relative bearing range and depth of position tracking mark TLM Bearing range and depth of event mark EVT Be...

Страница 52: ...ft if you prefer to display depth from the draft rather than depth from the transducer 0 0 m to 10 0 m increments of 0 1 m EVENT KEY Choose the key to use to enter own ship s position EVENT or SHOOT When choosing SHOOT the shoot function becomes inoperative EVENT SHOOT AUTO TILT Choose the range for the auto tilt form WIDE 2 to 10 4 to 16 6 to 20 or NARROW 1 to 4 2 to 6 3 to 8 WIDE NARROW SELECT U...

Страница 53: ...djust ES1 signal offset CW Noise decrease CCW Noise increase R209 ES1_GAIN 10 kΩ Adjust ES1 signal gain CW Gain increase CCW Gain decrease 3 5 1 Adjustment of signal level echo sounder connected Adjusts the output level of the echo sounder on the CONE Board as below 1 Choose an echo sounder display ES1 or ES2 from the menu 2 For ES1 adjust R168 to suppress noise and then adjust R209 so that the pi...

Страница 54: ...DC AC Processor unit inside view 3 6 1 CIF2 NMEA2 connector interface selection The signal format for the CIF2 NMEA2 port at the back of the processor unit can be set for CIF or NMEA by DIP switch S2 8 on the IFES Board 10P6983 The default format is OFF CIF DIP switch setting Format S2 8 ON NMEA S2 8 OFF CIF S2 IFES Board 10P6983 ...

Страница 55: ...elow according to the input port The default setting is AC See page 3 14 for parts location Input port Jumper ES1 J497 ES2 NET J496 Note The SIGOUT AC signal terminal and REC terminal DC signal in the output port are provided for a FURUNO echosounder Therefore when using the SIGOUT terminal it is not necessary to change the above mentioned jumper setting ...

Страница 56: ...3 16 This page intentionally left blank ...

Страница 57: ...the following power supply kit option in the processor unit to enable use of the CS 120A Name Power Supply Kit Type FSV 2403 Code No 000 067 013 Name Type Code No Qty Remarks Power supply pcb LEA50F 24 XFND 000 143 913 1 Spacer SQ 22 000 159 305 10 4 Protection sheet 10 071 3508 100 290 712 1 Screw M3 8 C2700W 000 163 190 10 4 Connector NJC NJC 203 PM 000 160 184 10 1 1 Unfasten seven screws to re...

Страница 58: ...d on the power module to the power supply pcb 5 Set the protection sheet supplied to the power supply pcb and fasten it with four screws 6 Reattach the power module 7 Connect between the processor unit and CS 120A as follows CS 120A J201 Processor Unit YEL BRN BRN BRN POWER FOR CS 120A port CIF1 or NMEA2 CIF2 port L E PP 1 2 3 NN MM JJ KK BB EE DD Z 1 2 3 4 10 24V 0V GND TD H TD C RD H RD C GND DS...

Страница 59: ...N Board as follows Input port DIP switch setting on DCON Board CIF1 S3 2 ON NMEA 2 CIF 2 S3 3 ON S3 DCON Board 10P6984 or 10P6984A Note If the CIF1 format is selected change baud rate to 2400 bps See CIF BAUD RATE on page 3 9 for details ...

Страница 60: ...4 4 This page intentionally left blank ...

Страница 61: ...部 PROCESSOR UNIT FSV 3002 60 000 067 043 1 予備品 予備品 予備品 予備品 SPARE PARTS SPARE PARTS SPARE PARTS SPARE PARTS 予備品 SPARE PARTS SP10 02601 006 921 340 1 付属品 付属品 付属品 付属品 ACCESSORIES ACCESSORIES ACCESSORIES ACCESSORIES 付属品 ACCESSORIES FP10 02901 007 008 780 1 工事材料 工事材料 工事材料 工事材料 INSTALLATION MATERIALS INSTALLATION MATERIALS INSTALLATION MATERIALS INSTALLATION MATERIALS 工事材料 INSTALLATION MATERIALS CP10 04...

Страница 62: ...LLATION MATERIALS CP10 06201 007 008 540 1 略図の寸法は 参考値です DIMENSIONS IN DRAWING FOR REFERENCE ONLY 略図の寸法は 参考値です DIMENSIONS IN DRAWING FOR REFERENCE ONLY 略図の寸法は 参考値です DIMENSIONS IN DRAWING FOR REFERENCE ONLY 略図の寸法は 参考値です DIMENSIONS IN DRAWING FOR REFERENCE ONLY 10CT X 9852 A 4 1 01 6 2 2 ޓޓ 176 0 ฬ ޓޓ 0 ᢙ 3 6 ㅜ㧛 4 4 5 ภ 01 ဳฬ㧛ⷙᩰ 5 4 26 105 056 6 10 6 4 5 Ꮏ ᢱ 1 㩄㩒㩂㩊 54 0㧕 100 614 54 0 54 0 2 1 01 㩄㩒㩂㩊...

Страница 63: ...㪫㪜㪛㩷㪝㪦㪩㩷㪘㪥㩷㪠㪫㪜㪤㪅㩷㩷㪫㪟㪜㩷㪣㪦㪮㪜㪩㩷㪧㪩㪦㪛㪬㪚㪫㩷㪤㪘㪰㩷㪙㪜㩷㪪㪟㪠㪧㪧㪜㪛㩷㪠㪥㩷㪧㪣㪘㪚㪜㩷㪦㪝㩷㪫㪟㪜㩷㪬㪧㪧㪜㪩㩷 㪧㪩㪦㪛㪬㪚㪫㪅㩷㪨㪬㪘㪣㪠㪫㪰㩷㪠㪪㩷㪫㪟㪜㩷㪪㪘㪤㪜㪅 A 6 1 01 6 2 2 ޓޓ 176 0 ฬ ޓޓ 0 ᢙ 3 6 ㅜ㧛 4 4 5 ภ 01 ဳฬ㧛ⷙᩰ 5 4 26 105 056 6 10 6 4 5 Ꮏ ᢱ 6 㩄㩒㩂㩊 㧕 100 614 8 ㅍฃାⵝ 14 64 05 8 4 70 6 1 01 㩄㩧㩊㩂㩎㩕㩩㩧 106 6 2 0 ㅍฃାⵝ 14 64 05 8 4 70 6 1 01 ሶ 4 2 10 7 8 㨻㨿 ㅍฃାⵝ 14 64 05 8 4 70 6 1 01 8 㨻㨺㩇 122 4 564 2 9 ㅍฃାⵝ 14 64 05 8 4 70 6 1 01 9 41 5 㧔 ߩኸᴺߪ ޔ ෳ ୯ߢߔ ޓ...

Страница 64: ...㪩㩷㪘㪥㩷㪠㪫㪜㪤㪅㩷㩷㪫㪟㪜㩷㪣㪦㪮㪜㪩㩷㪧㪩㪦㪛㪬㪚㪫㩷㪤㪘㪰㩷㪙㪜㩷㪪㪟㪠㪧㪧㪜㪛㩷㪠㪥㩷㪧㪣㪘㪚㪜㩷㪦㪝㩷㪫㪟㪜㩷㪬㪧㪧㪜㪩㩷 㪧㪩㪦㪛㪬㪚㪫㪅㩷㪨㪬㪘㪣㪠㪫㪰㩷㪠㪪㩷㪫㪟㪜㩷㪪㪘㪤㪜㪅 A 8 㧼㧭㧯㧷㧵㧺㧳 ޓ 㧸㧵㧿㨀 6 58 0 1 7 6 0 5 4 26 10 1 ͳ 3 6 70 6 ਅⵝ 7 70 6 58 ຠ 52 4 2 465 ຠ 52 4 2 465 52 ㇱຠ 1 55 0 ޓ 2 465 ㇱຠ 1 55 0 1㩢㩧㩂㩨 8 1 4 0 1 8 㨻㨺㩇 122 4 564 2 9 41 5 ⷺ㩘㩨㩣㩎 ోޓ 㩒㩆㩨 10 5 4 9 575 ⷺ㩏㨹㩎 㩆㨷 076 575 㩚㩀㩨㩁ਣᐔᐳ 6 9 5 4 575 㩔㩨㩒ᐳ 524 0 9 5 4 575 ሶ 4 2 10 7 8 䋨 䈱ኸᴺ䈲䇮ෳ ୯䈪䈜䇯㩷㩷㪛㪠㪤㪜㪥㪪㪠㪦㪥㪪㩷㪠㪥㩷㪛㪩㪘㪮㪠㪥㪞㩷㪝...

Страница 65: ...TRIC CO LTD 10CT X 9501 A 10 1 01 6 2 2 ޓޓ 176 0 ฬ ޓޓ 0 ᢙ 3 6 ㅜ㧛 4 4 5 ภ 01 ဳฬ㧛ⷙᩰ 5 4 26 105 5514 5 ઃዻຠ 1 ઃߌ ౕ 0 2 6 41 5 ᠲ ㇱ 14 10641 70 6 1 01 㩊㩨㩇㩎㩀㩔㩨㨺 756 18 4 ᠲ ㇱ 14 10641 70 6 1 01 41 5 㩄㩒㩂㩊㩆㨺㩣 7 41 5 ᠲ ㇱ 14 10641 70 6 1 01 㩚㩀㩨㩁ᐔᐳ 6 9 5 4 4 ᠲ ㇱ 14 10641 70 6 1 01 ⷺ㩏㨹㩎 㩆㨷 076 ᠲ ㇱ 14 10641 70 6 1 01 ࡃࡀᐳ 524 0 9 5 4 9 ᠲ ㇱ 14 10641 70 6 1 01 㩅㩡ዊ㩒㩆㩨 18 5 4 9 9 0 ᠲ ㇱ 14 10641 70 6 1 01 㨻㩖㩩㩈㨹㩎7 㩈㩛㩇 ...

Страница 66: ... 1 6 722 4 241 7 6 37 6 5 6 5 A 12 1 01 6 2 52 6 01 0 1 2 46 176 0 9 01 14 2 4 5 6 2 4 8 5 52 4 914 0 37 06 6 4 4 5 1 01 1 01 2 5 2 01 52 4 2 465 56 14 7 5 5 65 2 4 8 55 6 2 01 6 㩕㨷㨺㩇㩨 1 8 2 ㅍฃାⵝ 14 64 05 8 4 70 6 55 67 75 㩕㨷㨺㩇㩨 1 8 2 ㅍฃାⵝ 14 64 05 8 4 70 6 55 67 75 㩕㨷㨺㩇㩨 1 8 ㅍฃାⵝ 14 64 05 8 4 70 6 55 67 75 㩕㨷㨺㩇㩨 8 2 ㅍฃାⵝ 14 64 05 8 4 70 6 55 67 75 4 5 0 74701 64 1 6 9 01 㧔 ߩኸᴺߪ ޔ ෳ ୯ߢߔ ޓޕ 05 105 ...

Страница 67: ...ဳᑼ 㩄㨺㩎㩨 ภ߇㧞Ბߩ႐ว ޔ ਅᲑࠃࠅ Ბߦઍࠊࠆㆊᷰᦼຠߢ ࠅ ޔ߅ߥޓޕߔ ߡߞ ߇߆ࠄߜߤޔ ຠ ߪᄌࠊࠅ ߖࠎ ޕ 691 6 2 5 0 1 5 56 14 0 6 6 19 4 241 7 6 5 22 0 2 1 6 722 4 241 7 6 37 6 5 6 5 A 14 1 01 6 2 52 6 01 0 1 2 46 176 0 9 01 14 2 4 5 6 2 4 8 5 52 4 914 0 37 06 6 4 4 5 1 01 1 01 2 5 2 01 52 4 2 465 56 14 7 5 5 65 2 4 8 55 6 2 01 1 㩕㨷㨺㩇㩨 8 ਅⵝ ᓮེ 14 70 6 75 8 2 4 5 0 74701 64 1 6 9 01 㧔 ߩኸᴺߪ ޔ ෳ ୯ߢߔ ޓޕ 05 105 0 4 9 0 ޓ 14 4 4 0 10 㧕 1 ဳᑼ ...

Страница 68: ...D 1 ...

Страница 69: ...D 2 ...

Страница 70: ...D 3 ...

Страница 71: ...Y Hatai D 4 ...

Страница 72: ...Y Hatai D 5 ...

Страница 73: ...Takahashi T Y Hatai D 6 ...

Страница 74: ...Takahashi T Y Hatai D 7 ...

Страница 75: ...Y Hatai D 8 ...

Страница 76: ...D 9 ...

Страница 77: ...D 10 ...

Страница 78: ...This page is intentionally left blank ...

Страница 79: ...IG_D2 C SIG_D2 H SIG_D1 C SIG_D1 H TRXTXD C TRXTXD H TRXRXD C TRXRXD H DEMGUP C DEMGUP H DUPLSW H DUPLSW C EXTKP C EXTKP H SIG_D0 H SIG_D0 C NOTE 2 OPTION 1 SHIPYARD SUPPLY 3 CONNECTOR PLUGS FITTED AT FACTORY 5 5m CABLE AVAILABLE FOR JAPANESE ONLY J2 PROCESSOR UNIT 4 CN A103 108 J411 421 P P P P P P P CONTROL UNIT 操作部 FSV 3001 2 1 4 3 6 5 15 14 13 12 11 10 9 8 7 CN1TXD H CN1TXD C CN1RXD C CN1RXD H...

Страница 80: ...4 PROCESSOR UNIT 制御部 FSV 2402 2402S FSV 3002 3002S GND 10 9 8 GND GND 7 6 5 4 3 2 1 4 GND 10 9 8 GND GND 7 6 5 4 3 2 1 SRCN6A16 10P J12 ES2 SIG IN NC ES2 WL IN GND KP UP IN NC EXT KP INTKP1 INTKP2 INTKP3 GND EXT KP IN C EXT KP IN H EXT 12VKP IN J13 ES2 NET KP DN IN SRCN6A21 10S 2 8 7 6 5 4 3 2 1 J15 CN A105 2 1 SP AUDIO GND CN A106 J17 0V SHIELD 24VDC NJC 203PM CS 120A PC パソコン 4 PC IF 4 魚探 I F VI ...

Отзывы:

Похожие инструкции для FSV-30