

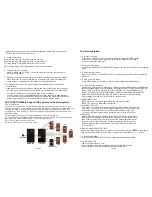

Locations and Names of the Controls
1. POWER & MUTE BUTTON
2. LCD DISPLAY
3. BUTTON
4. VOLUME - BUTTON
5. SEL/AUX MODE BUTTON
6. AV MODE BUTTON
7. AM/FM MODE BUTTON
8. HDMI MODE BUTTON
9. USB MODE BUTTON
10. BT MODE BUTTON
11. NEXT BUTTON
12. PREVIOUS BUTTON
13. 1/ PLAY/PAUSE BUTTON
14. 2/STOP BUTTON
15. 3/RPT BUTTON
16. 4/RDM button
17. 5/ BACKLIGHT/HANG UP BUTTON
18. 6/CLOCK ADJUST/ALARM/TEL BUTTON
19. RESET BUTTON
20. HEADPHONE SOCKET
21. AUX IN JACK
22. HDMI IN JACK
23. MICROPHONE IN
24. USB SOCKET
Page 1
Page 7
5
19
20
21
22
23
24
4
11
14
15
1
3
12
2
13
18
17
16
6
7
8
9
10
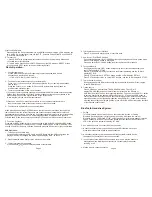
Wiring connecting socket view
GREY
YELLOW
+12V DC MEMORY B+
GREY/BLACK
BLACK
POWER GROUND
1
2
3
4
5
6
Mounting Installation
Location
* Choose a mounting location away from humid areas, water sources, appliances or
any equipment that can radiate heat.
* Select an area on a wall or cabinet which is free from cable, fuel or brake lines and
ensure the area behind the wall mount stereo has a vent hole or if it is an enclosed box
and has adequate room around the rear of the unit for cooling.
* Ensure when the stereo is mounted in the cut out that the wires at the rear of the unit
are not pressed against the heat sink
Installing the unit.
*
Before finally installing the unit, connect the wiring temporarily and make sure
the unit and the system work properly.
*Fix the unit with screw according to following diagram.
1
.
Remove plastic frame of the
front
panel
from the unit.
2. Fix the unit with 4 pieces
#
8 pan head self tapping screw.
3. Put back plastic frame of the front panel to the unit.
SCREW
SCREW
PLASTIC FRAME
OF THE FRONT PANEL


