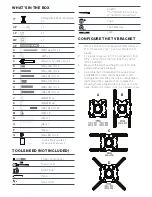


-
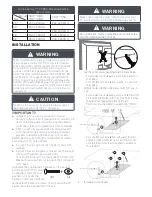
For wooden roof installation,, attach and fix the
bracket to ceiling using screws (M8 x 63mm)
and washers (M9).
-
For concrete roof installation, attach and fix the
bracket to ceiling using metal anchor (M8 x 40).
NOTE:
Use allen key and wrench to lock the
rod by turning counterclockwise, otherwise to
unlock. Ensure the rod is perpendicular to the
ground.
3
NOTE
S6 (O)
Metal Anchor
for oncrete roof
S13 (P)
4.
Attach TV mount bracket to the rod.
5.
Use 2 screws M8 x 55 mm (L) with M8 nuts (M) to
fix the joint
5
Screw Nuts:
M8 x 2
Screws:
M8 x 55 mm x 2
4
CAUTION
It is possible to dislodge your TV while you level it.
Use extreme caution until you tighten the leveling
and locking screws.
6.
Hook the top support of the TV mount onto the
arm of the ceiling mount.
7.
Secure the TV to the ceiling mount using two
screws (M6 x 8mm).
NOTE:
You could turn the screws by hand to
adjust the leveling of your TV. Once adjustment is
finished, tighten the screws firmly in place, but do
not over tighten. Over-tightening can damage the
screws, greatly reducing their holding strength.
8.
This mount allows a rotation of the TV of 360°
- rotate the TV to the desired location and then
tighten all screws.
6
7
8
Screws:
M6 x 8mm
Screws:
TBC
NOTE
NOTE:
It is recommended to be protected between
with the area near the wall and TV in case of damage
from strong winds or some other collision.
SPECIFICATION
Display Size
43 - 65" (1090 - 1650 mm)
Max Load
121 lbs (55 kg)
Mounting
Pattern
100 x 100 mm
200 x 100 mm
200 x 200 mm
300 x 200 mm
300 x 300 mm
400 x 200 mm
400 x 300 mm
400 x 400 mm
Tilt Range
Up to 15
°
downwards
Pan/Swivel
Range
Up to 360
°
Distance From
Ceiling
243⁄16 - 34" (614 - 864 mm)


