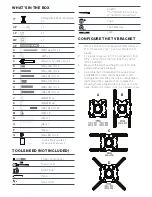


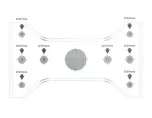


Furrion Aurora™ TV VESA Mounting Pattern
(W x H mm)
FDU***CBS
FDU***CBR
FDU***CSA
43"
200 x 200mm
200 x 200mm
49"
200 x 400mm
/
50"
/
200 x 400mm
55"
400 x 400mm
400 x 200mm
65"
400 x 400mm
400 x 200mm
INSTALLATION
WARNING
When installing ceiling plate on cinder block, verify first
that you have a minimum of 1⅜" of concrete thickness
to be used for the concrete wall anchors (not included).
Do not drill into mortar joints! Be sure to mount in a
solid part of the block, generally 1" minimum from the
side of the block. Cinder block must meet ASTM C-90
specifications. It is suggested that a standard electric
drill on slow setting is used to drill the hole instead of a
hammer drill to avoid breaking out the back of the hole
when entering a void or cavity. Concrete must be 2000
psi density minimum. Lighter density concrete may not
hold anchor.
CAUTION
Never try to hang a TV by yourself. Always use at
least two people to lift the TV into place.
!!IMPORTANT!!
Ɣ
Handle the TV in a vertical position to avoid
damage to the screen. If placing the TV screen-side
down or leaning against a wall during installation,
cover the screen with a protective cloth or blanket.
Ɣ
Check your TV manual before attaching brackets
to TV. Some models require attaching soundbar
brackets in tandem with attaching TV brackets.
Determine the correct length and diameter of screws
based on your TV hole patterns.
Ɣ
If your TV back is flat, use the shorter screws with
washers.
Ɣ
If your TV back is irregular or curved, use the longer
screws with washers and spacers (K).
* For Furrion Aurora™ TV, please use the screw size
M6x16 (D) and washers (J) to attach the TV bracket
to TV back.
Assemble the configured TV bracket on the back of
Furrion Aurora™ TV by using
(D)
(J)
4 x M6x16 screws (D) and
washers (J). Ensure the
bracket is vertically centered
and
leveled
. Tighten the screws (D) to ensure the TV
bracket securely attached on TV back.
WARNING
Make sure to use the correct length screw for your
TV. A screw that is too long might damage your TV.
WARNING
Do not drill into mortar joints. Be sure to drill holes
centered within studs or bricks.
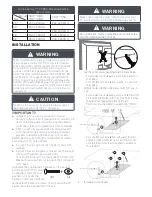
1.
Use the ceiling plater paper template to mark below:
-
For wooden roof installation, mark A, B, C and D in
the ceiling.
-
For concrete roof installation, mark a, b, c and d on
the ceiling.
2.
Drill pilot holes into the circle marks (A, B, C, D or a, b,
c, d).
-
For wooden roof installation, using a ¼" (6 mm) drill
bit to drill 4 pilot holes (A, B, C and D). Then remove
the wall mount paper template from wall.
Pilot holes must be drilled to a depth of 3" (75mm).
1
B
A
C D
For wooden roof: 3" (75mm)
2
-
For concrete roof installation, using a ⅜" (10 mm)
drill bit to drill 4 pilot holes (a, b, c and d) into solid
concrete. Pilot holes must be drilled to a depth of
19⁄16" (40mm).
1
c
a
b
d
For concrete roof: 19⁄16" (40mm)
2
3.
Installation continued:
Size
Model


