background image

First-time Setup


3.12 

3.4


Home Screen Introduction 

 
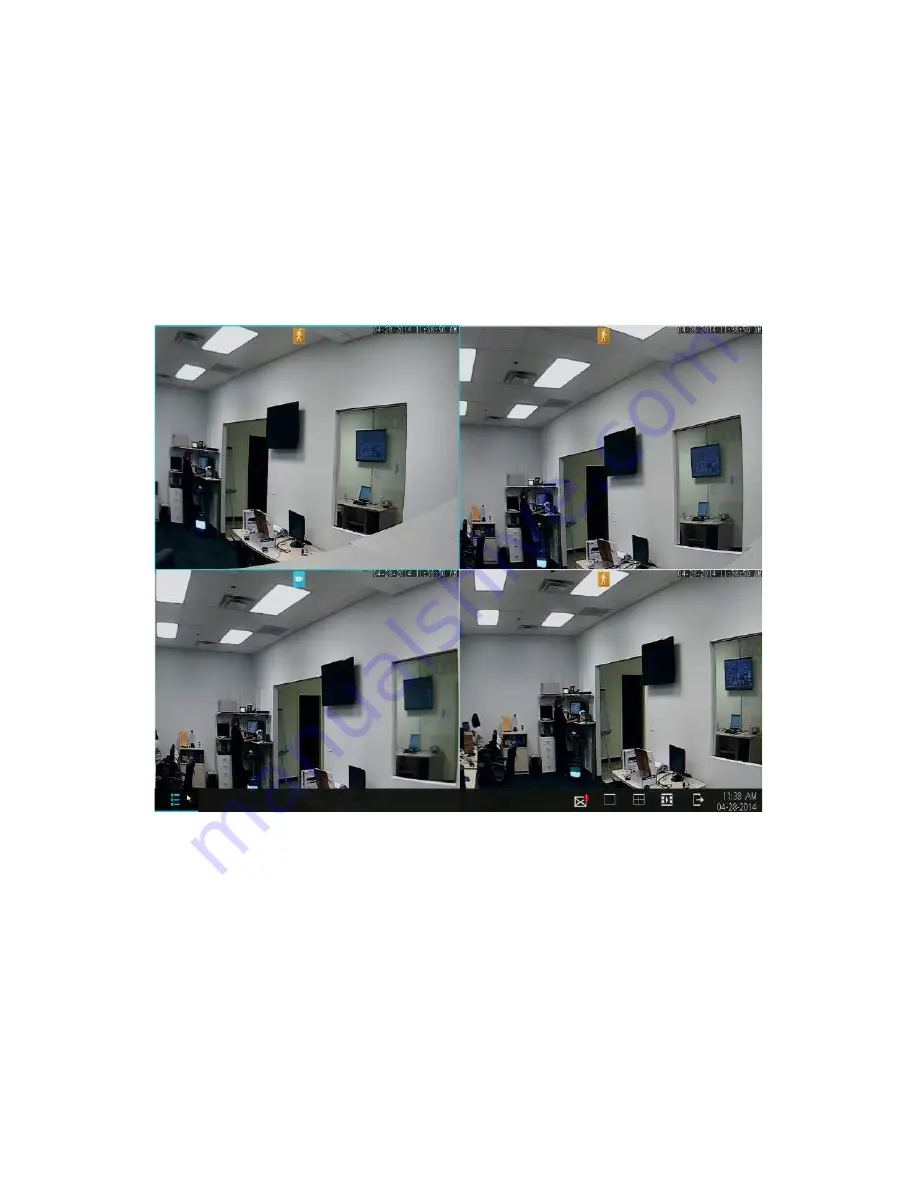
The home screen is the main screen of your NVR, displaying the live-video stream 
from the connected cameras.  There are several viewing options available locally 

on your NVR. By default it will be set to the quad-screen view with the live-video 
streams from all four camera feeds.  To access the new 

quick-menu

, move your 

cursor to the bottom of the screen using your mouse or press the menu button 
on your remote.   


Содержание ZP-IBT15-S

Страница 1: ...1...

Страница 2: ...2...

Страница 3: ...ns Features 2 6 Front Panel 2 7 Rear Panel 2 7 Mouse 2 8 First time Setup 3 1 3 3 1 NVR Installation 3 1 HDD Installation 3 1 Connecting your NVR 3 5 Connecting an External Alarm 3 6 3 2 Camera Instal...

Страница 4: ...Camera Controls 4 18 Image Setting 4 18 Zoom 4 19 Playback 4 20 4 3 Remote viewing Setup 4 22 4 4 Updating your NVR 4 26 From your NVR via USB 4 26 Support 5 1 5 5 1 Troubleshooting 5 1 5 2 Warranty...

Страница 5: ...ins important information prior to reading the manual and installing the system It overviews the manual purpose and conventions to aid in installation and covers minimum system requirements to ensure...

Страница 6: ...Manual Conventions This manual uses several symbols typographies and abbreviations that carry specific definitions In order to properly follow instructions please familiarize yourself with the followi...

Страница 7: ...VR near any heat sources and avoid direct sunlight Make sure there is good air circulation where the NVR is installed Install the NVR in a stable environment Handle the NVR carefully and avoid collisi...

Страница 8: ...oblems capturing HD videos from up to 80ft away Instant email notifications and multiple live streaming and recording options make your NVR available and accessible anywhere at anytime Using next gene...

Страница 9: ...rface 1 RJ45 10M 100M self adaptation 4 independent 10 100 Mbps Ethernet interfaces USB Interface 2 USB 2 0 inputs Alarm Inputs Output 4 channel sensor inputs 1 channel alarm output General Applicatio...

Страница 10: ...rast saturation Network Alarm Trigger Intelligent motion detection Alarm Response Email notification video recording snapshot buzzer Network Protocols TCP IP UDP DNS DDNS SMPT UPNP DHCP HTTP etc ONVIF...

Страница 11: ...Product Introduction 2 4 2 3 Package Contents Before proceeding with any setup procedures please make sure that your package includes the following contents...

Страница 12: ...14 S 2 15m 50ft Camera sPoE Cables 2 25m 80ft Camera sPoE Cables 1m 3ft CAT5e Network Cable USB Mouse IR Remote Control AAA batteries 19V 3A Power Adapter Quick Installation Guide 4 Wall Mount Screw P...

Страница 13: ...and optimizes storage by increasing recording quality when a critical event occurs Multitasking Users can view record playback backup live view and remotely access the NVR simultaneously from multipl...

Страница 14: ...Product Introduction 2 7 Front Panel Rear Panel...

Страница 15: ...Product Introduction 2 8 Mouse...

Страница 16: ...estern Digital Caviar Green AV GP hard drives or Seagate Pipeline hard drives that are specifically engineered for use in security camera environments We also suggest that you make your purchase from...

Страница 17: ...e Setup 3 2 1 Make sure your NVR is unplugged from its power source and slide the top panel off of the NVR 2 Connect the SATA power and data cables from the NVR to the corresponding ports on your HDD...

Страница 18: ...he HDD into the NVR with the cables placed as shown 4 Holding the hard drive and the NVR gently turn it over and line up the holes on the hard drive with the holes on the NVR Using a Phillips screwdri...

Страница 19: ...holes on the back panel and the two holes on the sides 6 When you power on your system you will see a popup asking you to format your HDD Press OK and wait 5 10 minutes NOTE If you do not see this pop...

Страница 20: ...he provided PoE cables as shown Please refer to 3 2 Camera Installation for specific instructions 2 Connect your display to the VGA input on the system as shown 3 Connect your system to a nearby power...

Страница 21: ...ow you how to plug in the wires from the external system to the NVR 1 Push the orange tab on the alarm port with your finger nail or pen in order to open the spring loaded connection 2 With the orange...

Страница 22: ...r system will attempt to add your cameras automatically Please wait 3 5 minutes for this process to complete If your system has not automatically added the cameras proceed to step 4 for manual setup 4...

Страница 23: ...dd to automatically search for IP cameras Please wait 3 5 minutes for the system to automatically add all of the cameras 6 Once you see a live video stream your setup is complete If you were unable to...

Страница 24: ...plastic anchor screw drill a 1 deep hole in each of the three marked locations 4 Insert anchor screws Place the anchor with the closed end evenly into the hole Gently tap the open end until the ancho...

Страница 25: ...tup Power on your NVR and double click anywhere on the screen On the login screen a Startup Wizard will appear to help you quickly setup your NVR Please follow the on screen instructions to quickly an...

Страница 26: ...ystem will automatically set the date and time settings through the internet connection If you do not enable this you will need to manually input the date and time in the corresponding forms Name phon...

Страница 27: ...m from the connected cameras There are several viewing options available locally on your NVR By default it will be set to the quad screen view with the live video streams from all four camera feeds To...

Страница 28: ...new notification icon to view more details Single View This option enables you to quickly view one camera feed in full screen Click on the icon to select the camera feed to view For further live vide...

Страница 29: ...ings menu to manage accounts change the date time change the live video streaming options and settings view the system events log view hard disk information view and upgrade your firmware and restore...

Страница 30: ...r account from the menu and selecting a function to perform Date Language Use this menu to change the date time settings and the language settings of your NVR NTP Enabling the Network Time Protocol NT...

Страница 31: ...age otherwise all changes will be lost Channel Name You may set a name to describe the camera feed on your NVR For example if you have set up a camera in the front yard on channel 1 you could name it...

Страница 32: ...e activated motion sensors activated alarms etc Use this menu to review the system log of all event notifications Series Numbers the events in sequence Type Describes the type of notification Alarm Sy...

Страница 33: ...e capacity the NVR will either stop recording or overwrite the older playback files The overwrite feature is generally recommended Refresh Update the HDD information shown on the page Total Space The...

Страница 34: ...artup guide to appear refer to 3 3 NVR First time Startup The startup guide will appear the next time the system is powered on Please refer to the following instructions to upgrade the firmware from t...

Страница 35: ...Using the NVR 4 7 Help FAQ Funlux offers comprehensive support for our users This page provides links to some of our resources that will help guide you to a maximal experience of our products...

Страница 36: ...5 minutes for this process to be completed Search for Devices Select to search for devices with the same protocol A pull up menu will appear for you to manually select the devices to add Auto Add Wil...

Страница 37: ...o add to the system 4 Press Add Device Manually to add the device by inputting the specific MAC address of the connected camera Video Stream Settings Adjusts the video quality frame rate resolution an...

Страница 38: ...ndwidth Resolution Change the resolution of the video stream QVGA 320x240 Streaming Bit Rate This is the type of bit rate that the NVR uses to view video from the camera VBR stands for the variable bi...

Страница 39: ...s you are an advanced user we do not recommend that you change these settings These definitions are not sufficient for manual networking and configuration Web Port This designates the port used when a...

Страница 40: ...ge to set up a DDNS Dynamic DNS Server for remote surveillance please refer to the knowledge base for full instructions UPNP UPNP Universal Plug and Play is a protocol used to establish network connec...

Страница 41: ...events motion detection and alarms in the playback menu Use this menu to define critical events and best optimize recording and storage on the system Record Mode The system has two available recordin...

Страница 42: ...ng the page otherwise all changes will be lost 1 Choose a channel to edit Select a channel under the dropdown menu next to Channel and select the box next to the channel in order to turn on motion det...

Страница 43: ...al Alarm c Alarm Duration will adjust how long both the buzzer and the alarm output will sound after motion is detected NOTE The alarm will sound continuously while motion is being detected d Snapshot...

Страница 44: ...l or exiting the page otherwise all changes will be lost 1 Choose an alarm to edit In the dropdown menu choose an alarm and select On to enable the alarm input Choose the type normally open or normall...

Страница 45: ...ack panel see 3 1 NVR Installation Connecting an External Alarm c Alarm Duration will adjust how long both the buzzer and the alarm output will sound after motion is detected d Send E mail The NVR wil...

Страница 46: ...trols by double clicking on the desired channel feed and a blue menu will appear as shown The icons represent the three control features image settings zoom and playback Image Setting This will adjust...

Страница 47: ...ne Select scene of operation for optimal white balance Adjust the brightness settings of the camera Adjust the color saturation of the camera Adjust the contrast settings of the camera Zoom Selecting...

Страница 48: ...hannel of your recording on the right panel under Channel When you select a channel it will be highlighted in blue 2 Select the month and year on the calendar in the right panel The days that are high...

Страница 49: ...he days 3 Under Event choose which type of recording that you want to search for You can choose normal alarm triggered or motion triggered recordings only or you can choose all recordings 4 Choose the...

Страница 50: ...r revolutionary user friendly setup we have eliminated the need for complex port forwarding procedures and other networking hassles Our product servers will automatically authenticate and configure yo...

Страница 51: ...your NVR Please make sure your mobile device is connected to the internet through the same wireless router as your NVR 3 Open the Zsight app on your mobile device and select the icon Open the Zsight...

Страница 52: ...tion by pressing the button as shown in the pictures Point your camera at the QR code on your device and hold it steadily until it scans successfully b Find the 10 digit device ID obtained from Step 1...

Страница 53: ...list Make sure that a live video stream from your NVR appears 7 Disconnect from your wireless network and access the NVR using 3G 4G Connect your mobile device to a different internet connection from...

Страница 54: ...ratulations Thank you for choosing Funlux 4 4 Updating your NVR From your NVR via USB Please refer to the following instructions to upgrade the firmware from the system required a USB drive 1 Download...

Страница 55: ...and check if the POWER LED indicator is on If so your monitor may be off or it may not be properly plugged into your NVR 2 If the unit is connected to the power outlet through a surge protector make s...

Страница 56: ...ress the Search for Device function and a list will appear You will have to select the device with the corresponding MAC address that is shown on your IP camera Alternatively you can directly add the...

Страница 57: ...d other items assembled after purchase must be unassembled and returned in the manufacturer s original packaging All returns will be inspected and products found to be non conforming will be rejected...

Страница 58: ...we will charge the full amount that was authorized on the credit card Subject to availability Funlux will ship product on the same day the RMA is generated Missing Parts Procedure In the event that y...

Страница 59: ...sponsible for arranging shipment of the returned defective item s from the US to the customer s international location In the event that we decide to issue store credit to a customer to reimburse for...

Страница 60: ...en altered obliterated or removed has not been handled or packaged correctly has been sold as second hand or has been resold contrary to US export regulations This limited warranty covers only replace...

Страница 61: ...b zmodo com Technical Support If you ever have any problems setting up or using this product call our TOLL FREE number for additional assistance 866 551 6881 Telephone Service Hours Mon Fri 8 00am 8 0...

Отзывы: