


In order to access the Time and Day menu, just give a short touch on the key. Through
the or keys it is possible to navigate among the parameters. In order to edit them press
the
SET
key and through the or keys update its value. By pressing once again the
SET
key, you return to the parameter menu.
Clock - Time settings.
Day - Day of the week settings.
Adjustable from 1 (Sunday) to 7 (Saturday).
NOTICE:
The controller is equipped with a lithium rechargeable battery in order to keep its
date and time in the case of an energy shortage. A fully charged battery can provide
enough energy to keep the time and date running for some weeks. If the controller
remains turned off for a prolonged period of time, it will display the message
[ECLO]
, in this case the controller's date and time has been lost due to low battery
and the user must adjust it again. To completely recharge a dischaged battery, keep
the controller turned on for at least 10 hours.
Obs.:
In the parameter menu, to leave and return to normal operation (preferential
indication of temperature and time) maintain the
SET
key pressed (long touch) until the
message
[----]
.appears. When the Fahrenheit temperature scale is selected, the
clock acquires the 12h standard, and the AM and PM icons are used for time indication. In
this scale, the Time and Day messages of the parameter description are replaced by Time
and Day in the controller display.
5.4.1 FILTERING OFF MODE
5.5 TIME AND DAY SETTINGS
To enable/disable filtering off mode, the button should be pressed for 4 seconds.
OFF: filtering turned off. In this mode, the events schedule is
ignored, the filtering output turned off, resulting in reduced
power consumption.
Note:
When adjusting the filtering mode, the controller changes into the new mode 5
seconds after your selection. This is also the time required for the parameter to be stored
in its memory.
5.6 EVENT SCHEDULE SETTINGS
4 segundos
off
AUX
If it is not necessary to use all 4 events, you should set these in the turned off state, by just
increasing the final time until
[,OFF]
appears. It is possible to set an event that begins in
one day and finishes in another. To do so you should raise the final event time until
[,CRo]
appears and set on the following day the initial event with time on
[00:00]
.
To set the event schedule associated to the support outlet, you should hold the key for
4 seconds.
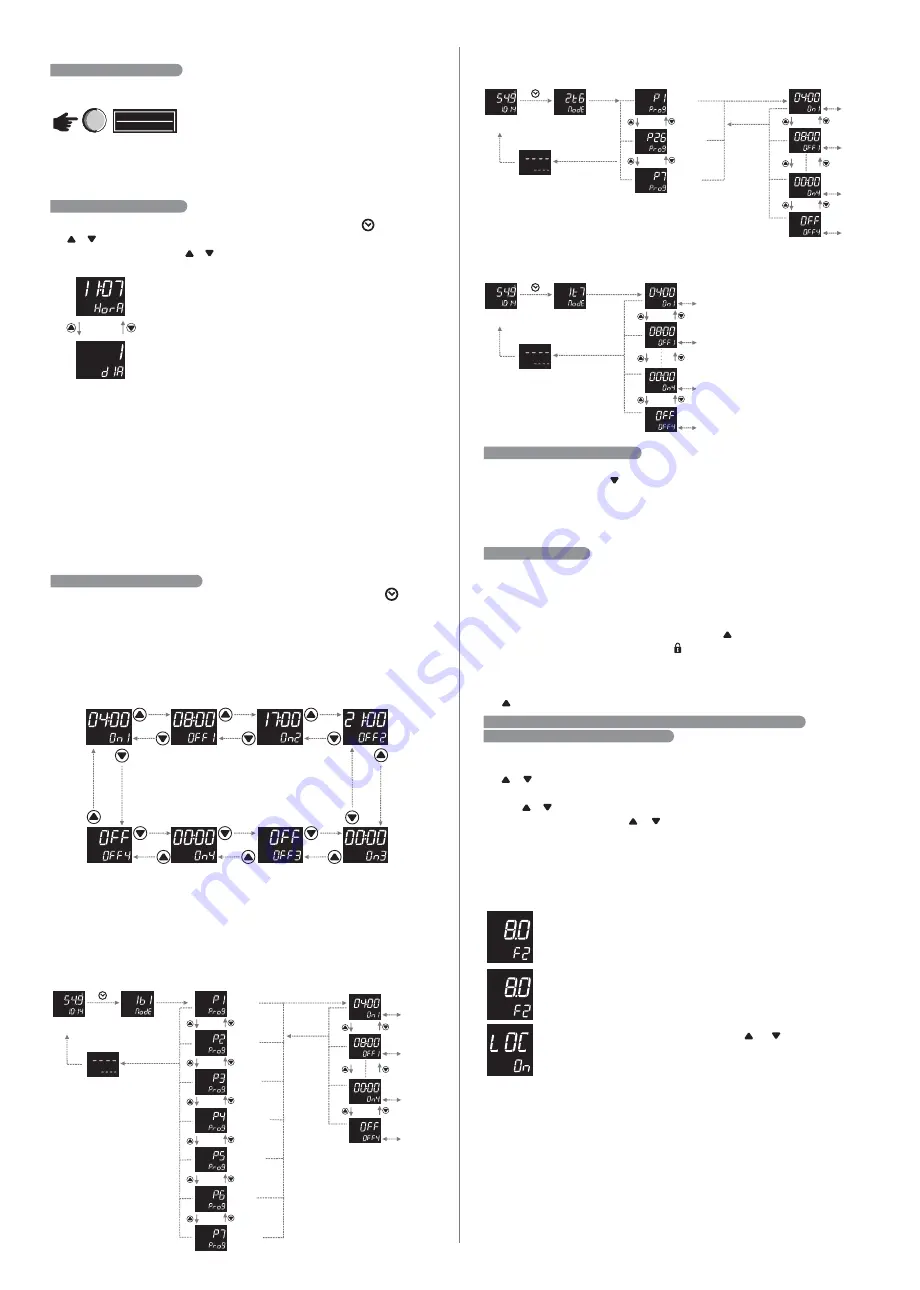
The schedule allows setting up to 4 events for each day of the week, as the programming
performed in parameter
[,F11]
- Filtering events schedule operating mode. Each event
is comprised by a final and initial schedule.
The event schedule gets factory settings in mode
[,1t7]
, same events for each day of
the week, and the schedules are defined as follows:
am pm
Hold for
4 sec.
2 seconds
am pm
am pm
SET
Long touch
Preferential
indication
Weekly
programming
Sunday
Monday
Tuesday
Wednesday
Thursday
Friday
SET
Short touch
SET
Long touch
According to the set operation mode, the following programming possibilities may be
presented:
Programmed case
[,F11]
=
[,1B1]
Programmed case
=
[,2T6]
[,F11]
SET
Adjustment
Short touch
SET
Adjustment
Short touch
SET
Adjustment
Short touch
SET
Adjustment
Short touch
am pm
Hold for
4 sec.
2 seconds
SET
Long touch
Preferential
indication
Weekday
Programming
am pm
am pm
Sunday
Weekdays
Saturday
SET
Short touch
SET
Long touch
SET
Adjustment
Short touch
SET
Adjustment
Short touch
SET
Adjustment
Short touch
SET
Adjustment
Short touch
Programmed case
[,F11]
=
[,1T7]
am pm
Hold for
4 sec.
2 seconds
SET
Long touch
Preferential
indication
Daily
programming
SET
Adjustment
Short touch
SET
Adjustment
Short touch
SET
Adjustment
Short touch
SET
Adjustment
Short touch
5.8 FUNCTION BLOCK
For security reasons and in order to avoid unauthorized people changing the controller
settings, there is the function block resource. With that setting activated, the parameters
cannot be changed, but they can be displayed, however. In the block condition, upon trying
to change the value of a parameter the message ‘‘
[,LOC][,,ON]
no display" will be
displayed.
To enable/disable the function block you should hold the key for the time set in parameter
[,F14]
– Time for function block. The icon indicates the block state to the user, in case
it is accessed, it indicates that the function block is active.
HINT:
with active function block one avoids that children, visitors or curious people change
the operation mode or the controller parameters. When some change is needed, just hold
the key to enable/disable this resource.
Initial time for the
1st event
End time for the
1st event
Initial time for the
2st event
End time for the
2st event
End time for the
3st event
Initial time for the
3st event
End time for the
4st event
Initial time for the
4st event
1 second
1 second
1 second
5.7 VIEW OTHER TEMPERATURES
To switch the temperature display of sensor T1, sensor T2 or the differential sensor (T1-
T2) give short touches on the key until the desired temperature is displayed. In the upper
display numbers the temperature measure is presented and in the lower display numbers,
the sensor description. The selected temperature will be displayed during 10 seconds.
After, which the preferential indication is again displayed, as set in parameter
[,F01]
–
Preferential Indication.
6. ADVANCED OPERATIONS FOR THE INSTALLER (TECHNICAL USE)
6.1 CONTROLLER PARAMETERS CHANGE
Access the settings menu holding the
SET
key for 4 seconds until
[FuNc]
appears.
After that
[Code]
will appear and then press once again the
SET
key, short touch. Use
the or keys to enter the access code value, 123, and when ready press the
SET
key
once again (short touch).
Use the or keys to select the desired function. With a short touch to the
SET
key it’s
possible to edit its value. Use the or keys to change the value, and when ready give a
short touch on the
SET
key to memorize the set value and return to the function menu.
To leave the menu and return to normal operation (temperature indication) hold the
SET
key (long touch) until
[----]
appears.
- Upon accessing the parameter settings, the upper display will flash and over
it the
SET
icon is displayed, indicating that it is possible to change the
parameter value.
Observations:
SET
am pm
- If the 123 code has not been inserted, upon accessing the parameter settings
the icon will be displayed over the upper display, indicating that the
setting is locked.
- With active function block, upon pressing the or keys to change the
function value, the controller will display the
[,LOC][,,On]
message on
the screen and it won't be possible to perform the parameter setting.
LOC
LOC
LOC
F
F
Saturday


