


Lag Operation Setting
If the room temperature remains high while after starting
the Lead lag operation, the stopped indoor unit will start the
operation.
During the Lag operation, blinks on the remote controller
display.
When the room temperature approaches to the set tempera-
ture, the Lag operation finishes.
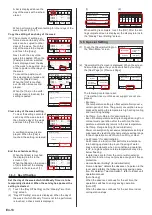
(9) Touch the [Lag Operation] on the “Lead Lag” screen.
(10) “Lag Operation” screen is displayed. Touch the [Enable]
or [Disable].
(9)
(10)
Backup Units
[2/16]
[Enable]
Lag Operation
Lead Lag Setting
Page 2/ 2
Back
Previous
Page
Lag Operation
Cancel
OK
Enable
Disable
When touching [OK], the display returns to the “Lead Lag”
screen.
Lead lag operation enable/disable
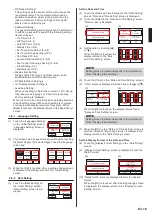
(11) Touch the [Enable/Disable] on the “Lead Lag” screen.
(12) “Enable/Disable” screen is shown. Touch the [Enable] or
[Disable].
(11)
(12)
Enable/Disable
[Enable]
[7 Day]
[10min.]
Cycle
Over Lap Time
Lead Lag Setting
Page 1/ 2
Next
Page
Back
Enable/Disable
Cancel
OK
Enable
Disable
When touching [OK], the Lead lag operation starts or stops.
The display returns to the “Lead Lag” screen.
If you enable the Lead lag operation while the air condition-
ers are stopped, they start the operation following the Lead
lag setting.
If you disable the Lead lag operation, each indoor unit keeps
the current operation/stop status.
Quit the Lead lag setting
To quit the Lead lag setting, touch
[Back].If the Lead lag operation
is enabled, the screen moves to
the monitor mode screen. If it is
disabled, the screen moves to the
“Initial setting” screen.
Enable/Disable
[Enable]
[7 Day]
[10min.]
Cycle
Over Lap Time
Lead Lag Setting
Page 1/ 2
Next
Page
Back
3-10 Maintenance (for administrator)
Verification, operation, and setting for administrator informa
-
tion are performed.
(1) Touch the [Maintenance] on the “Main Menu” screen.
(2)
When “Password Verification” screen is displayed, enter
the Password (or Installer Password) and touch [OK].
(1)
(2)
Monitor
Previous
Page
Page 3/ 3
Main Menu
Maintenance
0
CL
5
1
6
2
7
3
8
4
9
Cancel
OK
Password Verification
Enter Current Password
(3) If the password is entered correctly, the “Maintenance”
screen is displayed. The screen has 3 pages which are
switched by touching the [Next Page] or [Previous Page].
Back
Next
Page
Page 1/ 3
Maintenance
Error History
Setting
Status List
Version
Filter Sign
Reset
Previous
Page
Back
Next
Page
Page 2/ 3
Maintenance
Test Run
R.C. Address
Setting
Function Setting
I.U. Address
Verification
Back
Previous
Page
Page 3/ 3
Maintenance
Initialization
Installer Password
Change
Display Sensor
Values
Verification, operation, and setting of the following con
-
tents are performed. (♦: for installer)
(*: Items that indoor unit does not support are not dis
-
played.)
•
Error History:
The error history can be verified/cleared.
•
Setting Status List:
The status of each setting can be verified as a list.
•
Filter Sign Reset*:
After the indoor unit filter is cleaned, the filter sign can
be reset.
•
Version:
The software version No. of this unit can be verified.
•
Test Run ♦
•
R.C. Address Setting ♦
•
Indoor Unit Address Verification ♦
•
Function Setting ♦
•
Display Sensor Values* ♦
•
Installer Password Change ♦
•
Initialization ♦
When the [Back] is touched at settings other than initial-
ization, the display returns to the “Main Menu” screen.
When initialization is performed, the setting screen at
initial starting is displayed.
3-10-1 Error History
(1) Touch the [Error History] on
the “Maintenance” screen.
Back
Next
Page
Page 1/ 3
Maintenance
Error History
Setting
Status List
Version
Filter Sign
Reset
(2) “Error History” screen is displayed. When the screen
has multiple pages, they can be switched by touching
the [Next Page] or [Previous Page].
11:00
2:53
8:53
11:00
11:00
11:00
1 2015/ 8/ 1
002-01
141
2 2015/ 7/30
002-02
143
3 2015/ 7/25
002-02
143
4 2015/ 7/22
002-01
141
5 2015/ 7/22
002-01
141
6 2015/ 7/21
002-01
141
Page 1/ 2
Error History
No. Date
Time
Address
Code
Back
Next
Page
Erase
All
AM
AM
AM
AM
AM
AM
11:00
2:53
8:53
11:00
11:00
7 2015/ 7/ 1
002-01
141
8 2015/ 7/10
002-02
143
9 2015/ 7/ 5
002-02
143
10 2015/ 7/ 2
002-01
141
11 2015/ 7/ 2
002-01
141
Page 2/ 2
Error History
No. Date
Time
Address
Code
Back
Previous
Page
Erase
All
AM
AM
AM
AM
AM
(3)
When the [Back] is touched after verification, the display
returns to the “Maintenance” screen.
En-22
Содержание UTY-RNRGZ5
Страница 27: ......


