background image

Working with the Tablet PC

Using the stylus

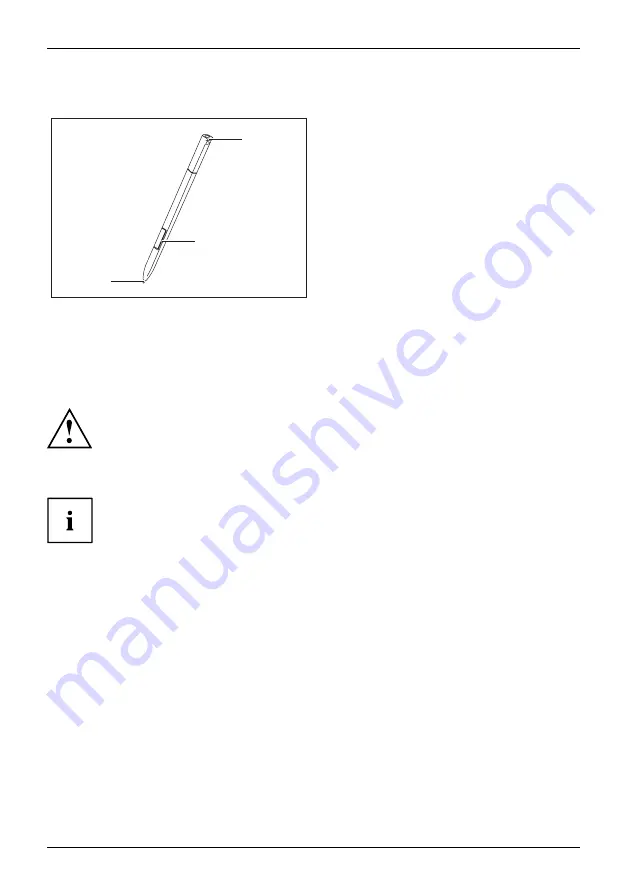
Stylus

1

2

3

1 = stylus tip

2 = stylus button (right mouse button)

3 = eyelet for stylus tether

You can use the stylus on your Tablet PC as an electronic writing tool, to select menu items and to
navigate through the programs. Programs that support handwriting recognition also allow you to
write directly on the screen with the stylus. You can also use the stylus as a drawing tool.

The Tablet PC is supplied with a stylus tether which you can attach to the
eyelets on the stylus and on the Tablet PC.

Use only the stylus that was provided with your Tablet PC. Do not use any other pointed
object as a substitute, that was not specially designed for your Tablet PC. Replace
the stylus tip if it is worn. The warranty does not cover a scratched screen.

While writing, take care that you do not scratch the surface of the
display (e.g. with a wristwatch or bracelet).

The stylus of the Tablet PC is an electronic instrument that can be damaged
if used improperly. Handle the stylus with care.

Our recommendations for proper handling of the stylus are as follows:

Do not gesture with the stylus.

Do not use the stylus as a pointer.

Do not use the stylus on surfaces other than the screen of the Tablet PC.

Do not try to turn the grip of the stylus. The grip is used to put the
stylus into its slot and to take it out of its slot.

Never store the stylus with its weight on the tip (e.g. with the tip down in a stylus
container). If the stylus is stored with the tip pointing down, this may have an
adverse effect on the stylus mechanism (particularly under high temperatures). In
this case the stylus tip may react as though it is constantly being pressed down. To
avoid damage, the stylus should be stored in the stylus slot when not in use.

The stylus can be in

fl

uenced by electromagnetic

fi

elds (cursor quivers or

jumps). There may be a few areas on the screen where the cursor quivers
slightly in spite of pressing the stylus down

fi

rmly.

28

Fujitsu

Содержание STYLISTIC Q507

Страница 1: ...System Operating Manual FUJITSU Tablet STYLISTIC Q507 ...

Страница 2: ...es Avenue Sunnyvale CA 94085 3470 U S A Telephone 800 831 3183 or 408 746 6000 http solutions us fujitsu com http solutions us fujitsu com contact Have a question Email us at AskFujitsu us fujitsu com Copyright 2017 Fujitsu America Inc All rights reserved FPC65 7795 02 ...

Страница 3: ... 9 Ports and controls 10 Important notes 13 First time setup of your device 18 Working with the Tablet PC 22 Accessories for your Tablet PC optional 38 Security functions 55 Connecting external devices 60 Settings in BIOS Setup Utility 64 Troubleshooting and tips 67 Technical data 74 Manufacturer s notes 80 Appendix 88 Index 100 ...

Страница 4: ...icrosoft and Windows are either registered trademarks or trademarks of Microsoft Corporation in the United States and or other countries The terms HDMI and HDMI High Definition Multimedia Interface and the HDMI Logo are trademarks or registered trademarks of HDMI Licensing LLC in the United States and other countries The ExpressCard word mark and logo are owned by the Personal Computer Memory Card...

Страница 5: ...dapter 19 Switching on the device for the first time 20 Installing Bonus Apps 21 Working with the Tablet PC 22 Status indicators 23 Switching the Tablet PC on 24 Programing the ON OFF button 24 Switching the Tablet PC off 25 Handwriting recognition 25 Touchscreen 26 Select display orientation portrait or landscape format 26 Touch commands 27 Calibrate the Digitizer for finger based operation of th...

Страница 6: ...e Security Lock docking cradle only 55 Configuring password protection in BIOS Setup Utility 55 Protecting BIOS Setup Utility supervisor password and user password 56 Password protection for booting the operating system 58 Password protection for the hard disk 59 Activating hard disk protection 59 Deactivating hard disk protection 59 Connecting external devices 60 Connecting an external monitor 60...

Страница 7: ...The battery discharges too quickly 72 Error messages on the screen 73 Technical data 74 Tablet PC 74 Screen resolutions for integrated screen and external screens 75 WLAN specifications 76 Rechargeable battery 77 AC adapter 36 W for the Tablet PC only without cradle 77 Docking cradle optional 77 AC adapter 65 W for the docking cradle optional 78 Keyboard cover optional 78 Intermediary VESA Mount P...

Страница 8: ...less LAN 92 Connection to the network 92 Troubleshooting the WLAN 93 Using the Bluetooth Device 95 Image Backup and Recovery Procedures 96 Windows 10 Procedures 96 Creating a recovery drive 96 Recovery options in Windows 10 96 Downloading driver updates 99 Index 100 6 Fujitsu ...

Страница 9: ...15 of the FCC rules Operations are subject to the following two conditions 1 This device may not cause harmful interference 2 This device must accept any interference received including interference that may cause undesired operation Declarationsofconformity This device complies with Part 15 of the FCC Rules Operations are subject to the following two conditions 1 This device may not cause harmful...

Страница 10: ...jitsu Shopping Online Please go to http www shopfujitsu com store Maintaining Latest Configuration To ensure that you always have the most current driver updates related to your system occasionally access the Fujitsu Software Download Manager FSDM utility The FSDM utility is available from the Fujitsu Support site FSDM will allow you to view a list of the most current drivers utilities and applica...

Страница 11: ...Name123 or a command used to start a program start exe This style indicates information that is displayed on the screen by a program e g Installation is complete This style indicates terms and texts used in a software interface e g Click on Save names of programs or files e g Windows or setup exe This style indicates Cross references to another section e g Safety information cross references to an...

Страница 12: ...ease familiarize yourself with these items before you start to work with the device Front 1 2 3 4 7 7 8 6 9 5 6 10 1 Touchscreen 2 Front webcam 3 Ambient light sensor 4 Webcam status LED blue 5 Power on indicator white 6 Speakers internal not visible 7 Mechanical mount for keyboard cover cradle 8 Docking port 9 Center alignment point 10 Battery charging indicator orange 10 Fujitsu ...

Страница 13: ...ted by cover 4 microHDMI port protected by cover 5 microSD card slot protected by cover 6 Battery charging indicator orange 7 DC input connector DC IN protected by cover Right side 2 3 4 5 6 7 1 1 USB 2 0 port protected by cover 2 Shortcut button 3 Volume down button 4 Volume up button 5 ON OFF button 6 Stylus garage 7 Tether eyelet Fujitsu 11 ...

Страница 14: ...Ports and controls Rear 1 1 1 1 3 4 2 5 5 1 Screw holes for mounting accessories device dependent 2 Webcam status LED 3 Rear webcam 4 Webcam flash 5 Dual microphones 12 Fujitsu ...

Страница 15: ...talling components during servicing Page 77 When handling this device you will come into contact with lead a chemical which in California is held to be a possible cause of birth defects and other damage to fertility Wash your hands after using the device Do not place objects or apply heavy pressure on your computer Do not apply too much force to the display corners Do not rotate display with exces...

Страница 16: ...isplay screen Do not pour liquids on the system or wash it with a heavily soaked cloth Do not place items on the top of the monitor in order to prevent it from being damaged During normal use of the device small particles from the environment can become embedded in the stylus tip and scratch the screen The warranty does not cover a scratched screen Energy saving Notes Energy Powersaving If you wil...

Страница 17: ...age If this is not the case obtain the appropriate AC adapter for your Tablet PC Do not use any other converter Check whether the local AC voltage and the AC cable are compatible If this is not the case buy an AC cable that suits the local conditions Enquire with the appropriate government office of the country you will be travelling in as to whether you may operate the wireless component integrat...

Страница 18: ...h a properly tuned X ray machine To avoid problems place it close to the entrance of the machine and remove it as soon as possible or have it hand inspected by security personnel Security officials may require you to turn your Tablet PC on So make sure you have a charged battery on hand for this Switch the Tablet PC off Unplug the AC plug of the AC adapter and all external devices from the power o...

Страница 19: ...ng your computer Be very careful to avoid any liquid entering the ports or slots as this can damage the unit Further information on cleaning the Tablet PC The touchscreen is very sensitive to scratches Only clean the display surface with a very soft slightly damp cloth Switch the Tablet PC off Reinigung Hinweise TabletPC Tastatur Touchpad Touchscreen To prevent the device from being switched on un...

Страница 20: ...the instructions on the screen NEVER switch off your device during the first time setup process The battery must be charged if you want to operate your device using the battery When used on the move the built in battery provides the device with the necessary power You can increase the operating time by using the available energy saving functions For instructions on how to connect external devices ...

Страница 21: ...ry surface Please note that the rubber feet of the device may mark certain types of delicate surfaces Keep other objects at least 100 mm 4 inches away from the device and its AC adapter to ensure adequate ventilation Do not expose the device to extreme environmental conditions Protect the device against dust humidity and heat Connecting the AC adapter Makingreadytouse ACadapter Observe the safety ...

Страница 22: ...m is pre installed on the hard disk 2 1 Press the ON OFF button 2 for about one second to switch the device on The power on indicator 1 lights up whenever the system is switched on During the installation process follow the on screen instructions You can find information and help on the Windows operating system functions on the Internet at http windows microsoft com 20 Fujitsu ...

Страница 23: ...heckbox adjacent to your selection or Click Select All if you would like to install all available applications Applications that are already installed appear in grey those that are available for installation appear in blue To confirm your selection click Install Note that in some cases depending upon which application was selected for installation after installation completes the system will promp...

Страница 24: ...hapter describes the basics for operating your Tablet PC You can find instructions on how to connect external devices e g mouse flash storage to the Tablet PC in the chapter Connecting external devices Page 60 Please refer to the notes in the chapter Important notes Page 13 22 Fujitsu ...

Страница 25: ...s less than 95 the battery will be charged to 100 as soon as the AC adapter is connected The indicator lights up orange The rechargeable battery is charging The indicator is not lit up The battery is not charging the battery is already fully charged or the AC adapter is not connected 2 3 Webcam status LED for front and rear webcam The indicator lights up blue The webcam is switched on while the Ta...

Страница 26: ...ormation The power on indicator 1 lights up whenever the system is switched on Programing the ON OFF button You can program the ON OFF button Operating system Menu Windows 10 Windows 10 Start Control Panel Search Control Panel Power Options Choose what the ON OFF button does If you have assigned a password you must enter this when requested to do so in order to start the operating system Detailed ...

Страница 27: ...eve the same effect as removing the battery press the reset button Handwriting recognition For detailed information on handwriting recognition see the documentation for your operating system At present handwriting recognition on Windows supports the following languages English German French Italian Japanese Korean Chinese traditional and simplified Dutch Portuguese Spanish Brazilian Norwegian Bokm...

Страница 28: ...al monitor In Windows 10 you can proceed as follows to set the output type Look for the keyword project Swipe your finger across the screen starting from the right hand edge Select All settings Look for the keyword project Select the required function Select display orientation portrait or landscape format You can choose to use either portrait or landscape for the display and the screen orientatio...

Страница 29: ...e first usage so that it recognises your fingertips as accurately as possible As soon as you notice that the accuracy is deteriorating you must recalibrate the device Please note There are separate calibration programs available for calibrating the stylus device dependent and for calibrating finger based operation Do not use the calibration tool for the stylus to calibrate finger based operation O...

Страница 30: ...ch or bracelet The stylus of the Tablet PC is an electronic instrument that can be damaged if used improperly Handle the stylus with care Our recommendations for proper handling of the stylus are as follows Do not gesture with the stylus Do not use the stylus as a pointer Do not use the stylus on surfaces other than the screen of the Tablet PC Do not try to turn the grip of the stylus The grip is ...

Страница 31: ...use button pressed Place the stylus tip directly on the object or window Keep the stylus tip held against the screen Drag the desired object or window Opening a context menu Click with the right mouse button Tap on the desired element with the stylus and keep the stylus pressed against the screen Moving the cursor Move the mouse Place the tip of the stylus directly on the screen Stylus location To...

Страница 32: ...pull it from the barrel Replace the tip with one of the new tips that were supplied with your stylus Insert the flat end of the tip into the barrel and exerting gentle pressure push it in until it is firmly in place If the tip is worn or damaged discard it Calibrating the stylus You must calibrate your Tablet PC with the stylus before first use so that it recognizes the stylus as accurately as pos...

Страница 33: ...ly dropping it or losing it Your device has one eyelet on the left side and one eyelet on the right side for securing the stylus tether see Ports and controls Page 10 The tether eyelet on the right side is shown below Fasten the stylus tether to the stylus eyelet and to the eyelet on the Tablet PC Fujitsu 31 ...

Страница 34: ...tted with three tablet buttons Symbol Description Functions Volume up button Increase volume Volume down button Decrease the volume Shortcut button Call the status area by pressing or start a screenshot function by a long press depends on configuration 32 Fujitsu ...

Страница 35: ...m Rechargeable battery Battery Battery Servicelife battery Rechargeablebattery Battery The built in battery provides the Tablet PC with the necessary power for use on the move You can increase the service life of the battery by caring for the battery properly The average battery service life is around 500 charge discharge cycles You can extend the battery service life by taking advantage of the av...

Страница 36: ...ata is held in main memory or in a swap file on the hard disk Never switch off the Tablet PC while it is in an energy saving mode If the built in battery is nearly drained close all open files and do not go into power saving mode If you do not intend to use your Tablet PC for a long period of time Exit the power saving mode if necessary via touching the screen or by switching on the Tablet PC Clos...

Страница 37: ...ory card 1 2 Open the slot cover 1 Carefully slide the storage card into the slot 2 The label area must be facing downward Do not apply any force otherwise the delicate contact surfaces could be damaged Memorycard Close the slot cover Fujitsu 35 ...

Страница 38: ...f the slot 1 Pull the memory card out of the slot 2 Close the slot cover 3 Wireless LAN Bluetooth wireless components The installation of wireless components not approved by Fujitsu will invalidate the certifications issued for this device Switching the wireless components on and off The wireless components are switched on and off using the appropriate functions of the operating system To switch w...

Страница 39: ...N specifications see chapter WLAN specifications Page 76 Ethernet and LAN docking cradle only EthernetLAN The internal network module of your Tablet PC supports Ethernet LAN You can use it to establish a connection to a local network LAN Local Area Network 2 1 Connect the network cable to the LAN port of the cradle 1 Connect the network cable to your network connection 2 Your network administrator...

Страница 40: ...vailable for your Tablet PC Docking cradle for charging the Tablet PC with additional ports Keyboard cover Intermediary VESA Mount Plate TPU cover with shoulder strap Folio cover Adapter cables microHDMI to VGA Full USB to LAN The following sections provide more information on handling the accessories 38 Fujitsu ...

Страница 41: ...10 11 9 1 Dock release button 2 Docking port 3 USB port 3 0 4 USB port 3 0 5 USB port 3 0 6 Microphone port 7 Headphones port 8 VGA monitor port 9 HDMI Port 10 LAN port 11 Security Lock device 12 DC jack socket DC IN With STYLISTIC Q507 the LAN port of the cradle supports Wake on LAN G3 only With STYLISTIC Q507 two additional external monitors can be connected either to the VGA monitor port or to ...

Страница 42: ... moisture and heat Connecting the Tablet PC to the cradle It is possible to connect the Tablet PC to the cradle while it is running However to prevent problems we recommend that you switch the Tablet PC off first Disconnect the AC adapter from the Tablet PC before connecting the Tablet PC to the cradle When the Tablet PC is connected to the cradle you must connect the AC adapter to the cradle to b...

Страница 43: ...ow 1 until you feel it engage on the connector and until the slide out position returns to its original position Your cradle is supplied with a separate AC adapter 19 V 3 42 A Make sure that you only use this AC adapter for the cradle Plug the AC adapter cable into the DC jack DC IN on the cradle 2 Connect the AC cable to the AC adapter 3 Plug the AC cable into the power outlet 4 Fujitsu 41 ...

Страница 44: ...arate the Tablet PC from the cradle while it is running 2 1 Press the slide out button in the direction of the arrow 1 until it firmly remains in pressed position red marking visible While holding down the lower part of the cradle lift the Tablet PC off the cradle in the direction of the arrow 2 42 Fujitsu ...

Страница 45: ...cover is an optimized device for the convenient input of text It only needs to be docked with the Tablet PC Components of the keyboard cover Keyboardcover Ports 3 1 2 1 Release button 2 Docking port for the Tablet PC 3 Status indicators Num Lock Caps Lock Scroll Lock Fujitsu 43 ...

Страница 46: ... attach the optional keyboard cover to the tablet and carry both using the TPU cover The keyboard cover and or tablet could be damaged 1 2 Press the release button 1 until it remains in the pressed position red marking becomes visible Push the Tablet PC onto the keyboard cover in the direction of the arrow until you feel it engage on the connector 2 and until the release button returns to its orig...

Страница 47: ...Disconnecting the Tablet PC from the keyboard cover 1 2 Press the release button 1 until it remains in the pressed position red marking becomes visible Lift the Tablet PC away from the keyboard cover in the direction of the arrow 2 Fujitsu 45 ...

Страница 48: ...th the corresponding screw holes for example The Intermediary VESA Mount Plate cannot be used in combination with the TPU cover with shoulder strap Use the appropriate tool of the correct size when securing the screws Keep the screws out of the reach of children 2 1 1 1 1 3 3 3 3 Remove the covers from the screw holes on the rear of the Tablet PC 1 Position the Intermediary VESA Mount Plate on the...

Страница 49: ...r strap 3 Rubber stopper in plastic bag for use in combination with keyboard cover 4 Fujitsu warranty 5 Accessory User Guide Inserting the Tablet PC in the protective TPU cover Lay the TPU cover on the table 1 2 Place the Tablet PC with the display side face up 1 and with the dock connection side forward into the corners of the TPU cover Allow the Tablet PC to click into place in the TPU cover 2 F...

Страница 50: ...Accessories for your Tablet PC optional a 3 3 If required secure the shoulder strap 3 at two of the four holders a of the TPU cover Adjust the length of the shoulder strap 48 Fujitsu ...

Страница 51: ...d cover To install the rubber stopper Fold in the connector side of the keyboard cover Remove backing paper from the adhesive strip on the rubber stopper 2 1 3 Carefully align the rubber stopper 2 and apply rubber stopper into the support cavity 1 in the direction of the arrow 3 Apply finger pressure along the stopper to activate adhesive bonding process Fold out the connector side of the keyboard...

Страница 52: ...e direction of the arrow until you feel it engage on the connector 5 and until the release button returns to its original position To prevent damage to the system never fold the Tablet PC on the keyboard cover if the Tablet PC is in the TPU cover Do not attach the optional keyboard to the Tablet PC and do not carry both using the TPU cover The keyboard cover and or Tablet PC could be damaged 50 Fu...

Страница 53: ...Accessories for your Tablet PC optional To disconnect the unit from the keyboard cover proceed as described in section Disconnecting the Tablet PC from the keyboard cover Page 45 Fujitsu 51 ...

Страница 54: ...gainst the storage surface of the cradle Carefully push the unit onto the cradle in the direction of the arrow 1 until you feel it engage on the connector and until the slide out position returns to its original position To disconnect the unit from the docking cradle proceed as described in section Disconnecting the Tablet PC from the cradle Page 42 52 Fujitsu ...

Страница 55: ...t the device is secured in the corresponding retainers of the folio cover The folio cover is only designed for the safe storage and secure transportation of the device Do not use the folio cover for other purposes Keep the folio cover away from fire or heaters Do not expose the folio cover to direct sunlight high temperatures or moisture 1 2 Place the Tablet PC with the display side face up 1 and ...

Страница 56: ...e for the device microHDMI to VGA VGA Conversion Adapter Kit 1 x microHDM to VGA cable Maximum resolution 1920 x 1080 Full USB to LAN LAN Conversion Cable Kit 1 x Full USB to LAN GbE limited performance For technical specifications see chapter Adapter cables optional Page 79 54 Fujitsu ...

Страница 57: ...ance Using the Security Lock docking cradle only SecurityLock Anti theftprotection SecurityLock Your docking cradle optional is equipped with a Security Lock device for a Kensington Lock Cable You can use the Kensington Lock Cable a sturdy steel cable to protect your docking cradle against theft The Kensington Lock Cable is available as an accessory Fit the Kensington Lock Cable to the fixture on ...

Страница 58: ...d Enter the password and press the Enter key Confirm new Password requires you to confirm the password Enter the password again and press the Enter key Changes have been saved is displayed as a confirmation that the new password has been saved To set the user password select Set User Password and proceed exactly as when configuring the supervisor password If you do not want to change any other set...

Страница 59: ...d field and press the Enter key You will be requested to enter the current password by the Enter Current Password prompt Enter New Password will appear and you will be requested to enter a new password Press the Enter key twice at this request In the Exit menu select the option Save Changes Exit Select Yes and press the Enter key The Tablet PC is rebooted and the password is removed Removing the s...

Страница 60: ...oot and press the enter key If Disabled is selected a password is not required and you cannot protect the system deactivates system protection Select the Save Changes Exit option under Exit The Tablet PC reboots You will be prompted to enter your password the supervisor password Deactivating system protection Start the BIOS Setup Utility and go to the Security menu Operatingsystem Select the Passw...

Страница 61: ...way as for the set up of the first hard disk Drive0 The field Password Entry on Boot is set to Enabled by default You can exit the BIOS Setup once you have finished changing the settings From the Exit menu choose the option Exit Saving Changes Press the Enter key and select Yes The Tablet PC reboots and your hard disk is now protected with a password The password prompt is enabled as soon as the T...

Страница 62: ...o be switched off please refer to the documentation supplied with your external device Some of the external devices require special drivers see the operating system and external device documentation Connecting an external monitor Micro HDMI port HDMIport The micro HDMI port on your device can be used to connect an external amplifier LCD TV or a plasma TV with an HDMI connection Connect the data ca...

Страница 63: ...alog VGA monitor port Screen output is limited to a maximum of two screens at the same time Monitor VGAport Screenconnection Monitorconnection Switch off the Tablet PC and the external monitor Plug the data cable of the external monitor into the monitor port First switch on the external monitor and then switch on the Tablet PC You can also switch back and forth between the external monitor and the...

Страница 64: ...1 has a data transfer rate of up to 10 Gbps Additional information can be found in the documentation for the USB devices Connect the data cable to the external device Connect the data cable to a USB port on the Tablet PC or cradle Device drivers USB devices will be automatically recognized and installed by your operating system How to remove USB devices correctly Always correctly remove the device...

Страница 65: ... PC or to the headphones port of your docking cradle optional The internal speakers are disabled If you purchase a cable from a retailer please note the following information The combined headphones and microphone port on your Tablet PC is a 3 5 mm jack socket If you want to connect headphones or a speaker you will need a 3 5 mm jack plug Connecting a microphone or other audio input devices Audiod...

Страница 66: ...on as you save and exit the BIOS Setup Utility The BIOS Setup Utility program contains the following menus Info Displays information relating to the BIOS processor and Tablet PC System Advanced system settings Advanced Configuration of various hardware components such as mouse keyboard processor Security Password settings and security functions Boot Configuration of the start up sequence Exit Exit...

Страница 67: ...he BIOS Setup Utility With the F9 key you can load the default settings of the BIOS Setup Utility Use the cursor keys or to select the menu you wish to access to make changes The menu is displayed on the screen Select the option you want to change with the cursor keys or Press the Enter key Press the ESC key to exit the selected menu For future reference make a note of the changes you have made fo...

Страница 68: ...ndard entries for all menus of the BIOS Setup Utility choose Load Setup Defaults and Yes Discard Changes Discard Changes without exiting BIOS Setup Utility To discard the changes you have made select Discard Changes and Yes The settings in place when BIOS Setup Utility was called remain effective You can now make additional settings in the BIOS Setup Utility If you want to exit the BIOS Setup Util...

Страница 69: ... the messages that appeared on the screen and information on acoustic signals All changes you have made to the hardware or software after receiving the Tablet PC All changes you have made to the BIOS Setup settings after receiving the Tablet PC Your system configuration and all peripheral devices connected to your system Your sales contract Our Tablet PCs have been designed primarily with mobile a...

Страница 70: ...roblems occur Should you encounter a problem with your computer that you cannot resolve yourself Note the ID number of your device The ID number is found on the type rating plate on the back or underside of the casing For further clarification of the problem contact the Fujitsu Service Desk When you do this please have ready the ID number and serial number of your system Recovering your Factory Im...

Страница 71: ...reen Cause Troubleshooting Touchscreen is switched off Press a key external keyboard or tap on the touchscreen External monitor or television set connected Check whether the graphics driver settings are correct or whether an external monitor has been detected in Intel Graphics Media Accelerator Driver for mobile The display on the Tablet PC s touchscreen is difficult to read Touchscreen Touchscree...

Страница 72: ...ving the battery press the reset button Check whether the AC cable is plugged properly into the external monitor and into the power outlet Check that the data cable is properly connected to the Tablet PC and the external monitor if it is plugged in with a connector Switch on the external monitor and the Tablet PC The external monitor is blank or the image is unstable Monitor Monitor Cause Troubles...

Страница 73: ...eshooting The battery is dead Charge the battery or Connect the AC adapter to the Tablet PC The AC adapter is not connected properly Check whether the AC adapter is properly connected to the Tablet PC Switch the Tablet PC on The Tablet PC stops working TabletPC Ending Cause Troubleshooting The Tablet PC is in energy saving mode End energy saving mode An application program has caused the malfuncti...

Страница 74: ...the wireless components on and off Page 36 The wireless component is switched on Despite this the wireless connection to a network does not work Check whether the wireless connection is enabled by the software Further information on using the wireless component can be found in the help files The battery discharges too quickly Battery Cause Troubleshooting The battery is either too hot or too cold ...

Страница 75: ...er Error message cause Resolution Keyboard error If you are using an external keyboard Check the connection and reboot the Tablet PC Bootable device was not found Check in the BIOS Setup whether your hard disk has been set correctly Make sure that the operating system is installed on the corresponding drive Press F1 to resume F2 to SETUP This error message appears if an error occurs during the sel...

Страница 76: ...l 101 levels Technology Wide View High Bright Display with LED background lighting Digitizer and glass panel Dual Digitizer stylus and touch Cameras Front facing Webcam 2MP resolution with status LED indicator Rear facing Webcam 8MP resolution with auto focus and status LED indicator Graphics card Chip Intel HD graphics Maximum resolution of external display 1920 x 1080 1080p Dimensions Width x De...

Страница 77: ...reen resolutions for integrated screen and external screens System Interface Ports on the cradle Max number of screens Number of external screens Integrated screen microHDMI port HDMI VGA Only tablet PC 2 1 3840x2160 30Hz 2560x1600 30Hz 1920x1080 60Hz 2560x1600 p30Hz 1920x1080 60Hz 2 1 1920x1200 60Hz 3840x2160 30Hz 2560x1600 30Hz 1920x1080 60Hz 2560x1600 30Hz 1920x1080 60Hz 1920x1200 60Hz With doc...

Страница 78: ...12 GHz to 2 472 GHz 11 ch 5 8 GHz to 5 85 GHz 21 ch Security WEP WEP key 64 128 bit WPA Personal TKIP AES WPA2 Personal TKIP AES WPA Enterprise TKIP AES WPA2 Enterprise TKIP AES IEEE 802 1x TLS PEAP Maximum recommended number of computers to be connected over wireless LAN during ad hoc connection 10 units or less Wi Fi based indicates that the interconnectivity test of the organization which guara...

Страница 79: ...al AC adapter or AC cable can be ordered at any time Docking cradle optional Electrical data Safety regulations complied with IEC60950 1 Protection class III Ports Headphones port 3 5 mm stereo mini jack Microphone port 3 5 mm stereo mini jack Docking port 40 pin HDMI Port 1 x VGA monitor port 1 x USB Universal Serial Bus 3 x USB 3 0 LAN port 1 x Security Lock device 1 x Ambient conditions Environ...

Страница 80: ...nt conditions Environment class DIN IEC 721 7K1 Mechanism class DIN IEC 721 7M2 Operating temperature 5 C 35 C 41 F 95 F Temperature in transit 15 C 60 C 5 F 140 F Intermediary VESA Mount Plate optional Dimensions Width x Depth x Height 3 54 in x 3 58 2 95 in x 0 24 in 90mm x 91mm 75mm x 60mm TPU cover with shoulder strap optional Dimensions Width x Depth x Height 10 63 in x 6 02 in x 0 75 in 270 ...

Страница 81: ...dapter cables optional microHDMI to VGA VGA Conversion Adapter Kit 1 x microHDM to VGA cable Maximum resolution 1920 x 1080 Full USB to LAN LAN Conversion Cable Kit 1x Full USB to LAN GbE limited performance Fujitsu 79 ...

Страница 82: ...tery Recycling Corporation RBRC a nonprofit public service organization dedicated to protecting our environment by recycling old batteries at no cost to you RBRC has drop off points at tens of thousands of locations throughout the United States and Canada To find the location nearest you go to www RBRC org or call 1 800 822 8837 If there are no convenient RBRC locations near you you can also go to...

Страница 83: ...r output polarity CAUTION Hazardous optical radiation may be emitted from the camera flash Do not operate the flash within 11 in 284mm of a person When using your STYLISTIC tablet equipment basic safety precautions should always be followed to reduce the risk of fire electric shock and injury to persons including the following Do not use this product near water for example near a bathtub washbowl ...

Страница 84: ...attery the display turns off after 4 minutes Energy saving benefits Fujitsu ENERGY STAR qualified mobile PCs use about half as much electricity as standard equipment saving half in utility costs But more than that ENERGY STAR also makes a difference for the environment Did you know that the average house can be responsible for twice the greenhouse gas emissions as the average car That s because ev...

Страница 85: ...and use of this Wireless LAN device must be in strict accordance with the instructions included in the user documentation provided with the product Any changes or modifications made to this device that are not expressly approved by the manufacturer may void the user s authority to operate the equipment The manufacturer is not responsible for any radio or television interference caused by unauthori...

Страница 86: ...receiver is connected to 4 Consult the dealer or an experienced radio TV technician for help FCC Radio Frequency Exposure statement The available scientific evidence does not show that any health problems are associated with using low power wireless devices There is no proof however that these low power wireless devices are absolutely safe Low power wireless devices emit low levels of radio freque...

Страница 87: ... without an approved US Department of Commerce export license This device complies with Part 15 of FCC Rules as well as ICES 003 B NMB 003 B Operation is subject to the following two conditions 1 this device may not cause harmful interference and 2 this device must accept any interference received including interference that may cause undesirable operation Modifications not expressly authorized by...

Страница 88: ...antes 1 l appareil ne doit pas produire de brouillage et 2 l utilisateur de l appareil doit accepter tout brouillage radioélectrique subi même si lebrouillage est susceptible d en compromettre le fonctionnement Déclaration de l exposition aux radiations RF Pour le fonctionnement du corps ce téléphone a été testé et répond aux directives d exposition RF lorsqu il est utilisé avec un accessoire qui ...

Страница 89: ...l utilisant les bandes 5 250 5 350 MHz 5 470 5 725 MHz et 5 725 5 825 MHz conformément à la limite p i r e maximale permise selon l annexe A9 2 afférent aux périphériques RSS210 En outre les utilisateurs doivent prendre garde au fait que les radars de grande puissance sont considérés comme des utilisateurs principaux ce qui signifie qu ils sont prioritaires des bandes 5 250 5 350 MHz et 5 650 5 85...

Страница 90: ...he main board of the mobile computer The WLAN devices operate in license free RF bands eliminating the need to procure an FCC operating license The WLAN operates in the 2 4GHz Industrial Scientific and Medical ISM RF band and the lower middle and upper bands of the 5GHz Unlicensed National Information Infrastructure UNII bands The WLAN devices are capable of five operating modes IEEE802 11a IEEE80...

Страница 91: ...n as Access Point s Connectivity is accomplished using only client devices in a peer to peer fashion That is why Ad Hoc networks are also known as peer to peer networks Ad Hoc networks are an easy and inexpensive method for establishing network connectivity between multiple computers Ad Hoc mode requires that the SSID network authentication and encryption key settings are identically configured on...

Страница 92: ... infrastructure mode wireless devices can communicate with each other or with a wired network Corporate wireless networks operate in infrastructure mode because they require access to the WLAN in order to access services devices and computers e g file servers printers databases An optional hub for a wired LAN may be required depending upon the type of access point used ADSL modem cable modem or si...

Страница 93: ...ices that transmit in the 2 4 GHz range may interfere with operation of WLAN devices in IEEE802 11b g n modes Symptoms of interference include reduced throughput intermittent disconnects and many frame errors It is HIGHLY recommended that these interfering devices be powered off to ensure proper operation of the WLAN device Deactivating Disconnecting the WLAN Device Disconnecting the WLAN device m...

Страница 94: ...n this software Pre defined parameters will be required for this procedure Please consult with your network administrator for these parameters Connection to the network After you have configured your computer you can connect to an active network by performing the following steps 1 Click on the WLAN icon in the system tray 2 Select Connect to a network 3 Select a network from the list that appears ...

Страница 95: ...ss Point Infrastructure connection set the network name SSID and network key to the same values as those of the access point Set the Network Authentication value identically to that of the Access Point Please consult your network administrator for this value if necessary Unavailable network connection Weak received signal strength and or link quality Ad hoc connection Retry connection after shorte...

Страница 96: ...erlapping RF channels can cause interference with the operation of the WLAN device Change the channel of your Access Point to a channel that does not overlap with the interfering device Wireless network authentication has failed Re check your Network Authentication Encryption and Security settings Incorrectly configured security settings such as an incorrectly typed WEP key a mis configured LEAP u...

Страница 97: ...hnology visit the Bluetooth Web site at www bluetooth com FCC Radiation Exposure Statement This system complies with the FCC limit values for radio frequency radiation in an uncontrolled environment The Bluetooth antenna is located at the top edge of the LCD screen and is exempt from the criteria for minimum distance because of its low power consumption The transmitter used in this system must not...

Страница 98: ... an administrator password or confirm your selection 2 When the tool opens make sure Backup system files to the recovery drive is selected and then select Next 3 Connect a USB drive to your PC select it and then select Next Create A large number of files need to be copied to the recovery drive so this could take some time 4 When it s done select Finish Note If you chose not to back up the system f...

Страница 99: ...e them and then reinstalls Windows 1 Select Settings Update security Reset this PC Get started 2 Choose an option Option What it does Keep my files This reinstalls Windows 10 but keeps your personal files and any apps that came with your PC It removes Changes you made to settings Apps and drivers you installed Remove everything This reinstalls Windows 10 and any apps that came with your PC It remo...

Страница 100: ... Installation support for the software downloaded from support website section below Auto Installation support for the software downloaded from support website 1 Download FSDM Fujitsu Software Download Manager from the support site and download all the drivers applicable to the model and OS using FSDM if they are not downloaded yet 2 When the software packages are downloaded from the web it is imp...

Страница 101: ...pdates related to your system you should occasionally access the Fujitsu Software Download Manager FSDM utility The FSDM utility is available from the Fujitsu Support site FSDM will allow you to view and download the most current drivers utilities and applications to determine whether you have the latest versions To download the FSDM Utility go to the Support Site http support fujitsupc com CS Por...

Страница 102: ...ing headphones 63 Cradle 39 Connecting a Tablet PC 40 D dark touchscreen 69 Date not correct 68 Declarations of conformity 7 Display Port 61 DOC INDUSTRY CANADA NOTICES 81 E Ending energy saving mode 71 Energy Energy consumption 34 Energy saving 14 Energy saving functions 34 Error message on the screen 73 Error messages on the screen 73 Ethernet LAN 37 F Fault Elimination 67 First time setup 18 G ...

Страница 103: ... BIOS Setup Utility 64 Slot Memory cards 34 Status indicators 23 Stylus 28 Summer time 68 Supervisor password change 56 entering 56 removing 57 Suspend Resume button 24 Switching on for the first time 20 Symbols Indicators 23 System settings BIOS Setup Utility 64 T Tablet before traveling 15 operating 22 Tablet PC cannot be started 71 doesn t work 71 reinigen 17 transporting 15 Tablet operation 22...

Страница 104: ...Index W Webcam 33 Winter time 68 Wireless components Safety notes 14 Wireless LAN Safety notes 14 Wrong date time 68 102 Fujitsu ...

Отзывы: