background image

U s i n g  Yo u r   S t y l i s t i c   S T 4 1 2 0 P / 2 1 P

23

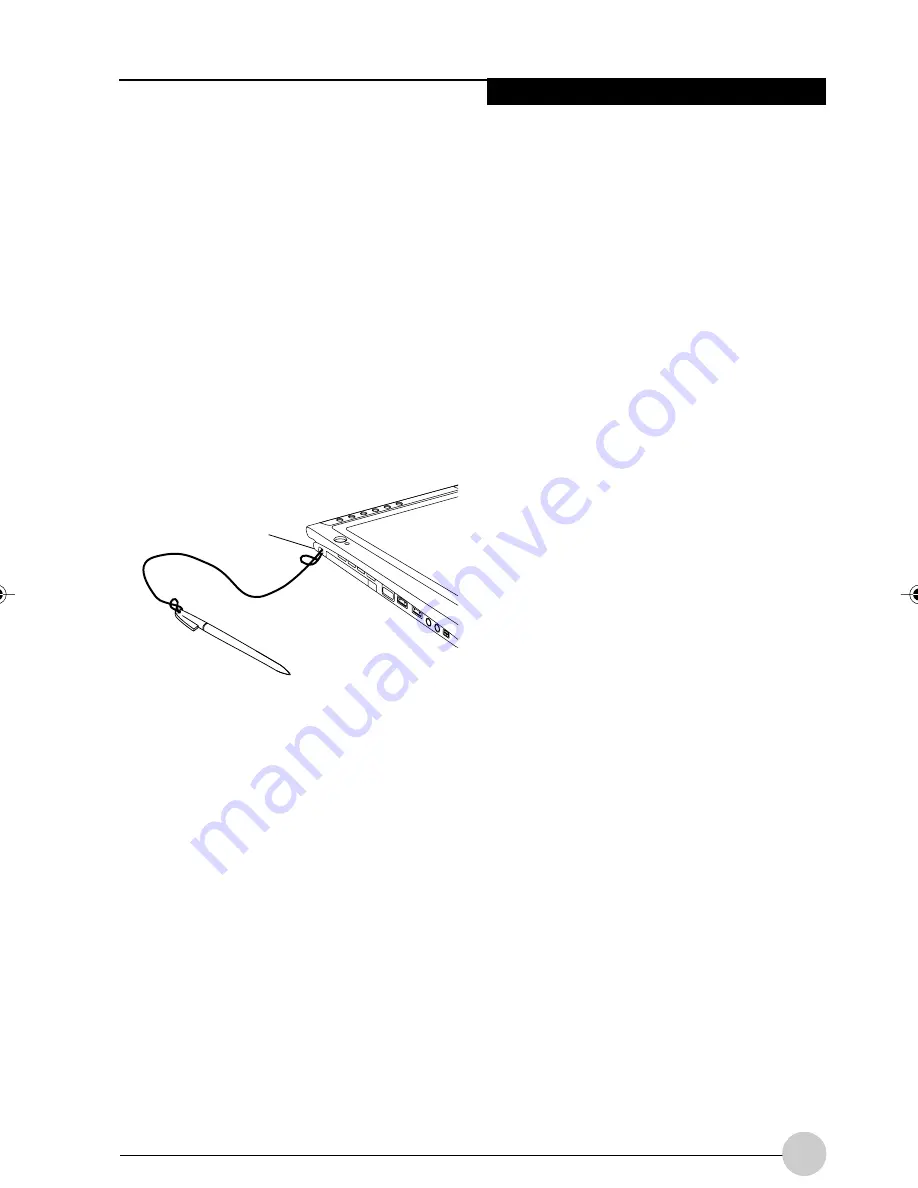
Figure 2-4. Installing a Pen Tether

Pen tether

attachment

point

INSTALLING A PEN TETHER

To prevent dropping or losing your pen, you
should attach it to your system using the pen
tether. (Pen tether is not provided)

To attach the pen tether to your Tablet PC,
perform the following steps:

1. Attach the end of the pen tether with the

clasp to your pen.  To do so push the end of
the tether through the hole in the pen, then
thread the opposite end of the tether through
the loop. 

(See Figure 2-4.)

NOTE:

The figure below may not be an exact pictorial
representation of the Pen Tether and your Pen
Tablet PC.

2. Attach the other end of the pen tether to the

attachment point on your Pen Tablet PC. To do
so, insert the end of the pen tether through the
attachment point, then feed the pen through
the large loop in the tether.

• The previous user of the Fujitsu Stylistic

ST4120P/21P Tablet PC writes with the
opposite hand or at a different pen angle.

• The system has been in use for some time

and the pen has not been recalibrated.

• The original system image has been

restored.

To Calibrate the Pen

1. Open the Control Panel from the Start |

Settings menu, and double-tap the Pen
Configuration icon. In the Setup Property
page, tap on [Calibrate] to start calibration.

2. Position the Fujitsu Stylistic ST4120P/21P

Tablet PC as you normally would during use.
Be sure to hold the pen at the angle that you
regulary use. Touch the screen only with the
pen tip; inadvertently touching the screen
with your finger or hand during the
calibration process, may result in faulty
calibration.

3. Perform the calibration steps according to

the instructions on the screen. The
calibration utility displays a cross-hair
symbol in the corners of the screen, one
corner at a time. Hold the pen as you
normally would while using the system and,
as accurately as possible, tap the center of
each crosshair as it is displayed.

4. When the Verify New Pen Calibration

Settings window appears, choose one of the
following steps.

• If you are satisfied that you tapped the

cross-hairs accurately, tap Yes. The taps
that you performed in step 3 are then used
to calibrate the screen.

• If you do not want to use the new

calibration, tap No.

• If you want to enter a new calibration, tap

Recalibrate. The calibration instructions
reappear.

• If you don’t tap the screen within 20

seconds, the default settings will be used.

If you have successfully performed the
procedure above, the pen is now recalibrated,
and can use the system as you normally
would.

CALIBRATING THE PEN

Calibration of the pen adjusts the cursor
position on the screen relative to the position of
the pen tip. You calibrate the pen to adjust the
distance error between where the pen actually
touches the screen and where the system
“thinks” the pen is touching. If the event you
wish to invoke is not displayed under the pen
tip when you use the pen, you should calibrate
the pen.

Pen calibration may be required due to the
following situations:

• The pen is being used for the first time.

Alb Passive 2(17-28)

26/3/03, 3:37 PM

23

Содержание ST4120P

Страница 1: ...red trademarks of the Personal Computer Memory Card International Association Intel Pentium and SpeedStep are registered trademarks of Intel Corporation Wi Fi is a trademark of the Wireless Ethernet Compatibility Alliance WECA All other products are trademarks or registered trademarks of their respective companies Copyright 2003 Fujitsu All rights reserved No part of this publication may be copied...

Страница 2: ...ii Fujitsu Stylistic ST4120P 21P Tablet PC User s Guide ...

Страница 3: ...ing the Battery 25 Tips for Conserving Battery Power 25 Modem Connection 26 PC Card Slot 26 Removing and Installing Memory Modules 26 Table of Contents 3 CARE AND MAINTENANCE Care and Maintenance 31 Protecting the Display Screen 31 Storing the Tablet PC 32 Avoiding Overheating 32 Cleaning the Display Screen 32 Troubleshooting 32 4 SPECIFICATIONS Fujitsu Stylistic ST4120P 21P Hardware Specification...

Страница 4: ...iv Fujitsu Stylistic ST4120P 21P Tablet PC User s Guide ...

Страница 5: ...v Preface ...

Страница 6: ...vi Fujitsu Stylistic ST4120P 21P Tablet PC User s Guide ...

Страница 7: ...yboard keys appear in brackets Example Fn F1 ESC ENTER and CTRL Pages with additional information about a specific topic are cross referenced within the text Example See page xx On screen buttons or menu items appear in bold Example Click OK to restart your Tablet PC DOS commands you enter appear in Courier type Example Shut down the computer The point icon highlights information that will enhance...

Страница 8: ...extension cord ampere rating Also make sure that the total rating of all products plugged into the wall outlet does not exceed 15 amperes 11 Never push objects of any kind into this product through cabinet slots as they may touch dangerous voltage points that could result in a fire or electric shock Never spill liquid of any kind on the product 12 Do not attempt to service this product yourself as...

Страница 9: ...mely high safety is secured could lead directly to death personal injury severe physical dam age or other loss hereinafter High Safety Required Use including without limitation nuclear power reactioncore control in nuclear atomic facility airplane automatic aircraft flight control air traffic control operation control in mass transport control system medical instrument for life support system miss...

Страница 10: ...be responsible for any software programs data or other information stored or used on any media or part of any Product returned to Fujitsu or its service providers for Warranty Service or other repair including but not limited to the costs of recovering such programs data or other information It is solely your responsibility as the Purchaser to back up any software programs data or information stor...

Страница 11: ...1 Getting Started withYour Fujitsu Stylistic ST4120P 21P Tablet PC 1 ...

Страница 12: ...2 Fujitsu Stylistic ST4120P 21P Tablet PC User s Guide Section One ...

Страница 13: ...r that has been designed to support Microsoft Windows 2000 or Windows XP Professional This chapter provides an overview of the Fujitsu Stylistic ST4120P 21P Tablet PC and its features Figure 1 1 Fujitsu Stylistic ST4120P 21P Tablet PC Getting Started with Your Fujitsu Stylistic ST4120P 21P Tablet PC ...

Страница 14: ...fe Infrared keyboard mouse port The infrared port wraps around the front and bottom of the display and is used for communicating with a proprietary infrared keyboard or mouse Application buttons Allow you to quickly launch pre defined applications and utilities by pressing a button Navigation buttons The navigation buttons allow you to move Page Up Page Down Tab Right Tab Left Cursor Up Cursor Dow...

Страница 15: ...ure of the system for the user when a running system is carried for a period of time Wireless LAN module cover Provides protection for wireless LAN radio solution Wireless LAN On Off switch This switch turns the device on and off You should switch the device off when it is not in use in order to maximize battery life Hard disk drive cover Covers the hard disk drive module These peripherals and acc...

Страница 16: ...mmunication with devices compliant with IrDA Standard Revision 1 1 USB ports Allow you to connect Universal Serial Bus compliant devices compliant with USB Standard Revision 1 1 to the Tablet PC Additional USB ports are located on the optional Tablet Dock IEEE 1394 Jack Allows you to connect between your Pen Tablet PC and peripherals such as a digital video camera Air flow vents Provides secondary...

Страница 17: ...r flow vents Provides secondary cooling for processor Do not obstruct the vents Kensington lock slot Allows you to attach a Kensington MicroSaverTM compatible security cable External Monitor Connector The External Monitor connector allows you to connect an external monitor These peripherals and accessories are sold separately Kensington Lock Slot Figure 1 5 Fujitsu Stylistic ST4120P 21P Tablet PC ...

Страница 18: ...vides secondary cooling for processor Do not obstruct the vents Infrared keyboard mouse port The infrared port wraps around the front and bottom of the display and is used for communicating with an optional proprietary infrared keyboard or mouse Infrared Keyboard Mouse Port Figure 1 6 Fujitsu Stylistic ST4120P 21P Tablet PC Features Right Side View Air Flow Vents Latch Point Pen Pen Holder ...

Страница 19: ...tate Remarks On State Idle Mode Suspend to RAM Off State Hibernate Save to Disk On State Idle Mode Suspend to RAM Hibernate Save to Disk Off State Green continuous Green blinking Off Amber Green Amber blinking Off The system is powered on and ready for use The system has suspended and saved active settings to RAM The system has suspended and saved settings and data to the hard disk drive AC adapte...

Страница 20: ...etween 50 100 Battery charge is between 13 49 Battery charge is between 0 12 There is a battery error Battery charge is between 50 100 Battery charge is between 13 49 Battery charge is between 0 12 Battery is not installed or system is off or in Hibernate mode If battery is inserted during power off LED blinks amber for 4 seconds to detect battery Battery status is displayed for 5 seconds after th...

Страница 21: ...unches the Windows Task Manager When you press the Right click button you pen switches its function from left mouse button to right mouse button emulation To generate a right mouse button click tap on the application button once and then tap on the display When you press the Fn Right click buttons at the same time they provide a Hovering function Hovering mode provides you with better cursor contr...

Страница 22: ...plication button acts the same way as an Enter key on a keyboard Pressing the Fn Ent buttons at the same time acts to invoke a pre determined application or keystroke combination as assigned the Tablet Button Settings utility You can change the settings in Control Panel Tablet Button Settings By default pressing the Fn Ent combination acts the same as if you had pressed Alt on a keyboard it select...

Страница 23: ...cursor will move up When the Down portion is pressed the cursor will move down Purpose when pressed with Fn button Secondary function When pressed with the Function Fn button the Up portion of this button allows you to tab right When pressed with the Function Fn button the Down portion of this button allows you to tab left When pressed with the Function Fn button the Up portion of this button will...

Страница 24: ...pacebar on a keyboard Pressing the Esc button while the BIOS is open acts to escape from the BIOS This is the same as if you had tapped Esc on a keyboard Pressing the Ent button while the BIOS is open acts the same as the Ent button on a keyboard Pressing the Fn button while the system is displaying the operating system boot menu opens the Advanced Operating System Options menu This menu allows yo...

Страница 25: ...external microphone The internal microphone is disabled when you plug in an external microphone Connect stereo headphones or powered external speakers The internal speaker is disabled when you plug in external headphones or powered speakers An infrared transceiver built into the Pen Tablet PC allows you to communicate with other devices that are compliant with the IrDA Standard Rev 1 1 Effective r...

Страница 26: ...cure the Pen Tablet PC using Kensington compatible locking devices The IEEE 1394 jack allows you to connect between your Pen Tablet PC and peripherals such as a digital video camera The Suspend Resume Power On button allows you to suspend Pen Tablet PC activity without powering off resume your Pen Tablet PC from suspend mode and power on the system when it has been shut down from Windows The Page ...

Страница 27: ...17 UsingYour Fujitsu Stylistic ST4120P 21P Tablet PC 2 2 2 2 2 ...

Страница 28: ...18 Fujitsu Stylistic ST4120P 21P Tablet PC User s Guide Section One ...

Страница 29: ... input when in Suspend to RAM mode Refer to the Resuming System Operation section later in this chapter for information on returning the system to the On state Hibernate mode Save to Disk S4 System operation is suspended All system functions are turned off to conserve power Active data in programs that were running before suspending system operation is stored on the hard disk drive The system does...

Страница 30: ...atus display the system is in Off state or in Hibernate Save to Disk mode and it is safe to perform this procedure If the Power icon is visible either blinking or on continuously do not perform this procedure See System States earlier in this chapter for details on modes represented by the Power icon 1 Ensure that the battery in your Pen Tablet PC is sufficiently charged or connect an external pow...

Страница 31: ...ion has suspended before you remove the battery Note that after you remove the battery you have approximately five minutes to replace it with a new battery or to plug in a power supply before the bridge battery is depleted Your system may be configured to suspend operation automatically after a period of inactivity Your system may be configured to enter Hibernate mode automatically after a period ...

Страница 32: ... your system uses Hibernate mode it will take longer to resume operation as compared to using Suspend to RAM mode Time is needed to read data from the hard disk drive Use the system as you normally would once system operation resumes All programs resume at the point where execution stopped when system operation was suspended USING THE PEN You can use the Fujitsu Stylistic ST4120P 21P Pen to select...

Страница 33: ...hat you regulary use Touch the screen only with the pen tip inadvertently touching the screen with your finger or hand during the calibration process may result in faulty calibration 3 Perform the calibration steps according to the instructions on the screen The calibration utility displays a cross hair symbol in the corners of the screen one corner at a time Hold the pen as you normally would whi...

Страница 34: ...elow 90 the battery begins charging and the Charging icon appears in the Status display If the battery charge is 90 or higher when you connect DC power the battery will not charge preventing battery overcharging Approximate Charge Time not in use 3 5 hours 4 5 hours Approximate Charge Time in use 7 hours 8 hours Table 2 3 Battery Charging Time Battery Charge Level Reached 90 100 2 Look at the Batt...

Страница 35: ...battery Figure 2 2 Removing the Battery Once the battery is installed you can resume system operation or start and use your system normally TIPS FOR CONSERVING BATTERY POWER You can extend the charge life of your battery by conserving battery power Your results may vary depending on your application and how the system is configured Here are some suggestions to help you conserve battery power Use a...

Страница 36: ...e battery charges when the AC Adapter is connected and the system is in On or Off states or Suspend mode It charges from the battery only when the system is in the On state MODEM CONNECTION The Fujitsu Stylistic ST4120P 21P Tablet PC is designed to accept a standard RJ 11 telephone plug Connect the plug to the modem jack located on the left hand side of the Pen Tablet PC See Figure 1 4 on page 7 f...

Страница 37: ...r and screws that you removed in step 2 5 Confirm that the DIMM module is recognized by the system To do so run BIOS Setup The size of the DIMM module should be displayed in the Info menu in BIOS Setup The DIMM module is installed in the Pen Tablet PC and you can now use the system Removing a Memory Module To remove a DIMM module 1 Ensure that the Pen Tablet PC is off To do so carry out the Shut D...

Страница 38: ...28 Fujitsu Stylistic ST4120P 21P Tablet PC User s Guide Section One ...

Страница 39: ...29 Care and Maintenance 3 3 3 3 3 ...

Страница 40: ...30 Fujitsu Stylistic ST4120P 21P Tablet PC User s Guide Section One ...

Страница 41: ...an the display by wiping the screen gently using a soft cotton cloth dampened with isopropyl alcohol Ensure that all residue has been removed from the screen before applying a new screen protector Figure 3 1 Removing the Protective Sheet Figure 3 2 Installing the screen protector During normal use of the Pen Tablet PC small particles from the environment can become embedded in the pen tip and scra...

Страница 42: ...s the internal temperature approaches the tolerable limits of heat sensitive components system functions are automatically limited or turned off to prevent damage To avoid overheating the Pen Tablet PC do not obstruct the air vents on the top and bottom edges of the Pen Tablet PC CLEANING THE DISPLAY SCREEN To clean the Pen Tablet PC display screen wipe the screen surface gently using a soft cotto...

Страница 43: ...tact your local help desk or reseller if you need assistance using BIOS Setup Display Screen Blank or Difficult to Read If the display screen on your Pen Tablet PC appears blank or is unreadable confirm that the system is running the Power icon is displayed continuously on the Status display and check the following The system brightness may be set too low causing the screen to appear too dark To c...

Страница 44: ...34 Fujitsu Stylistic ST4120P 21P Tablet PC User s Guide Section One ...

Страница 45: ...35 Specifications 4 4 4 4 4 ...

Страница 46: ...36 Fujitsu Stylistic ST4120P 21P Tablet PC User s Guide Section One ...

Страница 47: ...r high performance 3D 2D graphics video and display capabilities Dynamic Video Memory Technology DVMT dynamically responds to application requirements and efficiently allocates the proper amount of memory 48MB max for optimal graphics and system performance Display Specifications Display VRAM Interface Specifications One Type I or Type II PCMCIA CardBus version 3 0 Modem RJ 11 LAN RJ 45 IEEE 1394 ...

Страница 48: ...tems Environmental Specifications Agency Approval Specifications Additional Specifications The specifications for your particular model may vary To determine the specifications for your system please visit our web site at www fujitsu pc asia com Stylistic ST4120P 21P Specifications Continued Keyboard Mouse IR Port System IR Port SigmaTel STAC9767 codec Internal mono microphone and speaker Mono mic...

Страница 49: ...39 Agency Notices 5 5 5 5 5 ...

Страница 50: ...40 Fujitsu Stylistic ST4120P 21P Tablet PC User s Guide Section One ...

Страница 51: ...er is connected 2 The Ringer Equivalence Number REN for this equipment 3 The equipment requires a standard modular jack type USOC RJ 11C which is FCC Part 68 compliant 4 The FCC Registration Number This equipment is designed to be connected to the telephone network or premises wiring using a standard modular jack type USOC RJ 11C which is FCC Part 68 compliant and a line cord between the modem and...

Страница 52: ...sers of the Canadian Telephone Network NOTICE This equipment meets the applicable Industry Canada Terminal Equipment Technical Specifications This is confirmed by the registration number The abbreviation IC before the registration number signifies that registration was performed based on a Declaration of Conformity indicating that Industry Canada technical specifications were met It does not imply...

Страница 53: ...echnicians Only The modem to telephone network connection must be a line cord using a minimum 26 AWG wire For continued protection against risk of fire replace only with the same type and rating fuse Danger of explosion if Lithium clock battery is incorrectly replaced Replace only with the same or equivalent type recommended by the manufacturer Dispose of used batteries according to the manufactur...

Страница 54: ...44 Fujitsu Stylistic ST4120P 21P Tablet PC User s Guide Section One ...

Страница 55: ...45 Appendix Wireless LAN User s Guide ...

Страница 56: ...46 Fujitsu Stylistic ST4120P 21P Tablet PC User s Guide Section One ...

Страница 57: ...itution or attachment of connecting cables and equipment other than those specified by the manufacturer It is the responsibility of the user to correct any interference caused by such unauthorized modification substitution or attachment The manufacturer and its authorized resellers or distributors will assume no liability for any damage or violation of government regulations arising from failure t...

Страница 58: ... nearby persons must be maintained to ensure RF exposure compliance In order to comply with RF exposure limits established in the ANSI C95 1 standards the distance between the antennas and the user should not be less than 20 cm 8 inches Export restrictions This product or software contains encryption code which may not be exported or transferred from the US or Canada without an approved US Departm...

Страница 59: ...ring to exchange files and share a printer or other peripheral devices To use the AdHoc Mode you must set the same SSID and the same encryption key for all the computers that are connected All connected computers can communicate with each other within the communication range Infrastructure Mode If a number of computers are connected simultaneously in the AdHoc mode the transfer rate may be reduced...

Страница 60: ...n for computers running Windows 2000 When you receive your Fujitsu Stylistic ST4120P 21P Tablet PC the integrated wireless LAN device and drivers have already been installed This procedure outlines the steps for setting the device parameters Item Profile Mode SSID Transmit Rate Power Save Enabled AdHoc Channel Description Enter the system file name in which the parameter information is to be saved...

Страница 61: ... mal Input Description Click the down arrow and select an encryption option Disable Disables the encryption In this case Create keys with Passphrase and subsequent items are greyed out and you cannot enter anything 40 bit The encryption is set Select either Create keys with Passphrase Create keys manually or ASCII Input and enter the encryption keys 104 bit The encryption is set Select either Crea...

Страница 62: ... 40 bit and 104 bit encryption is the wireless LAN equivalent of 64 bit and 128 bit encryption as set by Microsoft and wireless LAN manufacturers This is the same encryption rate that is used by the Windows XP operating system and was selected in order to align it closer to the wireless LAN standard For consistency the Windows 2000 utilities reflect the same modes Outside of wireless LAN environme...

Страница 63: ...s installed in your system if more than one Local Area Connection entry is displayed In this case select the Local Area Connection entry with Intersil PRISM Wireless LAN PCI Card displayed under Device Name 6 Click OK The Local Area Connection Properties window appears again 7 Click OK When a message appears prompting you to restart the computer click Yes Checking the full computer name and workgr...

Страница 64: ...erties appears again Table 4 Checking computer name and workgroup 3 Right click the Local Area Connection then click Properties from the menu that appears Local Area Connection Properties appears 4 If File and Printer Sharing for Microsoft Networks is displayed in the list make sure that it is checked If it is not checked check it and click OK You do not have to perform the following steps Go to t...

Страница 65: ... you want to share Specifies the limit for the number of sharing users Specifies the folder access privileges Specifies the caching for the folder 4 Click OK The printer sharing is set and the icon changes Checking the Connection After the network setting is completed access the shared drive on another computer to check the connectivity of the wireless LAN network Accessing Another Computer The fo...

Страница 66: ... other computer to which you are connected is displayed when the connection is successful If you are connected to more than one computer the computer that has the best connectivity is displayed Shows the current channel used for the connection Shows the current transfer rate in Mbits sec Click Radio Off to disconnect Click Radio On to connect to the network Click this button to search for others t...

Страница 67: ...ylistic ST4120P 21P Tablet PC with the optional integrated wireless LAN device the device and drivers have already been installed This procedure outlines the steps for setting the device parameters Updated drivers and or utilities may become available after this manual is printed see any addenda or fliers that may be included in the system packaging Click Add under Preferred networks Wireless Netw...

Страница 68: ...ter code In Network Key input the same value as the other wireless LAN card Hexa decimal characters Table 8 Setting parameters 2 Perform the following steps Click Internet Protocol TCP IP Click Properties Internet Protocol TCP IP Properties appears 3 Set an IP address Ask your network administrator and check the setting Description Set the IP address and subnet mask Click Use the following IP addr...

Страница 69: ...es appears 6 Perform the following steps Click File and Printer Sharing for Microsoft Networks Click OK You will go back to Wireless Network Connection 2 Properties and File and Printer Sharing for Microsoft Networks is added to the list 7 Click Close Sharing Files The following example shows how to set sharing the Work folder on the c drive 1 Click Start My Computer 2 Double click the Local Disk ...

Страница 70: ...Other Places click My Network Places 3 From the left menu in Network Tasks click View workgroup computers The workgroup in which you are participating will appear 4 Double click the computer to which you want to connect The drive that you set in Computer Sharing appears 5 Double click the drive to which you want to connect The contents of the drive will appear and is available for use Description ...

Страница 71: ...ng To check this you need a different procedure depending upon the operating system that you use Refer to the appropriate section of this chapter Perform the following steps to search for the computer Click Start Search Other Computers Enter the computer name that you are connecting to in Name and click Search Double click the icon of the computer that has been searched Make sure that the driver i...

Страница 72: ...e PING command to check if the IP packet is correctly delivered to the destination To run the PING command the TCP IP protocol must be installed First you will determine your IP address then you will make sure your IP address can respond and then you will make sure other computers can be addressed 1 Windows XP Click Start All Programs Accessories Command Prompt 2 Type ipconfig directory filename w...

Страница 73: ...connection is successful Pinging 10 0 1 3 with 32 bytes of data Reply from 10 0 1 3 bytes 32 time 1ms TTL 32 Reply from 10 0 1 3 bytes 32 time 10ms TTL 32 Reply from 10 0 1 3 bytes 32 time 4ms TTL 32 Reply from 10 0 1 3 bytes 32 time 10ms TTL 32 If the connection fails Request timed out Destination host unreachable or a similar message appears In this case refer to the Other computers are not disp...

Страница 74: ...k beside Network adapters 5 Right click Intersil PRISM Wireless LAN PCI Card and click Uninstall from the menu that is displayed Confirm Device Removal appears 6 Click OK 7 Close System Properties Make sure that the icon has disap peared from the task tray in the lower right corner of the screen 8 Click Start Settings Control Panel 9 Double click Add Remove Programs Add Remove Pro grams appears 10...

Страница 75: ...ISM Wireless LAN PCI Card and click Uninstall from the menu that is displayed Confirm Device Removal appears 6 Click OK 7 Close System Properties 8 Make sure that the icon has disappeared from the task tray in the lower right corner of the screen 9 Click Start Control Panel Control Panel appears 10 Double click Add Remove Programs Add Remove Programs appears 11 Perform the following steps Click PR...

Страница 76: ...the network administrator to check the IP address to be set for the computer A DHCP server is a server that automatically assigns IP addresses to computers or other devices in the network There is no DHCP server for the AdHoc network If no access point is found in the network An IP address is expressed with four values in the range between 1 and 255 Set the each computer as follows The value in pa...

Страница 77: ...k name encryption key Windows 2000 Professional Windows XP Professional Max 350mA 10 or less Item Network Type Transfer Rate Frequency Range Channels Card Type VCC Security Supported Operating Systems Power Current Maximum number of units recommended for wireless LAN AdHoc network SPECIFICATIONS Technical Specifications for Integrated Wireless LAN Device ...

Отзывы: