Fujitsu SCENICVIEW A17-3 Скачать руководство пользователя страница 25

 SCENICVIEW 

A17-3/A19-3 

Locking the OSD menu 

The OSD menu can be locked to prevent accidental or unauthorised changes to the monitor settings. 


Press and hold the SELECT/MENU button for a few seconds while you switch on the monitor 
with the ON/OFF switch. 

A message is displayed that the action has been performed. 
Please proceed in the same manner to release the locked OSD menu again. 

Locking the ON/OFF button 

The ON/OFF switch can be locked to prevent accidental or unauthorised changes to the monitor 
settings. 


Press and hold both buttons 

6

 and 

5

 simultaneously for a few seconds. 

A message is displayed that the action has been performed. 
Please proceed in the same manner to release the locked ON/OFF switch again. 

Monitor settings using the OSD menu 

With the buttons on the control panel, call up and use the integrated OSD (On-Screen display) menu. 


The OSD menu is available in different languages. The English menu names are used in 
the following description (default setting). With the OSD function 

Language 

in the 

OSD


Setup 

you can select another language. 

i


To set the OSD menu, perform the following steps: 


Press the SELECT/MENU button to activate the OSD menu. 

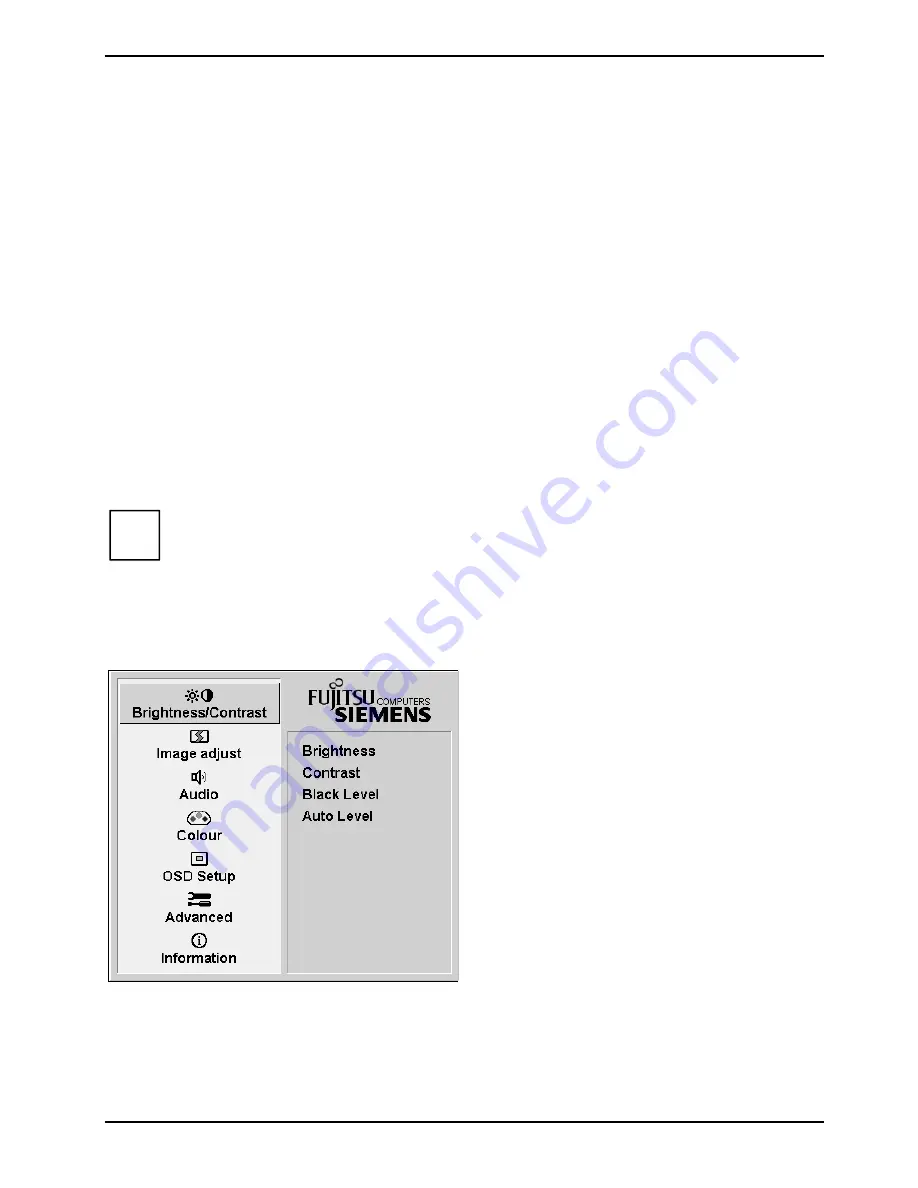
The main menu appears on the screen (on the left-hand side) with icons for the setting functions. 

The first symbol (

Brightness/Contrast

) is 

highlighted. In the right-hand part of the display 
the associated functions are shown. 


If necessary, press the 

6

 or 

5

 button to 

mark another icon (e.g. 

Image adjust

). 


Press the SELECT/MENU button to select 
the highlighted icon. 


The corresponding setting window (here: 

Image Adjust

) is displayed (on the right-hand side). 

A26361-K1146-Z120-1-7619, edition 1 

17 

Содержание SCENICVIEW A17-3

Страница 1: ...Monitor Operating Manual English SCENICVIEW A17 3 A19 3 ...

Страница 2: ...lems or other questions which you would like to be clarified Please contact our help desk see Warranty Booklet The latest information on our products tips updates etc can be found on the internet under http www fujitsu siemens com ...

Страница 3: ......

Страница 4: ...This manual was produced by Xerox Global Services Published by Fujitsu Siemens Computers GmbH Order No A26361 K1146 Z120 1 7619 Edition 1 AG 07 07 ...

Страница 5: ...SCENICVIEW A17 3 A19 3 LCD monitor Operating Manual july 2007 edition ...

Страница 6: ...f translation reproduction by printing copying or similar methods in part or in whole are reserved Offenders will be liable for damages All rights including rights created by patent grant or registration of a utility model or design are reserved Delivery subject to availability Right of technical modification reserved No liability for content and printing error ...

Страница 7: ...d removing the monitor base 10 Removing monitor base 11 Connecting the monitor 12 Connecting cables to the monitor 12 Connecting cables to the computer 13 Operation of the monitor 13 Adjusting the inclination 13 Adjusting portrait format 14 Switching the monitor on off 14 Notes on power management 15 Changing the monitor settings 16 Troubleshooting 22 Notes regarding the DIN EN ISO 13406 2 standar...

Страница 8: ...Contents A26361 K1146 Z120 1 7619 edition 1 ...

Страница 9: ...ecurity requirements This operating manual contains important information you require to start up and run your LCD monitor A graphics card screen controller with VGA interface or a digital graphics card with DVI interface is required to control the SCENICVIEW A17 3 A19 3 LCD monitor The monitor processes the data supplied to it by the screen controller The screen controller or the associated drive...

Страница 10: ...ce so as to avoid lasting damage scratches If the device is brought into the installation site from a cold environment condensation can form Before operating the device wait until it is absolutely dry and has reached approximately the same temperature as the installation site During installing and operating the device please observe the instructions on environmental conditions in the Technical dat...

Страница 11: ...should repair the device Unauthorised opening and incorrect repair may greatly endanger the user electric shock fire risk You may set only those resolutions and refresh rates specified in the Technical data chapter Otherwise you may damage your monitor If you are in any doubt contact your sales outlet or our help desk Use a screen saver with moving images and activate the power management for your...

Страница 12: ...er corresponding packaging fit to protect it against knocks and jolts Never drop the LCD monitor danger of glass breakage Cleaning Always pull out the power plug before you clean the monitor Do not clean any interior parts yourself leave this job to a service technician Do not use any cleaning agents that contain abrasives or may corrode plastic Ensure that no liquid will run into the system Ensur...

Страница 13: ...oes cause harmful interference to radio or television reception which can be determined by turning the equipment off and on the user is encouraged to try to correct the interference by one or more of the following measures Reorient or relocate the receiving antenna Increase the separation between equipment and the receiver Connect the equipment into an outlet on a circuit different from that to wh...

Страница 14: ...aken and are in force to assure that production units of the same equipment will continue to comply with the Commissions requirements Energy Star Guidelines The Fujitsu Siemens LCD monitor SCENICVIEW A17 3 A19 3 is designed to conserve electricity by dropping to less than 1 W when it goes into standby suspend and OFF mode With this new power management the LCD monitor SCENICVIEW A17 3 A19 3 qualif...

Страница 15: ...emarketing und Recycling D 33106 Paderborn Tel 49 5251 81 80 10 Fax 49 5251 81 80 15 http www fujitsu siemens de wvm RECUPEL Boulevard Reyers 80 B 1030 Brussels Tel 32 2 706 86 16 Fax 32 2 706 86 13 E Mail info recupel be http www recupel be SWICO Schweizerischer Wirtschaftsverband der Informations Kommunikations und Organisationstechnik A list of the SWICO Acceptance places can be found at http w...

Страница 16: ... delivery agrees with the details in the delivery note The complete LCD monitor package includes one monitor one data cable D SUB one audio cable one power cable one CD with software and documentation one Warranty Booklet a safety manual Should you discover that the delivery does not correspond to the delivery note notify your local sales outlet immediately We recommend that you keep the original ...

Страница 17: ...g distance to the monitor should be approximately 50 cm Example layout of monitor keyboard and copy holder 1 Preferred viewing distance 2 Permissible viewing distance Position the monitor for optimum viewing The viewing distance to the monitor should be approximately 50 cm Keep ventilated areas clear i Depending on the situation the use of a swivel arm or wall bracket VESA FPMPMI are available fro...

Страница 18: ...A19 3 Mounting and removing the monitor base The display surface is susceptible to scratching Therefore lay the monitor on a soft surface when mounting or removing the monitor base 10 A26361 K1146 Z120 1 7619 edition 1 ...

Страница 19: ...he power socket Lay the monitor on its face on a soft surface Disconnect all cables You can now mount a swivel arm or a wall bracket as per VESA FPMPMI with 100 mm hole spacing For instructions on how to mount the swivel arm or wall bracket please see the documentation for the swivel arm or wall bracket If you operate the monitor with the swivel arm or wall bracket it may not be turned by 180 A263...

Страница 20: ... socket 5 Holes for securing the pivot arm or wall mounting The data cable supplied has two 15 pin D SUB connectors for connection to the monitor and to the computer Insert one of the connectors of the data cable in the D SUB socket on the monitor 3 and secure the connector by tightening the retaining screws Insert one connector of the audio line in the AUDIO IN 4 socket on the monitor and make su...

Страница 21: ...properly earthed outlet and ensure a safe connection Plug the power connector of the computer into a properly grounded mains outlet When you start working with your monitor for the first time you should install the appropriate graphics drivers for your application software Details of how to do this are provided in the documentation on your screen controller the associated driver software i Operati...

Страница 22: ... OSD manually from landscape mode into portrait mode see section Monitor settings using the OSD menu To reset the monitor to the landscape mode the monitor must be turned counter clockwise The OSD display can be reset again in the OSD menu Switching the monitor on off The ON OFF switch at the front is used for switching the monitor on and off 1 Buttons for the OSD menu On Screen display 2 ON OFF s...

Страница 23: ... Stage ON Power Saving Mode Power indicator lights up blue lights up orange Function the monitor is working normally the screen is dark Power consumption Normal 32 W typical 17 37 W typical 19 reduced to 1 W If your computer detects inactivity no input it sends an appropriate signal to the monitor to reduce the power consumption energy saving mode The power indicator of the monitor changes colour ...

Страница 24: ...stems is used or minor corrections are to be made to the screen display then change the monitor settings with the OSD menu Changing the monitor settings with the buttons of the control panel 1 Buttons for the OSD menu On Screen display 2 Power indicator 3 ON OFF switch Use the buttons of the control panel to make the following monitor settings directly while the OSD menu is switched off Performing...

Страница 25: ...tor settings using the OSD menu With the buttons on the control panel call up and use the integrated OSD On Screen display menu The OSD menu is available in different languages The English menu names are used in the following description default setting With the OSD function Language in the OSD Setup you can select another language i To set the OSD menu perform the following steps Press the SELECT...

Страница 26: ...eration some functions are not available as they are not required due to the digital transmission technology used i Adjusting the brightness and contrast Calling the Brightness Contrast setting window Brightness Setting the brightness of the display With this function you change the brightness of the background lighting Contrast Setting the contrast of the display With this function you modify the...

Страница 27: ...e Adjusting the volume Calling the Audio setting window Setting the volume for playback with the integrated loudspeakers Volume Switching the loudspeakers off or on Mute Setting colour temperature and colours Calling the Colour setting window Selecting the colour temperature The warmth of the screen colours is set using the colour temperature The colour temperature is measured in K Kelvin You can ...

Страница 28: ...right OSD V Position Setting the vertical position of the OSD menu With this function you move the OSD menu up or down OSD Timeout Setting the display duration of the OSD menu With this function you select a value from 10 to 120 seconds If the set time expires without a setting being made the OSD menu is automatically faded out Setting the display format of the OSD menu With this function you swit...

Страница 29: ...nt resolution is set Change the resolution to 1280 x 1024 to achieve optimum picture quality With the function deactivated Off no message appears Factory Recall Activating the factory settings With this function all settings are reset to the factory settings without prompting for confirmation Press the SELECT MENU button to activate the function The Auto Processing message is displayed Displaying ...

Страница 30: ...le for the monitor is correctly attached to the monitor port on the computer Check whether the computer is switched on Message This is 85 Hz overdrive Change computer display input to 1024 x 768 at 60 Hz Change computer display input to 1280 x 1024 at 60 Hz The input signal horizontal frequency and refresh rate at the displayed input does not correspond to the technical monitor data Adjust the vid...

Страница 31: ...ectly using the OSD menu if the auto adjustment function does not give satisfactory results Notes regarding the DIN EN ISO 13406 2 standard Permanently unlit or lit pixels The standard of production techniques today cannot guarantee an absolutely fault free screen display A few isolated constant lit or unlit pixels picture elements may be present The maximum permitted number of pixels faults is st...

Страница 32: ...kg Storable display modes 25 25 Pixel error classes according to ISO 13406 2 Class II Class II Accessories Power cable 1 8 m D SUB data cable 1 8 m Audio cable 1 8 m Electrical data Video Analogue positive 0 7 Vpp 75 Ω Digital DVI D Synchronisation Separate Sync TTL positive or negative Horizontal frequency 30 kHz 82 kHz multi scanning Refresh rate 56 Hz 76 Hz Maximum pixel rate 135 MHz Power supp...

Страница 33: ...or instead Fujitsu Siemens A17 2 A19 1 Preset operating modes The picture position and size have been set to optimum values at the factory for the operating modes listed above Depending on the screen controller used it may be necessary to adjust the display position and size In this case you can change and save the settings see Operation of the monitor i The following are the most frequently used ...

Страница 34: ...Meaning Pin Meaning 1 Video input red 9 5 V DDC 2 Video input green 10 Sync earth 3 Video input blue 11 Earth 4 Earth 12 DDC Data 5 Earth 13 H sync 6 Red video earth 14 V sync 7 Green video earth 15 DDC Clock 8 Blue video earth 26 A26361 K1146 Z120 1 7619 edition 1 ...

Отзывы: