background image

10 | 

Click the [OK] button. A confirmation screen appears. 
Then click the [OK] button. 

Ö


The Ink remain counter is reset to 100%. 


For Windows 95, Windows NT 4.0 

c

 Right-click the

icon in task bar and select [Option]. 

d

 Click the [Device Setting] tab.  

e

 Click the [Clear] button on [Remaining Ink]. 


Click the [OK] button. A confirmation screen appears. 
Then click the [OK] button. 

Ö

 The Remaining Ink Counter is reset to 100%. 


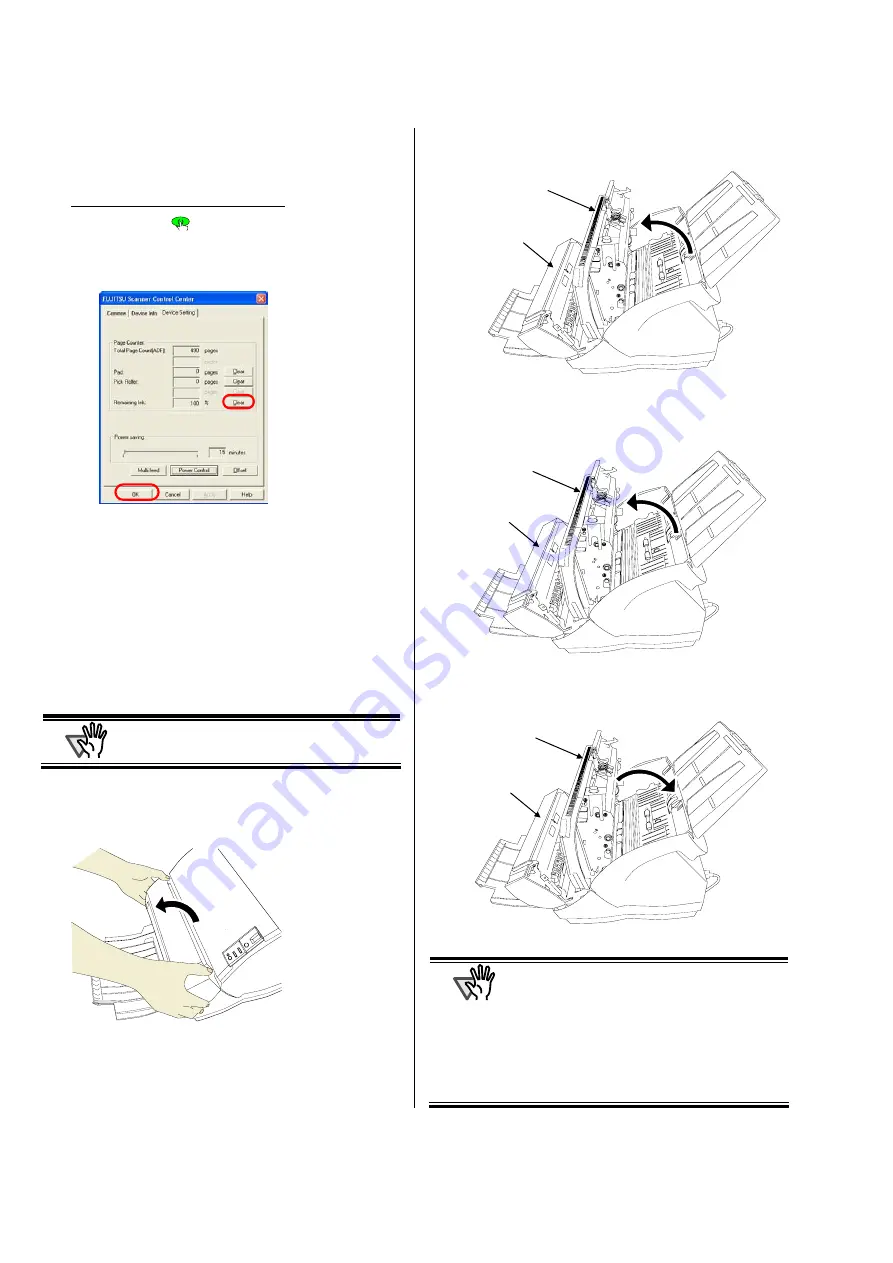
3.4. Removing Jammed Documents 

If document jams, remove the jammed document as 
follows:  

ATTENTION


Open the covers to remove the jammed 
documents.  
Do not pull out the documents forcefully.  

1.  Remove the documents in the ADF Paper chute.  

2.  Grab both ends of the Imprinter Cover, pull and 

turn it towards you to open the cover. 


3.  Open the ADF cover.  


3. 

Remove the jammed documents. 

4. 

Close the ADF cover. 


5. 

Grab both ends of the Imprinter Cover and close 
it. 


ATTENTION

z

  Do not move the Imprinter and scanner while 

printing. Printing may be out of order. 

z

  When you do not use the Imprinter for a long 

time, please remove the Print Cartridge from 
the Imprinter and store it.  

z

  Ink will be consumed every time at the initial 

processing by the Imprinter even if no printing is 
performed.  

z

  Do not move the scanner with the Imprinter  

installed. The Imprinter may get damaged.  

ADF Cover

Imprinter Cover 

ADF Cover

Imprinter Cover 

ADF Cover

Imprinter Cover 

Содержание fi-553PR

Страница 1: ...P3PC 1362 01EN fi 553PR Imprinter Operator s Guide ...

Страница 2: ...ORE USING THIS PRODUCT IF THIS PRODUCT IS NOT USED CORRECTLY UNEXPECTED INJURY MAY BE CAUSED TO USERS OR BYSTANDERS While all efforts have been made to ensure the accuracy of all information in this manual PFU LIMITED assumes no liability to any party for any damage caused by errors or omissions or by statements of any kind in this manual its updates or supplements whether such errors are omission...

Страница 3: ... different versions of the above operating system the general term Windows is used Regulatory Information FCC declaration This equipment has been tested and found to comply with the limits for a Class B digital device pursuant to Part 15 of the FCC Rules These limits are designed to provide reasonable protection against harmful interference in a residential installation This equipment generates us...

Страница 4: ...o an operation that if not strictly observed may result in severe injury or death CAUTION This indication alerts operators to an operation that if not strictly observed may result in safety hazards to personnel or damage to equipment Symbols Used In This Manual This manual uses the following symbols in explanations in addition to warning indications ATTENTION This symbol alerts operators to partic...

Страница 5: ...u bought the scanner or the Maintenance Service Center Pay particular attention to this warning in households where there are small children Do not take apart or modify the scanner The inside of the scanner contains high voltage components Touching these components might cause fire or electric shock CAUTION The following describes important cautions Install the scanner on a desk so that none of it...

Страница 6: ...tact the store where you purchased the Imprinter 1 2 Names and Functions of Parts Imprinter Unit Front Side Rear Side Imprinter with Scanner Installed Front Side Rear Side Inside Print Section Cover Imprinter Cover EXT Cable Imprinter Cable Fix Tab ADF Paper Chute Operator panel Function No display Function button Send to button Scan button Power button ADF Automatic Document Feeder Cover Stacker ...

Страница 7: ...ntly place the Scanner onto the Imprinter base while lowering and pushing it forward until it touches the Imprinter ATTENTION Be careful not to put the Scanner on the Fix Tabs or hitting it hard against them You may damage the Fix Tabs Be careful not to pinch your finger 4 Insert the screws of the Fix Tabs to the rear of the scanner and tighten them to secure the Imprinter with the Scanner 2 place...

Страница 8: ...own below and release the Arm 5 Take out the Print Cartridge from the bag 6 Remove protection tape on the Print Cartridge ATTENTION Do not touch the metal part of the Print Cartridge nor put the tape back again 7 Put the Print Cartridge into the holder as below ATTENTION Be careful not to let the Print Cartridge catch the print circuit film 8 Lower the Arm gently until it locks in and fix the Prin...

Страница 9: ...right figure is printed on the paper starting 5mm the range of error is 4mm from its leading edge HINT There are following print test patterns Test pattern 1 c Horizontal ABCDEFGHIJKLMNOPQRSTUVWXYZ _ 0000 0000 Test pattern 2 2 Horizontal abcdefghijklmnopqrstuvwxyz 00000000 Test pattern 3 3 Horizontal 0123456789 00000000 Test pattern 4 4 Vertical ABCDEFGHIJKLMNOPQRSTUVWXYZ _ 00000000 Test pattern 5...

Страница 10: ... In the TWAIN driver dialog box click Option button In Option dialog box choose Imprinter Endorser tab and specify the Imprinter settings HINT Available items are Position to start printing Y offset Font orientation Horizontal or vertical String to print Max 40 characters Counter Setup column add subtract step etc For the details please refer to FUJITSU TWAIN 32 Scanner Driver User s Guide or TWAI...

Страница 11: ...er should be positioned where the printing area of document Section 6 will pass under it ATTENTION When printing close to document edge be careful about the position so that characters may not be printed off of the document 9 Close the Print Section Cover 10 Turn on the scanner 11 Reset the Remaining Ink Counter ATTENTION You must clear the Remaining Ink counter whenever you replace the Print Cart...

Страница 12: ...uments forcefully 1 Remove the documents in the ADF Paper chute 2 Grab both ends of the Imprinter Cover pull and turn it towards you to open the cover 3 Open the ADF cover 3 Remove the jammed documents 4 Close the ADF cover 5 Grab both ends of the Imprinter Cover and close it ATTENTION z Do not move the Imprinter and scanner while printing Printing may be out of order z When you do not use the Imp...

Страница 13: ...t Cartridge ATTENTION When installing or replacing the Print Cartridge be careful not to insert it out of place 4 2 Cleaning the Imprinter While you use the Imprinter frequently ink sticks to the Imprinter base and that makes the paper dirty As a part of daily maintenance clean the Imprinter base by following the procedure below ATTENTION z When cleaning gently wipe off dust on the Imprinter base ...

Страница 14: ...e roller surfaces Clean lower rubber rollers total eight rotating the rollers by holding down the Scan button and Send to button on the operator panel of the Scanner ATTENTION When cleaning be careful not to touch the metal wheels located behind the upper rollers on the Print Cartridge holder cover 3 Clean the Plastic Rollers Clean two black plastic rollers on the inner side of the Imprinter Cover...

Страница 15: ... installed correctly Description A problem occurred to the Imprinter How to solve cOpen the Print Section Cover and confirm that the Print Cartridge is installed correctly dTurn off the scanner and then turn it on again If the problem occurs again contact the store where you purchased the Imprinter or contact an authorized FUJISTU scanner service provider ATTENTION For other errors refer to fi 553...

Страница 16: ...ease refer to fi 5530C Image Scanner Operator s Guide Chapter 6 Document Specification for the ADF ATTENTION Documents with glossy surface such as thermal paper thermal transfer paper coated paper and art paper take longer time for the ink to dry and may cause poor print quality The Imprinter must be cleaned more frequently if you use these types of papers Very thick paper or plastic document cann...

Отзывы: