background image

16

9

Ctrl key

Use the Ctrl key in combination with another key. Its function varies with each application.

10 Windows key

Press the Windows key to display the Start menu.

11 Alt key

Use the Ctrl key in combination with another key. Its function varies with each application.

12 Application key

This key has the same function as clicking the right mouse button.
Press this key to display the shortcut menu of the selected item.

13 Enter key

The Enter key is also referred to as the Return key.
Press this key to perform line feed or execute a command.

14 Delete key

Press the Delete key to delete a character. Press this key together with [Ctrl] and [Alt] to reset the
computer.

15 End key

Press the End key to move the cursor all at once to the end of the current line or text.

16 Cursor keys

Press each of these keys to move the cursor in the desired direction.

17 Page Down key

Scrolls down the on-screen page when pressed.

18 Page Up key

Scrolls up the on-screen page when pressed.

19 Numeric keypad

Enables you to enter numerals when the [Num Lock] indicator is on.
The function described in the lower part of the numeric key is enabled when the [Num Lock] indicator
is off.

20 Num Lock key

Press the Num Lock key to change the Ten-key pad functions.

Point

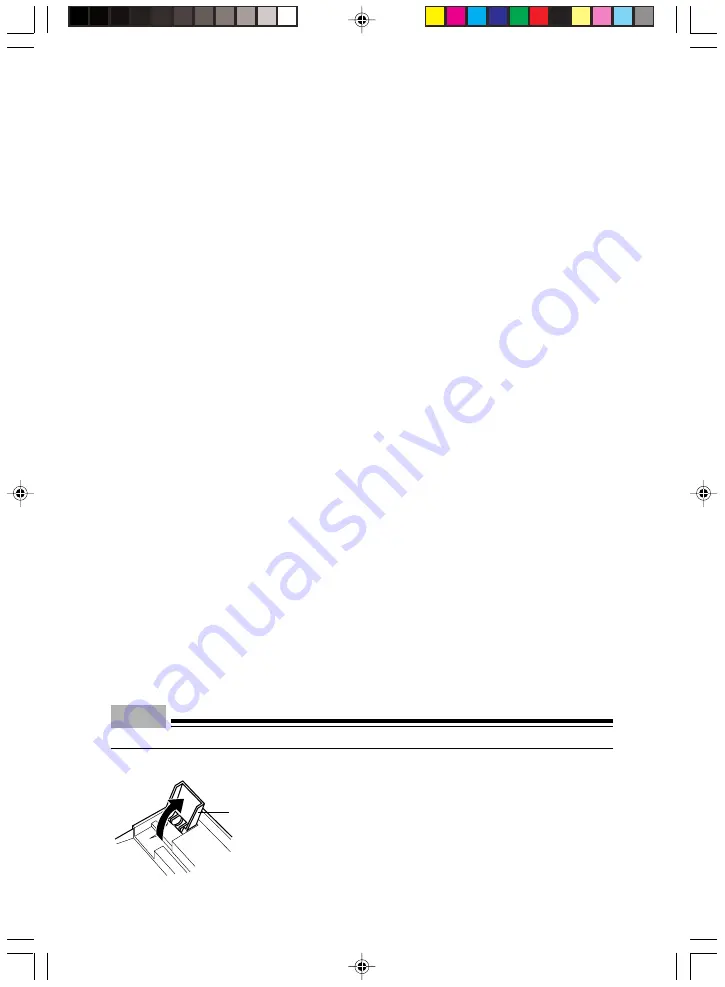
To tilt the keyboard, pull up the tilt foot on the both sides of the underside of the keyboard.

Tilt foot

Welli2 (15-20)

15/12/04, 10:30 AM

16

Содержание DESKPOWER P321

Страница 1: ...MS MS DOS Windows NT Windows 98 Windows Millennium Window 2000 and Windows XP Intel and Pentium are registered trademarks of Intel Corporation in the U S Celeron is a registered trademark of Intel Corporation in the U S Other product names are trademarks or registered trademarks of respective companies Other products are copyrighted by individual companies All other trademarks referenced are trade...

Страница 2: ... not sure of the type of power available consult your dealer or local power company 8 This product is equipped with a 3 wire grounding type plug a plug having a third grounding pin This will only plug into a grounding type power outlet This is a safety feature If you are unable to inserttheplugintotheoutlet contactyourelectriciantoreplaceyourobsoleteoutlet Donotdefeat the purpose of the grounding ...

Страница 3: ...often require extensive work by a qualified technician to restore the product to normal condition e If the product has been dropped or the cabinet has been damaged f If the product exhibits a distinct change in performance indicating a need for service 14 Use only the proper type of power supply cord set provided in your accessories box for this unit It should be a detachable type UL listed CSA ce...

Страница 4: ... this product Fujitsu as a member of the International Energy Star Program recognizes that this equipment is compliant with the standard of the International Energy Star Program The International Energy Star Program is a worldwide program for promoting energy saving for computers and other office equipment The program aims at promoting the development and use of products equipped with the function...

Страница 5: ...bleformaintainingtheintegrityofdata includingthebasicandapplication software storedorinstalledontheproduct Wedonotwarranttheintegrityofdatastoredorinstalled onthepersonalcomputerthecustomersentforrepair Takeappropriatemeasuressuchasmaking a backup We assume no responsibility for loss of data and any direct or incidental damage due to any cause other than those specified in the warranty This comput...

Страница 6: ...ed at that time by Microsoft Corp We recommend you to use the latest version In some environments however the Service Pack may cause unexpected failure Read Readme txt for the Service Pack before use Again we recommend you to make a system backup in case of failed installation Components of this product motherboard CD ROM hard disk and floppy disk drive contain traces of heavy metals lead and chro...

Страница 7: ...ised persons can access your data for example you can activate a screen saver with password protection For example you can activate a screen saver with password protection The security functions in the BIOS Setup also allow you to protect your data by means of passwords Notational conventions The meanings of the symbols and fonts used in this manual are as follows Indicates information which is im...

Страница 8: ...ionsinthe System expansions Replacing lithium battery chapter Caution components in the system can get very hot Manufacturer s notes Keep this operating manual together with your device If you pass on the device to third parties you should include this manual Energy saving When the PC is delivered some energy saving functions are already set If you are not using your PC switch it off In the BIOS S...

Страница 9: ...es cause harmful interference to radio or television reception which can be determined by turning the equipment off and on the user is encouraged to try to correct the interference by one or more of the following measures Reorient or relocate the receiving antenna Increase the separation between equipment and the receiver Connect the equipment into an outlet on a circuit different from that to whi...

Страница 10: ...n abrasives or may corrode plastic Ensure that no liquid enters the system Ensure that the ventilation areas of the system unit and the monitor are free Cleaning the system unit and the monitor Wipe the system unit and monitor casing with a dry cloth If particularly dirty use a cloth that has been moistened in mild domestic detergent and then carefully wrung out Cleaning the keyboard and the mouse...

Страница 11: ...l be disposed of in an environmentally acceptable manner Do not throw lithium batteries into the household waste They must be disposed of in accordance with local regulations concerning special waste Reference to products In this manual the product names are referred to as follows This manual includes information on other operating systems Product name Description used in the manual Microsoft Wind...

Страница 12: ...nting an optional unit in from your PC switch off the PC and all connected units and unplug all power cords from respective outlets to prevent electric shock Electric shock WARNING To prevent electric shock switch off the PC and connected peripherals and unplug power cords from respective outlets before disassembling the unit and installing a built in option Electric shock WARNING To prevent elect...

Страница 13: ...r 2 Operation This chapter explains basic operations and basic items for using the PC Chapter 3 Troubleshooting and Tips This chapter provides the basic information on the PC and operation Chapter 4 System Expansion Thischapterprovidesbasicinformationonhowtohandletheperipheralsinstalled or can be installed on the PC Chapter 5 Electrical Data This chapter provide the electrical data of the PC Organ...

Страница 14: ...itching Off the PC 13 Indicators on the PC 14 2 Keyboard 15 3 Floppy Disks 17 Working with Floppy Disks 17 Settings in BIOS Setup 18 Property and Data Protection 18 Access Protection Under Windows 18 BIOS Setup Security Functions 19 CHAPTER 3 Troubleshooting and Tips 1 Troubleshooting and Tips 22 Installing New Software 22 Power on Indicator Remains Unlit After You Have Switched on Your Device 22 ...

Страница 15: ...ds 28 Opening the casing 29 Closing the casing 29 Installing and Removing a Board 30 Low Profiles boards 34 Installing an Additional Serial Port 34 Installing and Removing the Hard Disk Drives 35 CHAPTER 5 Electrical Data Electrical Data 38 Welli2 0 INTRO 15 12 04 10 27 AM 15 ...

Страница 16: ...xvi Welli2 0 INTRO 15 12 04 10 27 AM 16 ...

Страница 17: ...CHAPTER 1 Preparing for Use Welli2 01 10 15 12 04 10 28 AM 1 ...

Страница 18: ...lied software External devices If you have received other devices in addition to your PC e g a printer or a modem do not connect these until after the initial installation The following sections contain a description of how to connect these external devices Connecting external devices to the serial port and Connecting external devices to the parallel port Drives and boards If you have received dri...

Страница 19: ...l data and protect it from dust humidity and heat Provide at least 200 mm of clearance on the left in front of and behind the ventilator area of the system unit to ensure adequate ventilation Do not cover the ventilation areas of the monitor and the system unit Do not place several system units one above the other Connect the Monitor Mouse and Keyboard The ports for monitor mouse and keyboard are ...

Страница 20: ...t on the system unit Connecting USB mouse Connect the USB mouse to the USB port on the system unit If you do not attach a mouse at the PS 2 mouse port you can disable the mouse controller in the BIOS Setup in order to free the IRQ12 for a different application Welli2 01 10 15 12 04 10 28 AM 4 ...

Страница 21: ...ted with an arrow must be compatible with the local rated voltage 115 100 V to 127 V 230 200 V to 240 V If the voltage setting is incorrect then lift out the manual voltage adjuster with a screwdriver 1 turn it to the required setting and reinsert it Devices without main power switch The visible value must agree with the local mains voltage 115 100 V to 127 V 230 200 V to 240 V If an incorrect mai...

Страница 22: ... time for this as this process must not be interrupted CAUTION Once the installation has been started the PC must not be switched off During installation the PC may only be rebooted when you are requested to do so Otherwisetheinstallationwillbenotbeperformedcorrectly Ifafaultoccursduringtheinstallation the contents of the hard disk must be completely restored You may need the licence number for Wi...

Страница 23: ...icator lights green and the PC is started Installing the software During installation follow the instructions on screen Consult the operating system manual if there is anything unclear about the requested input data You will find further information about the drivers on the Composite Software Drivers CD Welli2 01 10 15 12 04 10 28 AM 7 ...

Страница 24: ...lets Connect all cables at the system unit and peripherals You must observe the information provided in the chapter Important notes Plug all data communication cables into the utility sockets Plug all power cables into the grounded mains outlets Disconnecting cables Turn off all power and equipment switches Pull all power plugs out of grounded mains outlets Unplug all data communication cables fro...

Страница 25: ...ymbols shown below or similar Keyboard port purple PS 2 mouse port green 1 Serial interface 1 turquoise Monitor port blue Parallel interface Printer burgundy Microphone jack mono pink Audio output Line out lime green Audio input Line in light blue USB Universal Serial Bus black LAN LAN connector Some of the devices that you connect require special drivers see the operating system and device docume...

Страница 26: ...rom the data carrier supplied with the device or with the application programme Connecting external devices to the parallel port External devices can be connected to the parallel port e g a printer Connect the data cable to the external device Connect the data cable to the parallel port For an exact description of how to connect external devices to the parallel port please see the device documenta...

Страница 27: ...CHAPTER 2 Operation Welli2 11 14 15 12 04 10 29 AM 11 ...

Страница 28: ...tor lights green and the PC is started If you have assigned the system password you must enter this when requested to do so in order to start the operating system On devices without main power switch If the power on indicator lights orange or flashes green orange press the power button on the front of the casing The power on indicator lights green and the PC is started If you have assigned the sys...

Страница 29: ... CAUTION The main power switch and the power button do not disconnect the PC from the mains voltage To completely disconnect the mains voltage remove the power plug from the socket Switch the monitor off On devices without main power switch Shut down the operating system properly For Windows select Shut Down from the Start menu If the operating system does not automatically switch the PC off turn ...

Страница 30: ...PC must not be switched off with the main power switch if present or disconnected from the mains as this may result in data loss The indicator does not light up The PC is switched off power switch at 0 or disconnected from the power supply or ready to operate If the PC is ready to operate the PC can be enabled with the ON OFF switch 3 Floppy disk indicator The indicator lights up when the floppy d...

Страница 31: ... insert mode and overwrite mode 5 Print Screen key Pressing this button copies the screenshot to the clipboard 6 Home key Press the Home key to move the cursor all at once to the beginning of the current line or text 7 Indicators The indictor lights when you press Num Lock Shift Caps Lock or Scroll Lock indicating that it is enabled When the key is pressed again the indicator turns off and the key...

Страница 32: ...o delete a character Press this key together with Ctrl and Alt to reset the computer 15 End key Press the End key to move the cursor all at once to the end of the current line or text 16 Cursor keys Press each of these keys to move the cursor in the desired direction 17 Page Down key Scrolls down the on screen page when pressed 18 Page Up key Scrolls up the on screen page when pressed 19 Numeric k...

Страница 33: ...ppy disk 5 Eject button for inserted floppy disks 6 Disk is write protected 7 Disk is not write protected To insert a floppy disk push it into the drive in the insertion direction until it engages The label should be facing upward To remove the floppy disk press the eject button 5 The write protect switch enables you to protect the data on the floppy disk from inadvertent overwriting or deletion T...

Страница 34: ...your requirements in the BIOS Setup Property and Data Protection Software functions and mechanical locking offer a broad range of functions for protecting your PC and your personal data from unauthorised access You can also combine these functions Anti theft protection There are two ways to protect your PC from theft with a chain and the eyelet 1 with the Kensington Lock device 2 and with a Kensin...

Страница 35: ...Preventing unauthorised BIOS Setup entry Preventing unauthorised system access Preventing unauthorised access to the settings of boards with their own BIOS Preventing system booting from the diskette drive Preventing unauthorised writing of diskettes Protecting BIOS from being overwritten You can also combine these functions Welli2 15 20 15 12 04 10 30 AM 19 ...

Страница 36: ...20 Welli2 15 20 15 12 04 10 30 AM 20 ...

Страница 37: ...CHAPTER 3 Troubleshooting and Tips Welli2 21 26 15 12 04 10 31 AM 21 ...

Страница 38: ...e Installing New Software When installing programmes or drivers important files may be overwritten and modified To be able to access the original data in the event of any problems following installation you should backup your hard disk prior to installation Power on Indicator Remains Unlit After You Have Switched on Your Device This may be due to the following The mains voltage supply is faulty Ch...

Страница 39: ...with your monitor Power cable not connected Switch off the monitor and the PC Check that the power cable of the monitor is properly connected to the monitor and depending on the connector to the system unit or to the grounded mains outlet Check that the power cable of the PC is plugged properly into the system unit and grounded mains outlet Switch on the monitor and the system unit Monitor cable n...

Страница 40: ...stem unit If you use an adapter or extension lead with the mouse cable check the connections Make sure that only one mouse is connected Switch the PC on The mouse controller must be enabled if you use a PS 2 mouse on the PS 2 mouse port Check in the BIOS Setup that the mouse controller is Enabled Check that the mouse driver is properly installed and is present when the application programme is sta...

Страница 41: ...ps The PC cannot be switched off with the power button Cause The PC was not switched on with the power button Press the power button again Cause System crash Press and hold the power button for at least four seconds until the device switches off Out of system resources If you have too many applications running at once you may experience problems due to a lack of system resources In this case you s...

Страница 42: ...26 Welli2 21 26 15 12 04 10 31 AM 26 ...

Страница 43: ...CHAPTER 4 System Expansion Welli2 27 36 15 12 04 10 32 AM 27 ...

Страница 44: ...ereplacingthesystem board or components on the system board To prevent damage to the system board or the components and conductors on it please take care when you insert or remove boards Make sure expansion boards are inserted straightly Never use sharp objects screwdrivers for leverage Boards with electrostatic sensitive devices ESD are identifiable by the label shown Whenyouhandleboardsfittedwit...

Страница 45: ...ted to the PC are in the way disconnect them from the PC Place the system unit in a convenient working position Press on the clip 1 Push the top cover in the direction of the arrow 2 Closing the casing Push the top cover down in the direction of the arrow 1 until it engages Return the PC to its original position If you have disconnected cables reconnect them to the connectors on the rear panel 2 W...

Страница 46: ...manual for the mainboard Boards may already be installed when the device is shipped Installing a board 1 Open the casing see Opening the casing 1 2 Remove the screw 1 3 Remove the rear slot cover plate from the slot 2 Do not dispose of the cover plate For cooling protection against fire and in order to comply with EMC regulations you must refit the cover plate if you remove the board The top and t...

Страница 47: ...ten the board into place with the screw 2 9 If necessary connect the cables 10 Close the casing see Closing the casing If you have installed or removed a PCI board please check the relevant PCI slot settings in the BIOS Setup If necessary change the settings Further information is provided in the PCI board documentation 2 5 Make the required settings for the board Welli2 27 36 15 12 04 10 32 AM 31...

Страница 48: ...UTION To ensure proper cooling fire protection and observation of the relevant EMC electromagnetic compatibility regulations you must mount a rear slot cover plate Removing a board 1 Open the system unit see Opening the system unit 2 Disconnect the cables connected to the board 1 Welli2 27 36 15 12 04 10 32 AM 32 ...

Страница 49: ... screw 2 8 Close the casing see Closing the casing CAUTION If you have installed or removed a PCI board please check the relevant PCI slot settings in the BIOS Setup If necessary change the settings Further information is provided in the PCI board documentation 2 Welli2 27 36 15 12 04 10 32 AM 33 ...

Страница 50: ...ow profile board 1 and screw it on 2 Now you can install the low profile board in a suitable slot like a normal board see the chapter Installing board Removing slot adapter Unscrew the screw 1 and remove the slot adapter 2 2 1 Installing an Additional Serial Port An additional serial interface can be installed in a rear slot cover plate like a board The condition is that the system board has a fre...

Страница 51: ...e together somewhat 1 and pull the hard disk drive out of the case in the direction of the arrow 2 2 Disconnect all cables connected to the drive data cable power supply cable 1 1 2 It may be necessary to modify the entry for the drive in the BIOS Setup 3 Connect the cables to the hard disk drive 4 Close the casing see Closing the casing Welli2 27 36 15 12 04 10 32 AM 35 ...

Страница 52: ... the corresponding holes of the hard disk 4 Connect the cables to the hard disk drive 5 Press the EasyChange rails mounted on the hard disk drive together somewhat 1 and slide the hard disk drive into the case in the direction of the arrow 2 6 Close the casing see Closing the casing It may be necessary to modify the entry for the drive in the BIOS Setup EasyChange rails for a second hard disk driv...

Страница 53: ...CHAPTER 5 Electrical Data Welli2 37 38 15 12 04 10 33 AM 37 ...

Страница 54: ...ss 2K2 Temperature Operating 3K2 Transport 2K2 Condensation in operating must be avoided Clearance required to ensure adequate ventilation left front rear DESKPOWER P300 100 V 127 V 200 V 240 V 50 Hz 60 Hz 100 V 127 V 6 0 A 200 V 240 V 3 0 A 100 V 127 V 3 0 A 200 V 240 V 1 5 A 202 mm 376 mm 372 mm 11 kg in basic configuration DIN IEC 721 part 3 3 DIN IEC 721 part 3 2 15 C 35 C 25 C 60 C min 200 mm...

Отзывы: