background image


M3091DC Image Scanner Operation Guide 

4-9 


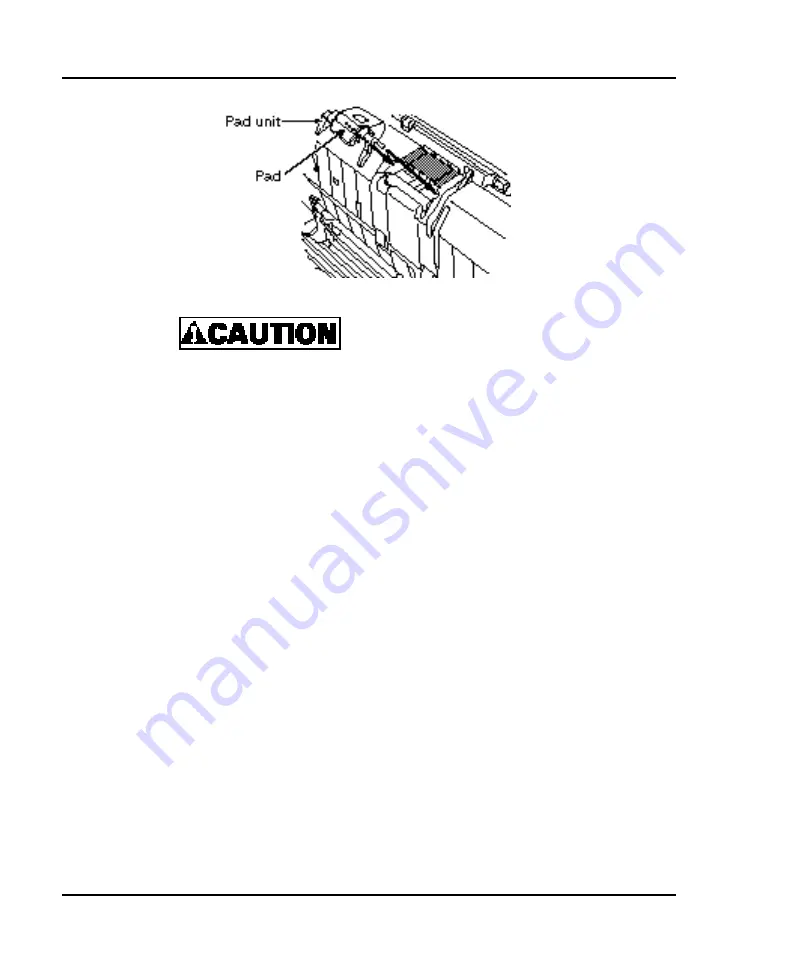
Check that the pad unit is mounted completely.  
If the pad unit is not mounted correctly, a 
document feeding error such as a paper jam 
may occur. 


4.4.3  Procedure for Replacing the Pick Roller Unit 

Replace the pick roller unit through the following procedure: 

1)  Remove any documents from the document support. 

2)  Open the automatic document feeder by pulling it toward you while 

raising the cover open lever. 

3)  Remove the document support. 

4)  Remove the pick roller unit. 

Press the paw of the pick roller unit inward, hold the knob, and raise 
the pick roller unit while turning it (in the arrow direction). 


Содержание C150-E140-03EN

Страница 1: ...2 M3091DC Image Scanner OPERATION GUIDE C150 E140 03EN ...

Страница 2: ...nerates uses and can radiate radio frequency energy and if not installed and used in accordance with the instructions may cause harmful interference to radio communications However there is no guarantee that interference will not occur in a particular installation If this equipment does cause harmful interference to radio or television reception which can be determined by turning the equipment off...

Страница 3: ...ent of Communications Le présent appareil numériqué n émet pas de bruits radioélectnques dépassant les limites applicables aux appareils numériques de la classe B prescrites dans le Règlement sur le brouillage radioélectrique édicté par le ministère des Comunications du Canada Notice to German Users Bescheinigung des Herstellers Importeurs Hiermit wird bescheinigt daß der dieldas M3091DC in Überei...

Страница 4: ...o take whatever measures may be required to correct the interference As an ENERGYSTAR Partner Fujitsu Limited has determined that this scanner meets ENERGYSTAR guidelines for energy efficiency ENERGYSTAR is a U S registered mark Trademark Acknowledgment Fujitsu is a registered trademark of Fujitsu Limited ThirdEdition April 2000 The contents of this manual may be revised without prior notice The c...

Страница 5: ... manual the Microsoft Windows NT Operating System is referred to as Windows NT the Microsoft Windows 95 Operating System is referred to as Windows 95 and the Microsoft Windows 98 Operating System is referred to as Windows 98 Microsoft Windows and Windows NT are registered trademarks of Microsoft Corporation of the U S in the United States and other countries Other company names or product names ap...

Страница 6: ...ge or loss caused to data as the result of using this product Please understand that the warranty range for failure of this product will never exceed the amount of money paid by the user for the product Fujitsu prohibits any user from using software supplied with this product or any other update software for this product for any purpose other than incorporation into this product Fujitsu also prohi...

Страница 7: ...ates a hazardous situation that could result in minor or moderate personal injury if the user does not perform the procedure correctly This alert signal also indicates that damage to the products or other property may occur if the user does not perform the procedure correctly In addition to the above cited signals the following symbols are also used to provide detailed information concerning injur...

Страница 8: ... concrete meaning of the action is illustrated in the symbol The example at left indicates the prohibition of disassembly Plug The symbol marked with indicates what must be observed The concrete meaning of the action is illustrated in the symbol The example at left directs the operator to disconnect the power plug from the outlet ...

Страница 9: ...0 VAC Do not make a starburst connection It could result in a fire or electric shock Do not damage break or process the power cord Do not put a heavy item on pull or forcibly bend it It could result in a fire or electric shock Use only the power cord AC adapter supplied with the scanner Do not use an extension cord It could result in abnormal heat or a fire Do not use the power cord or AC adapter ...

Страница 10: ... clean it well with a dry cloth Failure to do so could result in a fire Plug If one of the following occurs promptly stop using the scanner and disconnect the AC adapter from the outlet then call your sales agency or Fujitsu Limited The scanner generates smoke or the outside of the scanner is extraordinarily hot The scanner generates an abnormal sound Water enters the inside of the scanner Failure...

Страница 11: ...e used for a long period Failure to do so could result in a fire or electric shock Prohibited Always hold the plug when disconnecting the AC adapter from the outlet Pulling the power cord could damage the cord and result in a fire or electric shock Do not keep looking at the fluorescent lamp At least once a month check whether The AC adapter is firmly connected to the outlet The AC adapter is free...

Страница 12: ...here it is easily moistened A fire or electric shock could result Prohibited Do not install the scanner at a place affected by much vibration or where it would be unstable such as on a slope The scanner could fall and cause injury Do not leave the scanner for a long time in direct sunlight or at high temperature such as in a car in the scorching sun High temperature could deform or melt the cover ...

Страница 13: ...terior via an opening such as the document entry unit A fire or electric shock could result Plug If a foreign substance such as a metal water or liquid enters the scanner interior promptly disconnect the AC adapter from the outlet then call your sales agency or Fujitsu Limited Failure to do so could result in a fire or electric shock If the scanner has been dropped or the cover has been damaged di...

Страница 14: ...n openings could build up internal heat and result in a fire Do not cover or wrap the scanner with a cloth etc while in operation That could build up internal heat and result in a fire When removing a jammed document or performing fault recovery be careful not to touch sharp edges This could result in personal injury Do not touch the document entry or exit port while the scanner is operating This ...

Страница 15: ...al thoroughly to ensure correct connections of cables An incorrect connection could result in a malfunctioning scanner or peripheral devices When disposing of the scanner separate it from general waste The fluorescent lamp contains mercury Do not put it in waste to be processed at a general waste dumping site For disposal of fluorescent lamps follow the regulations or rules of the relevant local g...

Страница 16: ......

Страница 17: ...es concerning Installation 2 1 2 2 Mounting the Document Support 2 3 2 3 Connection 2 5 2 3 1 Notes concerning Connection 2 5 2 3 2 Connecting the SCSI Cable 2 6 2 3 3 Connecting the Power Cable 2 7 2 3 4 Setting the SCSI ID 2 8 2 3 5 Installing Driver and Software 2 9 2 4 Setting up the Stacker and Document Support 2 11 CHAPTER 3 Operation 3 1 3 1 Notes concerning Operation 3 1 3 2 Before Scannin...

Страница 18: ... Surface of the Scanner and the Document Support 4 4 4 3 2 Cleaning the Automatic Document Feeder 4 5 4 4 Consumables and Regular Replacement Components 4 7 4 4 1 Parts Number and Replacement Cycle of Consumables and Regular Replacement Components 4 7 4 4 2 Procedure for Replacing the Pad Unit 4 7 4 4 3 Procedure for Replacing the Pick Roller Unit 4 9 CHAPTER 5 When you suspect that a fault occurr...

Страница 19: ...th attached software as follows Scan software enables the saving of data scanned with the scanner in TIFF format in a personal computer Copy software enables the output of data scanned with the scanner to the printer connected to a personal computer The M3091DC Image Scanner has the following features High reliable ADF Performs document feeding at a level equivalent to business scanners Reading of...

Страница 20: ... the packing box and confirm missing items with the attached packing list If you find an item to be missing or defective call your sales agency Before using the scanner the user must make preparations for each of the following items SCSI board SCSI board driver SCSI cable The interface cable mounted on this device is half pitch 50 pin Please prepare the SCSI cable which fit for the SCSI board to b...

Страница 21: ... the components of the scanner and explains their functions Component Name Function Document support Accommodates documents to be read by the automatic document feeder Document guide Holds documents so that they are transported straight Automatic document feeder ADF Reads documents automatically ...

Страница 22: ...tton Selects a function to be started using this button This button s function is set using Launch Duplex button Switches between read modes You can confirm the current read mode with the Function No display panel Send to button Copies documents loaded in the document support Starts the operation specified by the Function button Scan button Scans the document placed in position Operator panel Powe...

Страница 23: ...mmodates the AC adapter Interface connector Accommodates an interface cable to be connected to a personal computer Half pitch 50 pin 2 SCSI terminator switch Set this switch to ON when the scanner is connected to the end of an SCSI link Otherwise set it to OFF SCSI ID switch Use this switch to set a SCSI ID The scanner is shipped with ID 5 ...

Страница 24: ...1 6 M3091DC Image Scanner Operation Guide Component Name Function Feed roller eject roller plastic roller Sends documents ...

Страница 25: ...nstallation location and environment notes Fire or electric shock Do not alter or disassemble the scanner High voltage components are inside When connecting or disconnecting an optional device first disconnect the AC adapter from the outlet and follow the written procedure Falling or dropping Do not place the scanner on an unstable surface but on an even surface where the scanner is stable without...

Страница 26: ...e inside from becoming too hot Fire electric shock falling or dropping When moving the scanner first disconnect the power plug from the outlet and the other connection cables Move the scanner carefully Malfunction Install the scanner far away from a strong magnetic or noise generating source Avoid static electricity which could result in a scanner malfunction For the floor and workbench on which n...

Страница 27: ...the procedure below to mount the stacker and document support 1 Hold the document support and insert it into the hole on the lower part of the scanner until it stops 2 Hold the document support and insert its tabs into the counterpart holes on the scanner as shown in the figure below ...

Страница 28: ...ctually read the user can raise the Paper Extension of the document support and pull out the stacker according to the size of the documents For information regarding the setup of the document support and the stacker see Section 2 4 Setting up the stacker and Document Support ...

Страница 29: ...connecting a device turn off the power switch on the personal computer disconnect the power plug from the outlet then follow the written procedure Use the scanner only with the indicated supply voltage Do not make a starburst connection Do not hold the power cable or AC adapter with moistened hands when connecting or disconnecting it If the power plug is dusty clean it with a dry cloth Do not put ...

Страница 30: ...t connect to the same outlet as large power consumption equipment such as a copy machine or a shredder 2 3 2 Connecting the SCSI Cable Insert the interface cable into the interface connector until it clicks Connect the connector on the other end of the cable to the personal computer or another SCSI device If the image scanner is the end termination of the SCSI bus set the SCSI terminator switch to...

Страница 31: ... AC adapter into the outlet u Key point The image scanner is not equipped with a power switch When connecting a cable or changing the setting first be sure to disconnect the power cable from the outlet While the driver and the software is active the reading lamp turns on or off in accordance with the status of the connected personal computer ...

Страница 32: ...rom the outlet 2 Set the device address using the SCSI ID switch on the back of the image scanner Notes concerning device address setting Address No Meaning 0 to 7 These address numbers can be set 8 9 The factory default value SCSI ID 5 is used for these numbers 3 After setting the address number corresponding to the target SCSI ID connect the power cable to the outlet ...

Страница 33: ... Disk1 folder on the CD ROM The following software is installed in Start Programs Tools COPY Sets the image quality when image data is being copiedby the image scanner COPY Help Displays Help information concerning COPY Image Sets the image quality when image data is being scanned by the image scanner Image Help Displays Help information about Image Uninstall Tools Uninstalls the Tools software La...

Страница 34: ...Image Scanner Operation Guide u Key point Thoroughly read Readme txt on the CD ROM before installation You must install the driver and all software components in order to use the operator panel of the image scanner ...

Страница 35: ... and Document Support Raise the Paper Extension of the document support and pull out the stacker according to the document size as follows 1 Hold the tab of the stacker and pull 2 Insert a finger into the dent at the center of the stacker then lift and pull the Stacker B ...

Страница 36: ...2 12 M3091DC Image Scanner Operation Guide 3 When using an A4 size document raise the Paper Extension of the document support as shown below ...

Страница 37: ...uipment turn off the power switch of the main unit and disconnect the power plug from the outlet After confirming that the smoke has disappeared notify the sales agency or service center Never repair the equipment yourself because doing so is dangerous Do not insert foreign matter such as metal and easy to burn materials via the opening ventilating hole into the device interior Also be careful not...

Страница 38: ...ehold use including the presence of children If the equipment will not be used for a long time disconnect the power plug from the outlet for safety Getting caught in movable parts Be careful not to catch the sleeve of your clothing your necktie or hair in the movable parts e g gears and rollers Damage If lightening occurs nearby disconnect the power plug from the outlet otherwise the equipment may...

Страница 39: ...e that are difficult to read Readable documents Readable documents are listed below Paper type High quality paper PPC paper paper specified by Xerox Corporation Ream weight 45 to 90 kg ream 52 3 to 104 7 g m2 Size A4 A5 B5 letter size legal size and name card size A8 Difficult to read documents Some types of Documents cannot be read well Confirm whether documents can be read effectively before usi...

Страница 40: ...n transfer and pressure sensitive paper Paper larger than letter size 216 mm and legal size 355 mm Cloth metal sheet and OHP sheet made of other materials than paper Photographic paper Paper perforated peripherally Nonrectangular paper Paper lighter than 45 kg ream 52 3 g m2 or heavier than 90 kg ream 104 7 g m2 Paper of uneven width ...

Страница 41: ...ts Hold the documents strongly with both hands so that both ends of the documents are slanted and then unbend the documents so that they are inflated Repeat the operations described above two or three times Turn the document by 90o and similarly loosen it u Key point The thickness of the documents to be set shall be 4 mm or less Failure to do so could result in the paper jam or the reading defect ...

Страница 42: ...ument support surface For double sided reading Place the surface first page facing the document support surface 3 3 Scanning Documents This section explains how to scan documents 1 Make sure that the powers of the personal computer and the scanner are ON 2 Check the document condition For details see Section 3 2 1 Confirming Document Condition ...

Страница 43: ...ort surface For double sided reading Place the surface first page facing down document support surface Insert the documents in the automatic document feeder until they softly touch the back of the automatic document feeder Excessively strong insertion results in feeding multiple pages simultaneously Also make sure that the ends of the pages are not folded down 5 Adjust the document guides to the d...

Страница 44: ...he scan processing is canceled 8 After finishing reading remove the documents from the stacker u Note When validating the Duplex button and Scan button on the equipment using the TWAIN driver you must validate Follow Instructions on the Operator Panel of the Equipment on the Fujitsu M3091DC TWAIN32 operation environment setting screen u Key point You can perform a simple editing operation of the d...

Страница 45: ...ng standard The document thickness must be 4 mm or less 50 sheets by 55 kg ream 64 g cm2 paper for A4 or legal size or smaller Level the end of the documents to be set For details see Section 3 2 2 Setting Documents Set the documents as described below For single side reading Place the reading side facing down document support surface For double sided reading Place the surface first page facing do...

Страница 46: ...utton When the Function No display panel is ON the single side reading mode is active When the Function No display panel blinks the double sided reading mode is active 9 Press the Send to button on the scanner The set documents are read and output from the printer u Key point Press the Send to button to start the application software The mark is displayed until the application starts If the applic...

Страница 47: ......

Страница 48: ...nlarge Reduce to fit Print Area on the MCopy screen and click Copy This specification becomes valid for subsequent copy operation To cancel this option uncheck Enlarge Reduce to fit Print Area When Enlarge Reduce to fit Print Area is checked the printing time may be extended ...

Страница 49: ...bed in Section 4 3 2 Cleaning the Automatic Document Feeder 4 1 Handling a Paper Jam Be aware of high temperature in the glass surface of Automatic Document Feeder ADF It could result in a burn If a document jams while being read during automatic document feeding remove it through the following procedure 1 Remove the document from the document support 2 Open the automatic document feeder by pullin...

Страница 50: ...4 2 M3091DC Image Scanner Operation Guide 3 Remove the jammed document 4 Restore the automatic document feeder into position by pushing its center Interface connectorPress the center ...

Страница 51: ...r reading error may occur 4 2 Daily Maintenance To use the image scanner over a long period of time you must perform some tasks daily Keep the following point in mind If the equipment surface document support or automatic document feeder is soiled clean it according to Section 4 3 Cleaning Especially be sure to clean the automatic document feeder Interface connectorCheck that both edges are closed...

Страница 52: ...AC adapter power plug from the outlet 4 3 1 Cleaning the Surface of the Scanner and the Document Support This section explains how to clean the scanner surface and the document support Use a dry cloth or a cloth moistened with a small amount of neutral detergent or isopropyl alcohol u Key point Never use an organic solvent such as thinner Do not allow moisture to get inside the device during clean...

Страница 53: ...ith a dry cloth or a cloth moistened with isopropyl alcohol Pad Clean this component downward in arrow direction In this case be careful not to catch the cloth in the pick arm or spring Automatic document feed glass surface Clean this component gently Pick roller Gently clean this component taking care not to damage the roller surface If black foreign matter attaches to the component the document ...

Страница 54: ... the document feed performance is affected therefore thoroughly clean it Paper guide surface white part Clean this component gently 3 Restore the automatic document feeder into position After restoring the automatic document feeder into position make sure that it is closed completely If the automatic document feeder is not properly closed a paper jam or reading error may occur ...

Страница 55: ...onents Parts number and replacement cycle of consumables standard and regular replacement components are shown below No Component name Parts No Replacement cycle standard 1 Pad unit PA03209 F010 Every 12 000 sheets or annually 2 Pick roller unit PA03209 F014 Every 50 000 sheets or annually The replacement cycle is estimated for A4 high quality paper 55 kg ream 64 g m2 and differs depending on the ...

Страница 56: ...hile raising the cover open lever 3 Remove the pad unit Step 1 Push the pick arm in the automatic document feeder in the arrow direction Step 2 Pull out the pad unit by using such as a ballpoint pen at both ends a and b of the pad unit 4 When mounting a new pad unit push the pick arm downward with one hand while mounting the pad unit with the other hand ...

Страница 57: ...he Pick Roller Unit Replace the pick roller unit through the following procedure 1 Remove any documents from the document support 2 Open the automatic document feeder by pulling it toward you while raising the cover open lever 3 Remove the document support 4 Remove the pick roller unit Press the paw of the pick roller unit inward hold the knob and raise the pick roller unit while turning it in the...

Страница 58: ...it paw slides into the pick roller unit hole of the equipment Push the paw and the center of the pick roller unit with your hands to completely insert the pick roller Check that the pick roller unit is mounted completely If the pick roller unit is mounted correctly a document feeding error such as a paper jam may occur ...

Страница 59: ... power again by connecting the power cable If the power is not turned on notify the sales agent or the nearest service center Are documents inserted to the back of the automatic document feeder Insert the documents gently to the back Is the automatic document feeder closed completely Confirm that the automatic document feeder is closed Is the interface cable connected correctly Connect the interfa...

Страница 60: ...cument feeder clean Clean them according to Section 4 3 Cleaning Images are misaligned or distorted Are documents set straight on the document support Set the documents straight using the document guides Is the pad clean Clean the pad according to Section 4 3 2 Cleaning the Automatic Document Feeder Double feeding 1 occurs frequently Is the pad worn Replace the pad unit Is the pick roller clean Cl...

Страница 61: ...t External dimensions mm 308 5 154 130 Weight kg 2 3 Voltage 100 V to 240 V Number of phases Single Input power Frequency 50 60 Hz Operating 28 W or less Power consumption Not operating 4 5 W or less Equipment status Operating Not operating During storage and transfer Temperature o C 5 to 35 20 to 60 20 to 60 Permissible range of temperature and humidity Humidity 30 to 80 8 to 95 8 to 95 ...

Страница 62: ...A 2 M3091DC Image Scanner Operation Guide External dimensions ...

Страница 63: ......

Отзывы: