En-19
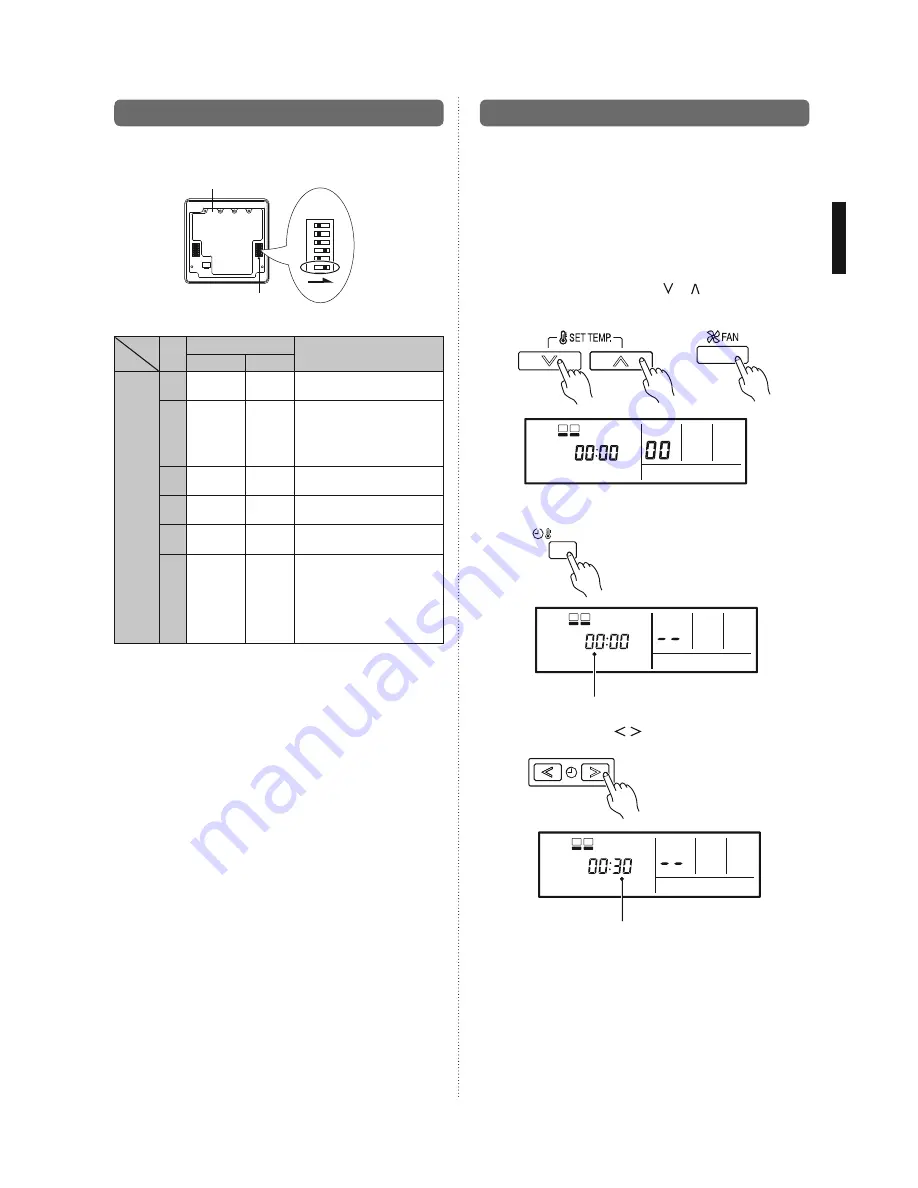
10.2. Setting the dip switches
Set the remote controller DIP switches.
[Example]
ON
ON
OFF
1
2
3
4
5
6
DIP switch 1
Front case (back side)
NO.
SW state
Detail
OFF
ON
DIP-
switch 1
1
)
Cannot be used.
(Do not change)
2
)
Dual remote controller setting
*
Refer to 2. DUAL REMOTE
CONTROLLERS in 11
SPECIAL INSTALLATION
METHODS.
3
)
Cannot be used.
(Do not change)
4
)
Cannot be used.
(Do not change)
5
)
Cannot be used.
(Do not change)
6
)
Invalidity
Validity
Memory backup setting
*
Set to ON to use batteries
for the memory backup. If
batteries are not used, all
of the settings stored in
memory will be deleted if
there is a power failure.
(
)
Factory setting)
10.3. Function setting
This procedure changes the function settings used to control
the indoor unit according to the installation conditions. Incorrect
settings can cause the indoor unit to malfunction. This proce-
dure should be performed by authorized installation or service
personnel only.
Perform the “FUNCTION SETTING” according to the installation
conditions using the remote controller. (Refer to the indoor unit
installation manual for details on the function numbers and set-
ting values.)
(1) Press the SET TEMP. buttons ( ) ( ) and FAN button
simultaneously for more than 5 seconds to enter the function
setting mode.
SU MO TU WE TH FR SA
(2) Press the SET BACK button to select the indoor unit num-
ber.
SU MO TU WE TH FR SA
Unit number of INDOOR UNIT
SET BACK
(3) Press the SET TIME (
) buttons to select the function
number.
Function number
SU MO TU WE TH FR SA


