background image


Removing and installing components during servicing 

10600690747, edition 1 

61 


1

a

3

2


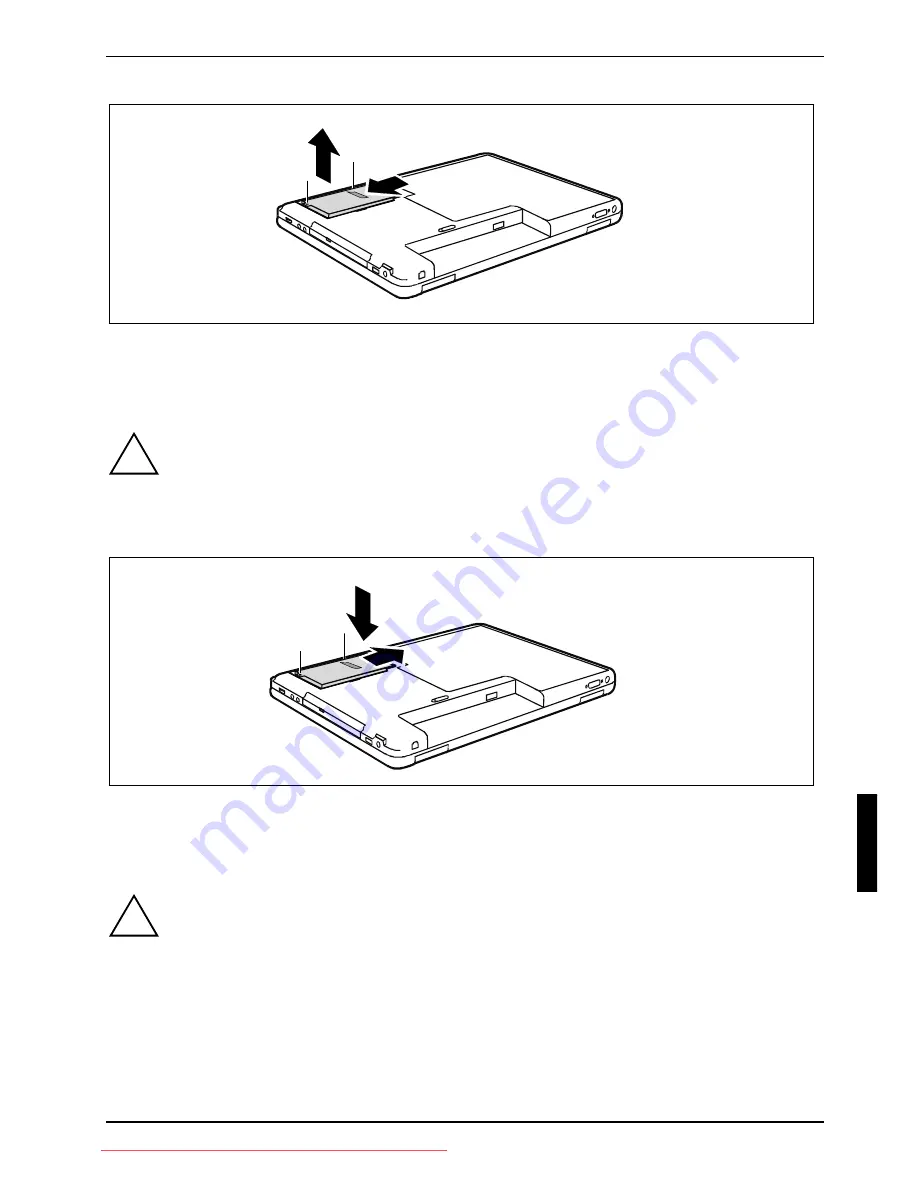
Remove the screw (1). 


Carefully slide the hard disk by the pulling aids (a) in the direction of the arrow (2). 


Raise the hard disk from the hard disk tray in the direction indicated by the arrow (3). 


!


The hard disk must be lifted out of the hard disk drive straight, not at an angle! 
 Otherwise there is the danger that the contacts may bend or break off. 

Installing the hard disk 

3

a

1

2


Place the hard disk precisely into the hard disk compartment (1). 


Carefully slide the hard disk by the pulling aids (a) in the direction of the arrow (2). 


Fasten the screw (3).  


!


 The hard disk must be placed into the hard disk drive straight, not at an angle! 
 Otherwise there is the danger that the contacts may bend or break off. 


Downloaded from LpManual.com Manuals

Содержание AMILO Xi Series

Страница 1: ...Notebook EasyGuide English AMILO Xi Series Downloaded from LpManual com Manuals ...

Страница 2: ... com support helpdesk html your sales partner your sales outlet Additional information is contained in the Help Desk list and the Warranty manual The Warranty manual can be found on the Drivers Utilities CD DVD provided with your computer The latest information on our products tips updates etc can be found on the internet at www fujitsu siemens com Downloaded from LpManual com Manuals ...

Страница 3: ...Downloaded from LpManual com Manuals ...

Страница 4: ...apier gedruckt This manual has been printed on recycled paper Este manual foi impresso em papel reciclado Denne håndboken er trykt på resirkulert papir Tato prírucka byla vytištena na recyklovaném papíre A használati utasítást visszaforgatott papírra nyomtatták Podręcznik ten wydrukowano na wtórnie wykorzystanym papierze Bu el kitabı tekrar geri dönüştürülmüş kağıt üzerine basılmıştır Order No 106...

Страница 5: ...nufacturer s notes Important notes Index Using your notebook for the first time Using your notebook Security functions Connecting external devices Removing and installing components Settings in BIOS Setup Utility Troubleshooting and tips March 2006 edition Downloaded from LpManual com Manuals ...

Страница 6: ...Electronics Inc All other trademarks referenced are trademarks or registered trademarks of their respective owners whose protected rights are acknowledged Copyright Fujitsu Siemens Computers GmbH 2006 All rights including rights of translation reproduction by printing copying or similar methods in part or in whole are reserved Offenders will be liable for damages All rights including rights create...

Страница 7: ...oard 17 Separate numeric keypad 19 Key combinations 19 Easy Launch keys 22 Touchpad touchpad buttons and ON OFF switch for touchpad 23 LCD screen 24 Information on LCD monitor 24 Monitor settings 25 Battery 25 Charging caring for and maintaining the battery 25 Removing and installing the battery 26 Using the power management features 27 ExpressCards 27 Installing ExpressCard 28 Removing ExpressCar...

Страница 8: ...r and user password 50 Password protection of operating system 52 Connecting external devices 53 Ports 54 Connecting an external monitor 54 Connecting USB devices 55 Connecting external audio devices 56 Connecting an external device to S Video Out 56 Connecting FireWire devices 57 Removing and installing components during servicing 59 Notes on installing and removing boards and components 59 Remov...

Страница 9: ...en is difficult to read 75 The external monitor stays blank 75 The external monitor is blank or the image is unstable 75 The notebook cannot be started 76 The notebook stops working 76 The printer does not print 77 The radio connection to a network does not function 77 Acoustic warnings 77 Technical data 79 Notebook 79 Battery 80 Mains adapter 120 W 80 Manufacturer s notes 81 Disposal and recyclin...

Страница 10: ...Downloaded from LpManual com Manuals ...

Страница 11: ... television an IEEE 1394 FireWire connection for high speed devices such as digital camcorders four USB ports which provide easy expansion with webcams game pads printers and more An infrared interface CIR Customized InfraRed for operating your notebook with a remote control an internal modem LAN and optional wireless LAN for Internet access an ExpressCard slot for operating an ExpressCard 34 or E...

Страница 12: ...nvalidate your warranty destroy the notebook or endanger your life i Indicates important information which is required to use the system properly Text which follows this symbol describes activities that must be performed in the order shown This font indicates screen outputs This font indicates programme names commands or menu items Quotation marks indicate names of chapters hard disks CDs DVDs and...

Страница 13: ...r 3 S Video out socket 4 Kensington Lock 5 LAN port 6 Memory card slot 7 FireWire port 8 USB ports 9 ExpressCard slot 10 Bass loudspeaker subwoofer 11 Battery 12 Battery release latch 13 Hard disk 14 On Off switch for wireless LAN Bluetooth 15 Touchpad buttons 16 Touchpad 17 ON OFF switch for touchpad 18 Built in loudspeakers 19 ON OFF switch of the Notebook 20 Easy Launch keys 21 CIR interface 22...

Страница 14: ...Downloaded from LpManual com Manuals ...

Страница 15: ...afety precautions for devices with radio components in the Safety manual Please take note of the information in the Removing and installing components during servicing chapter This notebook complies with the relevant safety regulations for data processing equipment If you have questions about using your notebook in a particular area please contact your sales outlet or our Hotline Help Desk Energy ...

Страница 16: ...ocal power supply and the specifications of the power cable are compatible If this is not the case buy a power cable that matches the local conditions Do not use a connection adapter for electrical devices to connect the notebook Your modem may not be fully compatible with the telephone system in the country you are visiting This may result in poor performance or the modem will not work at all Whe...

Страница 17: ...s e g direct sunlight in a car Cleaning the notebook Switch the notebook off Unplug the mains adapter from the mains socket Remove the battery Do not clean any interior parts yourself leave this job to a service technician Only use cleaning products designed for computers Normal household cleaners and polishes can damage the markings on the keyboard and the device the paintwork or the notebook its...

Страница 18: ...Downloaded from LpManual com Manuals ...

Страница 19: ... built in battery You can increase the battery s life by enabling the system s energy saving functions When you use your notebook in your home or office we recommend you use the mains adapter instead of the battery Please see the Connecting external devices chapter for instructions on how to connect devices such as a mouse and a printer to the notebook Unpacking and checking your notebook Unpack a...

Страница 20: ...riod of time The underside of the notebook heats up during normal operation Longer contac with the skin can become unpleasant or even result in burns Place the notebook on a stable flat nonslippery surface Please note that the rubber feet may mark certain types of surfaces Keep other objects 100 mm away from the notebook and its mains adapter to ensure adequate ventilation Never cover the fan inta...

Страница 21: ...chased your notebook Make sure that the power cable is approved for use in the country in which you intend to use it The mains adapter s AC cable should only be connected to a mains socket if the notebook is connected to the mains adapter 1 2 3 Connect the mains adapter cable 1 to the DC jack DC IN of the notebook Connect the power cable 2 into the mains adapter Plug the power cable 3 into a mains...

Страница 22: ...requested to do so Your operating system is pre installed on the hard disk to facilitate the procedure when you use your notebook for the first time Switch the notebook on see Using your notebook chapter Switching on the notebook section During installation follow the instructions on screen Consult the operating system manual if there is anything unclear about the requested input data i If there i...

Страница 23: ...connect devices such as a mouse and a printer to the notebook Please take note of the information in the Important notes chapter Switching on the notebook 2 1 Slide the release button in the direction of the arrow 1 and unfold the LCD screen upward 2 1 Press the ON OFF switch 1 to switch the notebook on The power on indicator on the notebook is on Downloaded from LpManual com Manuals ...

Страница 24: ... the operating system properly e g Windows XP Home Edition by clicking Start then Turn off Computer If the notebook is not switched off automatically press the ON OFF switch 1 for approx five seconds Close the LCD screen 2 so that it locks into place Downloaded from LpManual com Manuals ...

Страница 25: ...e drives and the keyboard functions These indicators are also visible with the notebook closed 1 A Power on indicator 1 Num Lock indicator Wireless LAN Bluetooth indicator A Caps Lock indicator Standby indicator Scroll indicator Scroll Lock Battery indicator Silent Mode indicator whisper mode Drive indicator Downloaded from LpManual com Manuals ...

Страница 26: ...y Drive indicator The indicator lights up one of the drives e g hard disk CD DVD is being accessed 1 Num Lock indicator The indicator lights up the Num Lock key has been pressed The numbers on the upper right on keys in the integrated numeric keypad are enabled A Caps Lock indicator The indicator lights up the Caps Lock key has been pressed All the characters you type appear in uppercase In the ca...

Страница 27: ...an enhanced keyboard Some enhanced keyboard functions are mapped with key combinations The following description of keys refers to Windows Additional functions supported by the keys are described in the relevant manuals supplied with your application programmes The figure below shows how to access the different characters on keys with overlaid functions The example applies when the Caps Lock indic...

Страница 28: ...ps Lock function simply press the Caps Lock key again Shift key The Shift key causes uppercase characters to appear In the case of overlay keys the character printed on the upper left of the key appears when that key is pressed Fn Fn key The Fn key enables the special functions indicated on overlay keys see Key combinations If the external keyboard does not feature a Fn key you can simultaneously ...

Страница 29: ... Microsoft Windows Some of the following key combinations may not function in other operating systems and with some device drivers Other key combinations are described in the relevant manuals supplied with your application programmes Key combinations are performed as follows Press and hold the first key in the combination While holding the first key down press the other key or keys in the combinat...

Страница 30: ... external monitor DVI I both the LCD screen and the external monitor LCD CRT Example Dependent on the display settings in the ATI Catalyst Control Center LCD CRT LCD CRT DVI I CRT Fn F5 Increasing the volume This key combination raises the volume of the integrated loudspeakers F6 Fn Reducing the volume This key combination reduces the volume of the integrated loudspeakers Fn F7 Increasing screen b...

Страница 31: ...Alt key and then press the Del key The Task Manager is displayed Select Shutdown and then Restart and confirm by clicking OK The warm boot will be carried out Backtab Shift Tab This key combination moves the cursor back to the previous tabular stop i Key combinations with the Windows keys are contained in the manual for your operating system Downloaded from LpManual com Manuals ...

Страница 32: ...werCinema see the section Remote control for PowerCinema InstantON PowerCinema for Windows XP Home device dependent Internet With this button you can start the standard internet browser of your system E mail Use this button to start the standard e mail programme for your system Silent Mode whisper mode This key reduces the speed of the fan i When the Silent Mode is switched on the processor and gr...

Страница 33: ...grease Do not use the touchpad if your fingers are dirty Do not rest heavy objects e g books on the touchpad or the touchpad buttons Moving the pointer Move your finger on the touchpad The pointer will move accordingly Selecting an item Move the pointer to the item you wish to select Tap the touchpad once or press the left button once The item will be selected Executing a command Move the pointer ...

Страница 34: ...0 WXGA 1440 x 900 UXGA 1600 x 1200 WSXGA 1680 x 1050 WUXGA 1920 x 1200 The screen resolution of the LCD monitor of your notebook is optimally set at the factory Permanently unlit or lit pixels The standard of production techniques today cannot guarantee an absolutely fault free screen display A few isolated constant lit or unlit pixels may be present The maximum permitted number of pixels faults i...

Страница 35: ... The average battery life is around 500 charge discharge cycles You can extend the battery life by taking advantage of the available energy saving functions Charging caring for and maintaining the battery The notebook battery can only be charged when the ambient temperature is between 5 C and max 35 C You can charge the battery by connecting the notebook to the mains adapter see Connecting the mai...

Страница 36: ...otebook off and pull the power plug out of the mains socket Close the LCD screen so that it locks into place Disconnect all cables connected to the notebook Turn your notebook over and place it on a sturdy flat surface 1 2 Slide the battery lock in the direction of the arrow 1 and hold it in place The arrow is shown on the battery lock Remove the battery from the battery compartment 2 Inserting ba...

Страница 37: ...book while it is in an energy saving mode If the notebook is in an energy saving mode mode Do not connect any external devices Do not disconnect any external devices Do not attempt to switch the notebook on if the built in battery is flat Do not add or remove RAM Do not add or remove a PC card When you close the lid the notebook automatically enters an energy saving mode The energy saving function...

Страница 38: ...to the ExpressCard slot Insert the ExpressCard in the slot guide with the connection contacts first Gently push the ExpressCard into the slot until you feel it click into place The ExpressCard can protrude by one to several millimetres depending on the type of ExpressCard i Please see the documentation on the ExpressCard for driver installation instructions You should also read the help files supp...

Страница 39: ... the icon Select the ExpressCard you want to stop and remove Press the Enter key Wait for the dialogue box which tells you that it is now safe to remove the ExpressCard 1 2 Press on the edge of the ExpressCard 1 so that the ExpressCard jumps out of the slot slightly Pull the ExpressCard out of the slot 2 Downloaded from LpManual com Manuals ...

Страница 40: ...30 10600690747 edition 1 Insert the placeholder for the ExpressCard into the slot guide Gently slide the placeholder for the ExpressCard into the slot until you feel it click into place Downloaded from LpManual com Manuals ...

Страница 41: ...Card MultiMediaCard MMC Memory Stick Memory Stick pro Sony i Please read the documentation supplied with the memory card for any special instructions Inserting memory card Carefully push the memory card into the slot The label should be facing upward The memory card may protrude by one to several millimetres depending on the memory card type Downloaded from LpManual com Manuals ...

Страница 42: ...lot slightly Slide the memory card out of the notebook 2 Hard disk The hard disk is the most important storage medium of your notebook You can work considerably faster and more efficiently if you copy applications and files from CDs DVDs to your hard disk When the hard disk is accessed the drive indicator lights up Downloaded from LpManual com Manuals ...

Страница 43: ...ten with a maximum of 700 Mbyte of data a virtually unlimited number of times This means the data can be deleted and changed DVD DVD ROM and DVD video Abbreviation for Digital Versatile Disc or Digital Video Disc A DVD is an optical data storage medium that can contain a maximum of 17 Gbytes of data These data cannot be changed DVD R DVD R Abbreviation for Digital Versatile Disc Recordable or Digi...

Страница 44: ...e suits best for your needs e g backing up data recording films storing pictures etc DVD RW drive With the DVD RW drive you can read all CD DVD types named above You can also write CD R CD RW and DVD RW Please ask your local computer store for assistance if you are not sure which CD or DVD type suits best for your needs e g backing up data recording films storing pictures etc DVD RW dual drive Wit...

Страница 45: ... storage devices Depending on the quality setting writing the data storage device may take some time Make sure that you insert the Label Flash data storage device correctly when writing otherwise you will no longer be able to read the data you have burned Handling CD DVDs i Observe the following guidelines when handling CD DVDs Avoid touching the surface of a CD DVD Hold CDs DVDs by their edges Al...

Страница 46: ...tched on 2 1 Push the insert eject button 1 The drive tray will open Gently pull the drive tray 2 completely out Place the CD DVD in the drive tray with the label facing upwards or Take out an inserted CD DVD Push in the drive tray until you feel it lock into place Downloaded from LpManual com Manuals ...

Страница 47: ...wer failure or damage to the drive it may be necessary to manually remove the CD DVD Switch the notebook off 2 1 Press a pen or a piece of wire e g a paperclip firmly into the opening 1 The drive tray is ejected You can now pull the drive tray 2 out of the drive Downloaded from LpManual com Manuals ...

Страница 48: ...ck corresponding DVD films Then the last regional code selected is retained and cannot be changed again i If a DVD film is to be watched in all regions it has the regional code 0 Before buying a DVD film you should check that the regional code of the DVD film matches the regional code set for the DVD drive of your notebook Adjusting AutoPlay function of your CD DVD drive Windows XP Home uses AutoP...

Страница 49: ...eaker is used to produce the bass tones As these bass tones are not perceived directionally only one bass loudspeaker is necessary and the installation location is not important underside of the notebook i If you attach an external microphone the built in microphone is disabled If you attach headphones or external loudspeakers the built in loudspeakers are disabled Adjusting the volume Set the des...

Страница 50: ...tilities CD DVD Remote control for PowerCinema InstantON PowerCinema for Windows XP Home device dependent Your notebook is equipped with a CIR interface for a remote control You can operate PowerCinema InstantON or PowerCinema with the remote control i Additional information is contained in the online manual for PowerCinema InstantON or PowerCinema This online manual can be found on the Drivers Ut...

Страница 51: ...dition 1 41 Using remote control 1 2 The remote control 2 must be in the effective range horizontally approx 30 of the notebook s CIR interface 1 You may not be more than 5 to 7 m from the notebook Downloaded from LpManual com Manuals ...

Страница 52: ...OL VOL Increase decrease volume This button increases or decreases the volume Jump back This button starts the playback of the previous track or previous film sequence Mute button This button switches the sound playback on and off Rewind This button rewinds the playback REPEAT Repeat This button repeats the current track or film sequence Fast forward This button advances the playback SUB TITLE Sub...

Страница 53: ...d receiving at up to 14 400 bit s Simple country adaptation with programme The modem complies with the EU Directive 91 263 EEC Telecommunications terminal equipment directive and has been checked in agreement with the guideline TBR 21 The modem can be operated in the following countries Multifrequency MFC dialling Belgium Denmark Germany Finland France Greece Great Britain Holland Ireland Iceland ...

Страница 54: ...ort of the notebook 1 Connect the modem cable to your telephone wall socket 2 i Please note that the telephone line is busy and that you cannot use your telephone if the modem cable is plugged into the telephone wall socket Pull the modem cable out of the telephone socket after you have finished your internet session or the fax mode and reconnect the telephone cable Downloaded from LpManual com Ma...

Страница 55: ... 1000 Mbps With the LAN module you can establish a connection to a local network LAN Local Area Network 1 2 Connect the LAN cable to the LAN port of the notebook 1 Connect the LAN cable to your network connector 2 i Your network administrator can help you to configure and use the LAN connections Downloaded from LpManual com Manuals ...

Страница 56: ...he ON OFF switch for Wireless LAN Bluetooth into the OFF position to deactivate the wireless LAN Bluetooth module The wireless LAN Bluetooth indicator goes out i Pay attention to the additional safety precautions for devices with wireless LAN Bluetooth provided in the Safety manual Detailed information can be found in the online help file and PDF document for your wireless LAN software The Wireles...

Страница 57: ...reduced during the installation of the French Bluetooth software If you require a French Bluetooth software however you do not live in France we recommend that you install the French Canadian software With this software the highest performance class is maintained Once you have installed the French Canadian software on your notebook Bluetooth may not be operated in France Downloaded from LpManual c...

Страница 58: ...Downloaded from LpManual com Manuals ...

Страница 59: ... in a safe place If you forget your passwords you will need to contact the help desk Passwords are not covered by your warranty and a charge will be made for assistance Brief overview of the security functions Security function Type of protection Preparation Kensington Lock Mechanical Mount and lock Kensington MicroSaver accessory BIOS password protection Password protection for BIOS Setup Utility...

Страница 60: ...ers It does not matter if you use upper or lowercase characters Protecting BIOS Setup Utility supervisor and user password i If you have opened these operating instructions on the screen we recommend that you print out the following instructions Because you cannot call the instructions onto the screen while you are setting up the password You prevent unauthorised opening of the BIOS Setup Utility ...

Страница 61: ...BIOS Setup Utility you must first enter your supervisor or user password Please note that you only have access to a few BIOS settings with the user password Changing supervisor or user password In order to change the Supervisor password you need to be logged into the BIOS Setup Utility using the existing Supervisor password Enter the BIOS Setup Utility again Follow the steps for setting the superv...

Страница 62: ...key Select Enabled and press the Enter key Select the Save Changes and Exit option under Exit Your notebook will now restart and you are asked to enter your password the supervisor password Deactivating system protection Enter the BIOS Setup Utility and go to the Security menu Select the Password on Boot option and press the Enter key Select Disabled and press the Enter key If you do not want to m...

Страница 63: ...ook Connecting devices to notebook 1 Turn off your notebook and all external devices 2 Unplug your notebook and all devices from the mains sockets 3 Connect the cables for your external devices following the supplied instructions 4 Plug all power cables into the mains sockets Disconnecting devices from notebook 1 Turn off your notebook and all external devices 2 Unplug your notebook and all device...

Страница 64: ...ebook Switch off the notebook and the external monitor Connect the data cable of the external monitor to the DVI I connector of the notebook i If you want to connect an analogue monitor first connect the monitor adapter provided to the DVI I connector of your notebook First switch on the external monitor and then the notebook Using the Fn F4 key combination you can switch back and forth between th...

Страница 65: ... external devices that also have a USB port e g a printer a scanner or a modem i USB devices are hot pluggable This means you can connect and disconnect devices while your operating system is running USB 1 x has a maximum data transfer rate of 12 Mbit s USB 2 x has a data transfer rate of up to 480 Mbit s Additional information can be found in the documentation for the USB devices Connect the data...

Страница 66: ... Start menu Programs Accessories Multimedia Volume Control or Set the desired volume with the volume control Connecting an external device to S Video Out You can connect an external device e g a TV to the S Video Out socket of your notebook to view films from DVDs photos or presentations etc Switch off the notebook and the external device Connect the external device to the S Video Out socket of yo...

Страница 67: ...peed of 400 Mbit per second i FireWire devices are hot pluggable Therefore the cables of FireWire devices can be connected and disconnected with the system switched on Additional information is provided in the documentation of the FireWire devices Connect this data cable of the external devices to the FireWire port of the notebook Plug the power cable of the external device into the mains socket D...

Страница 68: ...Downloaded from LpManual com Manuals ...

Страница 69: ... plug out of the mains socket Remove the battery Take care when you use the locking mechanisms on the battery and any other component Never use sharp objects such as screwdrivers scissors or knives as leverage to remove covers Boards with electrostatic sensitive devices ESD are identifiable by the label shown When you handle boards fitted with ESDs you must under all circumstances observe the foll...

Страница 70: ...ing and removing the hard disk Removing the hard disk Switch the notebook off and pull the power plug out of the mains socket Close the LCD screen so that it locks into place Disconnect all cables connected to the notebook Turn your notebook over and place it on a sturdy flat surface Remove the battery see Removing battery 1 1 2 Remove the screws 1 Pull off the cover from the notebook in the direc...

Страница 71: ...ut of the hard disk drive straight not at an angle Otherwise there is the danger that the contacts may bend or break off Installing the hard disk 3 a 1 2 Place the hard disk precisely into the hard disk compartment 1 Carefully slide the hard disk by the pulling aids a in the direction of the arrow 2 Fasten the screw 3 The hard disk must be placed into the hard disk drive straight not at an angle O...

Страница 72: ...ant Array of Independent Disks The RAID group is addressed as a single hard disk The data are distributed among the hard disks with special techniques to increase the write read speed of your notebook and or the security of your data For this purpose the data are initially divided into equally large blocks and then sequentially written to the two hard disks When reading the data the process is rev...

Страница 73: ...to the notebook Turn your notebook over and place it on a stabile sturdy flat surface If necessary lay an anti slip cloth on this surface to prevent the notebook from being scratched Remove the battery see Removing and installing the battery 2 1 Remove the screw 1 Firmly press a metal pin or wire e g paperclip into the opening 2 The drive tray is ejected You can now pull out the drive tray complet...

Страница 74: ... CD DVD drive 2 1 Slide the CD DVD drive into the notebook in the direction of the arrow 1 Fasten the screw 2 Install the battery see Inserting battery Turn the notebook over and place it on a flat surface Reconnect the cables that you disconnected before Downloaded from LpManual com Manuals ...

Страница 75: ...sure that foreign objects do not fall into the memory extension compartment The memory modules are located in a larger service compartment You must open the entire service compartment when removing and installing a memory module Once you have removed the cover the various components are exposed These components should be removed and replaced only by authorised specialists Therefore be sure to obse...

Страница 76: ... and installing components during servicing 66 10600690747 edition 1 Removing cover 1 Remove the screws 1 Pull off the cover from the notebook in the direction of the arrow Downloaded from LpManual com Manuals ...

Страница 77: ...lips outwards 1 The memory module will flap upward 2 Pull the memory module out of its slot in the direction of the arrow 3 Installing a memory module a 1 2 Insert the memory module with the contacts and the recess a facing the slot 1 Carefully push the memory module downwards until it engages noticeably 2 Downloaded from LpManual com Manuals ...

Страница 78: ...irection of the arrow 1 on its mounting location and flap it into place on the underside of the notebook 2 1 Fasten the cover with the screws 1 Install the battery see Inserting battery Turn the notebook over and place it on a flat surface Reconnect the cables that you disconnected before Downloaded from LpManual com Manuals ...

Страница 79: ...cessor and notebook identification Advanced For system settings such as interfaces keyboard and hard disks Security For security settings such as the password Power For setting the energy saving functions Boot For specifying the start order Exit For saving the changes and terminating the BIOS Setup Utility Start BIOS Setup Utility Reboot the notebook switch off on or reboot operating system The fo...

Страница 80: ... exit the BIOS Setup Utility Select Save Changes and Exit and Yes to save the current settings and exit the BIOS Setup Utility The notebook is rebooted and the new settings come into effect Discard Changes and Exit Discard changes and exit the BIOS Setup Utility Select Discard Changes and Exit and Yes to discard the changes you have made The settings which were in force when BIOS Setup Utility was...

Страница 81: ...book Any changes you have made to the BIOS Setup settings after receiving the notebook Your system configuration and all peripheral devices connected to your system Your sales contract Restoring installed software Please create backup copies of your files on a regular basis If data is damaged or lost you can restore your applications using the original data carriers However if you do not have back...

Страница 82: ... the boot process press the F8 key at short intervals until the message Extended Windows start options appears Select Last known working configuration If this operation is unsuccessful reinstall the Operating System as described below 1 Switch the computer on 2 Insert the Fujitsu Siemens Product Recovery CD ROM CD DVD that came with your computer into the CD DVD drive and close it 3 Switch your co...

Страница 83: ...ill suggest a name but you may change this if you wish Click on the Next button to continue The Windows XP setup process will continue installing the files it needs This will take several minutes During this process Windows XP will tell you what it is doing Your computer will automatically restart and the setup process will continue 14 The following prompt will appear on the screen To improve the ...

Страница 84: ...tructions Restoring the online documentation 1 Insert the Drivers Utilities CD DVD into the CD DVD drive while Windows is running 2 Select Documentation from the menu The online manuals for your computer will be installed Restoring additional software 1 Insert the Drivers Utilities CD DVD into the CD DVD drive while Windows is running 2 Select Additional Software from the menu and follow the on sc...

Страница 85: ...d into the power socket Check whether the data cable is properly connected to the notebook and the external monitor if it is plugged in with a connector Switch on the external monitor and the notebook The external monitor is blank or the image is unstable The wrong external monitor has been selected or the wrong screen resolution has been set for the application programme End the application progr...

Страница 86: ...ectly Switch the notebook off Check whether the mains adapter is connected correctly to the notebook Switch the notebook on The notebook stops working The notebook is in Standby or Suspend mode Reactivate the notebook by pressing a key Standby mode or by switching it back on Suspend mode An application programme has caused the malfunction Close the application programme or restart the notebook by ...

Страница 87: ...n see Switching wireless LAN Bluetooth module on and off The ON OFF switch for the wireless LAN Bluetooth module is in the ON position Nevertheless the radio connection to a network does not function Check whether the radio connection is switched on via the software i Details are contained in the online help for your wireless LAN software and in the Wireless LAN manual The Wireless LAN manual can ...

Страница 88: ...Downloaded from LpManual com Manuals ...

Страница 89: ...otebook Environmental conditions Environment class 3K2 Temperature Operation 3K2 Transport 2K2 5 C 35 C 15 C 60 C Dimensions notebook with 17 inch LCD screen Width x Depth x Height front back 408 mm 289 mm 38 25 mm Weight depending on configuration approx 4 1 kg i The data sheet of this notebook contains further technical data You will find the data sheet on the internet at www fujitsu siemens com...

Страница 90: ...g time approx 2 5 hours depending on application Mains adapter 120 W Main Rated voltage 100 V to 240 V automatic Frequency 50 Hz to 60 Hz automatic Sub Rated voltage 20 V Max rated current 6 A You can readily order an additional mains adapter and an additional power cable Downloaded from LpManual com Manuals ...

Страница 91: ...ents and other relevant provisions of Directive 1999 5 EC Copyright protected technology This product incorporates copyright protection technology that is protected by method claims of certain U S patents and other intellectual property rights owned by Macrovision Corporation and other rights owners Use of this copyright protection technology must be authorised by Macrovision Corporation and is in...

Страница 92: ...s Equipment and mutual recognition of conformity This equipment can be used in the following countries Belgium Denmark Germany Estonia Finland France Greece UK Ireland Iceland Italy Latvia Liechtenstein Lithuania Luxemburg Malta Netherlands Norway Austria Poland Portugal Sweden Switzerland Slovakia Slovenia Spain Czech Republic Hungary Cyprus Contact the corresponding government office of the resp...

Страница 93: ... C Caps Lock indicator 16 CD blank 35 CD DVD AutoPlay function 38 emergency removal 37 inserting 36 overview 33 removing 36 working with 35 CD DVD drive 3 33 AutoPlay function 38 installing 64 removing 63 removing installing 63 CD DVD drives 34 CD R 33 CD ROM 33 CD RW 33 CDRW DVD combo drive 34 AutoPlay function 38 CE marking 82 Changing font size 25 CIR interface 40 Cleaning 7 Configuration BIOS ...
Страница 94: ...adphones connecting 56 High speed devices connecting 57 I Important notes 5 Indicator Caps Lock 16 Drives 16 hard disk drive indicator 16 Num Lock 16 19 Standby 16 Indicator Scroll 16 Infrared interface 3 Internet Easy Launch key 22 K Kensington Lock 3 applying 49 Kensington MicroSaver 49 Key Backspace 18 Caps Lock 18 cursor control keys 18 Enter 18 Fn key 18 Fn F4 20 Return 18 Shift 18 Shift Tab ...

Страница 95: ...iMediaCard 31 N Network no radio connection 77 Notational conventions 2 Notebook before you travel 6 cleaning 7 first time setup 5 9 not starting 76 ON OFF switch 3 operating 13 setting up 10 stops working 76 switching off 14 switching on 13 transporting 6 7 Notebook views 3 Notebook operating 13 Notes 5 cleaning 7 energy saving 5 LCD screen 24 manufacturer 81 safety 5 transporting 6 Num Lock indi...

Страница 96: ...ervisor password cancelling 51 changing 51 Supervisor Password setting 51 Suspend mode terminating 76 Synchronisation screen display 25 System configuration 69 System settings BIOS Setup Utility 69 T Technical data 79 Time not correct 74 Time daylight savings 74 Tips 71 Touchpad 3 23 buttons 3 23 cleaning 7 dragging items 23 executing commands 23 moving the pointer 23 ON OFF switch 3 23 scroll bar...

Отзывы: