10
Installation
2mm
Fixing screw
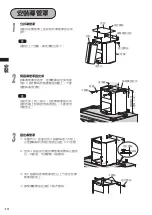
Attaching Duct Cover
1
Disassembling duct cover
Remove the front panel and duct cover
fixing bracket from the duct cover supplied.
Note
In case of upper discharge, remove the
top plate also.
2
Fastening duct cover fixing bracket
Using the height of the duct cover for
alignment, fasten the duct cover fixing
bracket to the wall using the 2 wood
screws and washers supplied (Do not
fasten the screws tightly).
Note
When attaching the duct cover fixing
bracket to the wall, there are three holes
in the bracket. Use the two holes at the
outer edge of the bracket, do not use the
center hole.
Fixing screw
Fixing screw
Duct cover
Front panel
Top plate
Duct cover
fixing bracket
Roller catch
Duct co
ver height
(Standard:
530)
30
Wood
screw
Washer
Exhaust duct
Duct cover
fixing bracket
3
Fixing duct cover
1) Insert supplied 4 screws on the top of the
enclosure as shown. Be sure to keep about
2mm space between the top and screw-
head.
2) Put the duct cover with aligning its 4 bottom
cutouts with the screws, slide it backward,
then tighten 4 screws securely.
3) Fix the upper left and right sides of the
duct cover to the duct cover fixing bracket
with 2 screws.
4) Tighten 2 wood screws for the duct cover
fixing bracket firmly.
Fixing screw
Wood screw


