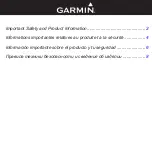
background image

FILTER

CLOSE

OPEN

PLUMBING CONNECTIONS

COMPLETE THIS PROCESS BEFORE WIRING

CONNECTION

CONNECTION PROCEDURE: 

Connect the water supply to the inlet of  the shower 

via 15mm copper, stainless steel or plastic pipe using 

a 15mm x 15mm elbow compression fitting.

Do  not  use excessive  force when making  these 

connections.

FITTING THE STOP VALVE

Fit the Stop valve (Warning: Conductive Valve shall not 

be used) by secure to the unit Inlet.

Note:

It is compulsory to have the product installed with 

stop valve (with filter) provided, failing which, dirt 

particles may cause failure of flow switch assembly.
Ensure the  supplied washers are in place  before 

connecting inlet and the Stop Valve. 
Fit the other point of Stop Valve to the incoming water 

supply.
Ensure that the backplate of the unit is flat on the wall 

and positioned squarely. Tighten the fixing screws. 
Turn  on  the  water  supply  and  check  for  leaks  in the 

pipework connection to the shower.

NOTE:

 At this stage no electricity can flow through the 

unit.

ELECTRICAL CONNECTION

WARNING: THIS UNIT MUST BE EARTHED.

SWITCH OFF THE ELECTRICITY SUPPLY. 

The cable entry points are shown in the figure below. 

Determine the cable entry to the unit.

a)  Side  entry  –  Poke  the  electrical  cable through       

  the Rubber grommet.

Route the cable into the shower unit and connect to the 

terminal block (Fig. 1) as follows:-
Earth cable to terminal marked     ‘     ’

Neutral cable to terminal marked  ‘ N ’

Live cable to terminal marked 

‘ L ’

IMPORTANT: Fully tighten the terminal block screws 

and ensure that no cable insulation is trapped under 

the screws. Loose connections can result in cabling 

overheating.  DO  NOT  switch  on  the  electricity 

supply until the cover has been fitted. 

Содержание FZ-WH5038D

Страница 1: ...Operating Installation Manual FZ WH5038N FZ WH5038NR FZ WH5038D FZ WH5038DR Please read this manual carefully before using this appliance ...

Страница 2: ...21 22 ...

Страница 3: ...Fujioh Fujioh ...

Страница 4: ......

Страница 5: ...1 x Hand shower c w filter mesh washer flow restrictor 1 x Fujioh Heater Unit 1 x Sliding Rail Set 2 x Wall Plug Screw Set 1 spare Hand ...

Страница 6: ...1 x Fujioh Heater Unit 1 x Spout 1 x Hand shower c w filter mesh washer flow restrictor 1 spare allen key ...

Страница 7: ...7 9 10 5 6 8 4 3 Soap Dish ...

Страница 8: ...Spout ...

Страница 9: ...8 DC Pump Model Indicator 16 LVDC Board 17 DC Pump Assembly 18 RCD Test Reset Button 1 5 18 7 6 18 17 16 8 2 None Pump Model ...

Страница 10: ...OWER Spout moveable type to Spout outlet BOTTOM to Hand shower outlet of Spout Extendable height 440mm Open closed adjust height allen key 683 3 3 Tighten with allen key Spout inlet BOTTOM from Heater outlet Be sure do this before step 6 avoid hose colliding to the wall after spout is installed to wall HAND SHOWER r h s s ...

Страница 11: ...3 8 ...

Страница 12: ...Service Stop Valve system ...

Страница 13: ......

Страница 14: ...ply Ensure that the backplate of the unit is flat on the wall and positioned squarely Tighten the fixing screws Turn on the water supply and check for leaks in the pipework connection to the shower NOTE At this stage no electricity can flow through the unit ELECTRICAL CONNECTION WARNING THIS UNIT MUST BE EARTHED SWITCH OFF THE ELECTRICITY SUPPLY The cable entry points are shown in the figure below...

Страница 15: ...ing to the unit Outlet Left side and hand shower Please make sure to remove one washer from the end of the flexible hose connecting to the hand shower Hence ensure that the supplied washer is in place at the outlet while filter mesh and Flow Restrictor are secured at the hand shower flow restrictor ...

Страница 16: ...The RCD sign will light meaning the unit is ON Turn the knob clockwise to sign the HEATER sign will light up Turn the knob anti clockwise to the HEATER sign will switch OFF ...

Страница 17: ... HEATER and RCD sign light will turn OFF DC ...

Страница 18: ......

Страница 19: ......

Страница 20: ......

Страница 21: ...1 50 4 70 1 50 RY2 COM NO COM NO RY1 Nin E2C Nout Lin Lout WIRING TERMINAL N Mains Supply To Heater Chasis TEST RESET RCD TEST RESET Thermal Cut out ELECTRONIC CONTROL BOARD ON OFF SWITCH POWER CONTROL SWT EC VR L N 2 1 3 G T2 T1 TRIAC INDICATOR BOARD HEATING ELEMENT FLOW SWITCH 4 ...

Страница 22: ...l RY2 COM NO COM NO RY1 Nin E2C Nout Lin Lout WIRING TERMINAL N Mains Supply To Heater Chasis TEST RESET RCD TEST RESET Thermal Cut out PUMP SPEED CONTROL ELECTRONIC CONTROL BOARD ON OFF SWITCH POWER CONTROL SWT EC VR VR 0 100K POT L L N N EC 2 1 3 G T2 T1 TRIAC RD SW PUMP 3 M LVDC LVDC2 INDICATOR BOARD HEATING ELEMENT 4 ...

Страница 23: ... ...

Отзывы: