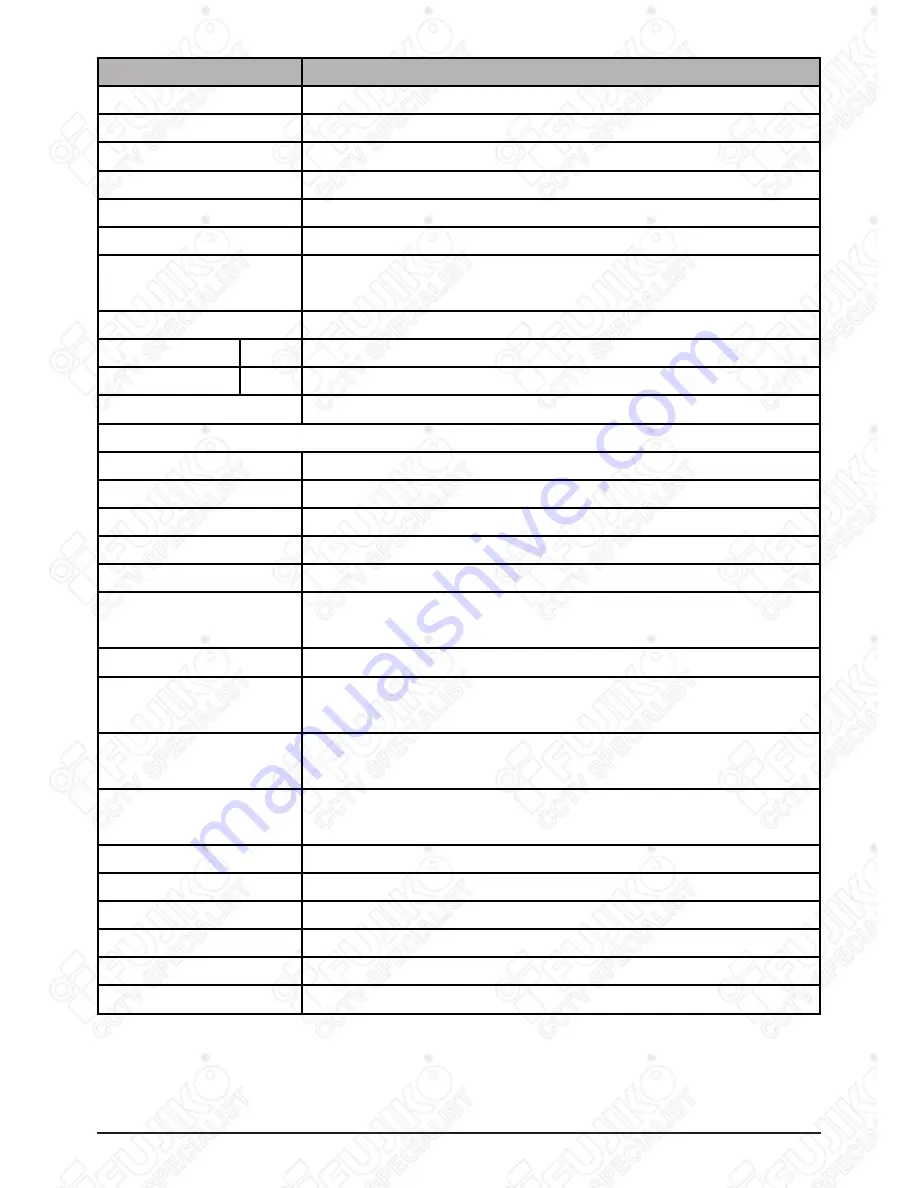
background image

EN_87

H.264 DVR

Specifications

4CH / 8CH / 16Ch

Video Input

4 , 8, 16

Video Output

Composite, VGA, SPOT-OUT

Compression

H.264

Live Display Resolution

NTSC 720*480, PAL 720*576

Alarm In/Out(Relay)

4/1 , 8/1 16/1

Operating System

EMBEDDED LINUX

System Control

Key buttons, IR Remote Controller, Remote software(DVR Player), 

Mouse

Live Display Speed

Real Time

Maximum

NTSC 30 fps 720 x 480 , 60 fps 720 x 240, 120 fps 360 x 240

PAL

25 fps 720 x 576 , 50 fps 720 x 288, 100 fps 360 x 288

Audio Record

1 IN, 1 Out

Features

Display

Brightness, Contrast, Color Adjustment Per Channel

Camera Title

12 Characters per Channel

Recording Mode

Manual, Schedule, Alarm, Motion

Recording Method

5 Levels of Compression Rate / Record Frame Rate Adjustment

Recording Adjustments

Pre-Alarm: 3 sec/ Post-Alarm: 10 sec. ~300 sec.

Motion Detection

Per Channel 4*4 Grids (SET)/ 28 x 24 (CLIENT)/ 20 Sensitivity 

Levels

Search Mode

Date & Time, Camera , Alarm / Motion

Playback Modes

Forward & Reverse: Pause, Frame by Frame, Normal Speed, 2X, 4X, 

8X, 16X

Multi-tasking

Simultaneous Live Display/ Playback, Record or Back-up, Remote 

Transmission

Watchdog

Power Failure Recovery: Auto Reboot / Maintaining Previous Record 

Settings

Watermark

Provided

Back Up

USB Flash Memory Stick, External HDD and External CD/DVD-RW

Interface

RS422/485, Ethernet(10/100 Base-T), USB 2.0

HDD

1 INTERNAL HDD

Network

LAN, WAN, Internet,

Remote

Client Software, Internet Explorer

***Revised at December 2009

Содержание FK-HM3004

Страница 1: ...04 FK HM3008 FK HM3016 ภาษาไทย ENGLISH เพื อสามารถใช เครื องบันทักนี อย างถูกต องและปลอดภัย ควรมั นใจว าท านได ศึกษาคู มือการใช งานตามคำแนะนำอย างถูกต อง To use this DVR correctly and safely be sure to read these operation instruction before use HM3K VER 01 12 09 ...

Страница 2: ......

Страница 3: ...04 FK HM3008 FK HM3016 ภาษาไทย ENGLISH เพื อสามารถใช เครื องบันทักนี อย างถูกต องและปลอดภัย ควรมั นใจว าท านได ศึกษาคู มือการใช งานตามคำแนะนำอย างถูกต อง To use this DVR correctly and safely be sure to read these operation instruction before use HM3K VER 01 12 09 ...

Страница 4: ...ฐาน เป นการป องกันไม ให เกิดความร อนในเครื องมาก เกินไป ไม ควรวางเครื องใกล เครื องกระจายความร อน เครื องทำความร อน หรือที ที มีแสงแดดส งถึง ห ามวางภาชนะที บรรจุน ำหรือของเหลวบนเครื อง เพราะอาจทำให เกิดไฟฟ าลัดวงจรได ไม ควรวางเครื องไว ในที มีอุณหภูมิหรือความชื นสูง อย าสอดวัตถุใดๆ ที เป นโลหะเข าไปในตัวเครื อง เพราะอาจทำให เกิดไฟฟ าลัดวงจรได เมื อต องการทิ งแบตเตอรี ควรทิ งไว ในที เฉพาะ ไม ควรทิ ...

Страница 5: ...ภาพสด TH_15 4 1 อธิบายหน าจอ TH_15 4 2 การแสดงสัญญาณกล องแบบแบ งช องและแบบสลับ TH_16 4 3 การขยายภาพ TH_17 4 4 จอภาพรอง TH_18 5 การตั งค าการทำงาน TH_19 5 1 เมนูหลัก TH_19 5 2 จอภาพ TH_20 5 3 การตั งค ากล อง TH_22 5 4 การตั งค าการตรวจจับการเคลื อนไหว TH_24 5 5 การบันทึกต อเนื อง TH_26 5 6 การทำงานร วมกับอุปกรณ เตือนภัย TH_27 5 7 การตั งเวลาบันทึก TH_32 5 8 การตั งค าเครือข าย TH_35 5 9 การตั งค าร...

Страница 6: ...นด วย USB Memory Stick TH_59 8 5 การกำหนดช วงเวลาที ต องการถ ายโอน TH_59 9 Client Software CMS TH_60 9 1 แนะนำโปรแกรม DVR PLAYER TH_60 9 2 การใช งานโปรแกรม TH_63 9 3 การควบคุมเครื องบันทึก DVR CONTROL TH_74 ภาคผนวก 1 Web Server TH_88 ...

Страница 7: ...ชิ นหนึ งสูญหาย หรือไม ควบจำนวน กรุณาติดต อผู จัดจำหน ายหรือตัวแทนจำหน าย ในกรณีคืนสินค าหรือ ส งเคลม ให บรรจุเครื องบันทึก ลงกล องเดิมพร อมกับอุปกรณ ต างๆ ให ครบ อุปกรณ จำนวน หมายเหตุ เครื องบันทึกภาพแบบดิจิตอล 1 แผ นซีดีซอฟต แวร ไคลเอนท 1 รีโมทคอนโทรล 1 แบตเตอรี COIN CR2025 1 AC อแด ปเตอร 1 สายไฟ 1 คู มือ 1 ...

Страница 8: ...ดง ฮาร ดดิสก เขียว 2 ควบคุมการดูภาพย อนหลัง บันทึก ใช ฟังก ชั นเหล านี ขณะอยู ในโหมดแสดงภาพสดหรือดูภาพย อนหลัง 1 ปุ มทิศทาง ใช เลื อนเคอร เซอร ในโหมดเมนูตั งค า 2 ข อมูล LOG หยุดดูภาพย อนหลัง ข อมูล LOG กดปุ มนี เพื อแสดงรายการบันทึกเหตุการณ หยุดดูภาพย อนหลัง กดปุ มนี เพื อยกเลิกการดูภาพย อนหลัง 3 ดูถอยหลังทีละภาพ ถอยหลังอย างเร ว บันทึก ...

Страница 9: ...เวลา และกดปุ มนี เพื อหยุดตั งเวลาบันทึก ดูเดินหน าทีละภาพ กดปุ มนี เพื อดูย อนหลังแบบเดินหน าหลังทีละภาพ เมื อค างภาพไว เดินหน าอย างเร ว กดปุ มนี เพื อดูย อนหลังแบบถอยหลังอย างเร ว 3 ปุ ม MENU SEC MENU กดปุ มนี เพื อแสดงหน าจอเมนูหลัก ESC กดปุ มนี เพื อออกจากเมนูโดยไม มีการบันทึกค า 4 ปุ ม ENTER กดปุ มนี เพื อบันทึกการตั งค า 5 ปุ มแบ งสัญญาณกล อง กดปุ มนี เพื อแสดงสัญญาณกล องแบบแบ งช องสัญญาณ 6...

Страница 10: ... ต อจอคอมพิวเตอร CRT LCD 5 RJ 45 Ethernet Port Lan เชื อมต อเครือข าย เพื อดูภาพผ านเครือข าย 6 MOUSE Connection เชื อมต อ USB เมาส รองรับเฉพาะ USB เมาส เท านั น 7 SENSOR ALARM IN 1 4 1 8 หรือ 1 16 เชื อมต ออุปกรณ เซ นเซอร 8 RELAY ALARM OUT 1 เชื อมต อรีเลย 9 RS 422 485 เชื อมต อกล อง PTZ 10 RS 232C D SUB 9PIN สำหรับการพัฒนาเฟิร มแวร เท านั น 11 DC 12V แจ คสำหรับเชื อมต อไฟ DC 12 โวลต 12 FIELD GND...

Страница 11: ...ยืนยัน ซูมภาพ ปุ มเรียกดูย อนหลัง ปุ มหยุดดูภาพย อนหลัง ปุ มค นหาตามวันเวลา ปุ มดูถอยหลังทีละภาพ ควบคุม PTZ ปุ มถอยหลังอย างเร ว ข อมูลระบบ ยกเลิก ESC ปุ ม ปุ มเมนู ปุ ม ปุ มบันทึก ปุ มตัวเลข ตัวอักษร ปุ มเดินหน าอย างเร ว ข อมูล LOG ปุ มดูเดินหน าทีละภาพ จอภาพรอง spot ...

Страница 12: ...ปลี ยนค า ปุ มหยุดดูย อนหลัง ปุ มถอยหลังอย างเร ว ปุ มเปิด ปิดบันทึกต อเนื อง ปุ มเปิด ปิดตั งเวลาบันทึก ปุ มดูภาพทีละเฟรม ปุ มเดินหน าอย างเร ว ปุ มเรียกดูย อนหลัง ปุ มหมายเลขกล อง ข อมูลบันทึกเหตุการณ สลับตำแหน งกล อง ถ ายโอนข อมูล ควบคุมกล อง PTZ เมนู ปุ มเปลี ยนค า ปุ มยกเลิก CANCEL เปิดปิดสถานะ ทางหน าจอ โหมดแสดงภาพสด คีย บอร ดจำลอง โหมดดูย อนหลัง ...

Страница 13: ...TH_7 H 264 DVR 2 การติดตั งและเชื อมต ออุปกรณ 2 1 กล อง จอมอนิเตอร ไมโครโฟน เซ นเซอร สายไฟ 1 แผนผังโครงสร างระบบ โครงสร างด านล างแสดงให เห นระบบที มีการติดตั งอย างสมบูรณ ...

Страница 14: ...3008 สามารถติดตั งกล องได 4 8 ตัว เชื อมต อกล องที ช องสัญญาณวิดีโอเข า หัวต อ BNC ที ด านหลังเครื อง การเชื อมต อกล อง PTZ ใช เชื อมต อสายควบคุมกล องที ช องสัญญาณ RS 422 Tx Tx และเชื อมต อสาย สัญญาณภาพเข าที ช องสัญญาณวิดีโอเข าด านหลังเครื อง ...

Страница 15: ...สัญญาณเสียงเข า 1 Vp p ที 600 โอห ม และเชื อมต อลำโพงที ช องสัญญาณเสียงออก ดังรูปตัวอย างด านล าง 4 จอภาพ ระบบสามารถรับการเชื อมต อจอภาพได 3 ช อง 2 BNC 1 VGA ที ด านหลังเครื อง โดยนำจอภาพที ต อง การแสดงผลมาเชื อมต อที ช องสัญญาณวิดีโอขาออก 1 BNC สำหรับจอภาพหลัก 1 BNC สำหรับจอภาพรอง Spot 1 VGA สำหรับจอคอมพิวเตอร หรือจอที รองรับ VGA ...

Страница 16: ...ปฏิบัติการ OS WINDOWS XP VISTA ง อีเธอร เน ต 10 100 Base T จ Microsoft DirectX 9 0C ถ าเครื องคอมพิวเตอร ยังไม ได ติดตั ง Microsoft DirectX แนะนำให ติดตั งเวอร ชั น 9 0C สามารถดาวน โหลดได ที เว บไซต ของไมโครซอฟท www microsoft com windows directx การไม รับประกัน Disclaimer ขอสงวนสิทธิ ในเรื องการดูภาพผ านเครือข ายไม ได เนื องจากคอมพิวเตอร ทั งหมดมีความแตกต างกันใน เรื องของการตั งค าและตัวฮาร ดแวร ...

Страница 17: ...0 วินาที 1 หยุดบันทึกก อนเพื อเข าหน าเมนูตั งค ารวดเร ว ขณะที เครื องกำลังบันทึกอยู จะไม สามารถเข าเมนูเวลา และเมนูบันทึกได 2 กดปุ มใส รหัสผ านที ถูกต องเมื อระบบให ใส รหัสผ าน 3 รหัสมาตรฐานจากโรงงาน คือ 000000 4 กดปุ ม MENU เพื อเข าหน าจอเมนูตั งค ารวดเร ว 5 เมนูตั งค ารวดเร วปรากฏ ใส รหัสผ านครั งเดียว 6 กดปุ ม เพื อเลือกเมนู กดปุ ม ENTER เพื อยืนยัน ...

Страница 18: ...า โดยกดปุ มตัวเลขหรือ ที หน าเครื องหรือที รีโมท คอนโทรล เพื อเปลี ยนค า กดปุ ม ENTER เพื อออกจากเมนูและบันทึกการตั งค า กดปุ ม ESC เพื อออกจากเมนู 3 โดยไม มีการบันทึกการตั งค า ข อสังเกต 1 โหมดการบันทึก ขณะกำลังบันทึก ท านไม สามารถตั งวันที เวลาได ต องหยุดบันทึกก อน 2 โหมดแสดงภาพสดหลังจากตั งวันที เวลา หลังจากตั งวันที เวลาแล ว กดปุ ม REC เพื อเริ มการบันทึก ...

Страница 19: ...ล ว กดปุ ม REC ที หน าเครื องหรือรีโมทคอนโทรลเพื ิอเริ ม การบันทึก 2 สำหรับการตั งค าแต ละกล องโดยเฉพาะหรือตั งค าพิเศษยิ งขึ น เข าเมนูบันทึก ในเมนูหลัก โปรดดูข อ 3 ขั นสูง เพื อวิธีเข าเมนูหลัก 2 2 จำนวนวันบันทึก เลือก จำนวนวันบันทึก แล วกดปุ ม ที หน าเครื องหรือที รีโมทคอนโทรลเพื อเปลี ยนค า 1 กดปุ ม ENTER เพื อออกจากเมนูและบันทึกการตั งค า กดปุ ม ESC เพื อออกจากเมนู 2 โดยไม มีการบันทึกการตั งค...

Страница 20: ...ด เลือกหัวข อนี เพื อเข าเมนูหลัก และกดปุ ม ENTER เพื อออกจากเมนูและบันทึกค าการ 1 ค า ถอยออกจากเมนู ตั งค าขั นสูง กดปุ ม ESC กดปุ ม MENU อีกครั งเพื อเข าเมนูหลัก ปิด เลือกหัวข อนี เพื ออยู ในเมนู ตั งค าขั นสูง 2 ต องการกลับมาเมนู ตั งค าขั นสูง อีกครั ง โปรดดูบทที 5 ข อ 2 1 ตั งค าหน าจอ 3 ...

Страница 21: ...ะชื อกล อง 4 แถบบอกสถานะ 1 CD DVD RW เชื อมต ออยู ถ าถ ายโอนข อมูล จะเป นสีน ำเงิน กำลังเชื อมต อ USB MEDIA ด านหน าเครื อง ถ าถ ายโอนข อมูล จะเป นสีน ำเงิน โหมดการตั งตารางเวลาบันทึกเปิดอยู ถ าโหมดนี ทำงานจะเป นสีน ำเงิน ฟังเสียงสด และฟังเสียงขณะดูภาพย อนหลัง จะเป นสีน ำเงิน แสดงจำนวนผูู ใช งานผ านเน ตเวิร ค ดูพร อมกันได สูงสุด 5 คน 2 แสดงวัน เดือน ปี และเวลา 3 แสดงพื นที ที เหลืออยู ของฮาร ดดิสก...

Страница 22: ...ลับภาพ กดปุ ม ที หน าเครื อง กดปุ ม DISPLAY ที รีโมทคอนโทรล หรือคลิกเมาส ขวา แล วเลือกไอคอน จะเปลี ยนลำดับการแสดงสัญญาณกล องแบบแบ งช องตามโหมด การแบ งช องสัญญาณ SPLIT MODE ในขณะแสดงสัญญาณกล องแบ งช องสัญญาณ กดปุ ม DISPLAY ที รีโมลคอนโทรล หรือคลิกปุ ม SPOT OUT ค าง 1 วินาที จะแสดงภาพแบบสลับตามโปรแกรมที ตั งไว ท านสามารถเข าไปตั ง ค าที แถบเมนู ตั งค าสลับภาพ ถ ายังไม สลับภาพ ให ย ายไปแสดงภาพแบบแบ ง...

Страница 23: ...นทึกค า 3 2 เมาส ใช เมาส ลากกล องที ต องการไปยังตำแหน งกล องที ต องการสลับ 4 3 การขยายภาพ ระหว างการดูภาพสดและดูภาพย อนหลัง ท านสามารถย อหรือขยายภาพแบบดิจิตอลได 4 เท า เพื อดูภาพใกล ๆ ทางหน าจอ โดยทำตามขั นตอนดังนี เลือกแสดงช องสัญญาณที ต องการแบบเต มจอ 1 กดปุ ม ZOOM ที รีโมทคอนโทรล หรือใช เมาส คลิกปุ ม PTZ ที รีโมทคอนโทรลจำลอง ซึ งจะปรากฏ 2 กรอบสี เหลี ยมสำหรับย อ ขยายภาพ ดังรูปด านล าง ย ายกรอบส...

Страница 24: ...ากจอมอภาพหลัก มีขั นตอนดังนี กดปุ ม SPOT ที รีโมทคอนโทรล หรือคลิกเมาส ขวาแล วคลิกปุ ม SPOT จากนั นกดปุ มหมายเลข 1 กล องที ต องการดูภาพแบบเต มจอ กดปุ ม SPOT สองครั ง เพื อสลับสัญญาณกล องอัตโนมัติ ผู ใช งานสามารถเข าไปตั งค าหน วงเวลาที 2 เมนู ตั งค าสลับภาพ กล องที ได รับสัญญาณจากเซ นเซอร จะแสดงสัญญาณกล องแบบเต มจอ 3 ...

Страница 25: ...ะเปลี ยนสี พร อมกรอบสีเขียวดังรูปด านบน กดปุ ม ENTER ที หน าเครื อง ที รีโมทคอนโทรล เพื อเข าไปหน าเมนูย อย กดปุ ม 2 เลือกแถบเมนู ซึ งแถบเมนูที เลือกจะเป นสีส มดังรูป ค าที ตั งไว จะบันทึกอัตโนมัติ เมื อเปลี ยนแถบเมนู กดปุ ม ENTER เพื อออกจากเมนูและบันทึกค าที ตั งไว 3 กดปุ ม CANCEL เพื อออกจากเมนูและไม มีการบันทึกค า ใช เมาส ชี ไปยังเมนูที ต องการแล วคลิก และคลิกปุ ม 4 เพื อปิดเมนู แถบเมนูที เลือ...

Страница 26: ...อง หรือชื อกล อง เส นขอบ เลือกสีเส นกรอบแบ งสัญญาณกล อง ขาว เทา เทาเข ม ดำ พื นหลัง เลือกสีพื นเมื อไม มีสัญญาณกล อง เทา เทาเข ม ดำ น ำเงิน ขาว ะ อุปกรณ จอภาพ เลือกประเภทจอภาพที ต องการแสดงสัญญาณกล อง CCTV แสดงสัญญาณกล องผ านให เหมาะกับจอมอนิเตอร VGA แสดงสัญญาณกล องให เหมาะกับจอคอมพิวเตอร โหมดแบ งภาพ เลือกการแบ งสัญญาณกล องทางจอมอนิเตอร ตั งค ารวดเร ว เลือก เปิด เพื อเข าหน าเมนู ตั งค ารวดเร ว เล...

Страница 27: ...ูที ต องการแล วคลิก จากนั นเลือกเปลี ยนค าที ต องการ 4 รายการ รายละเอียดการปรับค า หน วงเวลา เลือกระยะเวลาในการสลับภาพ 1 30 วินาที โหมดสลับ เลือกโหมดการแบ งสัญญาณกล อง เต มจอ เลือกช องสำหรับแสดงสัญญาณกล องที จอมอนิเตอร รอง กดปุ ม ENTER เพื อออกจากเมนูและบันทึกค าที ตั งไว 5 กดปุ ม CANCEL เพื อออกจากเมนูและไม มีการบันทึกค า ใช เมาส คลิกปุ ม 6 เพื อบันทึกค าและกลับเมนูหลัก คลิกปุ ม เพื อปิดเมนูและไม...

Страница 28: ...ซ อน เลือก ใช เพื อซ อนกล อง ค ามาตรฐานคือ ไม ความสว าง ปรับความสว าง 0 100 ค ามาตรฐานคือ 50 ความคมชัด ปรับความคมชัด 0 100 ค ามาตรฐานคือ 50 สี ปรับสี 0 100 ค ามาตรฐานคือ 50 ชื อ ตั งชื อกล อง สามารถตั งได 12 ตัวอักษร ค ามาตรฐานคือ CAMERA 1 รุ น P T Z เลือกโปรโตคอลของกล อง P T Z ค ามาตรฐานคือ ไม มี ไอดี P T Z เลือกไอดีของกล อง P T Z ค ามาตรฐาน 01 กดปุ ม ENTER เพื อออกจากเมนูและบันทึกค าที ตั งไว 6 ...

Страница 29: ...กษรจากคีย บอร ด หลังจากคลิกเมนู ตั งชื อ จะปรากฏคีย บอร ด เลือกใส ค าที ต องการ ที กดครั ง 1 กดครั ง 2 กดครั ง 3 กดครั ง 4 ที กดครั ง 1 กดครั ง 2 กดครั ง 3 กดครั ง 4 1 A B C 1 7 S T U 7 2 D E F 2 8 V W X 8 3 G H I 3 9 Y Z 9 4 J K L 4 0 0 5 M N O 5 10 SPACE 6 P Q R 6 ...

Страница 30: ...องการ 5 รายการ รายละเอียดการปรับค า เวลาบันทึก กำหนดเวลาการบันทึกเมื อเกิดการเคลื อนไหว 10 300 วินาที เลือกกล อง เลือกกล องที ต องการตั งค าการตรวจจับการเคลื อนไหว กดปุ ม เพื อเปลี ยนกล อง หรือใช เมาส คลิกเลือกกล อง ความไว ระดับความไวในการตรวจจับความเคลื ีอนไหว ต ำ 1 สูง 20 ตารางเคลื อนไหว กำหนดพื นที ในการตรวจจับการเคลื อนไหว กดปุ ม แล วกดปุ ม เพื อเลือกรายการ ซึ งจะเป นสีส ม ตารางตรวจจับการเคลื ...

Страница 31: ...ึกค าและกลับเมนูหลัก คลิกปุ ม เพื อปิดเมนูและไม มีการบันทึกค า พื นที ที กำหนดตรวจจับการเคลื อนไหว เลือก เปิด เพื อเปิดการตรวจจับการเคลื อนไหวที เมนู ต อเนื อง หรือเลือก ปิด 8 ถ าไม ต องการตรวจจับการเคลื อนไหว ดังรูปด านล าง กดปุ ม REC เมื อมีการเคลื อนไหว การบันทึกแบบตรวจจับความเคลื อนจะทำงาน 9 ตามค าที ตั งไว ทั งความละเอียด เฟรมเรต หลังจากหมดเวลาบันทึกแบบตรวจจับความเคลื อนไหวแล ว ระบบจะอยู ในโห...

Страница 32: ...อกจากเมนูและบันทึกค าที ตั งไว 5 กดปุ ม CANCEL เพื อออกจากเมนูและไม มีการบันทึกค า 6 กดปุ ม 7 เพื อบันทึก จากนั นไฟแดงหน าเครื องจะติด เมื อเครื องเริ มบันทึก รายการ รายละเอียดการปรับค า ใช เปิด บันทึกสัญญาณกล อง ปิด ไม บันทึกสัญญาณกล อง คุณภาพ เลือกคุณภาพของภาพที ต องการบันทึก มี 5 ระดับ ดีเยี ยม สูงสุด สูง กลาง ต ำ เฟรมเรต เลือกเฟรมเรต ความละเอียดในการบันทึกขึ นอยู กับโหมด Frame Field CIF ซึ งจะ...

Страница 33: ... 6 1 3 8 2 4 KB กลาง 7 2 4 5 2 8 8 6 5 4 3 4 KB สูง 10 2 6 4 4 12 3 7 7 4 8 KB สูงสุด 15 4 9 6 6 18 4 11 5 7 2 KB ดีเยี ยม 24 6 15 4 9 6 29 5 18 4 11 5 KB หมายเหตุ ตารางนี คำนวณตามทฤษฎี เพราะฉะนั น อาจจะมีความแตกต างกันกับการใช งานจริง ขึ นอยู กับ สัญญาณภาพและการตั งค าต างๆ 5 6 การทำงานร วมกับอุปกรณ เตือนภัย 1 การตั งค าการบันทึก การบันทึกเมื อได รับสัญญาณจากอุปกรณ เตือนภัย จะทำงานก ต อเมื อได ติ...

Страница 34: ...กลาง ต ำ เฟรมเรต เลือกเฟรมเรต ความละเอียดในการบันทึกขึ นอยู กับโหมด Frame Field CIF ซึ งจะตั งค าในเมนู ระบบ เสียง เปิด บันทึกเสียง ปิด ไม บันทึกเสียง บันทึกได 4 กล อง ขาเข า เลือกประเภทการทำงานของอุปกรณ เตือนภัย N O N C กดปุ ม ENTER เพื อออกจากเมนูและบันทึกค าที ตั งไว 6 กดปุ ม CANCEL เพื อออกจากเมนูและไม มีการบันทึกค า ใช เมาส คลิกปุ ม 7 เพื อบันทึกค าและกลับเมนูหลัก คลิกปุ ม เพื อปิดเมนูและไม ม...

Страница 35: ... กดปุ ม หรือปุ ม CAN CEL OSD ที รีโมทคอนโทรล อลาร มขาออก1 ตั งค าการทำงานให กับอุปกรณ รีเลย สัญญาณภาพหาย เคลื อนไหว ทุกอลาร ม อลาร มขาออก ระบบ ถ าเลือก ระบบ รีเลย จะทำงานก ต อเมื อระบบมีปัญหา เช น ฮาร ดดิสก มีปัญหา หรือฟัดลมไม หมุน เป นต น เมื ออุปกรณ รีเลย ทำงาน ต องการให หยุด กดปุ ม หรือปุ ม CANCEL OSD ที รีโมทคอนโทรล กดปุ ม ENTER เพื อออกจากเมนูและบันทึกค าที ตั งไว 5 กดปุ ม CANCEL เพื อออกจากเ...

Страница 36: ...รมเรต 6 S และบันทึกเสียง ระบบจะกลับมาอยู ในโหมดเตรียมพร อมหลังจากบันทึกร วมกับอลาร มเรียบร อยแล ว เครื องบันทึกจะเริ มบันทึกก ต อเมื อได รับสัญญาณอลาร มเท านั น ผลการทำงาน กดปุ ม REC เพิ มเริ มต นบันทึกต อเนื องที มีการตั งค าดังแสดงด านบนเป นหลัก คุณภาพการบันทึก สูง เฟรมเรต 6 S และไม บันทึกเสียง ถ าสัญญาณอาร มถูกกระตุ นที กล องนี ระบบจะเปลี ยนการบันทึกที คุณภาพ ดีเยี ยม เฟรมเรต 12 S และบันทึกเสีย...

Страница 37: ...6 S และไม บันทึกเสียง ถ าสัญญาณอาร มถูกกระตุ นที กล องนี ระบบจะเปลี ยนการบันทึกที คุณภาพ ดีเยี ยม เฟรมเรต 12 S และบันทึกเสียง ระบบจะกลับมาอยู ในโหมดเตรียมพร อมสำหรับอลาร ม หรือการเคลื อนไหว ระบบจะ เริ มบันทึกเมื อมีได รับสัญญาณอลาร มหรือมีการเคลื อนไหว ข อสังเกต ถ าโหมดการบันทึก อลาร ม เคลื อนไหว ต อเนื อง ทำงานพร อมๆ กัน โหมดการบันทึกร วมกับ อลาร มจะมีความสำคัญมากกว า ตามด วยโหมดการเคลื อนไหว และ...

Страница 38: ...การแล วคลิก จากนั นเลือกเปลี ยนค าที ต องการ 3 ใช เมาส คลิกปุ ม 4 เพื อบันทึกค าและกลับเมนูหลัก คลิกปุ ม เพื อปิดเมนูและไม มีการบันทึกค า กดปุ ม ENTER ที รีโมทคอนโทรล หรือใช เมาส คลิกเพื อเข าไปตั งค า จะปรากฏเมนู 5 หลังจากเลือกวันที ต องการแล ว ในตารางเวลา จะแบ งเป น 8 หมวด ทั งหมด อา จ อ พ พฤ ศ ส ทั งหมด ระบบจะบันทึกตามตารางนี ทุกๆ วันของสัปดาห ให เลือกเวลาเริ มต น เวลาสิ นสุด และโหมดที ต องการบ...

Страница 39: ...18 00 08 59 โหมด1 หลังจากตั งค าในเมนู ตั งเวลา เรียบร อยแล ว กดปุ ม 4 ที หน าเครื องหรือปุ ม SCHED ULE ที รีโมทคอนโทรล หรือใช เมาส คลิกที ไอคอน ไอคอนกลมๆ สีแดง พร อมตัวอักษร ตั งเวลา จะปรากฏบนหน าจอ และไฟด านหน าเครื องจะติดเป นสีแดง เมื อเวลาที ตั งไว ในเมนู ตั งเวลา สิ นสุดลง ไอคอนที บอกสถานะการบันทึกจะไม แสดงและไฟด านเครื อง 5 จะดับ ระบบจะหยุดการบันทึก ถ าต องการหยุดบันทึก ในขณะกำลังตั งตารางเ...

Страница 40: ... ปิด ปิด เคลื อนไหว ต อเนื อง เปิด เปิด ปิด ปิด ปิด ปิด อลาร ม อลาร ม ปิด ปิด เปิด เปิด ปิด ปิด ตั งเวลา ตั งเวลา ปิด ปิด ปิด ปิด ปิด เปิด ตั งเวลากับเคลื อนไหว ตั งเวลา ปิด เปิด ปิด ปิด ปิด เปิด ต อเนื องกับอลาร ม ต อเนื อง อลาร ม เปิด ปิด เปิด เปิด ปิด ปิด เคลื อนไหวกับอลาร ม ต อเนื อง อลาร ม เปิด เปิด เปิด เปิด ปิด ปิด ตั งเวลากับอลาร ม อลาร ม ตั งเวลา ปิด ปิด เปิด ปิด เปิด เปิด ...

Страница 41: ...กจากเมนูและบันทึกค าที ตั งไว 6 กดปุ ม CANCEL เพื อออกจากเมนูและไม มีการบันทึกค า ใช เมาส คลิกปุ ม 7 เพื อบันทึกค าและกลับเมนูหลัก คลิกปุ ม เพื อปิดเมนูและไม มีการบันทึกค า รายการ รายละเอียดการปรับค า ปรับค า ไอพีคงที ตั งค าไอพีเอง DHCP ให เซิฟเวอร จ ายไอพีให อัตโนมัติ กรณีต อกับเร าเตอร ตั งค าไอพี ตั งค า ไอพีแอดเดรส เน ตมาส ก เกตเวย เซิฟเวอร DNS พอร ต สามารถตั งค าพอร ตตั งแต 0000 9999 พอร ตขอ...

Страница 42: ...ห เรียบร อยแล ว โดยที เราไม ต องตั งค า SMTP Server เอง SMTP เลือกตั งค า SMTP Server เอง กรณีมี Mail Server SMTP เซิฟเวอร ตั งชื อ Email Server สำหรับส งอีเมล พอร ต เลือกพอร ตสำหรับ SMTP SERVER ส งอีเมล พอร ตมาตรฐาน คือ 25 สิทธิ เลือกสิทธิ เปิด หรือ ปิด ค ามาตรฐานเป น ปิด รหัสผู ใช ใส รหัสผู ใช ที ใช Email Server ถ าเซิฟเวอร ร องขอสิทธิ แม ว าจะใส ตัวอักษรตัวใหญ ระบบจะมองว าเป นตัวเล ก รหัสผ าน ใ...

Страница 43: ...ตั งให DYNDNS เลือกเว บไซต ที เปิดให บริการ DDNS คือ DYNDNS ถ าผู ใช งานเลือกรายการนี สามารถจะเลื อนไปตั งค ารายการต อไปได ชื อโดเมน ชื อโดเมนเนมที ผู ใช งานสมัครไว กับทาง DYNDNS เช น fujikoonline dvrdns info รหัสผู ใช ชื อผู ใช ที ผู ใช งานใช ติดต อกับ DYNDNS รหัสผ าน รหัสผ านของผู ใช งาน ทดสอบอัพเดต กดปุ ม เริ ม เพื อทดสอบการอัพเดด ...

Страница 44: ... วไป รายการ รายละเอียดการปรับค า แบนวิธ สามารถกำหนดแบนวิธได ตั งแต 64 KBS 8MBS ค ามาตรฐาน ไม จำกัด ไม จำกัดแบนวิธ บล อกปิง บล อกการใช คำสั ง PING ค ามาตรฐาน ปิด บล อคสแกน บล อกการใช ฟังก ชั น AUTO SCAN ของโปรแกรม CMS ค ามาตรฐาน ปิด ...

Страница 45: ...ม มีการบันทึกค า รายการ รายละเอียดการปรับค า ล อคอัตโนมัติ เมื อผู ใช เลือก เปิด เครื องจะล อกปุ มทุกปุ ม หลังจากไม มีการกดปุ มติดต อกันเกิน 3 นาที ถ าจะปลดล อกต องใส รหัสผ าน ค ามาตรฐานคือ ปิด เสียงปุ มกด เครื องจะมีเสียง เมื อผู ใช งานกดปุ มหน าเครื องหรือกดปุ มที รีโมทคอนโทรล ค ามาตรฐานเป น เปิด ถ าไม ต องการมีเสียงเลือก ปิด รุ นแผงแป น เลือกชนิดของคีย บอร ดสำหรับควบคุมและบอทเรต ความละเอียด ขนา...

Страница 46: ... คุณภาพที ได จะลดลง ปิด ถ าเป นภาพ จะมีคุณภาพดี แต ถ าเป นภาพเคลื อนไหว ภาพจะสั น ทำงานเมื อเปิด เลือกระบบการบันทึกหลังจากบู ตเครื องบันทึกแล ว บันทึกต อเนื อง ตั งเวลาบันทึก รหัสผ าน เปิด จะปรากฏไดอะล อกให ใส รหัสผ านทุกครั งเมื อกดปุ ม ปิด จะไม ปรากฏไดอะล อกให ใส รหัส ควรจะเลือก เปิด เพื อความปลอดภัย และควรเปลี ยนรหัสผ านที สามารถจำได ง าย แต ไม ควรลืม ความไวปุ มกด ความไวปุ มกดหน าเครื องที จะสา...

Страница 47: ...VR 2 การตั งค าวันที เวลา รายการ รายละเอียดการปรับค า วันที เวลา ตั งวันที เวลา โหมดบันทึก โหมดภาพสดหลังจากตั งเวลา ข อสังเกต ขณะอยู ในโหมดบันทึก ท านไม สามารถตั งวันที เวลาได ควรหยุดบันทึกก อนเพื อเปลี ยนวันที เวลา ...

Страница 48: ...น แต ไม ควร ลืมรหัสผ าน เพราะไม สามารถรีเซ ตระบบให กลับมาเหมือนเดิมได ADMIN สามารถกำหนดผู ใช งานได 5 คน แต ละคนยังสามารถกำหนดสิทธิ ในการใช งานเครื อง ใช งาน เลือก เปิด เพื อเปิดสิทธิ การใช งาน สิทธิ เลือกสิทธิ ในการใช งาน ดูภาพสด ดูย อนหลัง ถ ายโอน ปรับค า เครือข าย ปิดเครื อง รหัสผ าน เดิม ใส รหัสผ านเดิม 6 ตัวอักษร ใหม ใส รหัสผ านใหม 6 ตัวอักษร ยืนยัน ใส รหัสผ านอีกครั งให ตรงกัน ...

Страница 49: ... จะแสดงข อความบอกการดำเนินการ ใช เวลาประมาณ 10 30 วินาที สำหรับการฟอร แมตฮาร ดดิสก หลังจากฟอร แมตเสร จแล ว จะแสดงคำว า เรียบร อย ด านล างของหน าต าง บันทึกซ ำ เปิด บันทึกซ ำเมื อฮาร ดดิสก เต ม ปิด จะหยุดบันทึกเมื อฮาร ดดิสก เต ม ตรวจสอบดิสก จะหยุดบันทึกอัตโนมัติเมื อฮาร ดดิสก เสีย ระบบจะคอยตรวจสอบ ฮาร ดดิสก ทุกครั ง เมื อมีการบู ตเครื องใหม กดปุ ม หรือ เพื อหยุดหรือเริ มการทำงาน จำกัดการบันทึก จำก...

Страница 50: ...หลังจากเสียบ USB DRIVE เพื อต องการอัพเตด กดปุ ม เริ ม หรือใช เมาส คลิกปุ ม เริ ม เวอร ชันบอร ด แสดงเวอร ชันของบอร ด เวอร ชัน FPGA แสดงเวอร ชันของ FPGA ไม มี เวอร ชันไบออส แสดงเวอร ชันของไบออส เวอร ชันลีนุกซ แสดงเวอร ชันของลีนุกซ เวอร ชัน APP แสดงเวอร ชันของแอพพลิเคชั น ...

Страница 51: ...ีบอัดภาพ ชื อโฮสต แสดงชื อโฮสต ซึ งไม ซ ำกัน และ MAC address ภาษา ภาษาที ใช THAI เครือข าย แสดงหมายเลขไอพีและพอร ต ฮาร ดไดร ฟภายใน แสดงจำนวนฮาร ดดิสก และขนาดความจุ อุปกรณ แร ค แสดงอุปกรณ ที ติดตั งเข าไปในแร ค DVD CD HDD USB หน า แสดงอุปกรณ ที เสียบเข ากับพอร ต USB IDE BUS 0 แสดงสถานะของฮาร ดดิสก หลัก A Master B N A สำหรับฮาร ดดิสก ที สนับสนุนฟังก ชั น S M A T จะแสดงสถานะ เมื อปรากฏข อความ WARNING...

Страница 52: ...บพอร ต RS 422 ด านหลังเครื อง 1 PTZ เมนู ต องการควบคุมกล อง PTZ เลือกช องสัญญาณกล อง PTZ เต มจอ 1 กดปุ ม P T Z ที รีโมท หรือคลิกขวาเมาส แล วคลิกไอคอน PTZ จะปรากฏเมนูลัดขึ นมาด านซ าย 2 มือของจอภาพดังรูป ถ าต องการทราบรายละเอียดเพิ มเติม ดูเมนู HELP รายการ รายละเอียดการปรับค า ปุ ม ENTER กดปุ ม ENTER จะแสดงเมนู HELP กดปุ ม ENTER อีกครั งหรือกดปุ ม CANCEL เพื อยกเลิกเมนู HELP ...

Страница 53: ...ุ มนี เพื อยกเลิกการส ายหรือก มเงยของกล อง ปุ ม MENU เมื อผู ใช งานกดปุ มนี จะแสดงเมนูการใช งานทั งหมด กดปุ มนี อีกครั ง จะแสดงเมนูลัด กดปุ มขึ น ลง เพื อก ม เงย กดปุ มซ าย ขวา เพื อส ายไปซ าย ขวา กดปุ ม เพื อซูมเข า หรือ เพื อซูมออก ...

Страница 54: ...ทึกและออก ต องการดูภาพจากตำแหน ง Preset กดปุ ม INFO ที รีโมทคอนโทรล กดหมายเลขที ต องการแล วกดปุ ม ENTER กดปุ ม BACK UP เพื อเริ มทัวร กดปุ ม แล วใส ระยะของตำแหน ง Preset แล วกดปุ ม ENTER ตัวอย าง กดปุ ม BACK UP กด 5 กล องจะเริ มตัวจากตำแหน ง Preset ที 1 5 ปุ ม ฟังก ชั น Custom Function ที 1 กดปุ ม DISPLAY ที รีโมทคอนโทรล Custom Function ที 2 กดปุ ม ZOOM ที รีโมทคอนโทรล Custom Function ที 3 กดปุ ม ...

Страница 55: ...o 5 NEC NC 21D o o o o 6 SUNKWANG SK2107 o o o o o 7 RESERVED o o o o o 8 D MAX PTZ PROTOCOL o o o o o o 9 LG LPT A100L P T Z o 10 HONEYWELL GCC 655N 11 WONWOO PT 101 o 12 14 PELCO D 2400 9600 o o o o o o o o 15 C B TECH AN200 o o o 16 CANON VC C4 o o o 17 19 PELCO P 2400 9600 o o o o o o o o 20 22 PELCO EP 2400 9600 o o o o 23 PANASONIC WV CS W85x 86x o o o o o o 24 HONEYWELL HSDN 251N P o o o o ...

Страница 56: ...AD DELTADOME o o o o o 30 HUNT HTZ 2300 o o o o o o 31 HAZEM RESERVED o o o o 32 RVT EZ Protocol o o o o o o o o 33 LG MULTIX o o o o o 34 ELMO PTC 200C 400C o o o o 35 NICECAM MP 1xxx o o o o 36 C B TECH CNBPTZ102 o o o o o ข อสังเกต ผู ใช งานสามารถตั งค าความเร ว 1 ข า 8 เร ว กดปุ มที รีโมทคอนโทรลเพื อเพิ มความเร วหรือลดความเร วดังรูป ...

Страница 57: ...กดปุ ม 2 เพื อเลือกวันในปฏิทิน แล วกดปุ ม ENTER ที รีโมทคอนโทรล หรือที หน าเครื อง ใ ช เมาส คลิกเลือกวันเดือนปีที ต องการ 3 จากนั นจะปรากฏหน าต างเวลา กดปุ ม 4 เพื อเลือกชั วโมง นาทีที ต องการดูภาพย อนหลัง กดปุ ม ENTER ที รีโมทคอนโทรล ที หน าเครื อง หรือใช เมาส คลิกปุ ม 5 หรือกดดับเบิลคลิก เพื อเริ มดูภาพย อนหลัง คลิกปุ ม เพื อออกจากเมนูนี ถ าไม มีข อมูลเก บไว ในเดือนที ผ านมาหรือเดือนใดก ตาม ไม ส...

Страница 58: ...TH_52 H 264 DVR ถ าเลือก เวลา จะแสดงแบบหลายช องสัญญาณ ถ าเลือก กล อง จะแสดงช องสัญญาณกล องนั นเต มจอ ...

Страница 59: ...ว ภาพหาย เช น ฮาร ดดิสก เสีย เป นต น เครือข าย แสดงรายการที เชื อมต อกับเครือข าย อลาร ม แสดงรายการที ได รับสัญญาณเตือนภัย เคลื อนไหว แสดงรายการที เกิดการเคลื อนไหว ภาพหาย แสดงรายการที เกิดสัญญาณภาพหาย กดปุ ม 2 เพื อเลื อนเมนูที ต องการ กดปุ ม 3 เพื อเลือกเวลาที ต องการ กดปุ ม เพื อเปลี ยนหน า กดปุ ม ENTER ที รีโมลคอนโทรลเพื อดูภาพย อนหลัง หรือใช เมาส คลิกรายการที ต องการ 4 รายการเหตุการณ ทั งหมดอ...

Страница 60: ...การบันทึก เลือกข อมูลที ต องการ 4 1 ทุกกล อง เลือกทุกกล อง 2 ต อเนื อง ข อมูลการบันทึกแบบตั งค าเอง 3 อลาร ม ข อมูลการบันทึกเมื อได รับสัญญาณเตือนภัย 4 เคลื อนไหว ข อมูลการบันทึกเมื อเกิดการเคลื อนไหว เลือกช วงวันเวลาที ต องการ 5 เลือกปุ ม START แล วกดปุ ม ENTER หรือใช เมาส คลิกปุ ม START 6 ไอคอน USB จะเป นสีน ำเงิน ขณะทำการถ ายโอน ถ าความจุของ USB Memory Stick ไม พอ ระบบจะไม เริ มกระบวนการถ ายโอน...

Страница 61: ...ครื องบันทึก ถ า USB HDD ยังไม เป น FAT 32 ท านจะเห นข อความในเมนูอุปกรณ USB HDD ต องการฟอร แมต โปรดดูข อ 4 การตั งค าดิสก สำหรับข อมูลเพิ มเติมเกี ยวกับการฟอร แมตดิสก ก อนเริ มกระบวนการถ ายโอน โปรดทำตามข อสังเกตด านล าง 8 2 ถ ายโอนข อมูลด วย USB ฮาร ดดิสก สามารถใช USB HDD เพื อถ ายโอนข อมูลได รอประมาณ 10 วินาที ระบบจะจดจำการ เชื อมต อ หลังจากเสียบที พอร ต USB หน าเครื องบันทึก ...

Страница 62: ...ี ต องการบันทึก เลือกข อมูลที ต องการ 4 1 ทุกกล อง เลือกทุกกล อง 2 ต อเนื อง ข อมูลการบันทึกแบบตั งค าเอง 3 อลาร ม ข อมูลการบันทึกเมื อได รับสัญญาณเตือนภัย 4 เคลื อนไหว ข อมูลการบันทึกเมื อเกิดการเคลื อนไหว เลือกช วงวันเวลาที ต องการ 5 เลือกปุ ม START แล วกดปุ ม ENTER หรือใช เมาส คลิกปุ ม START 6 ไอคอน USB จะเป นสีน ำเงิน ขณะทำการถ ายโอน ถ าความจุของ USB Memory Stick ไม พอ ระบบจะไม เริ มกระบวนการถ...

Страница 63: ...ก 1 2 แบ งพาร ติชั น USB ฮาร ดดิสก มีขนาดความจุ 32 กิกะไบต วินโดส จะยอมให ท านฟอร แมตพาร ติชั นที เป น FAT32 ได มากสุดเพียง 32 กิกะไบต และทางไมโคร ซอฟท จะบอกให ใช พาร ตชั นเป น NTFS 2 เริ มต นถ ายโอนจากเครื องบันทึกไปยัง USB ฮาร ดดิสก 3 เปิดโปรแกรม CMS Player เพื อดูภาพที ถ ายโอน ข อสังเกต เฉพาะฮาร ดดิสก ที ฟอร แมตเป น FAT32 วินโดนส จะสามารถอ านข อมูลได ข อมูลในดิสก ที เป น FAT32 จะไม สามารถเปิดดู...

Страница 64: ...น จากนั นจะปรากฏ 2 หน าต างดังรูป กดปุ ม หรือ เพื ออุปกรณ USB CD DVD RW 3 เลือกช วงวันเวลาที ต องการ 4 เลือกปุ ม START แล วกดปุ ม ENTER หรือใช เมาส คลิกปุ ม START 5 ไอคอน USB จะเป นสีน ำเงิน ขณะทำการถ ายโอน ถ าความจุของ USB Memory Stick ไม พอ ระบบจะไม เริ มกระบวนการถ ายโอน ตัวชี กระบวนการถ ายโอนข อมูลจะแสดงด านล างของหน าต าง ขณะระบบกำลังถ ายโอน ห ามเรียกดูย อนหลัง เมื อถ ายโอนข อมูลเสร จแล ว ไอคอ...

Страница 65: ... นสีเทาดังรูป 8 4 วิธีดูภาพจากข อมูลที ถ ายโอนด วย USB Memory Stick 1 เปิดดูด วยโปรแกรม MCD Plyer เสียบ USB Memory Stick เข าที เครื องคอมพิวเตอร ไม ต องติดตั งโปรแกรม 2 ดับเบิลคลิกโปรแกรม ซึ งจะปรากฏหน าต างโปรแกรมดังรูป เดินหน า ถอยกลับอย างเร ว เลือกกล อง Watermark เล น หยุด 3 ข อมูลที ถ ายโอนยังสามารถดูด วยโปรแกรม DvrPlayer ได อีกด วย เวลาที เลือกจะปรากฏในช วงเวลาของหน าต างการถ ายโอน ...

Страница 66: ...ขึ นไป ผู ใช งานแต ละคนสามารถใช ฟังก ชั นของ เครื องบันทึกและจะไม กระทบกันผู ใช งานอื นๆ เว นแต เพียงการเข าไปตั งค าเครื องบันทึก เฉพาะผู ใช งานท าน เดียวที อนุญาตให เข าไปตั งค าเครื องบันทึกได ในเวลาที กำหนด ถ าเครื องคอมพิวเตอร ไม ตรงกับความต องการของระบบ โปรแกรม CMS อาจจะใช งานฟังก ชั นอย างเต ม ที โปรแกรมที เกี ยวข องกับ CMS ทั งหมดถูกทดสอบด วยสภาพแวดล อมที มีภารกิจอย างเดียว เพราะฉะนั น ถ า...

Страница 67: ... การติดตั งโปรแกรม ดับเบิลคลิก DvrPlayerInstaller exe หลังจากใส แผ น CD เข าไปแล ว 1 คลิก NEXT ตามรูป 2 คลิก INSTALL หรือ เลือกไดเร กทอรีที ต องการแล วคลิก INSTALL 3 คลิกปุ ม CLOSE หลังจากติดตั งเรียบร อยแล วดังรูป 4 ...

Страница 68: ...2 H 264 DVR จะมีไอคอน 5 ปรากฏอยู บนเดสก ท อบ ดับเบิลคลิกไอคอน 6 เปิดโปรแกรม แล วใส รหัสผ าน รหัสผ านมาตรฐาน คือ 0 ถ าต องการเปลี ยนรหัสผ าน เข าไปตั งค าที เมนู SETUP PASSWORD ต องการออกจากโปรแกรมกดปุ ม ESC ...

Страница 69: ...ระดับเสียง เพิ ม ลบเครื องบันทึก หน าต างเครื องบันทึก หน าต างเครื องบันทึกจำลอง โหมด CMS ปัจจุบัน สลับโหมดภาพสด ภาพย อนหลัง ตัวเลือกแสดงภาพ แสดงภาพแบบแบ งช องสัญญาณ 1 ก แสดงภาพเต มจอ ข แสดงภาพแบบแบ ง 4 ค แสดงภาพแบบแบ ง 6 ฆ แสดงภาพแบบแบ ง 7 ง แสดงภาพแบบแบ ง 8 จ แสดงภาพแบบแบ ง 9 ฉ แสดงภาพแบบแบ ง 10 ช แสดงภาพแบบแบ ง 16 ซ แสดงภาพแบบแบ ง 25 ฌ แสดงภาพแบบแบ ง 36 ญ แสดงภาพแบบแบ ง 49 ฎ แสดงภาพแบบแบ ง 64 ...

Страница 70: ...DvrPlayer Download ข จับภาพที ต องการ เมื อกดปุ มนี แล ว จะปรากฏเมนูให ปริ นท ภาพหรือ บันทึกภาพ ค เปิด ปิดการแสดงรายละเอียดบนจอภาพ ฆ ตั งค าโปรแกรม CMS เมื อกดปุ มนี จะปรากฏเมนูดังรูป แสดงเวลาปัจจุบันในโหมดแสดงภาพสดและเวลาขณะดูย อนหลังในโหมดดูย อนหลัง เดือน ชั วโมง นาที วินาที วัน วันที ปุ มสลับโหมดดูภาพสด ดูภาพย อนหลัง 3 ก ดูภาพสด ข ดูภาพย อนหลัง ปุ มตั งค าโปรแกรม 4 ...

Страница 71: ...ป ก OSD SETUP แสดงเวลา ชื อ DVR หมายเลข กล อง ชื อกล อง เฟรมเรตของแต ละ กล อง ที ช องสัญญาณกล อง ข OVERLAY Defualf แนะนำให ใช OVERLAY เพื อ เร งความเร วในการส งข อมูล ถ ามีปัญหาเกี ยวกับการ ดจอ ไม เจอไดรเวอร ให ยกเลิกฟังก ชั นนี และ ลดการแสดงผลของฮารดแวร ดังรูป ค VIDEO MODE เลือกระบบสัญญาณภาพ NTSC หรือ PAL ฆ DOWNLOAD กำหนดไดเร กทอรี สำหรับดาวน โหลดข อมูลจากเครื องบันทึก GENERAL 1 ตั งค าโปรแกรม CM...

Страница 72: ...RM EVENT เมื อเกิดเหตุการณ ที เครื องบันทึก ให แสดงสัญญาณกล องนั นเต มจอ a OLD PASSWORD รหัสผ านเดิม b NEW PASSWORD รหัสผ านใหม c CONFIRM PASSWORD ยืนยันรหัส ผ านใหม จากนั นกดปุ ม APPLY เพื อเปลี ยนรหัส ผ าน ไม ต องกดปุ ม OK การเปลี ยนรหัส ผ านนี จะมีผลกับ โปรแกรม DvrPlayer เท านั น ข อสังเกต รหัสผ านนี สำหรับใส เมื อเปิดโปรแกรม CMS แตกต างจากรหัสผ านของเครื องบันทึก ...

Страница 73: ...ม CMS จะส งเสียง เมื อเชื อมต อกับเครื องบันทึก DISCONNECT โปรแกรม CMS จะส งเสียง เมื อขาดการเชื อมต อกับเครื องบันทึก ALARM โปรแกรม CMS จะส งเสียงเมื อได รับสัญญาณอลาร มจากเครื องบันทึก MOTION โปรแกรม CMS จะส งเสียงเมื อ เครื องบันทึกตรวจพบการเคลื อนไหว VIDEO LOSS โปรแกรม CMS จะส งเสียง เมื อมีสัญญาณกล องหาย ตั งค าการแจ งเตือนด วยเสียงสำหรับโปรแกรม CMS ท านสามารถเลือกเปิด ปิดเสียงจากซอฟต แวร ปุ ...

Страница 74: ...ควบคุมกล อง PTZ 6 คลิกเลือกช องสัญญาณกล อง PTZ ให เต มจอ แล วคลิกปุ ม PTZ CONTROL เพื อใช งานตามที ต องการ ก หมุนส าย ก มเงย PAN TILT ข ปรับโฟกัส FUCUS เงยขึ น ก มลง หมุนซ าย หมุนขวา หมุนเฉียงซ าย หมุนเฉียงขวา ก มเฉียงขวา ก มเฉียงซ าย ปรับโฟกัสไกล เบลอ ปรับโฟกัสใกล ชัด ปรับโฟกัสอัตโนมัติ ...

Страница 75: ...ร จ หมุนส ายอัตโนมัติ AUTO PAN ฉ ก มเงยอัตโนมัติ AUTO TILT ง ฟังก ชั นพิเศษ SPECIAL FUNCTION ช ปุ มเปิด ปิด ฟังก ชั นพิเศษซึ งขึ นอยู กับกล อง P T Z ฟังก ชั นเตรียมพร อม หรือเปิด ปิดไฟของกล อง P T Z ตั งขอบเขตการหมุนอัตโนมัติทางซ าย ตั งขอบเขตการหมุนอัตโนมัติทางขวา เปิดฟังก ชั นหมุนอัตโนมัติ ตั งขอบเขตการเงยอัตโนมัติ ตั งขอบเขตการก มอัตโนมัติ เปิดฟังก ชั นก มอัตโนมัติ ...

Страница 76: ...หาย มีการเคลื อนไหว ได รับสัญญาณจากอุปกรณ เซ นเซอร หยุดบันทึก ปิดการใช ตารางเวลาบันทึก หยุดการโอนถ ายข อมูล จะเป นสีเหลือง แสดงรายชื อเครื องบันทึก ล าสุดที มีปัญหาหรือเกิดเหตุการณ สีจะเปลี ยนแปลงขึ นอยู กับเหตุการณ หรือ ปัญหาที รายงานมาจากเครื องบันทึก ก สีแดง เมื อเครื องบันทึก เกิดปัญหา เป นต นว า เชื อมต อไม ได ขาดการเชื อม ต อ ฮาร ดดิสก เสีย พัดลมหยุดหมุน ไฟฟ าดับ กู ระบบไม ได ระบบ ค าง จะเป ...

Страница 77: ...เงื อนไข บล อกสีแดงเข ม เกิดเหตุการณ หรือปัญหา บล อกสีแดงกระพริบ เกิดเหตุการณ หรือมีปัญหาล าสุด บล อกสีเหลืองเข ม สถานะล าสุดของเครื องบันทึก ถ าเครื องบันทึก ที มีการเชื อมต อเน ตเวิร คอยู ขาดการเชื อมต อหรือเกิดไฟฟ าดับ จะกระพริบเป นสีแดง 1 HDD FAIL ฮาร ดดิสก เสีย 2 FAN LOCK ก SYS FAN พัดลมด านข างมีปัญหา ข SYS FAN พัดลมที อยู บนซีพียูมีปัญหา 3 EVENT ก AL ALARM สัญญาณจากอุปกรณ เตือนภัย ข MO MOTI...

Страница 78: ...SYSTEM TIME แสดงวันที เวลาของเครื องบันทึก ค RECORD ค าปรับแต งกล องที บันทึกต อเนื องซึ งเป นปัจจุบัน ฆ ALARM ค าปรับแต งกล องที บันทึกร วมกับอลาร มซึ งเป นปัจจุบัน ง MOTION ค าการปรับแต งกล องที บันทึกเมื อมีการเคลื อนไหวซึ งเป นปัจจุบัน จ VIDEO LOSS ค าการปรับแต งกล องที มีสัญญาณภาพซึ งเป นปัจจุบัน ฉ HDD SIZE ฮาร ดดิสก ที ใช งานอยู ฮาร ดดิสก ทั งหมด ช BACKUP SIZE USB ฮาร ดดสิก ที ใช งานอยู USB ...

Страница 79: ... องการดูรายละเอียดเพิ มเติม ให คลิกขวาที ไอคอน DVR แล วเลือก DVR LOG LIST DVR LOG LIST โปรแกรมจะแสดงไฟล LOG ของเครื องบันทึก โดยจะดึงข อมูลไฟล LOG จากตัว เครื องมาแสดง ผู ใช งานสามารถค นหาเหตุการณ ต างๆ จากฟังก ชั นนี ถ าดับเบิลคลิกที รายการเหตุการณ จะเป นการดูภาพย อนหลัง ...

Страница 80: ...งบันทึก เอง 2 1 SET NAME พิมพ ชื อ ซึ งจะปรากฏบนโปรแกรม CMS 2 IP ใส หมายเลขไอพี ตัวอย าง 192 168 2 252 หรือชื อโฮสต ตัวอย าง fujikoonline dyndns org 3 PORT กำหนดพอร ตสำหรับเชื อมต อ พอร ตมาตรฐาน 7000 4 PASSWORD ใส รหัสผ าน 5 ADD TO LIST คลิกปุ ม ADD TO LIST เพื อเพิ มเครื องบันทึก 6 บันทึกค าและออกจากฟังก ชั น กดปุ ม OK 7 ออกจากฟังก ชั นและไม มีการบันทึก กดปุ ม CANCEL ปุ ม APPLY ใช สำหรับ การปรับแ...

Страница 81: ...lease stand by พร อมปุ ม Try again และ Cancel เครื องบันทึก ขาดการเชื อมต อกับเน ตเวิร ค และเชื อมต อไม ได เป น เพราะเน ตเวิร คมีปัญหาหรือใส ไอพีหรือรหัสผ านไม ถูกต อง โปรแกรม CMS จะพยายามเชื อมต อทุกๆ 30 วินาที เมื อคลิกที ไอคอนนี จะแสดงข อความ Network connection error หรือ Invalid Password เครื องบันทึก เกิดเหตุการณ หรือปัญหาทางระบบ เมื อคลิกที ไอคอนนี จะปรากฏหน าต าง CMS LOG LIST 1 2 1 ออกจากเม...

Страница 82: ...อช วยผู ใช งานให สะดวกขึ น โดยผู ใช งานสามารถคลิก ไอคอนเครื องบันทึก ที เชื อมต ออยู ดังรูป คลิกไอคอนเครื องบันทึกที ต องการ 1 จะแสดงจำนวนกล องของเครื องบันทึกที เลือก 2 ไอคอนที บอกเหตุการณ ต างๆ 3 สีน ำเงิน เชื อมต อกล องโดยไม มีการบันทึก สีน ำเงินเข ม สัญญาณภาพหาย สีแดง มีการบันทึกอยู ...

Страница 83: ...า แสดงเวลา 3 สถานะเครื องบันทึก แสดงสถานะการบันทึก เชื อมต อเครือข าย สัญญาณภาพหาย เหตุการณ และสถานะปัจจุบัน สถานะ เงื อนไข REC บันทึกปกติ ต อเนื อง Wait เริ มต นเชื อมต อ Loss สัญญาณภาพหาย Close ขาดการเชื อมต อกับเครื องบันทึก Alarm บันทึกร วมกับอลาร ม Motion บันทึกเมื อมีการเคลื อนไหว PB ดูย อนหลังสำหรับกล องที เลือก Live ดูภาพสด 4 เขตข อมูลต อวินาที ความเร วในการส งข อมูลทางเครือข าย อัตราเขตข ...

Страница 84: ...ภาพแบบคู ขนาน ดูได ทั งภาพสดและภาพย อนหลัง โดยคลิกเลือกกล องที ต องการ เลือก 6 Search จะแสดงปฏิทินเพื อเลือกข อมูลที ต องการดูภาพย อนหลัง เลือก Live จะแสดงภาพสด สามารถดูภาพได ทั งเครื องบันทึก และเครื องบันทึกจำลอง 5 เมนูช วย Context Menu เมนูช วยนี ยอมให กล องแต ละกล อง เครื องบันทึก และเครื องบันทึกจำลอง เข าถึงเมนูย อยได เมนูย อยจะ ยอมให ใช คุณสมบัติต างๆ ขึ นอยู กับเมนูย อยแต ละประเภทโดยเฉพาะ ...

Страница 85: ...ด ดังรูป 1 LIVE แสดงภาพสด 2 PROPERTY เปิดหน าต างคุณสมบัติของเครื องบันทึก 3 CMS LOG LIST เปิดหน าต างแสดงรายการ LOG ของโปรแกรม CMS 4 DVR LOG LIST เปิดหน าต างแสดงรายการ LOG ของเครื องบันทึก 5 POS DATA SEARCH เปิดหน าต างค นหาข อมูลจากเครื อง POS 6 SETUP เปิดหน าต างตั งค าระบบเครื องบันทึก 7 REMOVE ลบไอคอนเครื องบันทึกออกจากหน าต างนี ...

Страница 86: ...ันทึกไว ที ีเครื องคอมพิวเตอร ที เปิดโปรแกรม DvrPlayer 1 กดปุ ม เพื อสลับเข าโหมดดูภาพย อนหลัง ซึ งจะปรากฏดังรูป 2 กดปุ ม Search เพื อค นหาข อมูลจากตัวเครื อง ซึ งจะปรากฏหน าต างดังรูป 3 เมื อกดปุ ม SEARCH แล วจะปรากฏเมนู REMOTE เพื อดูภาพย อนหลังจากตัวเครื องบันทึก 4 เลือก REMOTE หรือ LOCAL เพื อดูภาพย อนหลัง ...

Страница 87: ...อก REMOTE และเครื องบันทึกที ต องการ 2 เมื อเลือกเครื องบันทึก จะแสดงปฏิทิน ถ ามีข อมูลจะแสดงบล อกสีแดง เส นสีการบันทึกข อมูล สีแดง Alarm สีเขียว Motion สีเหลือง Normal 3 คลิกเลือกวันที ชั วโมง นาที และกล องที ต องการ จากนั นกดปุ ม PLAY เพื อดูย อนหลัง ...

Страница 88: ...ู SETUP ที หน าต างโปรแกรมหลัก ดาวน โหลดจากเครื องบันทึก 2 ท านสามารถดาวน โหลดข อมูลภาพจากเครื องบันทึกมาเก บไว ที เครื องคอมพิวเตอร ผ านทาง โปรแกรม CMS 1 เลือก REMOTE และเลือกเครื องบันทึกที ต องการ 2 โปรแกรมจะแสดงข อมูลวิดีโอที เก บไว ที เครื องบันทึกเป นแบบกราฟิค ก BEGIN END บอกเวลาเริ มต นและสิ นสุดของไฟล ที เลือก ข CURRENT บอกเวลาของไฟล ขณะที ดาวน โหลด ค ยกเลิกการดาวน โหลด เลือก CANCEL ...

Страница 89: ... เมนูนี จะใช สำหรับดูภาพจากไฟล ที ดาวน โหลดผ านทางโปรแกรม CMS มาเก บไว ในเครื อง คอมพิวเตอร 1 คลิกเลือกปุ ม LOCAL 2 โปรแกรมจะแสดงข อมูลที เก บไว ในเครื องคอมพิวเตอร เป นแบบกราฟิค 3 กดปุ ม PLAY เพื อเริ มดูภาพ 4 กดปุ ม DELETE เพื อลบไฟล จากเครื องคอมพิวเตอร 5 กดปุ ม SAVE AS บันทึกไฟล บนโฟลเดอร อื นหรือคอมพิวเตอร เครื องอื น 6 กดปุ ม OPEN FILE เพื อเปิดไฟล จากแผ น CD หรือจากโฟลเดอร อื น ...

Страница 90: ... DVR 3 7 ตั งค าเครื องบันทึก ท านสามารถเข าไปตั งค าเครื องบันทึกผ านทางโปรแกรม CMS เหมือนกับการตั งค าหน าเครื องบันทึก การเข าไปตั งค าเครื องบันทึก ผ านทางเมนูช วยของเครื องบันทึก โดยคลิกขวาไอคอนเครื องบันทึกจะ ปรากฏเมนูตัวช วย เลือก SETUP ...

Страница 91: ...T ไม ควรตั งชื อเหมือนกับเครื องบันทึก 3 บันทึกค าและออกจากหน าต างโปรแกรม กดปุ ม OK 4 ออกจากหน าต างโปรแกมโดยไม บันทึก กดปุ ม CANCEL ลบเครื องบันทึกจำลองออก ให เลือกไอคอนรูป DVR ที ต องการแล วกดปุ ม DEL VIRTUAL 2 DVR AUTO ARRANGE เลือกอ อพชั นนี เพื อให โปรแกรม CMS จัดเรียงกล องที เกิดเหตุการณ ซึ งเพิ ม เข าในเครื องบันทึก จำลองเรียบร อยแล ว กล องที เกิดเหตุการณ จะถูกย ายไปยังกล องที 1 ให อัตโนมั...

Страница 92: ...ำลอง 4 ดับเบิลคลิกไอคอนเครื องบันทึกที ต องการ 1 เครื องบันทึกจำลองที เลือกจะทำงาน ซึ งจะปรากฏไอคอนดังรูป 2 เลือกช องสัญญาณภาพที ต องการ 3 เพิ มกล องเข าไปในช องสัญญาณภาพ มี 2 วิธี 4 เลือกทุกกล อง คลิกไอคอนเครื องบันทึก ที หน าต างเครื องบันทึก จากนั นใช เมาส ลากไปวาง 1 ยังตำแหน งสัญญาณภาพที ต องการ เลือกเฉพาะกล อง คลิกเลือกเฉพาะกล องของเครื องบันทึก ที ต องการแล วลาก ไปวางยังตำแหน ง 2 สัญญาณภาพที...

Страница 93: ...เลือกสัญญาณกล องที ต องการลบ จากนั นคลิกขวาเลือก REMOVE 1 เลือกสัญญาณกล องทีต องการ จากนั นใช เมาส ลากไปวางที ไอคอน DVR หรือ DVR จำลอง 2 การดูภาพสดของเครื องบันทึกจำลอง 5 การดูภาพสดจะเหมือนกับการดูภาพสดของเครื องบันทึก ...

Страница 94: ...อร ตมาตรฐาน คือ 7000 ตัวอย าง http 192 168 1 100 7000 http fujikoonline dyndns info 7000 ใส ชื อ ADMIN หรือ USER และรหัสผ าน ค ามาตรฐาน USERNAME ADMIN PASSWORD 000000 ถ าผู ใช งานไม ต องการใช งาน CMS LITE แต ต องการจะดูผ าน IE อย างเดียว ให เลือก WEB VIEWER USE OVERLAY หรือ WEB VIEWER NOT USE OVERLAY ...

Страница 95: ...Server ก Live แสดงภาพสด ข Remote Search ค นหาจากเครื องบันทึก ค File Open เปิดไฟล วิดีโอจากเครื องคอมพิวเตอร หรือแผ น CD ฆ Setup ตั งค าเครื องบันทึก ง Capture จับภาพ จ Rec บันทึกลงคอมพิวเตอร ฉ OSD แสดงชื อกล อง วันที สถานะเครื อง เฟรมเรต ทางจอภาพ ช 1 4 1 8 1 16 แสดงสัญญาณกล องเต มจอ ซ ควบคุมกล อง PTZ ฌ แบ งสัญญาณภาพแบบ 4 6 7 8 9 10 16 ...

Страница 96: ......

Страница 97: ...g flash with arrowhead symbol within an equilateral triangle is intended to alert the user to the presence of un insulated dangerous voltage within the product s enclosure that may be of sufficient magnitude to constitute a risk of electric shock to persons The exclamation point within an equilateral triangle is intended to alert the user to the presence of important operating and mainte nance ser...

Страница 98: ...1 Display Overview EN_15 4 2 Multi screen Display and Sequencing EN_16 4 3 Zooming EN_17 4 4 Spot Monitor EN_18 5 OPERATION EN_19 5 1 Main Menu Overview EN_19 5 2 Display Option EN_20 5 3 Camera Setup EN_22 5 4 Motion Recording EN_24 5 5 Continues Recording Normal Recording EN_26 5 7 Schedule Recording EN_31 5 8 Network Setup EN_34 5 9 System Setup EN_37 6 PAN TILT ZOOM CONTROL EN_43 7 SEARCH PLAY...

Страница 99: ...up EN_54 8 4 How to Play Backup data in USB Memory Stick Backup EN_55 9 Client Software CMS EN_56 9 1 DVR Player Program Introduction EN_56 9 2 Features EN_59 9 3 DVR CONTROL EN_70 9 4 Virtual DVR EN_81 Appendix 1 VIEW ONLY EN_85 ...

Страница 100: ...ation may result in high voltage electrical shock Qualified service personnel authorized by your equipment distributor should conduct internal inspections alterations and repairs Stop operating the equipment immediately if it emits smoke or noxious fumes Failure to do so may result in fire or electrical shock Immediately turn the DVR s power off remove the power cable from the power outlet Confirm...

Страница 101: ...recom mended for this equipment may lead to overheating distortion of the equipment fire electrical shock or other hazards Do not place the batteries near a heat source or expose them to direct flame or heat Neither should you immerse them in water Such exposure may damage the batteries and lead to the leakage of corrosive liquids fire electrical shock explosion or serious injury Do not attempt to...

Страница 102: ...Related Problems Moving the equipment rapidly between hot and cold temperatures may cause condensation water droplets to form on its external and internal surfaces You can avoid this by placing the equipment in an airtight resalable plastic bag and letting it adjust to temperature changes slowly before removing it from the bag If Condensation forms inside the Digital Video Recorder Stop using the ...

Страница 103: ...amaged or missing do not attempt to use the unit contact the supplier immediately If the unit must be returned it must be shipped in the original packing box CONTENTS QUANTITY REMARK DIGITAL VIDEO RECORDER 1 UNIT CLIENT SOFTWARE CD 1 REMOTE CONTROLLER 1 BATTERY COIN CR2025 1 AC Adapter 1 POWER CORD 1 USER GUIDE 1 ...

Страница 104: ...Video Recorder Power Blue Recording Red and HDD Green 2 Playback Record control These functions are used in Live Mode or Playback mode 1 Direction buttons In Menu setup mode used to move the cursor 2 LOG Playback Stop Log Press this button to access to log list Stop This button stops playback 3 R step or FR REC 1 CONTROLS ...

Страница 105: ...ove forward field by field picture by picture during STILL mode F F This button is used to Fast Forwarding during PLAYBACK mode 3 MENU SEC Menu Press this button to display the MAIN MENU screen ESC Press this button to exit menu without saving 4 ENTER Press this button to save menu settings 5 QUAD Press this button to display the cameras in multi screen view 6 Channel Numeric Buttons Press the but...

Страница 106: ... 5 LAN RJ 45 Ethernet Port For connecting to remote PC via Ethernet network 6 MOUSE connection Connect PS2 USB mouse to this port To use USB only mouse 7 connect it to USB port at rear panel SENSOR ALARM IN 1 4 1 8 or 1 16 For connecting alarm inputs 8 RELAY ALARM OUT 1 For connecting alarm out relays 9 RS 422 485 For connecting to PTZ camera 10 RS 232C Development purposes only 11 POWER DC power ...

Страница 107: ..._5 H 264 DVR 1 3 Remote Controller POWER DISPLAY MODE ENTER ZOOM PLAY STOP TIME SEARCH PTZ STEP_BACK REWIND INFO CANCEL ESC BUTTON MENU BUTTON RECORD NUMBERIC ALPHABETIC FAST REWARD LOG STEP_FORWARD STPOT ...

Страница 108: ... ALPHABET LOG Repositioning BACK UP PAN TILT ZOOM MENU BUTTON CANCEL OSD OFF LIVE Virtual Keypad PLAYBACK This DVR can be controlled by Mouse Connect a mouse via USB port before use If you click right button of your mouse in Live mode and Playback mode you will see following virtual Remote con trollers respectively and Virtual Keypad will be shown to enter PASSWORD and Camera Name etc ...

Страница 109: ...EN_7 H 264 DVR 2 INSTALLATION CONNECTIONS 2 1 Camera Monitor Microphone Alarm sensor and Power cord 1 System Configuration Diagram The following illustration is showing the fully installed system ...

Страница 110: ...4 8 cameras Connect cameras to the VIDEO IN BNC on the back panel of the system To connect a PTZ camera connect the PTZ camera s control line to the RS 422 TX RS 422 TX terminal and connect the video output to one out of VIDEO IN on the back panel of the product ...

Страница 111: ...roper audio device microphone to the AUDIO IN 1 Vp p 600 ohms and speaker to the AUDIO OUTPUT See illustration below 4 MONITOR There are three video outputs 2 BNC 1 VGA on the rear panel of the system Connect monitors depending on your application 1 BNC for Main composite video output 1 BNC for Spot composite video output 1 VGA output ...

Страница 112: ...STA e Spare 10 100 BaseT Ethernet Port f Microsoft DirectX 9 0c It is recommended to have DirectX 9 0c version in Client PC DirectX 9 0c is available for download from Microsoft homepage www microsoft com windows directx Disclaimer The remote viewing on network connection may not work on all personal computers due to dif ferencein personal settings and hardware configurations ...

Страница 113: ...Stop recording first to set QUICK SETUP menu While DVR is recording TIME and RECORD menu is not activated 2 Enter the password using Numeric buttons when prompted for a password 3 The Factory Default password for the unit is 000000 4 Press MENU button to display the QUICK SETUP screen 5 QUCIK SETUP menu appears once a password is entered 6 6 Use Directional buttons to select menu and press ENTER b...

Страница 114: ...s 1 Enter the Date and Time by pressing numeric buttons on the remote controller or 2 on the unit Press ENTER button to exit a menu with saving changes Press ESC to exit a menu 3 without making changes Note 1 Recording mode While recording mode you cannot set up time Stop recording to change TIME 2 Live mode after time set up After time set up press record button to continue recording mode ...

Страница 115: ... Field resolution at same rate 720x240 720x288 Frame 4 8Ch Each channel records at Frame resolution at same rate 720x480 720x576 Frame CIF Channel number 1 720x480 720x576 Channel number 2 8 360x240 360x280 2 2 RECORD DAYS Select RECORDING DAYS by pressing buttons on the remote controller or on the 1 unit Press ENTER button to exit a menu with saving changes Press ESC to exit a menu 2 without maki...

Страница 116: ...U OFF Select this to stay on QUICK SETUP menu 2 To resume Quick SETUP menu from Main Menu refer to 2 1 DISPLAY SETUP part in 3 manual NOTE 1 START RECORDING When setup is finished press REC button on the front panel or on the remote controller to start recording 2 For individual recording setup of each channel and more specified setup enter into RECORD in main menu Please refer to 3 ADVANCED for h...

Страница 117: ...Indicate Video Loss during Recording To disappear press CANCEL ESC button on remote controller or CLR button on the front panel 3 Camera No and Title 4 Status 1 Indicate an USB Device is connected on Front panel It s changed to blue color while it s doing backup If Mouse is connected cursor will be appeared Indicate the DVR is recording now Indicate Schedule Record mode is on It s changed to blue ...

Страница 118: ...apacity is less than 4GB this blue Recycling icon will be shown up 2 Multi screen Display and Sequencing Display Press DISPLAY buttons to activate the multi screen display It is changed the order as shown below among your choice of SPLIT MODE While in 16 way screen display press DIS PLAY buttons for 1second to begin full screen sequencing The sequence mode and dwell times are programmable For deta...

Страница 119: ...aving changes 3 2 Mouse Drag the selected camera to the position you wish to reposition by using mouse 4 3 Zooming During live view mode or playback it is possible to zoom into a section of the screen to get a close up view of the screen To activate the digital zoom select the full screen display of the camera you wish to zoom 1 Then press the ZOOM button on IR Remote controller Zoom area box pops...

Страница 120: ...n nels independently form the main monitor Press Spot button on the remote controller then press number button you wish watch as full 1 screen Press Spot button twice to auto switch cameras Sequence interval can be set from the 2 Sequential Setup When an alarm has been triggered that specific channel will go into Full Screen 3 ...

Страница 121: ...ed shown as below Note Factory default Admin user password is 000000 It is recommended to change the PASS WORD when you install the DVR Refer to System Setup Use Direction buttons 1 to select the desired menu Items selected in the menu are represented in color Press ENTER button to select the menu and display Sub Menu Use Left Right buttons 2 to select on TAP menu Selected items changed into ORANG...

Страница 122: ...on Main Monitor CAMERA Select On Screen Display information for Camera Number and Title BORDER LINE Select Board Line between cameras WHITE GRAY DARK GRAY BLACK BACKGROUND Select Background color on NO VIDEO status GRAY DARK GRAY BLACK BLUE WHITE SPLIT MODE Display is changed the order as shown below among your choice of SPLIT MODE QUICK SETUP Select On to resume Quick SETUP menu and Off to stay o...

Страница 123: ...ENT DWELL TIME 2 Sec Specify the dwell time of each camera or Multi screen mode is displayed Use button 1 second 30 second SEQ MODE None Select desired sequence mode to switching FULL SCREEN ALL Select the cameras to be included or excluded from the automatic sequencing ...

Страница 124: ...s are viewable after change into NO BRIGHTNESS 50 The brightness of each camera can be adjusted by pressing buttons CONTRAST 50 The contrast of each camera can be adjusted by pressing buttons COLOR 50 The color of each camera can be adjusted by pressing buttons TITLE Camera A combination of 12 digits and alphabets can be entered to label each camera Press appropriate Numeric button to type camera ...

Страница 125: ... characters from IR Remote Controller No 1st Press 2nd Press 3rd Press 4th Press No 1st Press 2nd Press 3rd Press 4th Press 1 A B C 1 7 S T U 7 2 D E F 2 8 V W X 8 3 G H I 3 9 Y Z 9 4 J K L 4 0 0 5 M N O 5 10 SPACE 6 P Q R 6 ...

Страница 126: ...EM ADJUSTMENT RECORD TIME Determines the duration of recording when motion is detected 10SEC 300SEC CAMERA SELECTION Use Left Right buttons or Number button to select the Camera you wish to configure SENSITIVITY Level 1 Low sensitivity Level 20 High sensitivity MOTION GRID Use this menu to setup Zones for the motion detection The screen shown below will overlay the current video image Motion zones...

Страница 127: ... or Disable motion detection on a per camera as shown below 6 Motion Detected zones Press the REC button then Motion recording starts according to configured Recording Quality 7 Frame Rate when Motion detected It will be back to stand by mode after motion recording time is end Camera does not record under normal conditions Note Motion Duration will be extended if there is another motion detection ...

Страница 128: ...le Recording on each camera QUALITY Specify the record picture quality for each camera ULTRA SUPER HIGH MIDDLE LOW RATE Select recording speed for each camera Recording resolutions is changed to Frame Field and CIF mode Refer to System AUDIO Select audio recording ON or OFF The audio data is always recorded in real time unlike the video data that can be recorded in various modes including real tim...

Страница 129: ... 6 18 4 11 5 7 2 KB ULTRA 24 6 15 4 9 6 29 5 18 4 11 5 KB It is calculated by theoretical therefore it may be different depends on Video Signals or other conditions in actual 5 6 Alarm Recording 1 Record Setup Please verify the alarm record settings prior to starting alarm recording Please note that alarm recording is independent of any recording modes Alarm record starts after Alarm Record Enable...

Страница 130: ...TMENT USE Enable or Disable Alarm Recording on a per camera QUALITY Specify the record picture quality for each camera on Alarm Recording ULTRA SUPER HIGH MIDDLE LOW RATE Select recording rate of each camera when Alarm is triggered AUDIO Select audio recording ON or OFF INPUT Specify the type of Alarm input Device Note Press MENU button on each Item at first line to apply all setting for the rest ...

Страница 131: ... selected the relay will be triggered when System has problems such as HDD FAIL Power loss etc Press Cancel button to stop Alarm Out It will be cleared by an order Alarm Motion Video Loss Save changes and exit the menu press ENTER button 6 Press REC button after setting RECORD ENABLE Then the red REC LED lights on the front 7 panel and recording starts 3 Recording Priority Example 1 RECORDING STAT...

Страница 132: ...ORDING STATUS USE MOTION ON ON ALARM RECORDING STATUS ON Resulting Actions Press the REC button to commence motion recording based on the configuration shown above High picture quality at 3 F S without audio If an alarm is triggered on this channel the configuration will be changed to Super picture quality at 6F S with Audio The system will revert back to stand by mode for Alarm or Motion once ala...

Страница 133: ...ure It breaks down the days of the week in eight different categories ALL SUN MON TUE WED THU FRI and SAT ALL is for everyday of the week Daily schedule has priority to ALL Enter the beginning and end time then select Record mode to record 5 BEGIN The time of recording start 1 END The time of recording end The ending time must not be before the starting time or 2 the same as the starting time It m...

Страница 134: ...ding time is over the REC indicator goes off and recording stops 9 If you wish to stop recording while scheduled recording press the SCHDULE button then the SCHEDULE indicator goes off and the Schedule Recording Mode is released Refer to Basic Recording for set up Note The recording time is set by 24H 00 00 23 59 You need to set 2 days if the setting is over one day D W BEGIN END MODE Monday 18 00...

Страница 135: ...tinuous RECORD ON OFF OFF OFF OFF Motion RECORD ON ON OFF OFF OFF Alarm ALARM OFF OFF ON ON OFF Schedule SCHEDULE OFF OFF OFF OFF ON Schedule Motion SCHEDULE OFF ON OFF OFF ON Normal and Alarm RECORD ALARM ON OFF ON ON OFF Motion and Alarm RECORD ALARM ON ON ON ON OFF Schedule and Alarm ALARM SCHEDULE OFF OFF ON OFF ON ...

Страница 136: ...the static IP address Net mask Enter the IP address of subnet mask Gateway Enter the IP address for the internet gateway server DNS Server Verify the name of the domain name system PORT Select 0000 9999 The DVR s connection port can be adjusted in case the default port 7000 is blocked The DVR s service port may be modified to allow the connec tion from CMS The static service consists of an IP addr...

Страница 137: ...ighlight SMTP Server and then press numeric buttons to define an e mail server PORT Define the port that the SMTP server will communicate through AUTH Select Authentication on or off The default is off USER ID Enter the user ID of Mail Server if your server needs Authentication It is recognized as a small letter even it s displayed as a Capital Letter Password Enter the password if your server nee...

Страница 138: ...s L50AD25 Your DVR s DDNS address is http L50AD25 dvrhost com portNO DYNDNS to use Dyndns com domain Domain Name Enter your domain name if you use Dyndns server for DDNS User ID Enter user ID for DDNS Password Enter user PW for DDNS DDNS Test Test your DDNS address 4 MISC ITEM ADJUSTMENT BANDWIDTH Unlimited is set by default Select 64 KBPS 8 MBPS ...

Страница 139: ... channel records at Field resolution 720x240 720x288 Frame 4 8Ch The system records each camera individually and then multi plexes them Each channel records at Frame resolution 720x480 720x576 Frame CIF Channel number 1 720x480 720x576 Channel number 2 8 360x240 360x280 RECORD LIMIT Allows you to configure when the DVR automatically deletes all data from HDD It lefts the data for below duration fr...

Страница 140: ...password window will not be shown except POWER SERVICE MENU RECORDING STOP SCHEDULE RECORDING STOP FACTORY DEFAULT To restore factory default settings stop recording and then execute START by using ENTER button KEY SENSI TIVITY The sensitivity of touch buttons on front panel can be controlled in this setting 2 Time ITEM ADJUSTMENT DATE TIME Enter the Date and Time Note While recording mode you can...

Страница 141: ...n enabled it will be possible to check individually under user settings Monitoring Playback Back up Network Configuration Main Menu Setup Shutdown Power off Enter the 6 numbers for the new password and then re enter the same password under COMFIRM section The asterisks will advance automatically as the numbers are entered ...

Страница 142: ...l begin and the progress will be displayed at the bottom of the window Please not that it takes 10 30 seconds for format a HDD 5 When formatting is finished it will display COMPLETE and also SUCCESS at the bottom of the window OVERWRITE Users may select the record policy of the system s internal hard disk drive By default the system s hard disk drive is set to overwrite from the beginning when it ...

Страница 143: ...y to USB Flash memory stick in the Root Folder 2 Turn on your DVR If you are using please stop the recording 3 Plug USB memory stick into the front USB port and check if USB icon shows up on the Status bar 4 Move to upgrade menu and start upgrade by pressing enter button Indicator CONDITION 5 Wait until upgrade finished and show Success message then Press to restart Indicator CONDITION H W VERSION...

Страница 144: ...what kind of device is connected to the front USB connector MOUSE PORT Displays mouse is connected to mouse port at rear panel IDE BUS 0 Shows the Primary HDD status A Master B N A note It will be displayed when the HDD support S M A R T function Please change this HDD to NEW HDD in the case of WARNING ERROR means the HDD damaged physically Note 1 Please make sure your USB Flash memory stick has e...

Страница 145: ...o 1 control Then press the P T Z FOCUS button Shortcut Menu box pops up as shown below 2 Note Please Refer to Help Menu for specific control INDICATOR RESULTING ACTIONS ENTER Button Press this button to display HELP Menu Press ENTER Button again or CANCEL button to cancel Help Menu CANCEL Button Press this button to cancel PAN TITL Operation ...

Страница 146: ... Out The layout of the PTZ interface conforms to the layout of the front of the DVR or the remote controller Menu button is the guide anchor position for all other buttons When in PTZ interface mode all buttons used for the PTZ related operation Please Check below items before using PTZ Camera 1 RS 422 485 Connection camera Jumper Setting and etc 2 Set the PTZ Camera ID MODEL NO at the Display men...

Страница 147: ...Enter the desired Preset and press Enter Start Auto Tour BACKUP on remote controller a Press Auto Tour Button b Press the button and enter the range of Preset and press Enter c For Example Auto Tour Button 5 will start the tour of 1 5 presets of the PTZ Camera Button Function PTZ custom function 1 DISPLAY on remote controller PTZ custom function 2 ZOOM on remote controller PTZ custom function 3 P ...

Страница 148: ...o o o 5 NEC NC 21D o o o o 6 SUNKWANG SK2107 o o o o o 7 RESERVED o o o o o 8 D MAX PTZ PROTOCOL o o o o o o 9 LG LPT A100L P T Z o 10 HONEYWELL GCC 655N 11 WONWOO PT 101 o 12 14 PELCO D 2400 9600 o o o o o o o o 15 C B TECH AN200 o o o 16 CANON VC C4 o o o 17 19 PELCO P 2400 9600 o o o o o o o o 20 22 PELCO EP 2400 9600 o o o o 23 PANASONIC WV CS W85x 86x o o o o o o 24 HONEYWELL HSDN 251N P o o ...

Страница 149: ...NIA ORX1000 29 AD DELTADOME o o o o o 30 HUNT HTZ 2300 o o o o o o 31 HAZEM RESERVED o o o o 32 RVT EZ Protocol o o o o o o o o 33 LG MULTIX o o o o o 34 ELMO PTC 200C 400C o o o o 35 NICECAM MP 1xxx o o o o 36 C B TECH CNBPTZ102 o o o o o Note Speed has 0 8 steps 1 Slow 8 Fast 0 Keep Pressing the button to increase speed ...

Страница 150: ...stored data on previous next month Note The data are color coded by category Alarm Red Motion Green Normal Yellow 3 Use Up Down buttons to select DAY on Calendar Selected data will be shown as a graphical representation of the recorded video stored on the DVR 4 Select Hour and Minutes or the camera you wish to playback Then press ENTER button Note Time Mulitscreen Display Camera Full screen Displa...

Страница 151: ... a list of all the events since the initial power on procedure of DVR SYSTEM It shows All Event except for Alarm Motion and Video Loss NETWORK It shows NETWORK List ALARM It shows All Alarm List MOTION It shows Motion List VIDEO LOSS It shows Video Loss List Use Up Down buttons 2 to desired Time to playback Use Left Right buttons to move NEXT page Press ENTER button to start playback 3 Note Log li...

Страница 152: ...cording Data 3 MOTION Motion Recording Data The illustration to the left has selected ALL CAMERA NORMAL ALARM and MOTION data Enter the numbers as required in 24 hour format then move to 5 Press ENTER button to start BACKUP 6 USB icon will be highlighted in blue during the backup If there is not enough space on your USB memory stick the system will not proceed with backup The backup progress indic...

Страница 153: ...de Note 2 Format USB HDD to FAT 32 format type in PC or DVR set If USB HDD is not formatted to FAT 32 type you can see message USB HDD NEED TO FORMAT in Device menu Please refer to 9 2 Disk for more information about formatting HDD 8 2 External USB HDD Backup External USB HDD CD DVD RW is recognized within 10 seconds after plug in UBS connection cable to UBS port in DVR ...

Страница 154: ...emory stick the system will not proceed with backup The backup progress indicator will be displayed at the bottom of the window While the system is in backup session please do not perform playback After backup process is finished USB icon will be highlighted in white 7 When users get out of backup menu the following message will be shown up to alert 8 Start to backup To Read USB backup HDD in Wind...

Страница 155: ... FAT 32 type regardless of HDD capacity 1 2 Make the partition on external HDD as 32G Windows will only let you format FAT32 partitions up to 32GB as MS are trying to make people use NTFS 2 Start Backup from DVR to external HDD 3 To read the backup data use CMS Local Player Note ONLY FAT 32 Format disk will be read through Window PC The data in FAT 32 format disk is not replayed on DVR ...

Страница 156: ...ilable The data will be backed up to CD DVD RW of All cameras and normal alarm motion recording together Use button to change select device USB Memory Stick 1 Enter the numbers as required in 24 hour format then move to 2 Press ENTER button to start BACKUP 3 USB icon will be highlighted in blue during the backup If there is not enough space on your USB memory stick the system will not proceed with...

Страница 157: ... will be changed Light Grey Color 8 4 How to Play Backup data in USB Memory Stick Backup 1 With MCD Player Plug a USB memory stick into your PC No software installation is required 2 Double Click on MCD Player in the window and will play as follows FF FR Channel Select Watermark Play Stop 3 Back up data can be also be played by LOCAL PLAYER Selected backup time from 09 25 09 35 will be displayed o...

Страница 158: ...nappropriate codecs have been installed on the PC CMS may not run if DirectX 6 0 or earlier version is installed Please download the latest Direct X from Microsoft PC system requirement The DVR player Software allows you to view live video search through archived video control PTZ camera and have full setup control DVR player Software is a kind of Central Management Software for DVR users to fully...

Страница 159: ...lient Install CD to CD ROM of your PC and Find DvrPlayerinstaller exe and 1 double click Click NEXT button below 2 Click Install Otherwise designate a directory for Install then Click Install 3 Click Close Button after below images appears 4 ...

Страница 160: ... ICON 5 of CMS will be displayed on your desktop Double click the ICON 6 to start enter the password to access Enter 0 as the default password Refer to CMS Setup to change the password To get rid of this screen Press ESC ...

Страница 161: ...e DVRs DVR Window Virtual DVR Window Current CMS Mode Live PB mode Switch Display option Multiscreen Displays 1 a Full Screen Display b Quad Screen Display c 6 Way Screen Display d 7 Way Screen Display e 8 Way Screen Display f 9 Way Screen Display g 10 Way Screen Display h 16 Way Screen Display i 25 Way Screen Display j 36 Way Screen Display k 49 Way Screen Display l 64 Way Screen Display Time and...

Страница 162: ...cation C Program Files Dvr Player Download b Save a snap image or print current monitoring images c OSD On Off button d CMS Setup It shows you current time on LIVE Mode and Playback time on PB mode Month Hour Minutes Second Day of week Date Live Playback mode Switch 3 a LIVE Viewing b Remote Playback or Playback for Downloaded file Quick Button 4 ...

Страница 163: ...VR name Camera Num ber Camera Name Frame Rates for each camera b OVERLAY Defualf It is recommended to use OVERLAY for transmission speed up Please cancel the Overlay function if there is broken screen caused by Invalid Video Driver installed If you still have the abnormal screen problem please slow down the Hardware Acceleration c VIDEO MODE Select NTSC or PAL d DOWNLOAD Designate a directory for ...

Страница 164: ...FULL SCREEN FOR ALARM EVENT Setting to perform a full screen pop up for alarm event Changing the password a OLD PASSWORD Enter your current password b NEW PASSWORD Enter the NEW pass word c CONFIRM PASSWORD Enter the New password to confirm Press APPLY button to change the password NOT OK button Note This password is for protection screen when you launched CMS This is different from your DVR passw...

Страница 165: ...cal DVR mode 6 SOUND Connect CMS will emit a sound when a DVR connects Disconect CMS will emit a sound when a DVR disconnects Alarm CMS will emit a sound when an alarm is triggered from the DVR Motion CMS will emit a sound when the DVR detects a motion Video Loss CMS will emit a sound when there is a Video Loss Audio alert setting for the CMS You can toggle to enable the sound or to disable the so...

Страница 166: ...controlled using the PTZ control box To control a channel specific PTZ camera simply click on the channel where the PTZ camera is connected a Pan and Tilt b Focus Indicator Resulting Actions Indicator Resulting Actions To tilt up To tilt down To pan left To pan right To go upper left hand To go upper right hand To go down left hand To go down left hand Indicator Resulting Actions Focus Far Focus N...

Страница 167: ... Start Automatic Tour e Special Function Key f AUTO TILT It has various function depends on PTZ camera Stand by Pan Tilt or Turn on off the lights of P T Z camera Indicator Resulting Actions Set Auto pan to left boundary Set Auto pan to right boundary Run Auto Pan function f Auto Pan Indicator Resulting Actions Set Auto Tilt to upper boundary Set Auto Tilt to down boundary Run Auto Tilt function h...

Страница 168: ...Loss Video Loss Recover Alarm Detect Motion Detect Record Stop Schedule Off Backup operation Stop Displays the name of the last five DVRs with an problem or event The color will change appro priately based on the event or problems reported from the DVR a Red The color changes to red when critical functions of the DVR is inter rupted or has failed Connection Fail Connection time out Disconnect Powe...

Страница 169: ...k Color Condition Solid RED An Event or a problem had occurred Blinking RED Current event or a problem Solid Yellow Current status of the DVR Note In case of network connection error or power failure DVR Number and DVR Name will blink in red 1 HDD FAIL Notify Hard Drive Disk failure during the operation 2 FAN LOCK a SYS FAN It shows defect of FAN on side of DVR b SYS FAN It shows defect of FAN on ...

Страница 170: ...L b SYSTEM TIME Display the time and date of DVR c RECORD Configure current Normal recording channel d ALARM Configure current Alarm recording channel e MOTION Configure current Motion recording channel f VIDEO LOSS Configure current Video Loss channel g HDD SIZE Available HDD Total HDD h BACKUP SIZE Available USB HDD Total USB HDD i REC REMAIN Estimated Remaining Recording Time j HDD It shows def...

Страница 171: ...perating For more specific information for each DVR please refer to DVR Log list DVR LOG LIST It shows the same log list with DVR Set It has a list of all the events since the initial power on procedure of DVR Selected message or time will be play back by double clicking ...

Страница 172: ...me Type on DVR title to display on Monitoring window Health window and DVR Window 2 IP Enter the IP address ex 192 168 0 52 or DNS name ex demo dvrhost com 3 Port 7000 Default 4 PASSWORD Select from the following options User Password It depends on user privilege Admin Password All functions 5 ADD TO LIST Click Add to List to complete add the DVR onto CMS list 6 Save changes and exit the menu Sele...

Страница 173: ...ction 4 System abnormality Orange colored DVR means CMS is trying to connect to the DVR through network When you click this icon it shows the message Connecting Please stand by with try again and cancel button Pink colored DVR means the disconnection of DVR caused by network error or invalid password CMS try to connect the DVR at every 30 sec in the case of network connecting error When you click ...

Страница 174: ...e Health Status Report and supplementary information from the DVR icons in DVR window the Camera Status Bar displays the status of individual cameras The cameras are displayed according to the channel Click the desired DVR 1 then it shows the information of camera 2 Each Icon means listed below 3 Blue Video Input is connected without recording Dark Blue Video Loss Red Recording the current channel...

Страница 175: ...Camera Number DVR Name or Host Name Camera title 2 Time Displays time 3 DVR Status Displays REC Network connection Video Loss Event and Current Status Indicator Condition REC Normal Recording Wait At the initial connecting Loss Video Loss Close Disconnected from DVR Alarm Alarm Recording Motion Motion Recording PB Playback for selected channel Live Live viewing 4 Field per Second Network transmiss...

Страница 176: ...ng the window of desired camera To come back to previous Live viewing mode please double click again 2 Select any camera for Full Screen display by clicking Right Mouse button 5 Context Menu The context menu allows access to the submenus for the channel DVR and the Virtual DVR The submenus allow access to various features for each individual submenu type 1 There are three types of Context Menu dur...

Страница 177: ...There are seven types of Context Menu on each DVR 1 LIVE Live display for selected DVR 2 PROPERTY DVR information 3 CMS LOG LIST 4 DVR LOG LIST 5 SETUP See DVR Menu Setup 6 REMOVE Delete the selected DVR from DVR Window ...

Страница 178: ...Mode for remote playback or to download the files onto the remote PC Unlike the live mode only one DVR can be accessed at a time 1 1 To start playback press PB button 2 2 It will be switched to Playback Mode as shown below 3 When SEARCH button pressed Remote Search Menu will appear 4 Select REMOTE button or LOCAL button for playback ...

Страница 179: ...ough CMS 1 Select REMOTE button and desired DVR 2 Remote Search shows a graphical representation of the recorded video stored on the DVR The Data are color coded by category Alarm Red Motion Green Normal Yellow 3 Select desired Date and Time By Click and drag it is possible to select longer min utes Click PLAY button to start playback ...

Страница 180: ...ve on remotely connected computer through CMS 1 Select Remote button and desired DVR 2 Remote Search shows a graphical representation of the recorded video stored on the DVR a BEGIN END Indicate the Start time and End time of selected File b CURRENT Indicate the time of current downloaded file c Download Cancel Select CANCEL d Download Complete Current time will be changed to message Download Comp...

Страница 181: ...t LOCAL button 2 Local Search shows a graphical representation of the stored file on the PC 3 Select desired DVR Date and time then click PLAY button to start playback 4 Deleted selected file from the PC 5 Save selected file onto another folder of the PC or other drive 6 To Review back up device through the Set ...

Страница 182: ...dification of various system settings to the DVR through CMS as it would be done accessing the DVR menu screen DVR set up can be accessed through the context menu from any DVRs Select any DVR for Menu setup Context Menu will appear on screen by Right clicking ...

Страница 183: ... set up to 64 DVRs can be added pulling one camera from each DVR to be displayed The Virtual DVR behaves in the same way a DVR would except for the warning notifications 2 VIRTUAL SET LIST MANAGER Virtual Set List Manager is used to add or delete Virtual DVR set on CMS 9 4 Virtual DVR Click button to start the Set List Manager Set List Manager Menu pops up as shown below ...

Страница 184: ... cameras Alarm Motion Video Loss Check those options to have the cameras with alarm motion triggers or Video Loss to be prioritized and arranged automatically in either Auto Arrange or Auto Insert Arrange 2 ADD VIRTUAL DVR Click Add Virtual Set button to make Virtual DVR Avoid over lapping same name for Individual Sets 3 Save changes and exit the menu Select OK 4 Exit the menu without change Click...

Страница 185: ...lay 3 There are two way to add cameras one is Whole DVR and the other is selected camera on each DVR Whole cameras of desired DVR 1 Click the desired DVR to directly drag the desired channel The camera will be added in numeric order from selected channel to end depends on connected number of cameras on DVR CH5 CH5 CH12 In the following exampels 8ch DVR draged to channel Number 5 ...

Страница 186: ...ged to Channel No 14 4 Live Viewing on Virtual DVR It is exactly same as Actual DVR Delete Camera 4 There are two ways of deleteing the camera from CMS Select any camera for delete during live monitoring Context Menu will appear on screen 1 by Right clicking Select REMOVE Select any camera to delete and directly drag to DVR Window or Virtual DVR Window 2 Note In the case of overlapping on same cha...

Страница 187: ...s page of the Internet Explorer For example type in http 192 168 2 112 7000 Above illustrates example of a unit when it is utilizing port 7000 You can either sign in with admin or user Next enter the password for the unit Click on Web Server to connect to the DVR only purpose for view ...

Страница 188: ... Live viewing b Remote Search c File Open to Review back up device through the Set d Setup DVR setup e Capture f Rec Local Recording g OSD Display camera titile camera no Time DVR status and frame rate on the screen h 1 4 1 8 1 16 Full sceen display i P T Z Contral j Multiscreen displays ...

Страница 189: ...ording Mode Manual Schedule Alarm Motion Recording Method 5 Levels of Compression Rate Record Frame Rate Adjustment Recording Adjustments Pre Alarm 3 sec Post Alarm 10 sec 300 sec Motion Detection Per Channel 4 4 Grids SET 28 x 24 CLIENT 20 Sensitivity Levels Search Mode Date Time Camera Alarm Motion Playback Modes Forward Reverse Pause Frame by Frame Normal Speed 2X 4X 8X 16X Multi tasking Simult...

Страница 190: ...nvironment or human health from uncontrolled waste disposal please separate this from other types of wastes and recycle it responsibly to promote the sustainable reuse of material resources Household users should contact either the retailer where they purchased this product or their local government office for details of where and how they can take this item for environmen tally safe recycling Bus...

Страница 191: ......

Страница 192: ...ท เอส จี ดี อินเตอร เทรดดิ ง จำกัด 54 5 6 ซ หน าวัง ถ เจริญกรุง 3 แขวงวังบูรพาภิรมย เขตพระนคร กทม 10200 โทร 0 2222 0559 แฟ กซ 0 2226 3031 อีเมล sgdinter fujiko biz เว บไซต www fujiko co th HM3K VER 01 12 09 ...

Отзывы: