background image

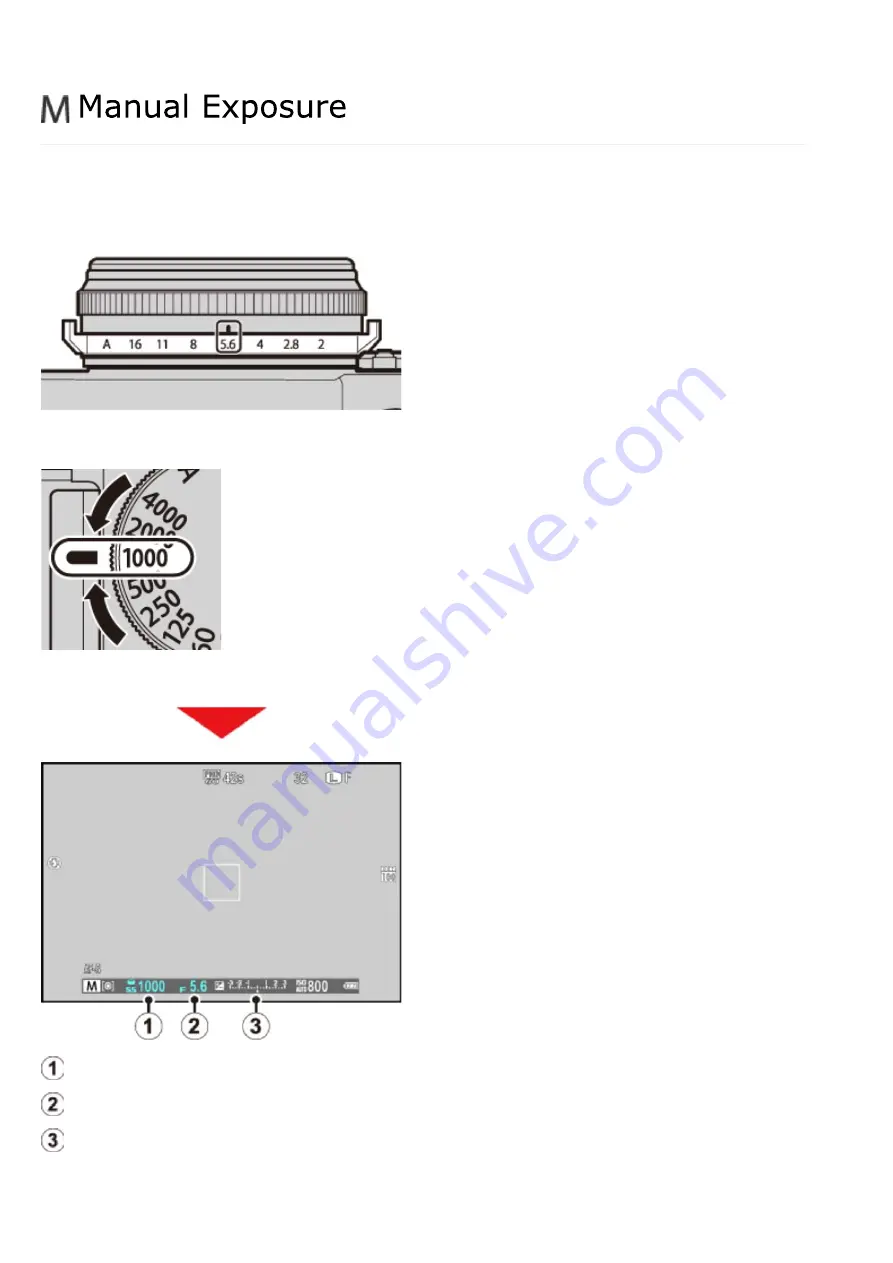
In this mode, you choose both shutter speed and aperture. The resulting exposure is shown by
an indicator in the display; if desired, exposure can be altered from the value suggested by the
camera.

Aperture: f/5.6

Shutter speed: 1/1000 s

Shutter speed

Aperture

Exposure indicator

Manual Exposure

- 87 -

Содержание X100T

Страница 1: ...his Manual Parts of the Camera The Selector The Command Dial The Aperture Ring and Shutter Speed Dial The VIEW MODE Button The Viewfinder Selector The DISP BACK Button Diopter Adjustment The Indicator...

Страница 2: ...iewing Pictures Deleting Pictures Recording Movies Viewing Movies Program AE Shutter Priority AE Aperture Priority AE Manual Exposure Bracketing Continuous Shooting Burst Mode Multiple Exposures Panor...

Страница 3: ...ISP CUSTOM SETTING CONVERSION LENS MF ASSIST ADVANCED FILTER INTERVAL TIMER SHOOTING SELF TIMER AE AF LOCK MODE AE AF LOCK BUTTON PHOTOMETRY INTERLOCK SPOT AE FOCUS AREA RED EYE REMOVAL SAVE ORG IMAGE...

Страница 4: ...UNT EDIT FILE NAME WIRELESS SETTINGS PC AUTO SAVE SETTING GEOTAGGING SET UP instax PRINTER CONNECTION SETTING COLOR SPACE FORMAT Wireless Transfer Copying Pictures to a Computer Printing Pictures via...

Страница 5: ...Introduction Viewing This Manual About This Manual 5...

Страница 6: ...this manual may be subject to change or deletion without notice This manual may not be reproduced in whole or in part without prior permission except for individual use Redistribution is prohibited In...

Страница 7: ...e a language A table of contents listing the main headings Click a heading to view sub headings and click a sub heading to view the page for that item The complete table of contents Click a sub headin...

Страница 8: ...The table of contents listing may not display on smartphones and other mobile devices Click the button to view the table of contents and again to hide it Viewing This Manual 8...

Страница 9: ...urrent position in the manual Click the button to return to the table of contents You can also navigate by clicking headings in the breadcrumb bar Click the button at the bottom of the page to jump to...

Страница 10: ...Enter a search term and click to search the manual Viewing This Manual 10...

Страница 11: ...ra The Selector The Command Dial The Aperture Ring and Shutter Speed Dial The VIEW MODE Button The Viewfinder Selector The DISP BACK Button Diopter Adjustment The Indicator Lamp The DRIVE Button Parts...

Страница 12: ...ot shoe Flash Microphone L Viewfinder window Strap eyelet Focus mode selector Aperture ring Focus ring Lens Front ring AF assist illuminator Self timer lamp Viewfinder selector Microphone R ON OFF swi...

Страница 13: ...g Eye sensor Command dial Connector cover DC coupler cable cover Battery chamber cover latch Battery chamber cover Tripod mount Speaker LCD monitor Microphone remote release connector Micro USB connec...

Страница 14: ...elete button playback mode Fn button function button 6 Wi Fi button Fn button function button 7 DRIVE button AEL AFL autoexposure autofocus lock button Indicator lamp Q quick menu button Selector func...

Страница 15: ...tion white balance and focus area selection buttons respectively and as function buttons 2 through 5 To prevent accidental operation of the selector and the Q button during shooting press MENU OK unti...

Страница 16: ...s to zoom in and out and choose the number of pictures displayed during playback and to select options in the quick menu display Press the center of the command dial to zoom in on the active focus are...

Страница 17: ...shutter speed dial to choose from modes P S A and M Shutter speed dial Aperture ring Mode P Program AE Mode S Shutter Priority AE Mode A Aperture Priority AE Mode M Manual Exposure The Aperture Ring...

Страница 18: ...can be adjusted using program shift Aperture A Shutter speed A Take pictures at the selected shutter speed The camera adjusts aperture automatically Aperture A Shutter speed 1 1000 s The Aperture Ring...

Страница 19: ...d aperture The camera adjusts shutter speed automatically Aperture f 5 6 Shutter speed A Take pictures at the selected aperture and shutter speed Aperture f 5 6 Shutter speed 1 1000 s The Aperture Rin...

Страница 20: ...through displays as shown below EYE SENSOR Automatic display selection using eye sensor VIEWFINDER ONLY Viewfinder only LCD ONLY LCD monitor only VIEWFINDER ONLY Viewfinder only eye sensor turns displ...

Страница 21: ...finder and turns it off when you take your eye away note that the eye sensor may respond to objects other than your eye or to light shining directly on the sensor If automatic display selection is ena...

Страница 22: ...n the electronic viewfinder EVF the optical viewfinder OVF and a dual optical viewfinder electronic range finder ERF display Rotate the selector as shown to choose from the following displays EVF OVF...

Страница 23: ...otographs may however differ slightly from the display in the viewfinder due to parallax EVF The live view display gives you a preview of the final picture including depth of field focus exposure and...

Страница 24: ...ay of indicators in the viewfinder and LCD monitor Shooting Optical Viewfinder Shooting Electronic Viewfinder Shooting LCD Monitor Playback Electronic Viewfinder LCD Monitor Standard Display Standard...

Страница 25: ...Standard Information off Standard Information off Info display The DISP BACK Button 25...

Страница 26: ...Standard Information off Info display Favorites The optical viewfinder can not be used for playback The DISP BACK Button 26...

Страница 27: ...3 Press DISP BACK to exit when settings are complete 4 ELECTRONIC LEVEL Selecting ELECTRONIC LEVEL displays a virtual horizon The camera is level when the two lines overlap The virtual horizon may not...

Страница 28: ...s is shown by the horizontal axis the number of pixels by the vertical axis No of pixels Pixel brightness Shadows Highlights Pixels are distributed in an even curve throughout the tone range Pixels ar...

Страница 29: ...he camera is equipped with diopter adjustment to accommodate individual differences in vision Rotate the diopter adjustment control until the viewfinder display is in sharp focus Diopter Adjustment 29...

Страница 30: ...al pictures can be taken at this time Flash charging flash will not fire when picture is taken Lens or memory error Warnings may also appear in the display The indicator lamp turns off when the viewfi...

Страница 31: ...IMAGE CONTINUOUS SHOOTING AE BKT ISO BKT FILM SIMULATION BKT WHITE BALANCE BKT DYNAMIC RANGE BKT MULTIPLE EXPOSURE MOTION PANORAMA In Advanced Filter mode drive options are unavailable and only one sh...

Страница 32: ...Shooting Optical Viewfinder Shooting Electronic Viewfinder LCD Monitor Playback Electronic Viewfinder LCD Monitor Camera Displays 32...

Страница 33: ...ral Density filter indicator Depth of field preview Conversion lens Location data download status Monitor sunlight mode Movie mode Time remaining Internal memory indicator Number of available frames I...

Страница 34: ...frame Focus frame Focus warning Temperature warning Electronic level Distance indicator Sensitivity Exposure indicator Aperture Film simulation White balance Shutter type Continuous mode Self timer in...

Страница 35: ...The Electronic Range Finder ERF To view the electronic range finder ERF rotate the viewfinder selector as shown when the optical viewfinder is displayed Shooting Optical Viewfinder 35...

Страница 36: ...settings ND Neutral Density filter indicator Focus check Depth of field preview Conversion lens Location data download status Monitor sunlight mode Movie mode Time remaining Internal memory indicator...

Страница 37: ...unaffected The brightness and clarity of the EVF and LCD monitor can be adjusted using the SCREEN SET UP options in the setup menu Image size quality Date and time Focus frame White balance Film simul...

Страница 38: ...See Also SCREEN SET UP The Setup Menu Shooting Electronic Viewfinder LCD Monitor 38...

Страница 39: ...ually displayed vary with camera settings The optical viewfinder can not be used for playback Date and time Intelligent face detection indicator Red eye removal indicator Pro focus mode pro low light...

Страница 40: ...nternal memory indicator Frame number Gift image Photobook assist DPOF print indicator Battery level Aperture Shutter speed Playback mode indicator Mark for upload to Favorites Playback Electronic Vie...

Страница 41: ...Attaching the Strap Charging the Battery Inserting the Battery and a Memory Card Turning the Camera on and Off Basic Setup First Steps 41...

Страница 42: ...p making sure that the tool and clip are in the orientations shown Keep the tool in a safe place You will need it to open the strap clips when removing the strap 1 Place the strap clip on an eyelet Ho...

Страница 43: ...licks closed 3 Attach a protective cover Place a protective cover over the eyelet as shown with the black side of the cover toward the camera Repeat Steps 1 4 for the second eyelet 4 Insert the strap...

Страница 44: ...Fasten the strap Fasten the strap as shown Repeat Steps 5 6 for the second eyelet 6 To avoid dropping the camera be sure the strap is correctly secured Attaching the Strap 44...

Страница 45: ...ery before use The camera uses an NP 95 rechargeable battery The battery takes about 4 hours to fully charge Place the battery in the charger Insert the battery in the orientation indicated by the lab...

Страница 46: ...charger in Plug the charger into an indoor power outlet The charging indicator will light 2 Charge the battery Remove the battery when charging is complete 3 The Charging Indicator The charging indica...

Страница 47: ...era Do not short the battery terminals The battery could overheat Read the cautions in The Battery and Power Supply Use only battery chargers designated for use with the battery Failure to observe thi...

Страница 48: ...stop To continue charging disable sleep mode on the computer and disconnect and connect the USB cable Charging may be impossible depending on computer specifications settings or conditions The batter...

Страница 49: ...hamber latch as shown and open the battery chamber cover Do not open the battery chamber cover when the camera is on Failure to observe this precaution could damage image files or memory cards Do not...

Страница 50: ...he direction shown by the arrow Confirm that the battery is securely latched Insert the battery in the orientation shown Do not use force or attempt to insert the battery upside down or backwards The...

Страница 51: ...lot Be sure card is in the correct orientation do not insert at an angle or use force If the memory card is not correctly inserted or no memory card is inserted will appear in the LCD monitor and inte...

Страница 52: ...press the battery latch to the side and slide the battery out of the camera as shown To remove the memory card press it in and release it slowly The card can then be removed by hand When a memory card...

Страница 53: ...tions are performed for the length of time selected for POWER MANAGEMENT AUTO POWER OFF in the setup menu To reactivate the camera after it has turned off automatically press the shutter button halfwa...

Страница 54: ...the battery level in the display Battery close to fully charged Battery about two thirds charged Battery about one third charged Charge as soon as possible red Battery exhausted Turn camera off and re...

Страница 55: ...you can reset the clock or change languages at any time using the DATE TIME or options in the setup menu Using the Selector Press the selector up down left or right to highlight items and press MENU O...

Страница 56: ...ft or right to highlight the year month day hour or minute and press up or down to change To change the order in which the year month and day are displayed highlight the date format and press the sele...

Страница 57: ...Taking Photographs Viewing Pictures Deleting Pictures Basic Photography and Playback 57...

Страница 58: ...ribes how to take pictures using program AE mode P Adjust settings for program AE Shutter speed Select A auto Exposure compensation Select 0 Focus mode Select S single AF Aperture Select A auto 1 Taki...

Страница 59: ...m that P appears in the display OVF EVF LCD Viewfinder Display Selection Use the viewfinder selector to switch between the optical viewfinder OVF and electronic viewfinder EVF displays Taking Photogra...

Страница 60: ...hands and brace your elbows against your sides Shaking or unsteady hands can blur your shots To prevent pictures that are out of focus or too dark underexposed keep your fingers and other objects awa...

Страница 61: ...twice and focus area will glow green Focus and exposure will lock while the shutter button is pressed halfway If the camera is unable to focus the focus frame will turn red will be displayed If the su...

Страница 62: ...ot Smoothly press the shutter button the rest of the way down to take the picture The flash may fire if lighting is poor Camera settings can be changed to prevent the flash firing 4 Taking Photographs...

Страница 63: ...t or right or rotating the focus ring Press the selector or rotate the ring right to view pictures in the order recorded left to view pictures in reverse order Keep the selector pressed to scroll rapi...

Страница 64: ...Favorites Rating Pictures To rate the current picture press DISP BACK and press the selector up and down to select from zero to five stars Viewing Pictures 64...

Страница 65: ...to information display changes each time the selector is pressed up Basic data Info display 1 Info display 2 Press the selector left or right or rotate the focus ring to view other images Viewing Pict...

Страница 66: ...Press the center of the command dial to zoom in on the focus point Press the center of the command dial again to return to full frame playback Viewing Pictures 66...

Страница 67: ...ges rotate the command dial left when the picture is displayed full frame Press DISP BACK or MENU OK to exit zoom Zoom indicator Rotate right Rotate left The maximum zoom ratio varies with image size...

Страница 68: ...ion Window When the picture is zoomed in the selector can be used to view areas of the image not currently visible in the display Navigation window shows portion of image currently displayed Viewing P...

Страница 69: ...tate right to view fewer images Use the selector to highlight images and press MENU OK to view the highlighted image full frame to zoom in on the selected image rotate the command dial right when the...

Страница 70: ...can not be recovered Copy important pictures to a computer or other storage device before proceeding If a message appears stating that the selected images are part of a DPOF print order press MENU OK...

Страница 71: ...eat to delete additional pictures 2 Delete multiple selected pictures Press the button in full frame playback and choose SELECTED FRAMES 1 Highlight pictures and press MENU OK to select or deselect pi...

Страница 72: ...SP BACK cancels deletion note that any pictures deleted before the button was pressed can not be recovered 2 If a memory card is inserted only the pictures on the memory card will be affected the pict...

Страница 73: ...Recording Movies Viewing Movies Basic Movie Recording and Playback 73...

Страница 74: ...n button function button 1 to start recording At default settings movie recording is assigned to the Fn1 button For information on choosing the roles played by the function buttons see The Function Bu...

Страница 75: ...nd M modes are recorded at the settings currently selected for photographs shutter speed and or aperture can be adjusted during shooting In other modes settings are adjusted automatically The optical...

Страница 76: ...adapter is required when connecting microphones with a 3 5 mm diameter plug A confirmation dialog will be displayed when a microphone is connected to the microphone remote release connector Press MENU...

Страница 77: ...Movies are indicated by a icon during full frame playback Press to begin playback Progress is shown in the display Viewing Movies 77...

Страница 78: ...trol playback End playback Adjust speed Pause playback End playback Single frame advance rewind Playback Press the selector up or down to adjust the volume press MENU OK again to resume playback Volum...

Страница 79: ...e speaker during playback Sound is not played back in silent mode Playback Speed Press the selector left or right to adjust playback speed during playback Speed is shown by the number of arrows or Vie...

Страница 80: ...Program AE Shutter Priority AE Aperture Priority AE Manual Exposure Shooting Mode 80...

Страница 81: ...ations of shutter speed and aperture that will produce the same exposure program shift To select program AE set shutter speed and aperture to A Aperture A Shutter speed A If the subject is outside the...

Страница 82: ...m shift Shutter speed Aperture The new values for shutter speed and aperture are shown in yellow To cancel program shift turn the camera off Program shift will also be cancelled if a flash mode other...

Страница 83: ...mode S you select the shutter speed and let the camera choose the aperture Set aperture to A and rotate the shutter speed dial to the desired setting Aperture A Shutter speed 1 1000 s Shutter speed S...

Страница 84: ...ommand dial If the correct exposure can not be achieved at the selected shutter speed aperture will be displayed in red when the shutter button is pressed halfway If the subject is outside the meterin...

Страница 85: ...ority AE mode A you select the aperture and let the camera choose the shutter speed Rotate the shutter speed dial to A and select the desired aperture Aperture f 5 6 Shutter speed A Aperture Aperture...

Страница 86: ...ay will show The slowest shutter speed available when ON is selected for POWER MANAGEMENT OVF POWER SAVE MODE in the setup menu is 1 4 s Previewing Depth of Field When PREVIEW DEPTH OF FIELD is assign...

Страница 87: ...aperture The resulting exposure is shown by an indicator in the display if desired exposure can be altered from the value suggested by the camera Aperture f 5 6 Shutter speed 1 1000 s Shutter speed A...

Страница 88: ...otating the command dial Exposure Preview To preview exposure in the LCD monitor select ON for SCREEN SET UP PREVIEW EXP IN MANUAL MODE Select OFF when using the flash or on other occasions on which e...

Страница 89: ...Using the Q Button Q Quick Menu Button 89...

Страница 90: ...to display the quick menu during shooting The options displayed in the quick menu can be selected using the EDIT SAVE QUICK MENU option in the setup menu Quick menu edit options can also be displayed...

Страница 91: ...nsitivity These settings can be adjusted using a function button or from the menus 2 Rotate the command dial to change the highlighted item 3 Press Q to exit when settings are complete 4 For quick acc...

Страница 92: ...The Function Buttons Fn Function Buttons 92...

Страница 93: ...displayed then highlight the desired button and press the selector right ADVANCED FILTER MULTIPLE EXPOSURE MACRO PREVIEW DEPTH OF FIELD ISO SELF TIMER IMAGE SIZE IMAGE QUALITY DYNAMIC RANGE FILM SIMUL...

Страница 94: ...tion in the shooting menu to choose the roles played by the function buttons You can also display options for any of the function buttons by pressing and holding the button See Also FUNCTION Fn SETTIN...

Страница 95: ...g the Self Timer Interval Timer Photography Using the Flash Focus Frame Selection Exposure Compensation Focus Exposure Lock Focus Mode Manual Focus Focus Mode M Metering Recording Pictures in RAW Form...

Страница 96: ...tomatically vary settings over a series of pictures Bracketing options can be displayed by pressing the DRIVE button AE BKT ISO BKT FILM SIMULATION BKT WHITE BALANCE BKT DYNAMIC RANGE BKT Bracketing 9...

Страница 97: ...ght to highlight a bracketing amount Each time the shutter release button is pressed the camera will take a picture at the current sensitivity and process it to create two additional copies one with t...

Страница 98: ...decreased by the selected amount This option can not be used if RAW is selected for IMAGE QUALITY Each time the shutter button is pressed the camera takes three shots at different dynamic range settin...

Страница 99: ...ame rate The camera takes photographs while the shutter button is pressed Focus and Exposure To vary focus and exposure with each shot select focus mode C in other modes focus and exposure are determi...

Страница 100: ...raph that combines two exposures Press the DRIVE button to display drive options 1 Highlight MULTIPLE EXPOSURE and press MENU OK to select the highlighted option and return to shooting mode 2 Multiple...

Страница 101: ...cond shot To return to Step 3 and retake the first shot press the selector left To save the first shot and exit without creating a multiple exposure press DISP BACK 4 Take the second shot 5 Press MENU...

Страница 102: ...to display drive options 1 Highlight MOTION PANORAMA and press MENU OK to select the highlighted option and return to shooting mode 2 To select the angle through which you will pan the camera while sh...

Страница 103: ...ul only to pan in the direction shown by the guides Use a tripod for best results If the desired results are not achieved try panning at a different speed Panoramas are created from multiple frames ex...

Страница 104: ...When a panorama is displayed in full frame playback you can press the selector down to automatically pan from left to right or if the panorama is in tall orientation bottom to top Panoramas 104...

Страница 105: ...ttings macro mode selection is assigned to the up button on the selector function button 2 For information on choosing the roles assigned to the function buttons see The Function Buttons Macro mode ca...

Страница 106: ...the electronic viewfinder The LCD monitor and electronic viewfinder can be used at short ranges without first enabling macro mode but the camera may take longer to focus The shadow cast by the lens m...

Страница 107: ...er is released two seconds after the shutter button is pressed Use to reduce blur caused by the camera moving when the shutter button is pressed The self timer lamp will blink as the timer counts down...

Страница 108: ...se the interval and number of shots Press MENU OK to proceed 2 Use the selector to choose the starting time and then press MENU OK Shooting will start automatically 3 Interval timer photography can no...

Страница 109: ...battery level before starting The display turns off between shots and lights a few seconds before the next shot is taken The display can be activated at any time by pressing the shutter button all the...

Страница 110: ...both the main subject and the background under low light note that brightly lit scenes may be overexposed A flash mounted on the hot shoe can be used to control optional remote flash units Select whe...

Страница 111: ...low Red Eye Removal When intelligent face detection is active and on is selected for red eye removal red eye removal is available in Red eye removal minimizes red eye caused when light from the flash...

Страница 112: ...to view the focus area display At default settings focus area display is assigned to the down button on the selector function button 5 For information on choosing the roles assigned to the function bu...

Страница 113: ...Focus frame Focus point Focus Frame Selection 113...

Страница 114: ...Use the selector to position the focus frame To select the center frame press DISP BACK 2 Focus Frame Selection 114...

Страница 115: ...store the frame to its original size Press MENU OK to select the chosen frame 3 If FOCUS AREA is selected for SELECTOR BUTTON SETTING in the setup menu the selector can be used to position the focus a...

Страница 116: ...posure compensation dial to adjust exposure when photographing very bright very dark or high contrast subjects Exposure compensation indicator OVF Exposure compensation indicator EVF LCD Exposure Comp...

Страница 117: ...Choose positive values to increase exposure Choose negative values to reduce exposure When using the optical viewfinder use the exposure indicator to check exposure Exposure Compensation 117...

Страница 118: ...hutter button is kept in this position Use focus and exposure lock to compose photographs with off center subjects Position the subject in the focus frame 1 Press the shutter button halfway to set foc...

Страница 119: ...mpose the photograph Do not change the distance to the subject while the shutter button is pressed halfway 3 Press the shutter button the rest of the way down to take the picture 4 Focus Exposure Lock...

Страница 120: ...n be selected using the AE AF LOCK BUTTON option in the shooting menu AE LOCK ONLY the default setting The AEL AFL button locks exposure only AF LOCK ONLY The AEL AFL button locks focus only AE AF LOC...

Страница 121: ...ther than reflect light such as hair or fur Insubstantial subjects such as smoke or flame Subjects that show little contrast with the background for example subjects in clothing that is the same color...

Страница 122: ...continually adjusted to reflect changes in the distance to the subject while the shutter button is pressed halfway Use for subjects that are in motion Focus locks while the shutter button is pressed...

Страница 123: ...focus mode Checking Focus To zoom in on the current focus frame for precise focus press the center of the command dial Press the dial again to cancel zoom In focus mode S focus check is available when...

Страница 124: ...Follow the steps below to focus the camera manually Slide the focus mode selector to M will appear in the display 1 Manual Focus Focus Mode M 124...

Страница 125: ...ject in the selected focus area press the AEL AFL button Use this feature available only in manual focus mode to quickly focus on a chosen subject The AUTOFOCUS SETTING INSTANT AF SETTING option in th...

Страница 126: ...of field blue bar Focus Zoom To zoom in on the current focus area for precise focus press the center of the command dial if ON is selected for FOCUS CHECK the camera will also zoom in when the focus r...

Страница 127: ...he bottom right corner of the display is used for focus zoom when the electronic range finder ERF is enabled If DIGITAL SPLIT IMAGE is selected the electronic range finder will show only the center se...

Страница 128: ...the subject press the button At default settings metering is assigned to function button 6 For information on choosing the roles assigned to the function buttons see The Function Buttons Metering can...

Страница 129: ...is ON and AREA is selected for AUTOFOCUS SETTING AF MODE the camera will meter lighting conditions in the selected focus area If INTERLOCK SPOT AE FOCUS AREA is OFF the camera will meter the center fo...

Страница 130: ...n ratios for higher quality JPEG images while NORMAL RAW uses higher JPEG compression ratios to increase the number of images that can be stored 2 RAW image quality options are not available with exte...

Страница 131: ...exposure Time T Bulb B Rotate the shutter speed dial to T 1 Rotate the command dial to choose a shutter speed between 30 s and 2 s in steps of 1 3 EV 2 Press the shutter button all the way down to tak...

Страница 132: ...er button is pressed the display shows the time elapsed since the exposure started 2 Selecting an aperture of A fixes shutter speed at 30 s To reduce noise mottling in long time exposures select ON fo...

Страница 133: ...splay a menu of film simulation types At default settings film simulation is assigned to the left button on the selector function button 3 For information on choosing the roles assigned to the functio...

Страница 134: ...ontrast than PRO Neg Std Recommended for outdoor portrait photography A soft toned palette The range of hues available for skin tones is enhanced making this a good choice for studio portrait photogra...

Страница 135: ...ance options At default settings white balance is assigned to the right button on the selector function button 4 For information on choosing the roles assigned to the function buttons see The Function...

Страница 136: ...fluorescent lights Use under cool white fluorescent lights Use under incandescent lighting Reduces the blue cast typically associated with underwater lighting 2 Press MENU OK The dialog shown below wi...

Страница 137: ...tion and try again Color temperature is an objective measure of the color of a light source expressed in Kelvin K Light sources with a color temperature close to that of direct sunlight appear white l...

Страница 138: ...sy effect Create a look that is evenly soft throughout the whole image Reds are recorded in color while other colors are recorded in black and white Orange objects are recorded in color while other co...

Страница 139: ...T TONE SHADOW TONE NOISE REDUCTION LONG EXPOSURE NR WHITE BALANCE SELECT CUSTOM SETTING EDIT SAVE CUSTOM SETTING FUNCTION Fn SETTING DISP CUSTOM SETTING CONVERSION LENS MF ASSIST ADVANCED FILTER INTER...

Страница 140: ...SHUTTER TYPE MOVIE SET UP WIRELESS COMMUNICATION The Shooting Menu 140...

Страница 141: ...e shooting menu 1 Press the selector up or down to highlight the desired menu item 2 Press the selector right to display options for the highlighted item 3 Press the selector up or down to highlight t...

Страница 142: ...WHITE BALANCE SELECT CUSTOM SETTING EDIT SAVE CUSTOM SETTING FUNCTION Fn SETTING DISP CUSTOM SETTING CONVERSION LENS MF ASSIST ADVANCED FILTER INTERVAL TIMER SHOOTING SELF TIMER AE AF LOCK MODE AE AF...

Страница 143: ...E FOCUS PRIORITY AF S PRIORITY SELECTION RELEASE AF C PRIORITY SELECTION RELEASE INSTANT AF SETTING AF S AF MODE AREA FACE DETECTION OFF PRE AF OFF AF ILLUMINATOR ON CORRECTED AF FRAME OFF ISO 200 IMA...

Страница 144: ...SHADOW TONE 0 STANDARD NOISE REDUCTION 0 STANDARD LONG EXPOSURE NR ON WHITE BALANCE AUTO FUNCTION Fn SETTING Fn1 MOVIE Fn2 MACRO Fn3 FILM SIMULATION Fn4 WHITE BALANCE Fn5 FOCUS AREA Fn6 PHOTOMETRY Fn...

Страница 145: ...INING IMAGE SIZE QUALITY MOVIE MODE REC TIME EVF LCD MOVIE MODE REC TIME OVF BATTERY LEVEL CONVERSION LENS OFF MF ASSIST STANDARD ADVANCED FILTER OFF SELF TIMER OFF AE AF LOCK MODE AE AF ON WHEN PRESS...

Страница 146: ...MOVIE SET UP MOVIE MODE 1920 1080 60 fps MOVIE ISO AUTO MIC LEVEL ADJUSTMENT 3 MIC REMOTE RELEASE MIC Factory Defaults Shooting Menu 146...

Страница 147: ...cus mode M you can press the center of the command dial to zoom in on the selected focus area or focus on the subject in the selected area at the touch of a button Select macro close up mode Choose ho...

Страница 148: ...set focus and exposure for a face anywhere in the frame for shots that emphasize portrait subjects Choose for group portraits in horizontal or vertical orientations to prevent the camera from focusin...

Страница 149: ...the AF assist illuminator will light to assist autofocus The AF assist illuminator turns off automatically in silent mode The camera may be unable to focus using the AF assist illuminator in some case...

Страница 150: ...t will be added to the display in the optical viewfinder The focus frame for the current focus distance is displayed in green when the shutter button is pressed halfway Focus frame for focus distance...

Страница 151: ...FINE RAW or NORMAL RAW is selected for image quality The following options are available in AUTO1 AUTO2 AUTO3 modes Option Default DEFAULT SENSITIVITY 200 MAX SENSITIVITY AUTO1 800 AUTO2 1600 AUTO3 32...

Страница 152: ...es are recorded Option Prints at sizes up to 3 2 34 25 cm 13 5 10 in 16 9 1 1 3 2 24 18 cm 9 5 7 in 16 9 1 1 3 2 17 13 cm 7 5 in 16 9 1 1 The shape of the frame varies with the aspect ratio Choose an...

Страница 153: ...record RAW images or FINE RAW or NORMAL RAW to record both JPEG and RAW images FINE and FINE RAW use lower JPEG compression ratios for higher quality JPEG images while NORMAL and NORMAL RAW use higher...

Страница 154: ...values If AUTO is selected the camera will automatically select values between 100 and 200 in response to shooting conditions Option Description AUTO 100 Increase contrast when shooting indoors or und...

Страница 155: ...olors Soft color and enhanced shadow contrast for a calm look Offers slightly more contrast than PRO Neg Std Recommended for outdoor portrait photography A soft toned palette The range of hues availab...

Страница 156: ...Choose film types for film simulation bracketing FILM SIMULATION BKT 156...

Страница 157: ...ity ND filter reducing exposure by the equivalent of 3 EV This allows slower shutter speeds or wider apertures to be used with brightly lit subjects making it possible to blur motion or soften backgro...

Страница 158: ...Adjust color density COLOR 158...

Страница 159: ...Sharpen or soften outlines SHARPNESS 159...

Страница 160: ...Adjust the appearance of highlights HIGHLIGHT TONE 160...

Страница 161: ...Adjust the appearance of shadows SHADOW TONE 161...

Страница 162: ...Reduce noise in pictures taken at high sensitivities NOISE REDUCTION 162...

Страница 163: ...Select ON to reduce mottling in long time exposures LONG EXPOSURE NR 163...

Страница 164: ...d automatically Measure a value for white balance Choose a color temperature For subjects in direct sunlight For subjects in the shade Use under daylight fluorescent lights Use under warm white fluore...

Страница 165: ...alance measurement options will be displayed frame a white object so that it fills the display and press the shutter button all the way down to measure white balance to select the most recent custom v...

Страница 166: ...ile those with a higher color temperature are tinged with blue You can match color temperature to the light source as shown in the following table or choose options that differ sharply from the color...

Страница 167: ...Recall settings saved with EDIT SAVE CUSTOM SETTING See Also EDIT SAVE CUSTOM SETTING Shooting Menu SELECT CUSTOM SETTING 167...

Страница 168: ...d press MENU OK to select 2 Adjust the following settings as desired To replace the settings in the current bank with the settings currently selected with the camera highlight SAVE CURRENT SETTINGS an...

Страница 169: ...tion dialog will be displayed highlight OK and press MENU OK 4 Settings can be recalled using the SELECT CUSTOM SETTING option in the shooting menu See Also SELECT CUSTOM SETTING The Shooting Menu EDI...

Страница 170: ...2 Highlight the desired function and press MENU OK to assign it to the selected button 3 See Also The Function Buttons Fn Function Buttons ADVANCED FILTER MULTIPLE EXPOSURE MACRO PREVIEW DEPTH OF FIEL...

Страница 171: ...d press MENU OK to select or deselect Selected items are indicated by a check mark 3 Press DISP BACK to exit when settings are complete 4 FRAMING GUIDELINE ELECTRONIC LEVEL AF DISTANCE INDICATOR MF DI...

Страница 172: ...nversion lenses Choose when using an optional WCL X100 conversion lens Choose when using an optional TCL X100 conversion lens Choose when no conversion lens is attached Attach The Conversion Lens Usin...

Страница 173: ...ont ring If you have trouble removing the front ring grip the entire ring and rotate it as shown 1 Attach the conversion lens 2 Keep the front ring and lens cap in a safe place when not in use CONVERS...

Страница 174: ...field of view of the conversion lens the bright frame is replaced by brackets showing approximately 80 of the field of view For accurate framing compose pictures using the electronic viewfinder or LCD...

Страница 175: ...anual focus mode Focus is displayed normally focus peaking and digital split image are not available A black and white split image display The camera heightens high contrast outlines Choose a color an...

Страница 176: ...oft throughout the whole image Reds are recorded in color while other colors are recorded in black and white Orange objects are recorded in color while other colors are recorded in black and white Yel...

Страница 177: ...ose the interval and number of shots Press MENU OK to proceed 2 Use the selector to choose the starting time and then press MENU OK Shooting will start automatically 3 Interval timer photography can n...

Страница 178: ...e battery level before starting The display turns off between shots and lights a few seconds before the next shot is taken The display can be activated at any time by pressing the shutter button all t...

Страница 179: ...used by the camera moving when the shutter button is pressed The self timer lamp will blink as the timer counts down The shutter is released ten seconds after the shutter button is pressed Use for sel...

Страница 180: ...posure and or focus will lock while the AEL AFL button is pressed If AE AF ON OFF SWITCH is selected exposure and or focus will lock while the AEL AFL button is pressed and remain locked until the but...

Страница 181: ...AE AF LOCK Choose whether the AEL AFL button locks exposure AE focus AF or both The AEL AFL button locks exposure only The AEL AFL button locks focus only The AEL AFL button locks both exposure and f...

Страница 182: ...hter or darker than the main subject If INTERLOCK SPOT AE FOCUS AREA is ON and AREA is selected for AUTOFOCUS SETTING AF MODE the camera will meter lighting conditions in the selected focus area If IN...

Страница 183: ...the current focus frame when AREA is selected for AUTOFOCUS SETTING AF MODE and SPOT is selected for PHOTOMETRY See Also PHOTOMETRY The Shooting Menu AUTOFOCUS SETTING The Shooting Menu INTERLOCK SPOT...

Страница 184: ...move red eye effects caused by the flash when shooting with Intelligent Face Detection Red eye reduction is performed only when a face is detected Red eye removal is not available with RAW images RED...

Страница 185: ...Choose ON to save unprocessed copies of pictures taken using RED EYE REMOVAL SAVE ORG IMAGE 185...

Страница 186: ...n when the subject is poorlylit A tripod is recommended If is displayed when the shutter button is pressed halfway the flash will fire when the photo is taken Except in commander mode the flash may fi...

Страница 187: ...Adjust flash brightness Note that the desired results may not be achieved depending on shooting conditions and the distance to the subject FLASH COMPENSATION 187...

Страница 188: ...of the option selected the mechanical shutter is used for motion panoramas When the electronic shutter is used the flash turns off shutter speed and sensitivity are restricted to values of 1 32 000 1...

Страница 189: ...LEVEL ADJUSTMENT MIC REMOTE RELEASE Choose a frame size and rate for movies Choose the sensitvity for movie recording MOVIE ISO does not affect the option selected for recording photographs Adjust th...

Страница 190: ...Specify whether the device connected to the microphone remote release connector is a microphone or a remote release MOVIE SET UP 190...

Страница 191: ...Connect to a smartphone or tablet over a wireless network See Also Wireless Transfer Connections The FUJIFILM Smartphone Tablet Computer App opens in another window WIRELESS COMMUNICATION 191...

Страница 192: ...RSION ERASE CROP RESIZE PROTECT IMAGE ROTATE RED EYE REMOVAL SLIDE SHOW PHOTOBOOK ASSIST MARK FOR UPLOAD TO IMAGE SEARCH COPY PRINT ORDER DPOF instax PRINTER PRINT DISP ASPECT WIRELESS COMMUNICATION P...

Страница 193: ...or up or down to highlight the desired menu item 3 Press the selector right to display options for the highlighted item 4 Press the selector up or down to highlight the desired option 5 Press MENU OK...

Страница 194: ...CROP RESIZE PROTECT IMAGE ROTATE RED EYE REMOVAL SLIDE SHOW PHOTOBOOK ASSIST MARK FOR UPLOAD TO IMAGE SEARCH COPY PRINT ORDER DPOF instax PRINTER PRINT DISP ASPECT WIRELESS COMMUNICATION PC AUTO SAVE...

Страница 195: ...gle RAW image to be processed in a multitude of different ways Display the desired picture 1 Highlight RAW CONVERSION in the playback menu and press MENU OK to display RAW conversion options These opt...

Страница 196: ...eat this step to adjust additional settings Create a JPEG copy using the settings in effect at the time the photo was taken Adjust exposure by 1 EV to 1 EV in increments of 1 3 EV Enhance details in h...

Страница 197: ...g is not displayed Repeat to delete additional pictures 2 Delete multiple selected pictures Select SELECTED FRAMES for ERASE in the playback menu 1 Highlight pictures and press MENU OK to select or de...

Страница 198: ...P BACK cancels deletion note that any pictures deleted before the button was pressed can not be recovered 2 If a memory card is inserted only the pictures on the memory card will be affected the pictu...

Страница 199: ...n dialog 4 Press MENU OK again to save the cropped copy to a separate file 5 Larger crops produce larger copies all copies have an aspect ratio of 3 2 If the size of the final copy will be YES will be...

Страница 200: ...ired picture 1 Select RESIZE in the playback menu 2 Highlight a size and press MENU OK to display a confirmation dialog 3 Press MENU OK again to save the resized copy to a separate file 4 The sizes av...

Страница 201: ...ess MENU OK Protect selected pictures Press the selector left or right to view pictures and press MENU OK to select or deselect Press DISP BACK when the operation is complete Protect all pictures Remo...

Страница 202: ...lected orientation whenever it is played back on the camera 4 Protected pictures can not be rotated Remove protection before rotating pictures The camera may not be able to rotate pictures created wit...

Страница 203: ...the camera is unable to detect a face or the face is in profile Results may differ depending on the scene Red eye can not be removed from pictures that have already been processed using red eye remova...

Страница 204: ...view on screen help The show can be ended at any time by pressing MENU OK Press the selector left or right to go back or skip ahead one frame Select FADE IN for fade transitions between frames As abo...

Страница 205: ...the images and press the selector up to select or deselect To display the current image on the cover press the selector down Press MENU OK to exit when the book is complete 2 The first picture selecte...

Страница 206: ...ok in the photobook assist menu and press MENU OK to display the book then press the selector left or right to scroll through the pictures Display the photobook and press MENU OK The following options...

Страница 207: ...movies can be selected for upload to YouTube Only photos can be selected for upload to MyFinePix com During playback selected pictures are indicated by YouTube Facebook or MyFinepix com icons Choose R...

Страница 208: ...d on specified face information Find all pictures with a specified rating Find all still pictures all movies or all RAW pictures Find all pictures selected for upload to a specified destination 1 Sele...

Страница 209: ...tures from internal memory to a memory card CARD INTERNAL MEMORY Copy pictures from a memory card to internal memory 2 Highlight one of the following options and press MENU OK Copy selected pictures P...

Страница 210: ...pictures to be printed from print orders stored on the memory card The information in the order includes the pictures to be printed and the number of copies of each picture WITH DATE WITHOUT DATE RES...

Страница 211: ...e a picture from the order press the selector down until the number of copies is 0 2 Repeat steps 1 2 to complete the print order Press MENU OK to save the print order when settings are complete or DI...

Страница 212: ...OK to remove all pictures from the order Print orders can contain a maximum of 999 pictures If a memory card is inserted containing a print order created by another camera the message shown below wil...

Страница 213: ...Print pictures on optional FUJIFILM instax SHARE printers See the printer manual for details See Also Printer manual PDF instax PRINTER PRINT 213...

Страница 214: ...ith an aspect ratio of 3 2 this option is available only when an HDMI cable is connected Select 16 9 to display the image so that it fills the screen with its top and bottom cropped out 3 2 to display...

Страница 215: ...Connect to a smartphone or tablet over a wireless network See Also The FUJIFILM Smartphone Tablet Computer App opens in another window WIRELESS COMMUNICATION 215...

Страница 216: ...Upload pictures to a computer over a wireless network See Also The FUJIFILM Smartphone Tablet Computer App opens in another window PC AUTO SAVE 216...

Страница 217: ...T MODE FRAME NO FOCUS RING FOCUS CHECK SOUND SET UP SCREEN SET UP SELECTOR BUTTON SETTING EDIT SAVE QUICK MENU POWER MANAGEMENT SHUTTER COUNT EDIT FILE NAME WIRELESS SETTINGS PC AUTO SAVE SETTING GEOT...

Страница 218: ...urrent mode i Press the selector left to highlight the tab for the current menu ii Press the selector down to highlight the setup menu tab containing the desired option iii Press the selector right to...

Страница 219: ...a menu item i Press the selector right to display options for the highlighted item ii Press the selector up or down to highlight an option iii Press MENU OK to select the highlighted option iv Press D...

Страница 220: ...ING FOCUS CHECK SOUND SET UP SCREEN SET UP SELECTOR BUTTON SETTING EDIT SAVE QUICK MENU POWER MANAGEMENT SHUTTER COUNT EDIT FILE NAME WIRELESS SETTINGS PC AUTO SAVE SETTING GEOTAGGING SET UP instax PR...

Страница 221: ...CONTINUOUS FOCUS RING CW FOCUS CHECK OFF SOUND SET UP OPERATION VOL SHUTTER VOLUME SHUTTER SOUND SOUND 1 PLAYBACK VOLUME 7 SCREEN SET UP IMAGE DISP OFF EVF AUTOROTATE DISPLAYS ON PREVIEW EXP IN MANUAL...

Страница 222: ...IMAGE SIZE Q7 IMAGE QUALITY Q8 FILM SIMULATION Q9 HIGHLIGHT TONE Q10 SHADOW TONE Q11 COLOR Q12 SHARPNESS Q13 SELF TIMER Q14 AF MODE Q15 FLASH MODE Q16 EVF LCD COLOR POWER MANAGEMENT AUTO POWER OFF 2...

Страница 223: ...GEOTAGGING SET UP GEOTAGGING ON LOCATION INFO ON COLOR SPACE sRGB Factory Defaults Setup Menu 223...

Страница 224: ...r left or right to highlight the year month day hour or minute and press up or down to change To change the order in which the year month and day are displayed highlight the date format and press the...

Страница 225: ...and press MENU OK 1 Use the selector to choose the time difference between local time and your home time zone Press MENU OK when settings are complete 2 To set the camera clock to local time highligh...

Страница 226: ...Choose a language LANG 226...

Страница 227: ...red option and press the selector right 2 A confirmation dialog will be displayed highlight OK and press MENU OK 3 DATE TIME TIME DIFFERENCE SHUTTER COUNT custom white balance wireless network and PC...

Страница 228: ...Select ON to disable the speaker flash and illuminator in situations in which camera sounds or lights may be unwelcome appears in the display when silent mode is on SILENT MODE 228...

Страница 229: ...s formatted Frame number Directory number File number Numbering continues from the last file number used or the first available file number whichever is higher Choose this option to reduce the number...

Страница 230: ...Choose the direction in which the focus ring is rotated to increase the focus distance in manual focus mode FOCUS RING 230...

Страница 231: ...The image will be magnified in the display to assist focus when the focus ring is rotated in manual focus mode FOCUS CHECK 231...

Страница 232: ...of the sounds produced when camera controls are operated Choose mute to disable control sounds Adjust the volume of the sounds produced when the shutter is released Choose mute to disable the shutter...

Страница 233: ...from those in the final image Pictures are displayed until the MENU OK button is pressed or the shutter button is pressed halfway To zoom in on the active focus point press the center of the command...

Страница 234: ...htness adjustment Adjust the hue of the display in the electronic viewfinder Adjust monitor brightness Adjust monitor hue Choose ON to preview the effects of film simulation white balance and other se...

Страница 235: ...RAMING Choose the type of framing grid available in shooting mode For rule of thirds composition A six by four grid Frame HD pictures in the crop shown by the lines at the top and bottom of the displa...

Страница 236: ...Choose ON to automatically rotate tall portrait orientation pictures during playback Choose the units used for the focus distance indicator SCREEN SET UP 236...

Страница 237: ...CUS AREA Choose the roles played by the up down left and right buttons on the selector The selector buttons serve as function buttons The selector can be used to position the focus area SELECTOR BUTTO...

Страница 238: ...e quick menu shows current settings as BASE 2 Highlight the desired item and press MENU OK to assign it to the selected position in the quick menu 3 SELECT CUSTOM SETTING ISO DYNAMIC RANGE WHITE BALAN...

Страница 239: ...ally Note that in some situations the camera turns off automatically even when OFF is selected Select ON to reduce power consumption and increase the number of pictures that can be taken on a single c...

Страница 240: ...mate number of times the shutter has been released Other actions may also increment the counter for example turning the camera off changing the viewfinder display selection or choosing playback mode S...

Страница 241: ...Replace the default file name prefix DSCF or _DSF Enter the desired prefix then highlight SET and press MENU OK EDIT FILE NAME 241...

Страница 242: ...the default setting recommended in most circumstances to resize larger images to for upload to smartphones OFF to upload images at their original size Resizing applies only to the copy uploaded to th...

Страница 243: ...load destination Choose SIMPLE SETUP to connect using WPS MANUAL SETUP to configure network settings manually See Also The FUJIFILM Smartphone Tablet Computer App opens in another window PC AUTO SAVE...

Страница 244: ...o save the data with your pictures Choose whether location data downloaded from a smartphone are embedded in pictures as they are taken Display the location data last downloaded from a smartphone See...

Страница 245: ...Enter a printer name SSID and password for connection to an optional FUJIFILM instax SHARE printer See the printer manual for details See Also Printer manual PDF instax PRINTER CONNECTION SETTING 245...

Страница 246: ...sRGB Adobe RGB Choose the gamut of colors available for color reproduction Recommended in most situations For commercial printing COLOR SPACE 246...

Страница 247: ...card is inserted this option will format internal memory All data including protected pictures will be deleted from the memory card or internal memory Be sure important files have been copied to a com...

Страница 248: ...Wireless Transfer Copying Pictures to a Computer Printing Pictures via USB Viewing Pictures on TV Connections 248...

Страница 249: ...Camera Remote app on your smartphone to browse the images on the camera download selected images control the camera remotely or copy location data to the camera To connect to the smartphone press the...

Страница 250: ...pied from the camera you can upload pictures from the camera using the PC AUTO SAVE option in the camera playback menu or by pressing and holding the Wi Fi button in playback mode See Also The Functio...

Страница 251: ...inserted Connect the camera directly to the computer do not use a USB hub or keyboard 3 Turn the camera on 4 Copy pictures to the computer using MyFinePix Studio or applications provided with your ope...

Страница 252: ...lit after the message has cleared from the computer display Failure to observe this precaution could result in loss of data or damage to the memory card Disconnect the camera before inserting or remov...

Страница 253: ...ge the camera can be connected directly to the printer and pictures can be printed without first being copied to a computer Connecting the Camera Printing Selected Pictures Printing the DPOF Print Ord...

Страница 254: ...Connect the USB cable as shown and turn the printer on 1 Turn the camera on USB will be displayed in the monitor followed by the PictBridge display 2 Printing Pictures via USB 254...

Страница 255: ...MENU OK to start printing 4 If no pictures are selected when the MENU OK button is pressed the camera will print one copy of the current picture Printing the Date of Recording To print the date of re...

Страница 256: ...the playback menu In the PictBridge display press DISP BACK to open the PictBridge menu 1 Press the selector up or down to highlight PRINT DPOF 2 Press MENU OK to display a confirmation dialog 3 Press...

Страница 257: ...and then on again Disconnecting the Camera Confirm that the above message is not displayed and turn the camera off Disconnect the USB cable Pictures can be printed from internal memory or a memory ca...

Страница 258: ...nnectors are fully inserted 2 Tune the television to the HDMI input channel See the documentation supplied with the television for details 3 Turn the camera on and press button The camera monitor turn...

Страница 259: ...s Remote Releases Conversion Lens Stereo microphones Other Website of the country or region of purchase For more information visit the website of the country or region of purchase the new window will...

Страница 260: ...sh head can be rotated 90 up 180 left or 120 right for bounce lighting This clip on flash unit powered by two AAA alkaline or Ni MH batteries has a Guide Number of 20 65 ISO 100 m ft With the FUJIFILM...

Страница 261: ...ble batteries can be purchased as required BC 65N Replacement battery chargers can be purchased as required At 20 C 68 F the BC 65N charges an NP 95 in about 240 minutes For more information visit the...

Страница 262: ...RR 90 Remote Releases RR 90 Use to reduce camera shake or keep the shutter open during a time exposure An optional RR 90 remote release can be used for long time exposures Remote Releases 262...

Страница 263: ...phone remote release connector A confirmation dialog will be displayed when a third party release is connected press MENU OK and select REMOTE for MIC REMOTE RELEASE For more information visit the web...

Страница 264: ...he focal length by approximately 1 4 to 33 mm equivalent to 50 mm in 35 mm format When attached to the X100T the WCL X100 increases the angle of view for wider angle shots For more information visit t...

Страница 265: ...MIC ST1 MIC ST1 An external microphone for movie recording For more information visit the website of the country or region of purchase the new window will open Check the website Stereo microphones 265...

Страница 266: ...Adapter rings Lens hoods Protector filters Leather cases Hand Grip Grip Belt Other 266...

Страница 267: ...100T X100S X100 It is used when attaching the LH X100 lens hood or 49 mm filters available from third party suppliers Attaching Adapter Rings Remove the front ring If you have trouble removing the fro...

Страница 268: ...as shown with the projections facing out 2 Keep the front ring and lens cap in a safe place when not in use Attach the adapter ring before attaching LH X100 lens hood PRF 49S protector filter or third...

Страница 269: ...e with the X100T X100S X100 comes with an AR X100 adapter ring made of the same material The adapter ring is required when attaching the hood Attach the adapter ring before attaching the lens hood Ali...

Страница 270: ...nserted or removed with the camera still in its case To increase the camera s grip Both battery and memory card can be swapped with the grip in place Additionally a tripod screw hole can be placed in...

Страница 271: ...Select the website of your country or region the new window will open Country Region Country Region Country Region Country Region Country Region Website of the country or region of purchase 271...

Страница 272: ...For Your Safety For Your Safety 272...

Страница 273: ...Safety precautions are described in the following pdf See Also For Your Safety PDF For Your Safety 273...

Страница 274: ...Troubleshooting FAQ Warning Messages and Displays Specifications Links Restrictions on Camera Settings Appendix 274...

Страница 275: ...t in a pocket or other warm place and reinsert it in the camera immediately before taking a picture There is dirt on the battery terminals Clean the terminals with a soft dry cloth The battery has bee...

Страница 276: ...he memory card contacts Clean the contacts with a soft dry cloth The memory card is damaged Insert a new memory card The battery is exhausted Charge the battery or insert a fully charged spare battery...

Страница 277: ...selected subject is closer to the center of the frame than the main subject Recompose the picture or turn face detection off and frame the picture using focus lock The flash does not fire The flash i...

Страница 278: ...selector is set to C Select a different focus mode Intelligent Face Detection is on Turn Intelligent Face Detection off Problem Solution Pictures are grainy The pictures were taken with a different m...

Страница 279: ...The camera is not properly connected Connect the camera correctly The printer is off Turn the printer on Only one copy is printed the date is not printed The printer is not PictBridge compatible The c...

Страница 280: ...n If the message persists contact a FUJIFILM dealer TURN OFF THE CAMERA AND TURN ON AGAIN LENS CONTROL ERROR CARD NOT INITIALIZED The memory card or internal memory is not formatted or the memory card...

Страница 281: ...memory is not formatted Format the memory card or internal memory READ ERROR The file is corrupt or was not created with the camera The file can not be viewed The memory card contacts require cleaning...

Страница 282: ...order on the current memory card contains more than 999 images Copy the pictures to internal memory and create a new print order CAN NOT SET DPOF The picture can not be printed using DPOF CAN NOT SET...

Страница 283: ...t not supported by the printer Movies and some pictures created with other devices can not be printed if the picture is a still picture created with the camera check the printer manual to confirm that...

Страница 284: ...264 Audio Linear PCM stereo sound Number of recorded pixels L 3 2 4896 3264 16 9 4896 2760 1 1 3264 3264 M 3 2 3456 2304 16 9 3456 1944 1 1 2304 2304 S 3 2 2496 1664 16 9 2496 1408 1 1 1664 1664 Moti...

Страница 285: ...Shutter speed Mechanical Shutter P mode 4 sec to 1 4000 sec All other modes 30 sec to 1 4000 sec Bulb max 60min Time 2 sec to 30 sec Electronic Shutter 1 sec to 1 32000 sec P A S M mode Bulb Time 1 s...

Страница 286: ...Shade Fluorescent light Daylight Fluorescent light Warm White Fluorescent light Cool White Incandescent light Underwater Custom Color temperature selection Self timer 10 sec 2 sec delay Interval time...

Страница 287: ...RD Velvia VIVID ASTIA SOFT CLASSIC CHROME PRO Neg Hi PRO Neg Std MONOCHROME MONOCHROME Ye FILTER MONOCHROME R FILTER MONOCHROME G FILTER SEPIA Advanced filter Toy camera Miniature Pop color High key L...

Страница 288: ...Micro connector Type D Audio input Microphone shutter release input 2 5mm stereo mini connector Power supply NP 95 Li ion battery included Dimensions 126 5mm W 74 4mm H 52 4mm D 5 0in W 2 9in H 2 1in...

Страница 289: ...Flash EF 20 EF 42 EF X20 Protector Filter PRF 49S Stereo Microphone MIC ST1 Remote Release RR 90 Grip Belt GB 001 1 Please see the Fujifilm website Memory Cards to check memory card compatibility 2 E...

Страница 290: ...found on the following website The FUJIFILM app gives you more opportunities to enjoy your pictures on smart phones tablets and computers MyFinePix Studio Windows only can be used to copy pictures to...

Страница 291: ...The following table lists the settings available in each mode See Also Restrictions on Camera Settings PDF Restrictions on Camera Settings 291...

Отзывы: