background image

43

Advanced

Features

3

NNN 1111 2222

0

I N C A N D E S C E N

N C A N D E S C E N T

I N C A N D E S C E N T

I N C A N D E S C E N T

A U T O

A U T O

A U T O

A U T O

O F F

O F F

O F F

O F F

S E T

S E T

M

4

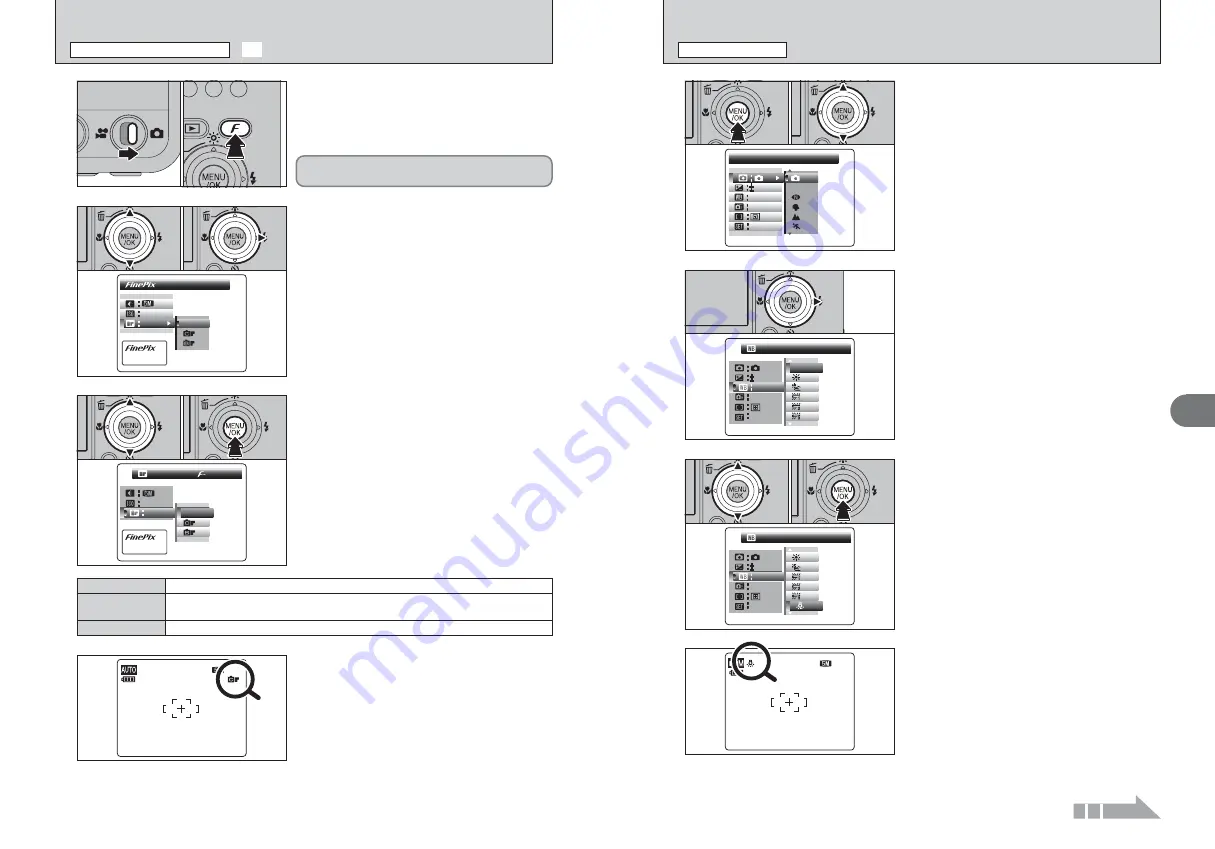
When the setting is enabled, an icon appears in the
top-left corner of the LCD monitor.

!

The settings available in the menu screen vary depending on
the Photography mode.

1

Press the “MENU/OK” button to display the
menu on the LCD monitor.

2

Press “

a

” or “

b

” to select the menu item.

1

1

Press “

a

” or “

b

” to change the setting.

2

Press the “MENU/OK” button to confirm the
setting.

0

1

0

2

3

PHOTOGRAPHY MENU OPERATION

PHOTOGRAPHY MENU

S E T

S E T

S E T

S E T

A U T O

A U T O

A U T O

A U T O

A U T O

A U T O

A U T O

A U T O

O F F

O F F

O F F

O F F

00

M

M

S H O O T I N G   M O D E

S H O O T I N G   M O D E

0

1

0

2

0

A U T O

A U T O

A U T O

A U T O

A U T O

A U T O

A U T O

A U T O

A U T O

A U T O

O F F

O F F

O F F

O F F

S E T

S E T

M

!

When the top or bottom of the menu item is selected, press

a

” or “

b

” to change the page.

Press “

c

”.

2

Continued

42

S T A N D A R D

S T A N D A R D

P H O T O   M O D E

P H O T O   M O D E

P H O T O   M O D E

P H O T O   M O D E

NN

A U T O

A U T O

A U T O

A U T O

S T D

S T D

S T D

S T D

S T D

S T D

S T D

S T D

1

Set the Mode switch to “

q

”.

2

Press the “

p

” button to display the menu on the

LCD monitor.

3

1

Press “

a

” or “

b

” to change the setting.

2

Press the “MENU/OK” button to confirm the
setting.

0

1

0

2

The FinePix COLOR setting is retained even when
the camera is off or the mode setting is changed.

!

In “

r

” Movie mode, do not set the “

ü

” FinePix COLOR

setting.

4

!

p

-CHROME may have little visible effect with some subjects,

such as close-up shots of people (portraits).

!

Because the effects on the image differ depending on the
scene being shot in 

p

-CHROME mode, take pictures in 

p

-

STANDARD mode as well as this mode. Note that you may
not be able to see any difference on the LCD monitor.

!

For shots taken in 

p

-CHROME mode or 

p

-B&W mode,

automatic quality adjustment will be suppressed on Exif Print
compliant printers.

When setting 

p

-CHROME or 

p

-B&W, the icon

appears on the LCD monitor.

p

-CHROME: 

ù

p

-B&W: 

ñ

NNN 1111 2222

The contrast and color saturation are set to standard. Use this mode for normal photography.

p

-STANDARD

The contrast and color saturation are set to high. This feature is effective for taking more vivid
shots of subjects such as scenery (blue sky and greenery) and flowers.

p

-CHROME

This setting converts the colors in the photographed image to black and white.

p

-B&W

C O L O R

C O L O R

S T D

S T D

S T D

S T D

S T D

S T D

S T D

S T D

P H O T O   M O D E

P H O T O   M O D E

P H O T O   M O D E

P H O T O   M O D E

N

A U T O

A U T O

A U T O

A U T O

2

1

Press “

a

” or “

b

” to select “

ü

” FinePix COLOR.

2

Press “

c

”.

0

1

0

2

1

0

1

0

2

ü

FinePix COLOR

p

PHOTO MODE   PHOTOGRAPHY

Содержание FinePix Z1

Страница 1: ...show you how to use your FUJIFILM DIGITAL CAMERA FinePix Z1 correctly Please follow the instructions carefully OWNER S MANUAL 1 2 3 4 5 6 Getting Ready Settings Using the Camera Advanced Features Software Installation Viewing Images ...

Страница 2: ... Ownership All copyrights and other proprietary rights to Software and Documentation are owned and retained by FUJIFILM or the third party suppliers as indicated on or in Software or Documentation Nothing contained herein shall be construed expressly or implicitly as transferring or granting any right license or title to you other than those explicitly granted under this Agreement 5 Limited Warran...

Страница 3: ...AF MODE 48 CENTER 48 MULTI 48 PHOTOGRAPHY MENU p PHOTO MODE PHOTOGRAPHY PHOTOGRAPHY FUNCTIONS 3 Advanced Features B PLAYBACK Ò ERASING SINGLE ALL FRAMES 49 Ú IMAGE ROTATE 51 HOW TO SPECIFY PRINT OPTIONS DPOF 52 SPECIFYING DPOF SETTINGS EASILY 53 DPOF SET FRAME 55 DPOF ALL RESET 57 Ç PROTECTING IMAGES FRAME SET ALL RESET ALL 58 AUTOMATIC PLAYBACK 60 Â RECORDING VOICE MEMOS 61 Â PLAYING BACK VOICE M...

Страница 4: ...his camera may cause interference to other equipment in the hospital or aircraft For details please check with the applicable regulations Handling Your Digital Camera This camera contains precision electronic components To ensure that images are recorded correctly do not subject the camera to impact or shock while an image is being recorded Trademark Information h and xD Picture Card are trademark...

Страница 5: ...socket Place the camera vertically in the cradle when setting or removing it Camera parts and features Refer to the pages in parentheses for information on using the camera parts or features The Cradle Use the cradle as a convenience tool for your camera h Setting the camera in the cradle to charge the battery P 14 h Displaying your images on a TV P 85 h Transferring image files quickly to your PC...

Страница 6: ...ch aside while loading the battery Check that the battery is firmly held in place LOADING THE BATTERY AND THE MEDIA 1 Getting Ready 1 Check that the camera is turned off before opening the battery cover If opening the battery cover while the camera is still on the camera will turn off Do not apply force to the battery cover Compatible battery Always use the Rechargeable Battery NP 40 included The ...

Страница 7: ...pleted The display will shortly go blank and the camera will stop working Replace or recharge the battery Blinking red Lit white Lit white 1 2 4 Lit red 3 Turn the camera on and check whether the battery level warning Ä Ã or V appears on the LCD monitor Á Ä or à appears as a small icon on the left hand side of the LCD monitor Depending on the camera mode the transition from à to V may occur more q...

Страница 8: ...era to charge the battery The socket outlet shall be installed near the equipment and shall be easily accessible The shape of the plug and socket outlet depends on the country of use Check that the camera is turned off Set the camera in the cradle Only connect and disconnect the AC power adapter when the camera is off Connecting or disconnecting the AC power adapter while the camera is on temporar...

Страница 9: ...the camera has been left for a long period To set the date and time later press the DISP BACK button If you do not set the date and time this message will appear each time you turn the camera on DAT DATE T E T I ME ME SET SET CANCEL CANCEL 2 0 0 7 2 0 0 7 2 0 0 6 2 0 0 6 2 0 0 4 2 0 0 4 2 0 0 3 2 0 0 3 2005 2005 YY Y MM D DD 1 1 2 1 0 0 AM 2 1Press d or c to select Year Month Day Hour or Minute 2P...

Страница 10: ...hanges Date order Explanation YY MM DD Displays the date in the year month day format MM DD YY Displays the date in the month day year format DD MM YY Displays the date in the day month year format SELECTING THE LANGUAGE SET SET UP UP SET UP SET UP SET SET OFF OFF OFF OFF AUTO AUTO AUTO AUTO AUTO AUTO AUTO AUTO 0 0 1 2 1Press the MENU OK button to display the menu on the LCD monitor 2Press a or b ...

Страница 11: ...the displayed frame To cancel erasing press the DISP BACK button Up down left and right are indicated by black triangles in the Owner s Manual Up or down is shown as a or b and left or right is shown as d or c Displaying the on screen Help DISP BACK button DISP Press this button to select the LCD monitor display BACK Press this button to stop a procedure midway through Photo mode button Photograph...

Страница 12: ...ves a blurred picture camera shake Place the camera on a stable surface to prevent camera shake particularly for shots in the dark when the selected flash mode is Suppressed flash There may be some uneven brightness at the lower edge of the LCD monitor This is normal and does not affect the image 4 Press T telephoto button to zoom in Press W wide angle button to zoom out A zoom bar appears on the ...

Страница 13: ...t orange Recording to xD Picture Card not ready Blinking orange Charging the flash flash will not fire Lit red Battery charging is in progress Blinking red i xD Picture Card Warnings No card inserted card not formatted incorrect format card full and xD Picture Card error i Lens operation error Detailed warning messages appear on the LCD monitor P 101 102 INDICATOR LAMP DISPLAY TAKING PICTURES AUTO...

Страница 14: ...M 2 0 0 5 3 2 4 1 0 0 0 AM N N N 1 1 1 1 2 2 2 2 Position the main subject at the intersection of two lines in this frame or align one of the horizontal lines with the horizon Use this frame as a guide to the subject s size and the balance of the shot while composing a shot The framing guideline is not recorded on the image The lines in the scene frame divide the image into 3 roughly equal parts h...

Страница 15: ... selected in Multi frame playback mode 2 3 1 14 14 1 14 1 14 3 3 22 22 3 22 3 22 3 3 23 23 3 23 3 23 3 3 24 24 3 24 3 24 2005 2005 Press a b d or c to move the cursor colored frame to the selecting frame 1 14 14 1 14 1 14 3 3 22 22 3 22 3 22 3 3 23 23 3 23 3 23 3 3 24 24 3 24 3 24 2005 2005 0 1 VIEWING THE IMAGES w PLAYBACK PLAYBACK MODE Press a b d or c to move the cursor colored frame to the sel...

Страница 16: ...CANCEL ERAS ERASE E OK OK 3 0 1 0 2 Playback zoom Press the T or W button during single frame playback to zoom the image A zoom bar appears on the LCD monitor Press a b d or c to display another part of the image The current displayed image appears on the navigation screen Playback zoom cannot be used with multi frame playback Press the DISP BACK button to cancel playback zoom Zoom bar Navigation ...

Страница 17: ...d or blue cast due to the light source Change the White balance setting in the photography menu To avoid missing snapshot opportunities Take pictures in AUTO mode see Using the Camera Shoot with HIGH SPEED SHOOTING To prevent the subject from being overexposed or underexposed and to show the substance and textures of the subject clearly Use exposure compensation Select if the background is pale an...

Страница 18: ...ng pictures of people in low light conditions The flash fires a pre flash just before the picture is taken and then fires again to take the actual picture The flash fires as required by the shooting conditions If pressing the shutter button while the flash is charging the picture will be taken without the flash Red eye effect When using the flash to take a picture of people in low light conditions...

Страница 19: ...e 2 second self timer This is useful to prevent camera shake 1 N N N 1 1 1 1 2 2 2 2 OFF 0 1 0 2 Available Photography modes AUTO À m s 36 d FLASH PHOTOGRAPHY FUNCTIONS d Forced flash Use this mode in backlit scenes such as a subject against a window or in the shade of a tree or to get the correct colors when taking a picture under bright lighting In this mode the flash fires in bright as well as ...

Страница 20: ...able frames also changes P 24 3 0 1 0 2 QUALITY MODE NUMBER OF RECORDED PIXELS p PHOTO MODE PHOTOGRAPHY 38 This is useful when checking the shot composition for dark scenes Slow synchro shots etc 1 Set the Mode switch to q Press the fi a button fi appears on the LCD monitor and the subject is displayed brightly To cancel increased brightness Press the fi a button again This function is automatically ...

Страница 21: ... such as the night sky Choose the sensitivity setting that best suits the conditions When selecting À NATURAL LIGHT in ˇ SHOOTING MODE only AUTO can be selected in the û sensitivity setting When selecting AUTO as the sensitivity setting the camera selects the best sensitivity setting for the subject s brightness 1 2 0 1 0 2 ISO ISO AUTO AUTO AUTO AUTO STD STD STD STD AUTO AUTO AUTO AUTO 64 64 64 6...

Страница 22: ...tton to confirm the setting 0 1 0 2 The FinePix COLOR setting is retained even when the camera is off or the mode setting is changed In r Movie mode do not set the ü FinePix COLOR setting 4 p CHROME may have little visible effect with some subjects such as close up shots of people portraits Because the effects on the image differ depending on the scene being shot in p CHROME mode take pictures in ...

Страница 23: ...om 7 types of Scene position setting for the scene being shot Set the Mode switch to q 4 Press the MENU OK button to confirm the setting PHOTOGRAPHY MENU PHOTOGRAPHY MENU Displaying the menus P 43 Continued 44 PHOTOGRAPHY MENU OPERATION PHOTOGRAPHY MENU ˇ Shooting mode P 45 Specify s MANUAL AUTO À NATURAL LIGHT m PORTRAIT LANDSCAPE SPORTS or NIGHT Exposure compensation P 46 Use this setting when t...

Страница 24: ...ubject and the background h Compensation range 2 EV to 2 EV 13 steps in 1 3 EV increments See P 107 for more information on EV Any of the following disables exposure compensation i Using the flash in Auto or Red eye reduction mode i Shooting dark scenes in Forced flash mode Shooting mode Explanation Available flash modes m PORTRAIT Used for photography getting beautiful skin tones and soft overall...

Страница 25: ...er subject in focus When taking pictures in Macro mode the camera focuses on the center of the LCD monitor CENTER The camera focuses on the center of the LCD monitor Use this setting when taking pictures using AF AE lock P 25 IS0100 IS0100 0100 N N N 1 1 1 1 2 2 2 2 1 250 250 F5 F5 6 6 1 250 F5 6 1 250 F5 6 1 250 F5 6 IS0100 0100 N N N 1 1 1 1 2 2 2 2 2 0 0 5 3 2 4 1 0 0 0 AM 2 0 0 5 3 2 4 1 0 0 0...

Страница 26: ...rames files cannot be erased Unprotect the frames files before erasing them P 58 To stop the procedure midway Press the DISP BACK button to cancel erasing of all the frames files Some unprotected frames files will be left unerased Even if you stop the procedure immediately some frames files will be erased CANCEL CANCEL CANCEL CANCEL Ò ERASING SINGLE ALL FRAMES PLAYBACK MENU Images that can be rota...

Страница 27: ...ettings If there were previous DPOF settings only the modifications are cancelled 0 1 0 2 When DPOF settings were specified on another camera When the data includes a frame file with DPOF settings that were specified on another camera RESET DPOF OK appears Pressing the MENU OK button erases all of the DPOF settings already specified for each frame file Specify the DPOF setting for each frame file ...

Страница 28: ... 0 0 5 3 2 4 1 0 0 0 AM 2 0 0 5 3 2 4 1 0 0 0 AM 0 1 0 2 DPOF SET FRAME PLAYBACK MENU Continued 54 DPO DPOF F SE SET T I N G N G HA HAS BEEN BEEN COMPLETED COMPLETED DPOF SET T I N G HAS BEEN COMPLETED DPOF SET T I N G HAS BEEN COMPLETED DPOF SET T I N G HAS BEEN COMPLETED COMPLETED COMPLETED TOTAL TOTAL 9SHEETS SHEETS PR I NT ORDE ORDER R DPO DPOF 5 Total number of prints appears on the LCD monit...

Страница 29: ...ay the frame file for specifying DPOF settings 2Press a or b to set a value up to 99 as the number of copies of the frame file to be printed For frames files that you do not want printed set the number of prints to 0 zero To specify more DPOF settings repeat steps 1 and 2 Prints of up to 999 frames files can be ordered on the same xD Picture Card DPOF settings cannot be specified for movie Images ...

Страница 30: ... OK 1 1 2 SE SET T RESE RESET T FRAME FRAME SE SET T ALL ALL FRAME FRAME RESE RESET T ALL ALL 1 2 1Press a or b to select Ç PROTECT 2Press c 3 1Press a or b to select FRAME SET ALL or RESET ALL 2Press the MENU OK button to confirm your selection FRAME Protects or unprotects only the selected frame file SET ALL Protects all the frames files RESET ALL Removes the protection from all the frames files...

Страница 31: ...mo 0 1 0 2 Â RECORDING VOICE MEMOS PLAYBACK MENU Continued 60 1 1 2 FADE FADE IN IN FADE FADE IN IN NO NORMAL AL FADE FADE IN IN MULTI TIPLE PLE CLOCK CLOCK NO NORMAL AL 3 1Press a or b to select the playback interval and the type of image transition 2Press the MENU OK button The image frames are advanced and played back Press d or c to advance or go back through the images when selecting NORMAL a...

Страница 32: ...the speaker Speaker  PLAYING BACK VOICE MEMOS PLAYBACK MENU t appears on the LCD monitor when an image file with a voice memo is selected Voice memos cannot be played back using multi frame playback Press the DISP BACK button to select single frame playback 62 REC REC RE REC REC F I F I N I N I SH SH After 30 seconds of recording FINISH appears on the LCD monitor To finish Press the MENU OK butto...

Страница 33: ...ING Zoom bar A saved image size varies depending on the zoom scale For 0 3M the fl YES option appears in yellow 2 0 1 0 2 3 1 1 2 TR I MM ING ING SET SET Continued TRIMMING PLAYBACK MENU 64 SET SET CANCEL CANCEL 1 0 2 3 4 5 6 7 8 9 10 10 1 Press the MENU OK button while playing back voice memo The voice memo is paused during playback 1 1 0 2 3 4 5 6 7 8 9 10 10 SET SET CANCEL CANCEL 2 Press d or c ...

Страница 34: ...e on the xD Picture Card Because a movie is recorded onto the xD Picture Card as it is saved it cannot be recorded correctly if the camera suddenly loses power if you open the battery cover or disconnect the AC power adapter It may not be possible to playback your movies on other cameras Continued 66 YES YES YES YES CANCEL CANCEL CANCEL CANCEL TR I MM ING ING TR I MM ING TR I MM ING Press the DISP...

Страница 35: ...ise may be recorded in shots taken outdoors When the remaining time runs out recording ends and the movie is saved onto the xD Picture Card If recording is stopped immediately after it begins 1 second of the movie is recorded onto the xD Picture Card 6 Press the shutter button down halfway during recording recoding ends 4 Press the shutter button down fully to start recording The brightness and co...

Страница 36: ...ugh the movie Skip playback Press d or c when the movie is paused the movie advances or goes back one frame Hold down d or c to move through the frames quickly 6s 6s 6s 6s STOP STOP STOP STOP PAUSE PAUSE Bar PLAY PLAY PLAYING BACK MOVIES PLAYBACK MODE 1 Movies cannot be played back using multi frame playback Press the DISP BACK button to select single frame playback 2 1Press b to play the movie 2T...

Страница 37: ... Always turn the camera off when replacing the battery Opening the battery cover or disconnecting the AC power adapter without turning the camera off may cause the camera settings to revert to the factory default values set at shipment USING THE SET UP SCREEN OK OK NTSC NTSC NTSC NTSC SET SET ENGLISH ENGLISH PAGE 3 PAGE 3 1 3 2 3 1Press d to move to page number 2Press a or b to select the page 0 1...

Страница 38: ...ng SET SET CANCEL CANCEL 1 0 2 3 4 5 6 7 8 9 10 10 SET UP 74 SET UP menu options Settings Display Factory default Explanation Page àBEEP VOLUME OFF 1 2 3 2 Sets the volume of the tone emitted when the camera controls are used áIMAGE DISP 3 SEC 1 5 SEC OFF 1 5 SEC Specifies whether an image checking screen photography result appears after taking a picture The image appears for a few moments and is ...

Страница 39: ...rk pressing the shutter button down halfway recovers the LCD monitor brightness 76 h Optical zoom focal length Approx 36 mm to 108 mm max zoom scale 3 h Digital zoom focal length Approx 108 mm to 616 mm max zoom scale approx 5 7 h Optical zoom focal length Approx 38 mm to 114 mm max zoom scale 3 h Digital zoom focal length Approx 114 mm to 650 mm max zoom scale approx 5 7 35 mm camera equivalents ...

Страница 40: ...s including protected frames files Back up important frames files onto your PC or another media 1Press d or c to select OK 2Pressing the MENU OK button erases all the frames files and initializes the xD Picture Card When CARD ERROR WRITE ERROR READ ERROR or CARD NOT INITIALIZED appears see P 101 for information before formatting the xD Picture Card 0 1 0 2 SET UP T T IME IME D I D I FFERENCE FFERE...

Страница 41: ...em administrator account e g Administrator 3 Required to use the FinePix Internet Service The software can still be installed even if you do not have an Internet connection Operating System 1 CPU Windows 98 including the Second Edition Windows Millennium Edition Windows Me Windows 2000 Professional 2 Windows XP Home Edition 2 Windows XP Professional 2 200 MHz Pentium or better recommended 800 MHz ...

Страница 42: ...ardware and software requirements Compatible Mac Power Macintosh G3 1 PowerBook G3 1 Power Macintosh G4 iMac iBook Power Macintosh G4 Cube or PowerBook G4 Power Macintosh G5 Operating System Mac OS X compatible with version 10 2 8 to 10 3 7 RAM 192 MB minimum 256 MB or better recommended Hard disk space Amount required for installation 200 MB minimum Amount required for operation 400 MB minimum Wh...

Страница 43: ...mera on in Playback mode Automatic playback starts automatically When not using Automatic playback function press the MENU OK button to stop it 5 6 1 CAMERA CONNECTION USING THE CRADLE 6 Viewing Images 84 5 2 INSTALLATION ON A Mac OS X 10 The FinePixViewer installation completed message dialog appears Then click exit button and close it 11 Launch Image Capture from the Applications folder 12 Chang...

Страница 44: ...HEC CHECK I K I NG NG US USB P I P I CTB CTBR I DGE DGE When a printer that supports PictBridge is available images can be printed by connecting the camera directly to the PictBridge compatible printer without using a PC In PictBridge function images photographed on other than a camera may not be printed 6 2 1 Specifying images for printing on the camera 1Press the w button for about 1 second to t...

Страница 45: ...ting the specified number of prints PR I NT I NG NG CANCEL CANCEL 1 1 1 19 19 19 19 SHEETS SHEETS Disconnecting the printer 1Check that PRINTING is not displayed on the camera s screen 2Press the POWER button on the cradle to turn the power off 4 CHECKING USB appears and then the menu is displayed on the LCD monitor If the menu does not appear check whether the ò USB MODE setting is PICTBRIDGE Dep...

Страница 46: ... PC Install the software first Do not connect the camera to the PC before installing all the software This mode provides a simple way to read images from an xD Picture Card and store images onto an xD Picture Card CD ROM Software for FinePix CX DSC Mass storage device mode 6 3 1 Connecting to a PC 1 Insert an xD Picture Card into the camera Gold contact area Gold marking 1Press the w button for ab...

Страница 47: ...ollow the instructions provided on screen to save the images To proceed without saving the images click the Cancel button The Windows CD ROM may also be required during installation In this event change CD ROMs as directed by the on screen instructions h FinePixViewer automatically starts up and the Save Image Wizard window Save Image dialog box appears Follow the instructions provided on screen t...

Страница 48: ... to Use FinePixViewer covers a range of topics including batch processing and ordering prints 1Check that the camera is not connected to the PC 2Quit all currently running applications 3Open the My Computer window Then open the Control Panel and double click on Add Remove Programs Windows 4The Add Remove Programs Properties window appears Select the software to be uninstalled FinePixViewer or the ...

Страница 49: ...ows 2000 Professional Windows XP or iMac Mac OS 8 6 to 9 2 2 Mac OS X 10 1 2 to 10 2 2 and models that support USB as standard h Compatible with xD Picture Card of 16 MB to 512 MB and SmartMedia of 3 3 V 4 MB to 128 MB h PC Card Adapter DPC AD The PC Card Adapter allows the xD Picture Card and SmartMedia to be used as a PC Card Standard ATA compliant PCMCIA 2 1 PC card Type II h Compatible with xD...

Страница 50: ... 98 Using Your Camera Correctly e Read this information and the Safety Notes P 108 to make sure you use your camera correctly Places to Avoid Do not store or use the camera in the following types of locations h In the rain or in very humid dirty or dusty places h In direct sunlight or in places subject to extreme temperature rises such as in a closed car in summer h Extremely cold places h Places ...

Страница 51: ...e played back 100 Notes on the xD Picture Card Image Memory Card h This Image Memory Card is a new image recording media xD Picture Card developed for digital cameras The Image Memory Card consists of a semiconductor memory NAND type flash memory to record digital image data The recording process is electrically performed and enables erasure of existing image data as well as re recording of new im...

Страница 52: ...era on i Load a new or fully charged battery i Wait until the charging is completed before pressing the shutter button i Change the Photography mode The flash settings are restricted because the camera settings are tailored to the scene being shot Change the Photography mode for a wider range of flash settings i Move to within the effective flash range before taking the picture i Hold the camera c...

Страница 53: ...ix photo mode p mode Specifications System 104 Troubleshooting Possible causes Solutions Frame erase does not erase the frame The ERASE ALL function does not erase all the frames Screens are not displayed in English There is no image or sound on the TV The TV image is black and white When connecting the camera to a PC the photographed image or playback image appears on the camera s LCD monitor Not...

Страница 54: ...cture Card Weight for photography Approx 150 g 5 3 oz including battery and xD Picture Card Operating conditions Temperature 0 C to 40 C 32 F to 104 F 80 humidity or less no condensation According to the CIPA Camera Imaging Products Association standard procedure for measuring digital still camera battery consumption extract When using a battery use the battery supplied with the camera The storage...

Страница 55: ...ould cause the battery to ignite or burst Keep xD Picture Cards out of the reach of small children Because xD Picture Cards are small they can be swallowed by children Be sure to store xD Picture Cards out of the reach of small children If a child swallows an xD Picture Card seek medical attention or call an emergency number WARNING CAUTION Do not use this camera in locations affected by oil fumes...

Страница 56: ...111 110 ...

Страница 57: ...26 30 Nishiazabu 2 chome Minato ku Tokyo 106 8620 Japan http home fujifilm com products digital Printed in Japan FGS 507103 FG Printed on recycled paper ...

Отзывы: