background image

5

Be
fore

 Y

o

u

 Begi

n

Parts of the Camera

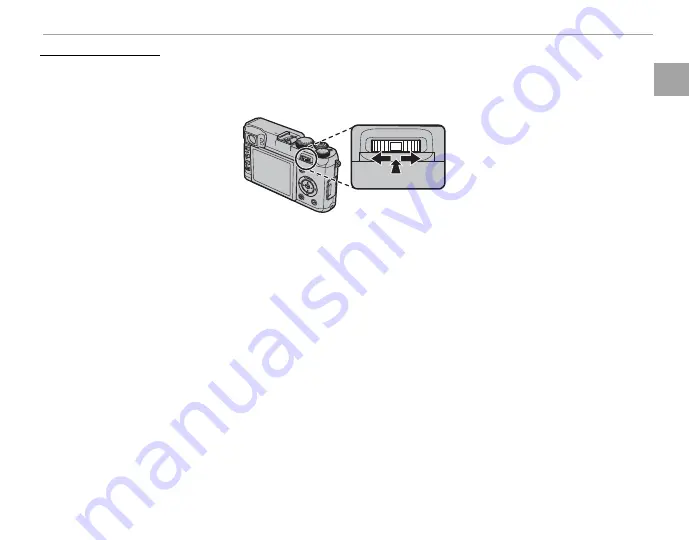
 The Command Control

 The Command Control

Pressing the command control left or right performs the same function as pressing the command dial 
left or right.  It can also be used to choose a combination of shutter speed and aperture in place of the 
command dial (program shift; 

P

 24) or to adjust aperture in increments of 1

/

3 EV (

P

 26, 27).

You can also press the center of the command dial to zoom in on the focus area selected for manual 
focus in the electronic viewfi nder or LCD monitor, or to zoom in on the active focus point during play-
back or (if 

CONTINUOUS

 is selected for 

A


IMAGE DISP.

  in the setup menu; 

P

 81) image review (press 

again to cancel zoom).

Содержание FinePix X100

Страница 1: ...at you have read and understood its con tents before using the camera For information on related products visit our website at http www fujifilm com products digital_cameras index html For more information on the X100 visit http www finepix x100 com Before You Begin First Steps Taking Photographs More on Photography Viewing Pictures Menus Connections Technical Notes Troubleshooting Appendix EN BL0...

Страница 2: ...y cords should be routed so that they are not likely to be walked on or pinched by items placed upon or against them paying particular at tention to cords at plugs convenience receptacles and the point where they exit from the appliance Accessories Do not place this video product on an unstable cart stand tripod bracket or table The video product may fall causing serious injury to a child or adult...

Страница 3: ...cons with a diagonal bar tell you that the action indicated is prohibited Prohibited Filled circles with an exclamation mark indicate an ac tion that must be performed Required WARNING WARNING Unplug frompower socket If a problem arises turn the camera off remove the bat tery and disconnect and unplug the AC power adapter Continued use of the camera when it is emitting smoke is emitting any unusua...

Страница 4: ... can cause a fire Using a flash too close to a person s eyes may temporarily affect the eyesight Take particular care when photo graphing infants and young children When a memory card is removed the card could come out oftheslottooquickly Useyourfingertoholditandgently release the card Injury could result to those struck by the ejected card Request regular internal testing and cleaning for your cam...

Страница 5: ...a If the batteries leak clean the battery compartment thoroughly before inserting new batteries If fluid from the battery comes into contact with skin or clothing flush the affected area with water If fluid enters your eyes immediately flush the affected area with water and seek medical attention Do not rub your eyes Failure to observe this precaution could result inpermanentvisualimpairment Ni MH Ba...

Страница 6: ...our mouth thoroughly with water Drink large quantities of water and induce vomiting then seek medical assistance Although the display is manufactured using extremely high precision technology it may contain pixels that are always lit or that do not light This is not a malfunction and images recorded with the product are unaffected TrademarkInformation TrademarkInformation xD Picture Card and E are ...

Страница 7: ...le and DC supply cord ForCustomersinCanada ForCustomersinCanada CAUTION This Class B digital apparatus complies with Cana dian ICES 003 DisposalofElectricalandElectronicEquipmentinPrivate DisposalofElectricalandElectronicEquipmentinPrivate Households Households IntheEuropeanUnion Norway IcelandandLiechten stein This symbol on the product or in the man ual and in the warranty and or on its packagin...

Страница 8: ...isted here Troubleshooting Troubleshooting P P105 105 WarningMessagesandDisplays WarningMessagesandDisplays P P109 109 Having a specific problem with the camera Find the answer here Find out what s behind that flashing icon or error message in the display Glossary Glossary P P113 113 RestrictionsonCameraSettings RestrictionsonCameraSettings P P120 120 The meanings of some technical terms may be fo...

Страница 9: ...ocus mode 48 Focus frame selection 50 Focus lock 46 Manual focus 48 Adjusting Exposure ISO sensitivity 51 Auto ISO 84 Metering 52 Shutter speed and aperture 28 Program autoexposure 24 Shutter priority autoexposure 25 Aperture priority autoexposure 26 Manual exposure 27 Long time exposures 29 Exposure lock 46 Exposure compensation 30 Adjusting Colors to the Light Source White balance 35 Film simula...

Страница 10: ...y 37 Bracketing 38 Panoramas 39 Movies 42 Using the Flash The built in flash 2 32 Flash photography 32 Flash mode 32 Flash compensation 71 Optional flash units 71 100 Custom Settings Assigning a role to the Fn button 53 Saving and recalling settings 55 ...

Страница 11: ...form the leather on the camera body Any liquid on the camera should be removed immediately with a soft dry cloth Use a blower to remove dust from the lens and monitor then gently wipe with a soft dry cloth Any remaining stains can be removed by wiping gently with a piece of FUJIFILM lens cleaning paper to which a small amount of lens cleaning fluid has been applied Care should be taken to avoid sc...

Страница 12: ...ging the Battery 11 Inserting the Battery and a Memory Card 12 Compatible Memory Cards 15 Turning the Camera on and Off 16 Basic Setup 17 Choosing a Display 18 Using the Hybrid Viewfinder 19 Focusing the Viewfinder 19 The DISP BACK Button 20 Optical Viewfinder Shooting 20 Electronic Viewfinder Shooting 20 LCD Monitor Shooting 20 Electronic Viewfinder LCD Monitor Playback 21 Choosing a Shutter Soun...

Страница 13: ...cus Mode 48 Focus Frame Selection 50 Sensitivity 51 Metering 52 The Fn Button 53 Film Simulation 54 Saving Settings 55 The RAW Button 56 The ND Filter 57 Viewing Pictures Viewing Pictures Viewing Pictures Full Frame 58 Playback Zoom 59 Multi Frame Playback 60 Viewing Movies 61 Image Search 62 mPhotoBook Assist 63 Creating a PhotoBook 63 Viewing Photobooks 64 Editing and Deleting Photobooks 64 View...

Страница 14: ...IGHT TONE 71 sSHADOW TONE 71 hNOISE REDUCTION 71 FAF MODE 71 IFLASH 71 gEXTERNAL FLASH 71 uSELECT CUSTOM SETTING 72 KEDIT SAVE CUSTOM SETTING 72 vDISP CUSTOM SETTING 72 Using the Menus Playback Mode 73 Playback Menu Options 73 mPHOTOBOOK ASSIT 73 tIMAGE SEARCH 73 AERASE 73 jMARK FOR UPLOAD TO 74 ISLIDE SHOW 75 jRAW CONVERSION 75 BRED EYE REMOVAL 75 DPROTECT 76 GCROP 76 eRESIZE 77 CIMAGE ROTATE 77 ...

Страница 15: ...OUND 82 IPLAYBACK VOLUME 82 JLCD BRIGHTNESS 83 MAUTO POWER OFF 83 GOVF POWER SAVE MODE 83 HQUICK START MODE 83 FFn BUTTON 83 NISO AUTO CONTROL 84 BRED EYE REMOVAL 84 CAF ILLUMINATOR 85 kAE AF LOCK MODE 85 vAE AF LOCK BUTTON 85 jFOCUS CHECK 85 IFOCUS RING 85 MFOCUS SCALE UNITS 85 zFRAMING GUIDLINE 86 JCOLOR SPACE 86 KLONG EXPOSURE NR 86 nSAVE ORG IMAGE 87 mAUTOROTATE PB 87 OBACKGROUND COLOR 87 cGUI...

Страница 16: ... 94 Macintosh Installing FinePixViewer 96 Connecting the Camera 98 Technical Notes Technical Notes Optional Accessories 100 Accessories from FUJIFILM 100 Attaching Adapter Rings and Lens Hoods 101 Connecting the Camera to Other Devices 102 Caring for the Camera 103 Storage and Use 103 Cleaning 104 Traveling 104 Troubleshooting Troubleshooting Problems and Solutions 105 Warning Messages and Display...

Страница 17: ...era POther pages in this manual on which related information may be found Menus and other text in the displays are shown in bold In the illustrations in this manual displays may be simplified for explanatory purposes Supplied Accessories Supplied Accessories The following items are included with the camera NP 95 rechargeable battery BC 65N battery charger Lens cap USB cable Owner s Manual this man...

Страница 18: ...ng 24 26 27 11 Focus ring 48 12 Lens 104 13 Front ring 101 14 AF assist illuminator 85 Self timer lamp 45 15 Viewfinder selector 19 16 Microphone R 42 17 ON OFF switch 16 18 Fn Function button 53 19 Battery latch 12 14 20 Memory card slot 13 21 Battery chamber 12 22 Eye sensor 18 23 Command control 5 24 Connector cover 88 89 98 25 Cable channel cover for DC coupler 26 Battery chamber cover latch 1...

Страница 19: ...Indicator Lamp The indicator lamp shows camera status as follows Indicator lamp Indicator lamp Camera status Camera status Glows green Glows green Focus locked Blinks green Blinks green Blur focus or exposure warning Picture can be taken Blinks green and orange Blinks green and orange Recording pictures Additional pictures can be taken Glows orange Glows orange Recording pictures No additional pic...

Страница 20: ...35 r F macro button P34 You can also rotate the command dial to choose a combination of shutter speed and aperture program shift P24 or to adjust shutter speed in increments of 1 3EV P25 27 Control Lock Control Lock To lock the RAW button and prevent the command dial being used as a DRIVE flash white balance or macro button press MENU OK until X is displayed This prevents accidental operation of t...

Страница 21: ...n of shutter speed and aperture in place of the command dial program shift P24 or to adjust aperture in increments of 1 3EV P26 27 You can also press the center of the command dial to zoom in on the focus area selected for manual focus in the electronic viewfinder or LCD monitor or to zoom in on the active focus point during play backor ifCONTINUOUSisselectedforAIMAGEDISP inthesetupmenu P81 imager...

Страница 22: ...Dynamic range 70 7 ND Neutral Density filter indicator 57 8 Internal memory indicator 9 Number of available frames 114 10 Image quality and size 69 70 11 Battery level 16 12 Focus frame 46 50 13 Virtual horizon 72 14 Temperature warning 112 15 Bright frame 16 Distance indicator 48 85 17 Sensitivity 51 18 Aperture 24 26 27 19 Shutter speed 24 25 27 20 Shooting mode 24 25 26 27 21 Histogram 21 22 Ex...

Страница 23: ...4 25 Macro close up mode 34 26 Flash mode 32 27 Depth of field preview 26 28 Focus frame 46 50 a indicates that no memory card is inserted and that pictures will be stored in the camera s internal memory P13 Shooting LCD Monitor F 2000 1 F5 6 000100 P 200 1 Flash mode 32 2 Macro close up mode 34 3 Metering 52 4 Continuous mode 37 5 Silent mode indicator 22 6 ND Neutral Density filter indicator 57 ...

Страница 24: ...2050 1 1000 F4 5 200 10 00 AM 10 00 AM 2 1 3 3 2 3 2F F YouTube 1 Rating 58 2 Red eye removal indicator 75 3 Silent mode indicator 22 4 Gift image 58 5 Frame number 82 6 Playback mode indicator 58 7 Mark for upload to 74 8 Photobook assist indicator 63 9 DPOF print indicator 90 10 Protected image 76 ...

Страница 25: ...eed it to open the strap clips when removing the strap 2 Place the strap clip on an eyelet Hook the strap eyelet in the clip opening Re move the tool using the other hand to keep the clip in place 3 Pass the clip through the eyelet Rotate the clip fully through the eyelet until it clicks closed 4 Attach a protective cover Place a protective cover over the eyelet as shown with the black side of the...

Страница 26: ...nsert the strap Insert the strap through a protective cover and strap clip 6 Fasten the strap Fasten the strap as shown Repeat Steps 5 6 for the second eyelet Q To avoid dropping the camera be sure the strap is correctly secured ...

Страница 27: ... light The Charging Indicator The Charging Indicator The charging indicator shows battery charge sta tus as follows Charging Charging indicator indicator Battery status Battery status Action Action Off Off Battery not Battery not inserted inserted Insert the battery Insert the battery Battery fully Battery fully charged charged Remove the battery Remove the battery On On Battery charging Battery c...

Страница 28: ... opening the battery chamber cover Q Do not open the battery chamber cover when the camera is on Failure to observe this precau tion could damage image files or memory cards Q Do not use excessive force when handling the battery chamber cover 2 Insert the battery Insert the battery as shown inside the battery chamber using the battery to keep the bat tery latch pressed to one side Battery latch Ar...

Страница 29: ... not insert at an angle or use force If the memory card is not correctly inserted or no memory card is inserted a will appear in the display and in ternal memory will be used for recording and playback Q SD SDHC SDXC memo ry cards can be locked making it impossible to format the card or to record or delete images Before inserting a memory card slide the write protect switch to the unlocked positio...

Страница 30: ...he card Q Q Batteries Batteries Remove dirt from the battery terminals with a clean dry cloth Failure to observe this precaution could prevent the battery from charging Do not affix stickers or other objects to the battery Failure to observe this precaution could make it im possible to remove the battery from the camera Do not short the battery terminals The battery could overheat Read the caution...

Страница 31: ... a memory card seek medical assistance immediately miniSD or microSD adapters that are larger or smaller than the standard dimensions of an SD SDHC SDXC card may not eject normally if the card does not eject take the camera to an authorized service repre sentative Do not forcibly remove the card Do not affix labels to memory cards Peeling labels can cause camera malfunction Movie recording may be ...

Страница 32: ...ly press the shutter button halfway or turn the ON OFF switch to OFF and then back to ON R For information on other power saving and startup options see page 23 Q Fingerprints and other marks on the lens or viewfinder can affect pictures or the view through the viewfinder Keep the lens and viewfinder clean Battery Level Battery Level After turning the camera on check the battery level in the displ...

Страница 33: ... step Any steps you skip will be displayed the next time the camera is turned on 2 Set the date and time NO SET 2013 2012 2010 2009 1 1 12 00 AM 2011 YY MM DD DATE TIME NOT SET Press the command dial left or right to highlight the year month day hour or minute and press up or down to change To change the order in which the year month and day are displayed highlight the date format and press the co...

Страница 34: ...utomatic display selection using eye sensor Viewfinder only LCD monitor only Automatic Display Selection Automatic Display Selection In this mode the viewfinder turns on automatically when you put your eye to the view finder and the LCD monitor turns on when you take your eye away note that the eye sensor may respond to objects other than your eye or to light shining directly on the sensor Eye sen...

Страница 35: ...directly with no display lag Subjects are always in focus allowing you to check their expression at any time while a field of view slightly larger than that of the lens makes it easier to locate your subject without removing your eye from the viewfinder The viewfinder window is however at a slight distance from the lens with the result that the display in the viewfinder may differ slightly from th...

Страница 36: ...lay LCD Monitor Shooting Detailed display Standard display F 2000 1 F5 6 000100 P 200 P 2000 F5 6 200 0 1 0 5 1 0 1 5 2 0 3 0 5 0 10m F P 100 2000 F5 6 200 0 1 0 5 1 0 1 5 2 0 3 0 5 0 10m Custom display Custom Display Custom Display Choose items for display using vDISP CUSTOM SETTING in the shooting menu P72 Framing grid Exposure compensation exposure indicator Dynamic range Virtual horizon Meteri...

Страница 37: ... 31 2050 10 00 AM 100 0001 3 2 F Q The optical viewfinder can not be used for playback Histograms Histograms Histograms show the distribution of tones in the im age Brightness is shown by the horizontal axis the number of pixels by the vertical axis Pixel brightness No of pixels Shadows Highlights Optimal exposure Pixels are distrib uted in an even curve through out the tone range Overexposed Pixe...

Страница 38: ...s the command dial right SET SET UP IMAGE DISP FRAME NO SHUTTER VOLUME OPERATION VOL SHUTTER SOUND PLAYBACK VOLUME 1 5 SEC CONT SOUND 1 SOUND 2 SOUND 3 5 Highlight one of the following op tions and press MENU OK i A leaf shutter sound j A focal plane shutter sound k A mirror reflex sound 6 Press DISP BACK to return to shooting mode Silent Mode Silent Mode In situations in which camera sounds or li...

Страница 39: ... the subject R When power saving is in effect shooting informa tion is not displayed until the shutter button is pressed halfway Q Power saving is available only when the optical viewfinder is used H HQUICKSTARTMODE QUICKSTARTMODE To reduce camera startup time select ON for HQUICK START MODE R ON reduces startup time to about 0 7 seconds com pared to about 2 2 seconds when OFF is selected Q The ca...

Страница 40: ...and aperture displays will show P F5 6 200 2000 P 2000 F5 6 200 Optical viewfinder EVF LCD Program Shift Program Shift If desired you can rotate the command dial or press the command con trol left or right to other combinations of shutter speed and aperture without altering exposure program shift Program shift is not avail able when a flash is used AUTO is selected for UDYNAMIC RANGE in the shooti...

Страница 41: ...e correct exposure can not be achieved at the selected shutter speed aperture will be displayed in red when the shutter button is pressed halfway Adjust shutter speed until the correct exposure is achieved Q If the subject is outside the metering range of the camera the aper ture display will show S 200 F5 6 2000 S 2000 F5 6 200 Optical viewfinder EVF LCD R Shutter speed can also be adjusted in in...

Страница 42: ...available when ON is selected for GOVF POWER SAVE MODE is 1 4s P23 A F5 6 200 2000 A 2000 F5 6 200 Optical viewfinder EVF LCD R Aperture can also be adjusted in increments of 1 3EV by pressing the command control left or right Command control Depth of Field Depth of Field The aperture ring can be used to adjust aperture before recording begins Choose a low f numbers to soften background details Th...

Страница 43: ...and command control can be used to adjust shutter speed and aperture by 2 3EV from the selected value in steps of 1 3EV Use the command dial to adjust shutter speed the com mand control to adjust aperture Command dial Command control M F5 6 200 2000 M 2000 F5 6 200 Optical viewfinder EVF LCD R The manual exposure display includes an exposure indicator that shows the amount the picture would be und...

Страница 44: ...and aperture is unavailable shutter speed or aperture will be displayed in red and the desired exposure may not be achieved Aperture Aperture Shutter speed Shutter speed 1 1 4000 4000s s 1 1 2000 2000s s 1 1 1000 1000s or slower s or slower F2 F2 Not available Not available Not available Not available Available Available F2 8 F2 8 F4 F4 Available Available F5 6 F5 6 F8 or above F8 or above Availab...

Страница 45: ...T 1 Rotate the shutter speed dial to T 2 Rotate the command dial to choose a shutter speed between 1 2s and 30s in steps of 1 3EV S 1 F5 6 200 3 Press the shutter button all the way down to take a picture at the select ed shutter speed Bulb B Bulb B 1 Rotate the shutter speed dial to B 2 Press the shutter button all the way down The shutter will remain open for up to 60 minutes while the shut ter ...

Страница 46: ...5 6 200 2000 1 F5 6 000100 P 200 F OVF EVF LCD Choose positive values to increase exposure Choose negative values to reduce exposure Choosing an Exposure CompensationValue Choosing an Exposure CompensationValue Backlit subjects Choose values from 2 3EV to 12 3EV for an explanation of the term EV see the Glossary on page 113 Highly reflective subjects or very bright scenes e g snowfields 1EV Scenes...

Страница 47: ...press the shutter button halfway to focus R If the subject is poorly lit the AF assist illuminator may light P85 Ifthecameraisabletofocus it will beep twice and focus area will glow green Focus and exposure will lock while the shutter button is pressed halfway If the camera is unable to focus the focus frame will turn red and s will be displayed 2 Shoot Smoothly press the shutter button the rest o...

Страница 48: ...nd press MENU OK to select Mode Mode Description Description AUTO AUTO AUTO FLASH AUTO FLASH K K RED EYE REDUCTION RED EYE REDUCTION The flash fires when required Recommended in most situations N N FORCED FLASH FORCED FLASH L L FORCED FLASH FORCED FLASH The flash fires whenever a picture is taken Use for backlit subjects or for natural coloration when shooting in bright light P P SUPPRESSED FLASH ...

Страница 49: ... 800 1600 1600 3200 3200 6400 6400 m m ft ft 2 2 0 5 0 5 18 18 1 6 59 1 6 59 2 2 2 8 2 8 0 5 0 5 13 13 1 6 42 1 6 42 2 2 2 8 2 8 4 4 0 5 0 5 9 0 9 0 1 6 29 1 6 29 2 2 2 8 2 8 4 4 5 6 5 6 0 5 0 5 6 4 6 4 1 6 20 1 6 20 2 2 2 8 2 8 4 4 5 6 5 6 8 8 0 5 0 5 4 5 4 5 1 6 14 1 6 14 2 2 2 8 2 8 4 4 5 6 5 6 8 8 11 11 0 5 0 5 3 2 3 2 1 6 10 1 6 10 2 8 2 8 4 4 5 6 5 6 8 8 11 11 16 16 0 5 0 5 2 3 2 3 1 6 7 5 1...

Страница 50: ...t focus at distances of less than 80cm 2 6ft when the optical viewfinder is used To exit macro mode press the command dial left and select OFF OFF OFF P R The LCD monitor and electronic viewfinder can be used to focus at short ranges when macro mode is not selected but the time needed to focus increases R The shadow cast by the lens may appear in photographs taken with the flash at distances under...

Страница 51: ...k k Selecting this option displays a list of color temperatures P36 highlight a tempera ture and press MENU OK i i For subjects in direct sunlight j j For subjects in the shade Option Option Description Description k k Use under daylight fluorescent lights l l Use under warm white fluorescent lights m m Use under cool white fluorescent lights n n Use under incandescent lighting g g Reduces the blu...

Страница 52: ...lorTemperature ColorTemperature Color temperature is an objective measure of the color of a light source expressed in Kelvin K Light sources with a color temperature close to that of direct sunlight appear white light sources with a lower color tempera ture have a yellow or red cast while those with a higher color temperature are tinged with blue You can match color temperature to the light source...

Страница 53: ...e shutter button the rest of the way down to start shooting Shooting ends when the shutter button is released after ten JPEG or eight RAW pictures have been taken or when memory is full R Focus and exposure are determined by the first frame in each series The flash turns off automati cally the previously selected flash mode is restored when burst shooting is turned off R Frame rate varies with shu...

Страница 54: ...urrent sensitivity P51 and process it to create two additional copies one with sensitivity raised and the other with sensitivity lowered by the selected amount regardless of the amount selected sensitiv ity will not exceed ISO 6400 or fall below ISO 200 FILM FILM SIMULATION SIMULATION BKT BKT Each time the shutter is released the camera takes one shot and processes it to create three copies with d...

Страница 55: ...pan the camera while shooting press the command dial left Press the dial left or right to highlight an angle and press MENU OK 120 120 SWITCH DEGREES OF ANGLE MOTION PANORAMA 120 120 180 3 Press the command dial right to view a choice of pan directions Press the dial it left or right to high light a pan direction and press MENU OK SWITCH DIRECTION FROM LEFT TO RIGHT 4 Press the shutter button all ...

Страница 56: ...e The camera may in some cases record an greater or lesser angle than selected or be unable to stitch the frames together perfectly The last part of the panorama may not be recorded if shooting ends before the panorama is complete Q Shootingmaybeinterruptedifthecameraispanned too quickly or too slowly Panning the camera in a direction other than that shown cancels shooting Q The desired results ma...

Страница 57: ...0 11 1M 180 180 Horizontal Horizontal 7 680 1 440 11 1M 7 680 1 440 11 1M Vertical Vertical 2 160 7 680 16 6M 2 160 7 680 16 6M For Best Results For Best Results For best results prop your elbows against your sides and move the camera slowly in a small circle at a steady speed keeping the camera horizontal and being careful only to pan in the direction shown by the guides Use a tripod for best res...

Страница 58: ...au tomatically switch to the electronic viewfinder 2 Press the shutter button all the way down to start recording 3 Press the shutter button all the way down again to end recording Re cording ends automatically after ten minutes or when memory is full R Focus exposure and white balance are adjusted automatically throughout recording The color and brightness of the image may vary from those dis pla...

Страница 59: ...ilm simulation P54 and exposure compensation P30 and select a focus mode P48 R To increase zoom by 3 for a focal length equivalent to 105mm 35mm format press the k button before recording begins Press n to cancel zoom Q Continuous AF is used when AF S is selected for focus mode Q Aperture control and manual focus are not available during recording ...

Страница 60: ...options and press MENU OK to select Option Option Description Description S S 10 SEC 10 SEC The shutter is released ten seconds after the shutter button is pressed Use for photographs in which you wish to appear yourself R R 2 SEC 2 SEC The shutter is released two seconds after the shutter button is pressed Use to reduce blur caused by the camera moving when the shutter button is pressed OFF OFF S...

Страница 61: ...nds remaining until the shutter is released To stop the timer before the picture is taken press DISP BACK 99 The self timer lamp on the front of the camera will blink immediately before the picture is taken If the two second timer is selected the self timer lamp will blink as the timer counts down R The self timer turns off automatically when the camera is turned off ...

Страница 62: ...he AFL AEL button focus and or exposure will remain locked even if the shutter button is pressed Choose AE LOCK ONLY to lock exposure but not focus AF LOCK ONLY to lock focus but not exposure or AE AFLOCK to lock both focus and exposure In manual focus mode P48 the camera will focus automatically with the AFL AEL button 2 Recompose Keep the shutter button pressed halfway or keep the AFL AEL button...

Страница 63: ...h a window or other reflective object Dark subjects and subjects that absorb rather than reflect light such as hair or fur Insubstantial subjects such as smoke or flame Subjects that show little contrast with the background for example subjects in clothing that is the same color as the background Subjects positioned in front of or behind a high contrast object that is also in the focus frame for e...

Страница 64: ... other words the distance in front of and behind the focus point that appears to be in focus you can also check focus visually in the electronic viewfinder or LCD monitor Choose for manualcontroloffocusorinsituationsinwhichthecameraisunabletofocususingautofocus P47 Reduce focus distance Increase focus distance 0 1 0 5 1 0 1 5 2 0 3 0 5 0 10m M 2000 F5 6 200 Manual focus mode icon Manual focus indi...

Страница 65: ...u P85 pressing the center of the command control magnifies the view in the electronic viewfinder or LCD monitor for precise focus To scroll to other areas of the frame press the AF button and rotate the com mand dial 0 1 0 5 1 0 1 5 2 0 3 0 5 0 10m M 2000 F5 6 200 0 1 0 5 1 0 1 5 2 0 3 0 5 0 10m M 2000 F5 6 200 ...

Страница 66: ...ial the focus frame can be returned to the center by pressing MENU OK Q When you switch to the optical viewfinder the camera will select the focus frame closest to that selected in the electronic viewfinder or LCD monitor 2000 F5 6 200 Focus frame Focus point OVF EVF LCD When framing pictures in the electronic viewfinder or LCD moni tor you can choose the size of the focus frame for AF S by press ...

Страница 67: ... displayed by pressing the Fn button SET EXIT P F 3 2 200 OFF SHOOTING MENU DYNAMIC RANGE ISO SELF TIMER FILM SIMULATION IMAGE SIZE IMAGE QUALITY 2 Press the command dial up or down to highlight the desired option and press MENU OK to select P 2000 F5 6 200 SET SHOOTING MENU P F 3 2 ISO 200 OFF 320 400 500 250 200 L 100 R Sensitivity is not reset when the camera is turned off R Sensitivities of L ...

Страница 68: ...in most situations p p SPOT SPOT The camera meters lighting conditions in an area at the center of the frame equivalent to 2 of the total Recommended when the back ground is much brighter or darker than the main subject due to paral lax not recommended when pictures are framed in the optical view finder q q AVERAGE AVERAGE Exposure is set to the average for the entire frame Provides consistent exp...

Страница 69: ...nthesetupmenu P83 Theoptionsavailableinclude depth of field preview P26 the self timer P44 sensitivity P51 image size P69 image quality P70 dynamic range P70 film simulation P54 ND filter P57 AF mode P71 movie recording P42 and custom settings P55 R The FFn BUTTON menu can also be displayed by pressing and holding the Fn button ...

Страница 70: ...o a wide range of subjects from portraits to landscapes Velvia VIVD Velvia VIVD A high contrast palette of saturated colors suited to nature photos ASTIA SOFT ASTIA SOFT A soft toned palette of less saturated colors MONOCHROME MONOCHROME Take pictures in standard black and white e e MONOCHROME YeFILTER MONOCHROME YeFILTER Take black and white pictures with slightly increased contrast This setting ...

Страница 71: ... CUSTOM SETTING SELECT CUSTOM SETTING 2 Highlight a custom settings bank and press MENU OK to select Adjust the following as desired and press DISP BACK when adjustments are complete NISO UDYNAMIC RANGE PFILM SIMULATION DWHITE BALANCE fCOLOR rHIGHLIGHT TONE sSHADOW TONE HSHARPNESS and hNOISE REDUCTION FILM SIMULATION WHITE BALANCE ISO DYNAMIC RANGE 200 AUTO MID EXIT CUSTOM 1 COLOR SAVE CURRENT SET...

Страница 72: ...y selects FINE Taking a picture or pressing the RAW button again restores the previous setting R RAW images record raw unprocessed data from the camera image sensor JPEG copies of RAW images can be created using the jRAW CONVERSION option in the playback menu or RAW images can be viewed on a computer using the RAW File Converter application that is installed with the software on the supplied CD P9...

Страница 73: ...y lit subjects making it possible to blur motion or soften background details without risk of overexposure 1 Press MENU OK in shooting mode to display the shooting menu Press the command dial up or down to highlight tND FILTER and press MENU OK SET SHOOTING MENU P COLOR HIGHLIGHT TONE SHADOW TONE STD STD MID WB SHIFT ND FILTER OFF EXIT STD SHARPNESS 2 Press the command dial up or down to highlight...

Страница 74: ...e R Pictures taken using other cameras are indicated by a m gift image icon during playback Favorites Rating Pictures Favorites Rating Pictures To rate the current picture press DISP BACK and press the command dial up and down to select from zero to five stars Deleting Pictures Deleting Pictures To delete the current picture press the command dial up b The following dia log will be displayed ERASE...

Страница 75: ...e Focus Point Press the center of the com mand control to zoom in on the focus point Press the center of the command control again to return to full frame playback PlaybackZoom PlaybackZoom Press k to zoom in on the current picture n to zoom out When the picture is zoomed in the command dial can be used to view areas of the image not currently visible in the display Press DISP BACK or MENU OK to e...

Страница 76: ...ress n when a picture is displayed full frame Press n to view more images 100 0001 100 0001 Press k to view fewer images Use the command dial to highlight images and press MENU OK to view the highlighted image full frame In the nine and hundred frame displays press the command dial up or down to view more pictures ...

Страница 77: ...one frame at a time End playback End playback Press the command dial up to end playback Adjust speed Adjust speed Press the command dial left or right to adjust playback speed during playback Speed is shown by the number of arrows M or N Adjust volume Adjust volume PressMENU OK to pause playback and display volume controls Press the command dial up or down to adjust the volume press MENU OK again ...

Страница 78: ...earch by rating BYTYPE OF DATA Find all still pictures all movies all pictures taken in burst mode or all RAW pictures BY UPLOAD MARK Find all pictures selected for upload to a specified destination 3 Select a search condition Only pictures that match the search condition will be displayed To delete or protect selected pictures or to view the selected pictures in a slide show press MENU OK and cho...

Страница 79: ...or photobooks 2 Scroll through the images and press the com mand dial up to select or deselect To display the current image on the cover press the command dial down Press MENU OK to exit when the book is complete R The first picture selected becomes the cover im age Press the command dial down to select a different image for the cover 3 Select COMPLETE PHOTOBOOK to select all photos or all photos ...

Страница 80: ...the pictures EditingandDeletingPhotobooks EditingandDeletingPhotobooks Display the photobook and press MENU OK The following options will be displayed select the desired option and follow the on screen instruc tions EDIT Edit the book as described in Creating a PhotoBook P63 ERASE Delete the book Photobooks Photobooks Photobooks can be copied to a computer using the supplied MyFinePix Studio softw...

Страница 81: ... full frame the camera will play back the picture from left to right or from bottom to top Press the command dial down to pause and resume playback or press the dial up to return to full frame playback To rewind or advance one frame at a time press the command dial left or right while playback is paused PLAY STOP PAUSE ...

Страница 82: ... picture in the burst similarly pressing the dial left when the first picture is displayed displays the last picture R Deletion P58 rotation P77 protect P76 and copy P78 operations applied during burst mode playback apply only to the current picture In contrast if these operations are performed when a picture taken in continuous shooting mode is displayed in single frame playback all images in the...

Страница 83: ...ght through pictures and press MENU OK to delete the current picture a con firmation dialog is not displayed SELECTED FRAMES SELECTED FRAMES Highlight pictures and press MENU OK to select or deselect pictures that in a photobook or print order are shown by S When the operation is complete press DISP BACK to display a confirmation dialog then high light OK and press MENU OK ALL FRAMES ALL FRAMES A ...

Страница 84: ...lect and return to the settings list Repeat this step to adjust additional settings 3 Press the RAW button to preview the JPEG copy Press MENU OK to save the copy or press DISP BACK to return to Step 2 Setting Setting Description Description REFLECT SHOOTING COND Create a JPEG copy using the settings in ef fect at the time the photo was taken PUSH PULL PROCESSING Adjust exposure by 1EV to 3EV in i...

Страница 85: ...aults to defaults to 200 200 Control the camera s sensitivity to light P51 O OIMAGE SIZE IMAGE SIZE defaults to defaults to O O3 2 3 2 Choose the size and aspect ratio at which still pictures are recorded Aspect Ratio Aspect Ratio Pictures with an aspect ratio of 3 2 have the same proportions as a frame of 35mm film while Pictures with an aspect ratio of 3 2 have the same proportions as a frame of...

Страница 86: ... both sunlight and deep shade for such high contrast subjects as sunlight on water brightly lit autumn leaves and portraits taken against a blue sky and for white objects or people wearing white note however that mottling may appear in pictures taken at higher values R If AUTO is selected shutter speed and aperture will be displayed when the shutter button is pressed halfway R R B B200 is availabl...

Страница 87: ...t subjects and selects the focus area automatically tAREA Choose the focus area manually P50 I IFLASH FLASH defaults to defaults to 0 0 Adjust flash brightness Choose from values between 2 3EV and 2 3EV Note that the desired results may not be achieved depending on shooting conditions and the distance to the subject g gEXTERNAL FLASH EXTERNAL FLASH defaults to defaults to OFF OFF Choose ON when us...

Страница 88: ...peed aperture and sensitivity exposure compensation exposure indicator metering flash mode white balance film simulation dynamic range number of exposures remaining image size and quality and battery level See pages 6 7 for the locations of these items in the displays 1 Highlight OVF or EVF LCD and press MENU OK 2 Press the command dial up or down to highlight items and press MENU OK to select or ...

Страница 89: ...ht an option and press MENU OK Press DISP BACK to exit when settings are complete SET EXIT ERASE IMAGE SEARCH SLIDE SHOW MARK FOR UPLOAD TO RAW CONVERSION PHOTOBOOK ASSIST PLAYBACK MENU PlaybackMenuOptions PlaybackMenuOptions m mPHOTOBOOK ASSIT PHOTOBOOK ASSIT Create books from your favorite photos P63 t tIMAGE SEARCH IMAGE SEARCH Search for pictures P62 A AERASE ERASE Delete all or selected pictu...

Страница 90: ...dicators R Choose RESET ALL to deselect all pictures If the number of pictures affected is very large a message will be displayed while the operation is in progress Press DISP BACK to exit before the operation is complete Uploading Pictures Windows Only Uploading Pictures Windows Only Selected pictures can be uploaded using the Selected pictures can be uploaded using the YouTube Facebook Upload Yo...

Страница 91: ...lide show is in progress j jRAW CONVERSION RAW CONVERSION Create JPEG copies of RAW pictures P68 B BRED EYE REMOVAL RED EYE REMOVAL Remove red eye from portraits The camera will analyze the image if red eye is detected the image will be processed to create a copy with reduced red eye 1 Display the desired picture 2 Select BRED EYE REMOVAL in the playback menu 3 Press MENU OK R Red eye may not be r...

Страница 92: ...res will be deleted when the memory card or internal memory is formatted P81 G GCROP CROP Create a cropped copy of the current picture 1 Display the desired picture 2 Select GCROP in the playback menu 3 Use the k and n buttons to zoom in and out and press the command dial up down left or right to scroll the picture until the desired portion is displayed 4 Press MENU OK to display a confirmation di...

Страница 93: ...TATE Rotate pictures 1 Display the desired picture 2 Select CIMAGE ROTATE in the playback menu 3 Press the command dial down to rotate the picture 90 clockwise up to rotate it 90 counterclockwise 4 Press MENU OK The picture automatically be displayed in the selected orientation whenever it is played back on the camera R Protected pictures can not be rotated Remove protection before rotating pictur...

Страница 94: ...to view pictures and press MENU OK to copy the current picture ALL FRAMES Copy all pictures R Copying ends when the destination is full R DPOF print information is not copied P91 K KPRINT ORDER DPOF PRINT ORDER DPOF Select pictures for printing on DPOF and PictBridge compatible devices P90 91 J JDISP ASPECT DISP ASPECT Choose how High Definition HD devices display pictures with an aspect ratio of ...

Страница 95: ...the tab for the current menu 1 3 Press the command dial down to highlight X SET OFF SET UP DATE TIME TIME DIFFERENCE ENGLISH SILENT MODE RESET FORMAT EXIT Tab 1 4 Press the command dial right to place the cursor in the setup menu 2 Adjust settings Highlight items and press the command dial right to view options then highlight an option and press MENU OK Press DISP BACK to exit when settings are co...

Страница 96: ...zone Press MENU OK when settings are complete To set the camera clock to local time highlight g LOCAL and press MENU OK To set the clock to the time in your home time zone select h HOME If g LOCAL is selected g will be displayed for three seconds when the camera is turned on L La a Choose a language P17 o oSILENT MODE SILENT MODE defaults to defaults to OFF OFF Select ON to disable the speaker fla...

Страница 97: ...efaults to 1 5SEC 1 5SEC Choose how long images are displayed after shooting Colors may differ slightly from those in the final image and noise mot tling may be visible at high sensitivities Option Option Description Description CONTINUOUS CONTINUOUS Pictures are displayed until the MENU OK button is pressed or the shutter button is pressed halfway To zoom in on the active focus point press the ce...

Страница 98: ...ith duplicate file names RENEW RENEW Numbering is reset to 0001 after formatting or when a new memory card is inserted R If the frame number reaches 999 9999 the shutter release will be disabled P111 R Selecting RRESET P80 sets BFRAME NO to CONTINUOUS but does not reset the file number R Frame numbers for pictures taken with other cameras may differ G GOPERATION VOL OPERATION VOL defaults to defau...

Страница 99: ...off manually Note that in some situations the camera turns off automatically even when OFF is selected G GOVF POWER SAVE MODE OVF POWER SAVE MODE defaults to defaults to OFF OFF Select ON to reduce the drain on the battery roughly doubling the number of pictures that can be taken on a single charge P23 H HQUICK START MODE QUICK START MODE defaults to defaults to OFF OFF Select ON to reduce the tim...

Страница 100: ...nt settings ON ON MAX SENSITIVITY MAX SENSITIVITY Choose the upper limit for auto sensitivity from ISO 400 800 1600 and 3200 the lower limit is fixed at ISO 200 800 800 MIN SHUTTER SPEED MIN SHUTTER SPEED When the shutter speed dial is rotated to A and ISO AUTO CONTROL is ON the camera will adjust sensitivity only as required to prevent shutter speed from being slower than this value 1 60 SEC 1 60...

Страница 101: ...ill lock while the AFL AEL button is pressed If AE AF ON OFF SWITCH is selected exposure and or focus will lock while the AFL AEL button is pressed and remain locked until the button is pressed again v vAE AF LOCK BUTTON AE AF LOCK BUTTON defaults to defaults to AE LOCK ONLY AE LOCK ONLY Choose the role played by the AFL AEL button P46 j jFOCUS CHECK FOCUS CHECK defaults to defaults to ON ON If ON...

Страница 102: ... four grid Frame HD pictures in the crop shown by the lines at the top and bottom of the display J JCOLOR SPACE COLOR SPACE defaults to defaults to sRGB sRGB Choose the gamut of colors available for color reproduction Option Option Description Description sRGB sRGB Recommended in most situations Adobe RGB Adobe RGB For commercial printing K KLONG EXPOSURE NR LONG EXPOSURE NR defaults to defaults t...

Страница 103: ...DANCE DISPLAY GUIDANCE DISPLAY defaults to defaults to ON ON Choose whether to display tool tips G GCORRECTED AF FRAME CORRECTED AF FRAME defaults to defaults to OFF OFF If ON is selected a second focus frame for focus distances of about 80cm 2 6ft will be added to the display in the optical view finder The focus frame for the current focus distance is displayed in green when the shutter button is...

Страница 104: ...onnector R Be sure the connectors are fully inserted 3 Tune the television to the HDMI input channel See the documentation supplied with the televi sion for details 4 Turn the camera on and press a button The camera monitor turns off and pictures and movies are played back on the TV Note that the camera volume controls have no effect on sounds played on the TV use the television volume controls to...

Страница 105: ...the camera on and press a button tUSB will be displayed in the monitor fol lowed by the PictBridge display shown below at right USB 00 OK SET FRAME SHEETS PICTBRIDGE TOTAL 00000 PrintingSelectedPictures PrintingSelectedPictures 1 Press the command dial left or right to display a picture you wish to print R To print one copy of the current picture pro ceed directly to Step 3 2 Press the command dia...

Страница 106: ...select PRINT WITHOUT DATE To ensure that the date is correct set the camera clock before taking pictures Some printers do not support date printing See the printer manual for details PrintingtheDPOFPrintOrder PrintingtheDPOFPrintOrder To print the print order created with KPRINT ORDER DPOF in the playback menu P91 1 In the PictBridge display press DISP BACK to open the PictBridge menu 2 Press the ...

Страница 107: ...a Confirm that the above message is not displayed and turn the camera off Disconnect the USB cable CreatingaDPOFPrintOrder CreatingaDPOFPrintOrder The KPRINT ORDER DPOF option in the play back menu can be used to create a digital print order for PictBridge compatible printers or de vices that support DPOF DPOF DPOF DPOF Digital Print Order Format is stan dard that allows pictures to be printed fro...

Страница 108: ...o display a picture you wish to in clude in or remove from the print order 2 Press the command dial up or down to choose the number of copies up to 99 To remove a picture from the order press the command dial down until the number of copies is 0 SHEETS DPOF 00001 01 PRINT ORDER DPOF SET FRAME Total number of prints Number of copies 3 Repeat steps 1 2 to complete the print order Press MENU OK to sa...

Страница 109: ...order R Remove the memory card to create or modify a print order for the pictures in internal memory R Print orders can contain a maximum of 999 pictures R If a memory card is inserted containing a print order cre ated by another camera the message shown at right will be displayed Pressing MENU OK cancels the print order a new print order must be created as described above RESET DPOF OK CANCEL YES...

Страница 110: ... or better 2 2 RAM RAM 1GB or more 1GB or more 512MB or more 512MB or more 1 1GB or more GB or more 2 2 Free disk space Free disk space 15GB or more 15GB or more 2GB or more 2GB or more Video Video 1024 768 pixels or more with 24 bit color or better A graphics processing unit GPU that supports DirectX 7 or later Other Other Built in USB port recommended Operation is not guaranteed with other USB p...

Страница 111: ...NVERTER If the Installer Does Not Start Automatically If the Installer Does Not Start Automatically If the installer does not start automatically select Computer or My Computer from the Start menu then double click the FINEPIX CD icon to open the FINEPIX CD window and double click setup or SETUP EXE 4 If prompted to install Windows Media Player DirectX or NET Framework follow the on screen instruc...

Страница 112: ...Recommended when displaying HD movies 2 After starting the computer and quitting any applications that may be running insert the installer CD in a CD ROM drive and double click Installer for Mac OS X 3 An installer dialog will be displayed click Installing FinePixViewer to start installation Enter an administrator name and password when prompted and click OK then follow the on screen in structions...

Страница 113: ...hen a camera is connected open menu then select FPVBridge in the Applications FinePixViewer folder and click Open Quit Image Capture Mac OS X 10 6 Connect the camera and turn it on Open the Applications folder and start Image Capture The camera will be listed under DEVICES select the camera and choose FPVBridge from the Connecting this camera opens menu and click Choose Quit Image Capture Installa...

Страница 114: ...ttery before connecting the camera 2 Turn the camera off and connect the supplied USB cable as shown making sure the connectors are fully inserted Con nect the camera directly to the computer do not use a USB hub or keyboard 3 Turn the camera on MyFinePix Studio or FinePixViewer will start automatically follow the on screen instructions to copy pictures to the computer To exit without copying pict...

Страница 115: ...pictures saved to a network server using the supplied software in the same way as on a standalone computer Q The user bears all applicable fees charged by the phone company or Internet service provider when using services that require an Internet connection Disconnecting the Camera Disconnecting the Camera After confirming that the indicator lamp is out turn the camera off and disconnect the USB c...

Страница 116: ...rs can be purchased as required The BC 65N charg es an NP 95 battery in about 210 minutes at 20 C 68 F Flash units Flash units Shoe Mount Flash EF 20 This clip on flash unit powered by two AA batteries has a Guide Number of 20 66 ISO 100 m ft and supports TTL flash control The flash head can be rotated upwards 90 for bounce lighting Shoe Mount Flash EF 42 This clip on flash unit powered by four AA...

Страница 117: ...od as shown R Keep the front ring and lens cap in a safe place when not in use R Attach the adapter ring before attaching filters from third party suppliers Lens hoods Lens hoods LH X100 This aluminum lens hood exclusively for use with the X100 comes with an AR X100 adapter ring made of the same material The adapter ring is required when attach ing the hood Adapter rings Adapter rings AR X100 An a...

Страница 118: ...rom third party suppliers USB cable supplied SD card slot or card reader Computer Computer Related Computer Related Printing Printing Printer PictBridge compatible printer USB cable supplied FINEPIX X100 Audio Visual Audio Visual Flash Photography Flash Photography EF 20 shoe mount flash EF 42 shoe mount flash SD SDHC SDXC memory card HDTV HDMI cable ...

Страница 119: ...camera If this occurs turn the camera off and wait an hour be fore turning it on again If condensation forms on the memory card remove the card and wait for the condensation to dissipate If the camera will not be used for an extended pe riod remove the battery and memory card Do not store or use the camera in locations that are exposed to rain steam or smoke very humid or extremely dusty exposed t...

Страница 120: ...aning paper to which a small amount of lens cleaning fluid has been applied Care should be taken to avoid scratching the lens or monitor The camera body can be cleaned with a soft dry cloth Do not use alcohol thinner or other volatile chemicals which can discolor the leather on the camera body Traveling Traveling Keep the camera in your carry on baggage Checked baggage may suffer violent shocks th...

Страница 121: ...attery has been charged many times The battery has reached the end of its charging life Purchase a new The battery has reached the end of its charging life Purchase a new battery battery The camera turns off The camera turns off suddenly suddenly The battery is exhausted The battery is exhausted Charge the battery Charge the battery P P11 or insert a fully charged spare battery 11 or insert a full...

Страница 122: ...down which may result in noticeable mottling when images are previewed in the displays Images taken with the camera are unaffected in noticeable mottling when images are previewed in the displays Images taken with the camera are unaffected The display goes dark after The display goes dark after shooting shooting The display may darken while the flash charges Wait for the flash to charge The display ma...

Страница 123: ... temperature warning is displayed Turn the cam Turn the cam era off and wait for it to cool down era off and wait for it to cool down Playback Problem Problem Solution Solution Pictures are grainy Pictures are grainy The pictures were taken with a different make or model of camera The pictures were taken with a different make or model of camera Playback zoom is unavail Playback zoom is unavail able ab...

Страница 124: ...ter Use the bundled software to transfer pictures Use the bundled software to transfer pictures P P94 Pictures can not be Pictures can not be printed printed The camera is not properly connected The camera is not properly connected Connect the camera correctly Connect the camera correctly P P89 The printer is off The printer is off Turn the printer on Turn the printer on Only one copy is printed O...

Страница 125: ...e subject is dark use the The subject is too bright or too dark and the picture will be over or under exposed If the subject is dark use the flash flash P P32 32 FOCUS ERROR FOCUS ERROR Camera malfunction Turn the camera off and then on again If the message persists contact a FUJIFILM dealer Camera malfunction Turn the camera off and then on again If the message persists contact a FUJIFILM dealer TURN...

Страница 126: ... IS FULL INSERT A NEW CARD INSERT A NEW CARD NO CARD NO CARD No memory card inserted when No memory card inserted when E ECOPY COPY is selected Insert a memory card is selected Insert a memory card WRITE ERROR WRITE ERROR Memorycarderrororconnectionerror Memorycarderrororconnectionerror Reinsert the card or turn the camera off and then on again If the message Reinsert the card or turn the camera off...

Страница 127: ...r rotate to a protected picture Remove protection and try again P P76 76 PRESS AND HOLD PRESS AND HOLD THE DISP BUTTONTO THE DISP BUTTONTO DEACTIVATE SILENT MODE DEACTIVATE SILENT MODE An attempt was made to adjust the volume with the camera in silent mode Exit silent mode before adjusting An attempt was made to adjust the volume with the camera in silent mode Exit silent mode before adjusting the...

Страница 128: ...ck on turn the printer off and then turn it back on PRINTER ERROR PRINTER ERROR RESUME RESUME Printer out of paper or ink or other printer error Check printer see printer manual for details If printing does not Printer out of paper or ink or other printer error Check printer see printer manual for details If printing does not resume automatically press resume automatically press MENU OK MENU OK to ...

Страница 129: ...es for optimal color reproduction during printing HDMI High Definition Multimedia Interface An interface standard for the transmission of images and sound that adds audio input to the DVI interface used to connect computers to displays JPEG Joint Photographic Experts Group A compressed file format for color images The higher the compression rate the greater the loss of information and more noticea...

Страница 130: ... O3 2 3 2 4 4 7 7 820 820 1300 1300 1640 1640 2620 2620 O O16 9 16 9 5 5 8 8 960 960 1530 1530 1940 1940 3070 3070 P P3 2 3 2 7 7 14 14 1260 1260 2470 2470 2530 2530 4970 4970 P P16 9 16 9 8 8 16 16 1490 1490 2950 2950 2990 2990 5920 5920 Q Q3 2 3 2 14 14 28 28 2470 2470 4760 4760 4970 4970 9570 9570 Q Q16 9 16 9 21 21 32 32 3750 3750 5630 5630 7540 7540 11310 11310 Motion Motion panorama panorama...

Страница 131: ...1 080 1 920 1 080 Motion panorama 180 Motion panorama 180 2 160 7 680 2 160 7 680 Vertical Vertical 7 680 1 440 7 680 1 440 Horizontal Horizontal Motion panorama 120 Motion panorama 120 2 160 5 120 2 160 5 120 Vertical Vertical 5 120 1 440 5 120 1 440 Horizontal Horizontal Lens Lens FUJINON fixed focal length lens FUJINON fixed focal length lens Focal length Focal length f 23mm f 23mm 35mm format eq...

Страница 132: ... red eye removal off red eye removal off auto with red eye removal fill flash with red eye removal off slow auto with red eye removal fill flash with red eye removal off slow sync with red eye removal sync with red eye removal red eye removal on red eye removal on Hybrid viewfinder Hybrid viewfinder Optical viewfinder Optical viewfinder Reverse Galilean viewfinder with electronic bright frame display and...

Страница 133: ... card Note Note Number of shots that can be taken with battery varies with battery charge level and will decline at low Number of shots that can be taken with battery varies with battery charge level and will decline at low temperatures temperatures Camera size Camera size W H D W H D 126 5mm 74 4mm 53 9 31 0 126 5mm 74 4mm 53 9 31 0 mm 5 0in 2 9in 2 1 1 2 mm 5 0in 2 9in 2 1 1 2 in in Excluding pr...

Страница 134: ...city 15VA 15VA Rated output Rated output 4 2V DC 650mA 4 2V DC 650mA Supported batteries Supported batteries NP 95 rechargeable batteries NP 95 rechargeable batteries Charging time Charging time Approx 210 minutes 20 C 68 F Approx 210 minutes 20 C 68 F Operating temperature Operating temperature 0 C to 40 C 32 F to 104 F 0 C to 40 C 32 F to 104 F Dimensions Dimensions W H D W H D 65mm 25 3mm 80mm ...

Страница 135: ...D monitor are manufactured using advanced high precision technol ogy small bright points and anomalous colors may appear particularly in the vicinity of text This is normal for this type of LCD display and does not indicate a malfunction images recorded with the camera are unaffected Digital cameras may malfunction when exposed to strong radio interference e g electric fields static electricity or...

Страница 136: ...fps 5fps 3fps 3fps Bracketing Bracketing O O W W X X Y Y Metering Metering o o 2 2 2 2 p p q q Focus Mode Focus Mode AF C AF C AF S AF S 3 3 MF MF Exposure Compensation Exposure Compensation Option Option P P S S A A M M r r F F B B SELF TIMER SELF TIMER N N ISO ISO H 12800 H 12800 6400 6400 5000 5000 4000 4000 3200 3200 2500 2500 2000 2000 1600 1600 800 800 640 640 500 500 400 400 200 200 L 100 L...

Страница 137: ...RNAL FLASH u u SELECT CUSTOM SETTING SELECT CUSTOM SETTING K K EDIT SAVE CUSTOM SETTING EDIT SAVE CUSTOM SETTING Option Option P P S S A A M M r r F F v v DISP CUSTOM DISP CUSTOM SETTING SETTING FRAMING FRAMING GUIDLINE GUIDLINE ELECTRONIC ELECTRONIC LEVEL LEVEL AF DISTANCE AF DISTANCE INDICATOR INDICATOR HISTOGRAM HISTOGRAM APERTURE APERTURE S SPEED ISO S SPEED ISO EXP EXP COMPENSATION COMPENSATI...

Страница 138: ...EED SPEED B B RED EYE REMOVAL RED EYE REMOVAL C CAF ILLUMINATOR AF ILLUMINATOR j j FOCUS CHECK FOCUS CHECK I I FOCUS RING FOCUS RING J J COLOR SPACE COLOR SPACE 6 6 K K LONG EXPOSURE NR LONG EXPOSURE NR 1 Fixed at OFF 2 Fixed at o multi 3 Continuous AF is used when AF S is selected for focus mode 4 Fixed at Q 5 Center focus area selected automatically 6 Automatically optimized for selected shootin...

Страница 139: ...123 Memo Memo ...

Страница 140: ...7 3 AKASAKA 9 CHOME MINATO KU TOKYO 107 0052 JAPAN http www fujifilm com products digital_cameras index html ...

Отзывы: