background image

8

 First  Steps

Inserting the Battery and a Memory Card


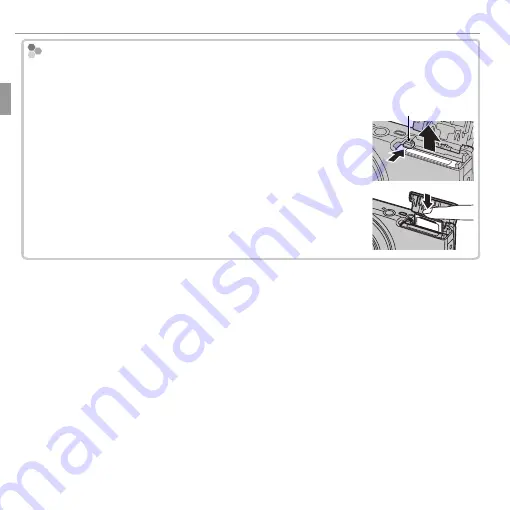
  Removing the Battery and Memory Card

  Removing the Battery and Memory Card

Before removing the battery or memory card, 

turn the camera off

 and open the 

battery-chamber cover.

To remove the battery, press the battery latch to the side, and 
slide the battery out of the camera as shown.

Battery latch

To remove the memory card, press it in and release it slowly.  
The card can then be removed by hand.  When a memory card 
is removed, the card could come out of the slot too quickly. Use 
your finger to hold it and gently release the card.

Содержание FINEPIX JZ700 Series

Страница 1: ...you have read and un derstood its contents and the warnings in For Your Safety Pii before using the camera For information on related products visit our website at http www fujifilm com products digital_cameras index html EN BeforeYou Begin First Steps Basic Photography and Playback More on Photography More on Playback Movies Connections Menus Technical Notes Troubleshooting Appendix BL02701 102 ...

Страница 2: ...ion cords as this can result in a risk of fire or electric shock Ventilation Slots and openings in the cabinet are provided for ventilation to ensure reliable operation of the video product and to pro tect it from overheating and these openings must not be blocked or covered The open ings should never be blocked by placing the video product on a bed sofa rug or other similar surface This video pro...

Страница 3: ...the video product Lightning For added protection for this video product receiver during a lightning storm or when it is left unattended and unused for long periods of time unplug it from the wall outlet and disconnect the antenna or cable system This will prevent damage to the video product due to lightning and power line surges Service Service Servicing Do not attempt to service this video produc...

Страница 4: ...mera in the bathroom or shower This can cause a fire or electric shock Donot disassemble Never attempt to change or take apart the camera never open the case Failure to observe this precaution can cause fire or electric shock Donottouch internalparts Should the case break open as the result of a fall or other accident do not touch the exposed parts Failure to observe this precau tion could result ...

Страница 5: ...over or fall and cause injury Do not move the camera while the AC power adapter is still connect ed Do not pull on the connection cord to disconnect the AC power adapter This can damage the power cord or cables and cause a fire or electric shock Do not use the AC power adapter when the plug is damaged or the plug socket connection is loose This could cause a fire or electric shock CAUTION CAUTION ...

Страница 6: ...fter charging or use This is normal Battery Life At normal temperatures the battery can be recharged about 300 times A noticeable de crease in the length of time the battery will hold a charge indicates that it has reached the end of its service life and should be re placed Storage Performance may be impaired if the battery is left unused for extended periods when fully charged Run the battery fla...

Страница 7: ...ry charger sold separately Q CAUTION Do not use the discharge option with alkaline batteries The camera draws a small amount of current even when off Ni MH batteries that have been left in the camera for an extended pe riod may be drawn down to the point that they no longer hold a charge Battery perfor mance may also drop if the batteries are run down in a device such as a flashlight Use the disch...

Страница 8: ...ghly with water Drink large quantities of water and induce vomiting then seek medical assistance Although the display is manufactured using extremely high precision technology it may contain pixels that are always lit or that do not light This is not a malfunction and images re corded with the product are unaffected TrademarkInformation TrademarkInformation xD Picture Card and E are trademarks of ...

Страница 9: ... the answer here WarningMessagesandDisplays WarningMessagesandDisplays P P91 91 Find out what s behind that flashing icon or error message in the display Memory Cards Memory Cards Pictures can be stored in an optional SD SDHC and SDXC memory cards P9 re ferred to in this manual as memory cards TemperatureWarning TemperatureWarning The camera will turn off automatically before its temperature or th...

Страница 10: ...tion op tions Frequently Used Buttons Frequently Used Buttons Taking Pictures During Playback Taking Pictures During Playback y To return instantly to shooting mode press the shutter button halfway View Shoot Turning the Camera on in Playback Mode Turning the Camera on in Playback Mode y When the camera is off playback can be started by pressing the a button for about a second ...

Страница 11: ...3 Playback Mode 13 Basic Setup 15 Basic Photography and Playback Basic Photography and Playback Taking Pictures in Q Scene Recognition Mode 16 Viewing Pictures 19 More on Photography More on Photography Shooting Mode 20 Choosing a Shooting Mode 20 Shooting Mode Options 21 j PRO LOW LIGHT 23 k HDR 24 aADVANCED FILTER 25 r MOTION PANORAMA 360 26 i INDIVID SHUTTER 3D 28 Focus Lock 30 F Macro Mode Clo...

Страница 12: ... Computer 52 Windows Installing MyFinePix Studio 52 Connecting the Camera 54 Importing pictures or movies to Mac Macintosh 56 Menus Menus Using the Menus Shooting Mode 57 Using the Shooting Menu 57 Shooting Menu Options 58 ASHOOTING MODE 58 d EXP COMPENSATION 58 N ISO 59 O IMAGE SIZE 60 T IMAGE QUALITY 61 PFINEPIX COLOR 61 DWHITE BALANCE 62 RCONTINUOUS 62 b FACE DETECTION 63 FAF MODE 63 F MOVIE AF...

Страница 13: ...T 73 The Setup Menu 74 Using the Setup Menu 74 Setup Menu Options 75 F DATE TIME 75 NTIME DIFFERENCE 75 L a 75 o SILENT MODE 75 R RESET 76 KFORMAT 76 A IMAGE DISP 76 B FRAME NO 77 G OPERATIONVOL 77 H SHUTTERVOLUME 77 e SHUTTER SOUND 78 I PLAYBACKVOLUME 78 JLCD BRIGHTNESS 78 ELCD MODE 78 MAUTO POWER OFF 78 LDUAL IS MODE 78 BRED EYE REMOVAL 79 mBLINK DETECTION 79 R INTELLIGENT DIGITAL ZOOM 80 pMOVIE...

Страница 14: ...sual 82 Digital viewer 82 3D print 82 Accessories from FUJIFILM 83 Caring for the Camera 84 Storage and Use 84 Water and Sand 84 Condensation 84 Cleaning 85 Traveling 85 Troubleshooting Troubleshooting Problems and Solutions 86 Warning Messages and Displays 91 Appendix Appendix Memory Card Capacity 95 Specifications 96 ...

Страница 15: ...hich related information may be found Menus and other text in the LCD monitor are shown in bold In the illustra tions in this manual displays may be simplified for explanatory purposes Supplied Accessories Supplied Accessories The following items are included with the camera NP 45AorNP 45B rechargeablebattery AC power adapter USB cable CD ROM contains this manual Strap User Guide Basic Manual Atta...

Страница 16: ...he right of each item Selector button Move cursor up c instant zoom button P36 b delete button Px MENU OK button P15 57 65 74 Move cursor right N flash button P33 Move cursor left F macro button P32 Move cursor down h self timer button P35 Illustrations in this manual may be simplified for explanatory purposes ...

Страница 17: ...8 Lens and lens cover 9 Microphone 44 10 LCD monitor 4 11 a playback button 19 12 Terminal cover 47 13 Strap eyelet 1 14 DISP display BACK button 5 15 o silent mode button x 15 Battery chamber cover 6 16 USB multi connector 47 48 54 17 Tripod mount 18 Memory card slot 7 19 Battery chamber 6 20 Battery latch 6 8 21 Connector for HDMI cable 47 Press and hold the DISP BACK button until o is displayed...

Страница 18: ...5 9 Sensitivity 59 10 Image size Image quality 60 61 11 Temperature warning ix 91 12 FINEPIX color 61 13 White balance 62 14 Battery level 5 15 Dual IS mode 78 16 Exposure compensation 58 17 Shutter speed Aperture 18 Date and time 15 19 Blur warning 34 91 20 Focus frame 30 21 Self timer indicator 35 22 Macro close up mode 32 23 Flash mode 33 1 Shooting mode 20 2 Intelligent Face Detection indicato...

Страница 19: ...avorites 39 12 DPOF print indicator 50 13 Protected image 71 Battery Level Battery Level Battery level is shown as follows Indicator Indicator Description Description D white Battery partially discharged C white Battery more than half discharged B red Low battery Charge as soon as possible A blinks red Battery exhausted Turn camera off and charge battery Hiding andViewing Indicators Hiding andView...

Страница 20: ...ng the battery chamber cover 2 Insert the battery Align the orange stripe on the battery with the orange battery latch and slide the bat tery into the camera keeping the battery latch pressed to one side When inserting the battery be sure that the battery is se cured by the orange battery latch If the bat tery is not securely latched the camera may not turn on or may turn off without warning The c...

Страница 21: ... back of the slot Q Be sure card is in the correct orienta tion do not insert at an angle or use force Battery Click Q SD SDHC SDXC memory cards can be locked making it impossible to format the card or to record or delete images Before inserting an SD SDHC SDXC memory card slide the write protect switch to the unlocked position Write protect switch 4 Close the battery chamber cover ...

Страница 22: ...off and open the battery chamber cover To remove the battery press the battery latch to the side and slide the battery out of the camera as shown Battery latch To remove the memory card press it in and release it slowly The card can then be removed by hand When a memory card is removed the card could come out of the slot too quickly Use your finger to hold it and gently release the card ...

Страница 23: ...rmation on formatting memory cards see K FORMAT P76 Memory cards are small and can be swallowed keep out of reach of children If a child swallows a memory card seek medical assistance immediately miniSD or microSD adapters that are larger or smaller than the standard dimensions of an SD SDHC SDXC memory card may not eject normally if the card does not eject take the camera to an authorized service...

Страница 24: ...ion could make it impossible to remove the battery from the camera Do not short the battery terminals The battery could overheat Read the cautions in The Battery and Power Supply Pvi Use only battery chargers designated for use with the battery Failure to observe this precaution could result in product malfunction Do not remove the labels from the battery or attempt to split or peel the outer casi...

Страница 25: ...R The camera operates in external power mode if the camera is turned on while plugged into AC power The Charging Indicator The Charging Indicator The charging indicator is displayed in the center of the LCD monitor Charging indicator Charging indicator Battery status Battery status Action Action a a Battery charging Battery charging s s Battery fault Battery fault Unplug the AC power adapter from ...

Страница 26: ...e the connectors are fully inserted Connect the camera directly to the computer do not use a USB hub or keyboard Q If the camera is turned on charging is not available Q If the computer goes into sleep mode while charging charging will stop To continue charging disable sleep mode on the computer and disconnect and connect the USB cable Q Charging may be impossible depending on computer specificati...

Страница 27: ...Mode Switching to Playback Mode Press the a button to start playback Press the shutter button halfway to return to shooting mode PlaybackMode PlaybackMode To turn the camera on and begin playback press the a button for about a second Press the a button again or press the ON OFF button to turn the camera off R R Switching to Shooting Mode Switching to Shooting Mode To exit to shooting mode press th...

Страница 28: ...Q Fingerprints and other marks on the lens can affect pictures Keep the lens clean Q The ON OFF button does not completely end the supply of power to the camera R R Auto Power Off Auto Power Off The camera will turn off automatically if no operations are performed for the length of time selected for MAUTO POWER OFF P78 ...

Страница 29: ...me the camera is turned on START MENU ENGLISH NO SET DEUTSCH FRANCAIS 2 The date and time will be displayed Press the selector left or right to highlight the year month day hour or minute and press up or down to change To change the order in which the year month and day are displayed highlight the date format and press the selector up or down Press MENU OK when settings are complete R R The Camera...

Страница 30: ...ress the ON OFF button to turn the camera on Q shooting indicators will be dis played The The g g Icon Icon This icon indicates that the camera continuously searches for faces to select the appropriate scene increasing the drain on the battery Scene Icon Scene Icon The camera selects the scene according to shooting conditions and the type of subject bPORTRAIT portraits cLANDSCAPE landscapes dNIGHT...

Страница 31: ...n the display Zoom indicator Zoom out Zoom in Holding the Camera Holding the Camera Hold the camera steady with both hands and brace your elbows against your sides Shaking or unsteady hands can blur your shots To prevent pictures that are out of focus or too dark under exposed keep your fingers and other objects away from the lens and flash ...

Страница 32: ...ll be dis played Change the composition or use focus lock P30 4 Shoot Smoothly press the shutter button the rest of the way down to take the picture R If the subject is poorly lit the flash may fire when the pic ture is taken For information on using the flash when lighting is poor see N Using the Flash Intelligent Flash P33 Click The Shutter Button The Shutter Button The shutter button has two po...

Страница 33: ...en taking important photo graphs take a test shot and check the results 1 Press the a button The most recent picture will be displayed 2 View additional pictures Press the selector right to view pictures in the order recorded left to view pictures in reverse order Press the shutter button to exit to shooting mode ...

Страница 34: ...hoosingaShootingMode 1 Press MENU OK to display the shooting menu 2 Highlight ASHOOTING MODE and press the selector right to display shooting mode options SET SHOOTING MENU EXIT SHOOTING MODE 3 Highlight the desired mode and press MENU OK QSCENE RECOGNITION CANCEL SET Selects optimum camera settings for certain modes 4 Press DISP BACK to exit to shooting mode ...

Страница 35: ...r low light or with the camera zoomed in P23 k k HDR HDR Choose when photographing high contrast scenes The camera varies exposure over a series of shots and blends the results to preserve details in highlights and shadows P24 C C NATURAL NATURAL N N The camera takes two shots one without the flash and one with D D NATURAL LIGHT NATURAL LIGHT Capture natural lighting under low light conditions L L...

Страница 36: ...utter speeds are used to capture the expanding burst of light from a firework Q Q SUNSET SUNSET Choose this mode to record the vivid colors in sunrises and sunsets R R SNOW SNOW Choose for crisp clear shots that capture the brightness of scenes domi nated by shining white snow S S BEACH BEACH Choose for crisp clear shots that capture the brightness of sunlit beaches U U PARTY PARTY Capture indoor ...

Страница 37: ...om ratios R A single combined photograph may not be created with some scenes or if the subject or camera moves during shooting Do not move the camera until shooting is complete PRO LOW LIGHT PRO LOW LIGHT To save unprocessed copies of pictures taken in this mode select ON for the t SAVE ORIGINAL IMAGE option in the setup menu P81 Q Keep the camera steady during shooting Q Frame coverage is reduced...

Страница 38: ...ose for high contrast scenes Select k HDR for A SHOOTING MODE P57 R A single combined photograph may not be created with some scenes or if the subject or camera moves during shooting Do not move the camera until shooting is complete HDR HDR To save unprocessed copies of pictures taken in this mode select ON for the t SAVE ORIGINAL IMAGE option in the setup menu P81 Q Keep the camera steady during ...

Страница 39: ...ly soft throughout the whole image C C CROSS SCREEN CROSS SCREEN 1 1 Create a star pattern where lines radiate out from bright objects u u PARTIAL COLOR RED PARTIAL COLOR RED Areas of the image that are the selected color are recorded in that color All others areas of the image are recorded in black and white v v PARTIAL COLOR ORANGE PARTIAL COLOR ORANGE w w PARTIAL COLOR YELLOW PARTIAL COLOR YELL...

Страница 40: ...ght an angle and press MENU OK 3 Press the selector right to view a choice of pan directions Press the selec tor left or right to highlight a pan direction and press MENU OK 4 Press the shutter button all the way down to start recording There is no need to keep the shutter button pressed during recording 5 Pan the camera in the direction shown by the arrow Shooting ends automatically when the prog...

Страница 41: ...her than that shown cancels shooting Q The desired results may not be achieved with moving subjects subjects close to the camera unvarying subjects such as the sky or a field of grass subjects that are in constant motion such as waves and waterfalls or subjects that undergo marked changes in brightness Panoramas may be blurred if the subject is poorly lit For Best Results For Best Results For best...

Страница 42: ... the first shot R To exit without recording a picture press DISP BACK 4 The first shot will be shown superimposed on the view through the lens Using it as a guide frame the second shot and press the shutter release button R The 3D effect may not be visible with some sub jects or under some shooting conditions For best results the distance the camera is moved between shots should be about 1 30th to...

Страница 43: ...using other applications that support the MP format 3D TVs that support the MP format can display images in 3D See the manual for your TV for details Q Images are not output in 3D when printed directly from the camera Q 3D images are displayed in 2D in slide shows and when output on a conventional TV Q 3D images can not be edited or retouched Note Note The MP The MP M Multi ulti P Picture format i...

Страница 44: ... 1 Focus Position the subject in the focus frame U and press the shutter button halfway to lock focus and exposure Focus and exposure will remain locked while the shutter button is pressed halfway AF AE lock 2 Recompose Keep the button pressed halfway 3 Shoot Press the button all the way down ...

Страница 45: ...r car bodies Fast moving subjects Subjects photographed through a window or other re flective object Darksubjectsandsubjectsthatabsorbratherthanreflect light such as hair or fur Insubstantial subjects such as smoke or flame Subjects that show little contrast with the background for example subjects in clothing that is the same color as the background Subjects positioned in front of or behind a hig...

Страница 46: ...ector left F and select F When macro mode is in effect the camera fo cuses on subjects near the center of the frame Use the zoom control to compose pictures P17 To exit macro mode press the selector left F and select H OFF OFF R Use of a tripod is recommended to prevent blur caused by camera shake ...

Страница 47: ...when shooting at night or indoors under low light Press the selector right N and choose from the fol lowing flash modes P AUTO FLASH According to shooting conditions Option Option Description Description AUTO AUTO K K AUTO FLASH AUTO FLASH The flash fires when required Recommended in most situations N N L L FORCED FLASH FORCED FLASH The flash fires whenever a picture is taken Use for backlit subje...

Страница 48: ...of a tripod is recommended R The flash may fire several times with each shot Do not move the camera until shooting is complete R The flash may cause vignetting K K RED EYE REDUCTION RED EYE REDUCTION L L FORCED FLASH FORCED FLASH M M RED EYE SLOW RED EYE SLOW J icon indicates that Intelligent Face Detection and red eye removal are on and will be used to minimize red eye caused by the flash reflect...

Страница 49: ...r off S 10 SEC The shutter is released ten seconds after the shutter button is pressed Use for self portraits The self timer lamp on the front of the camera blinks while the timer counts down R 2 SEC The shutter is released two seconds after the shutter button is pressed Use to reduce blur caused by the camera moving when the shutter release button is pressed The self timer lamp will blink as the ...

Страница 50: ...ing subjects such as children pets and athletes at sporting events 1 Position the subject in the focus frame Use the zoom control to frame the subject in the cen ter of the display 2 Choose a frame Press the selector up c to cycle through framing options as shown below No zoom Horizontal low zoom Horizontal high zoom Vertical low zoom Vertical high zoom ...

Страница 51: ...ed area will be enlarged to create a full sized picture R Intelligent Face Detection will not detect faces outside the selected frame Intelligent digital zoom 1 Enable intelligent digital zoom Select ON for the RINTELLIGENT DIGITAL ZOOM option in the setup menu P80 2 Choose a subject Frame the subject in the center of the display using intelligent digital zoom ...

Страница 52: ...ing intelligent digital zoom indicated by a frame at the center of the display 4 Frame the picture Use the zoom control to choose the area that will be included in the final photograph 5 Focus and shoot The framed area will be enlarged to create a full sized picture Q Pictures taken using the instant zoom are lower quality than pictures taken using normal zoom ...

Страница 53: ...order recorded left to view pictures in reverse order Keep the selector pressed to scroll rapidly to the desired frame R Pictures taken using other cameras are indicated by a m gift image icon during playback I IFavorites RatingPictures Favorites RatingPictures To rate the picture currently displayed in full frame playback press DISP BACK and press the selector up and down to select from zero to f...

Страница 54: ...re is zoomed in the selector can be used to view areas of the image not currently visible in the display Navigation window shows portion of image currently displayed in LCD monitor Zoom indicator Press DISP BACK to exit zoom R The maximum zoom ratio varies with image size Playback zoom is not available with cropped or resized copies saved at a size of a or smaller ...

Страница 55: ...revious and following images in the background Select j to increase the number of images displayed to two nine or one hundred i to view fewer images 100 0001 100 0001 When two or more images are displayed use the selector to highlight images and press MENU OK to view the highlighted image full frame In the nine and hundred frame displays use the selector to view more pictures ...

Страница 56: ...r deselect pictures that are protected or in a print order are shown by S When the operation is complete press DISP BACK to display a confirmation dialog then highlight OK and press MENU OK to delete the selected pictures ALL FRAMES ALL FRAMES A confirmation dialog will be displayed highlight OK and press MENU OK to delete all unprotected pictures Pressing DISP BACK cancels deletion note that any ...

Страница 57: ...re from left to right To pause playback press the selector down press the selector down again to resume To delete the panorama press the selector up b when playback is paused To exit to full frame playback press the selector up while panorama playback is in progress PLAY STOP PAUSE R The playback direction can be controlled by pressing the selector left or right ...

Страница 58: ... REC Time available is displayed in monitor To end recording press the F button again Recording ends automatically when the movie reaches maximum length or memory is full Automatic Scene Selection Automatic Scene Selection In Q mode the camera selects the scene according to shoot ing conditions and the type of subject d portraits d poor ly lit landscapes f poorly lit portraits c landscapes e close...

Страница 59: ...ding begins R Sounds made by the camera may be recorded Q Do not open the battery chamber cover during shooting or saving a movie on a memory card Failure to observe this precaution could prevent the movie from being played back Q Vertical or horizontal streaks may appear in movies containing very bright subjects This is normal and does not indicate a malfunction Q The temperature of the camera ma...

Страница 60: ...ress the selector up to end playback If playback is not in progress pressing the selector up will delete the movie Advance Advance rewind rewind Presstheselectorright to advance left to rewind If playback is paused the movie will advance or rewind one frame each time the selector is pressed Adjust volume Adjust volume Press MENU OK to pause playback and display volume con trols Press the selector ...

Страница 61: ...ully inserted R When an HDMI cable is connected pictures and sound are played back on the TV 2 Tune the television to the HDMI input channel See the documentation supplied with the television for details 3 Press the a button for about a second to turn the camera on The camera monitor turns off and pictures and movies are played back on theTV Note that the camera volume controls have no effect on s...

Страница 62: ...e that depending on the printer not all the functions described below may be supported 1 Connect the supplied USB cable as shown and turn the printer on 2 Turn the camera on 3 Press the selector left or right to display a picture you wish to print 4 Press the selector up or down to choose the number of copies up to 99 5 Repeat steps 3 4 to select additional pictures Press MENU OK to display a conf...

Страница 63: ...era off and disconnect the USB cable R Pictures can be printed from a memory card that has been formatted in the camera R If no pictures are selected the camera will print one copy of the current picture R Page size print quality and border selections are made using the printer Printing the Date of Recording Printing the Date of Recording To print the date of recording on pictures press DISP BACK ...

Страница 64: ...s to be printed from print orders stored on a memory card The information in the order includes the pictures to be printed and the number of copies of each picture 1 Select playback mode and press MENU OK to display the playback menu 2 Highlight K PRINT ORDER DPOF and press MENU OK 3 Highlight one of the following options and press MENU OK WITH DATE s Print the date of recording on pictures WITHOU...

Страница 65: ...print order press the selector down until the number of copies is zero 6 Repeat Steps 4 5 to complete the print order and press MENU OK when settings are complete 7 A confirmation dialog will be displayed Press MENU OK to save the print order R Print orders can contain a maximum of 999 pictures R If a memory card is inserted containing a print order created by another camera a message will be disp...

Страница 66: ...12MB or more 512MB or more 1 1GB or more GB or more 2 2 Free disk space Free disk space 2GB or more 2GB or more GPU GPU Supports DirectX 9 or later Supports DirectX 9 or later recommended recommended Supports DirectX 7 or later Supports DirectX 7 or later required performance not guaranteed with other GPUs required performance not guaranteed with other GPUs Video Video 1024 768 pixels or more with...

Страница 67: ...creen instructions to install MyFinePix Studio If the Installer Does Not Start Automatically Windows 7 WindowsVista Windows XP If the Installer Does Not Start Automatically Windows 7 WindowsVista Windows XP If the installer does not start automatically select Computer or My Computer from the Start menu then double click the FINEPIX CD icon to open the FINEPIX CD window and double click setup or SE...

Страница 68: ... direct sunlight in case you need to re install the software Installation is now complete Proceed to Connecting the Camera P54 ConnectingtheCamera ConnectingtheCamera 1 If the pictures you wish to copy are stored on a memory card insert the card into the camera R Windows users may require the Windows CD when starting the software for the first time Q Loss of power during transfer could result in l...

Страница 69: ...ly to the computer do not use a USB hub or keyboard 3 Press the a button for about a second to turn the camera on After start ing MyFinePix Studio follow the on screen instructions to copy pictures to the computer To exit without copying pictures click Cancel For more information on using the supplied software start the application and select the appropriate option from the Help menu ...

Страница 70: ...tware in the same way as on a standalone computer Q The user bears all applicable fees charged by the phone company or Internet ser vice provider when using services that require an Internet connection Uninstalling the Supplied Software Uninstalling the Supplied Software Only uninstall the supplied software when it is no longer required or before be ginning reinstallation After quitting the softwa...

Страница 71: ... UsingtheShootingMenu To display the shooting menu press MENU OK in shooting mode Highlight items and press the se lector right to view options then highlight an option and press MENU OK Press DISP BACK to exit when set tings are complete The options available vary with the shooting mode selected ...

Страница 72: ...A d d icon and exposure indicator are displayed at settings other than 0 Exposure compen icon and exposure indicator are displayed at settings other than 0 Exposure compen sation is not reset when the camera is turned off to restore normal exposure control choose sation is not reset when the camera is turned off to restore normal exposure control choose a value of 0 a value of 0 R R Turn the flash...

Страница 73: ...high sensitivities 100 100 ISO ISO 3200 3200 Bright Bright Scene Scene Dark Dark Less noticeable Less noticeable Noise mottling Noise mottling More noticeable More noticeable Option Option Description Description AUTO AUTO Sensitivity is adjusted automatically in response to shooting conditions 3200 1600 800 400 3200 1600 800 400 200 100 200 100 Sensitivity is set to the specified value which is s...

Страница 74: ...emory allowing more pictures to be recorded O O4 3 4 3 Size Aspect ratio SizeVersus Aspect Ratio SizeVersus Aspect Ratio Size Size Option Option Prints at sizes up to Prints at sizes up to O O 34 25cm 13 5 10in P P 24 18cm 9 5 7in Q Q 17 13cm 7 5in Aspect ratio Aspect ratio 4 3 Pictures have the same proportions as the camera display 3 2 Pictures have the same proportions as a frame of 35mm film 1...

Страница 75: ... black and white Option Option Description Description c c STANDARD STANDARD Standard contrast and saturation Recommended in most situations a a CHROME CHROME Vivid contrast and color Choose for vivid shots of flowers or enhanced greens and blues in landscapes b b B W B W Take pictures in black and white R R Settings other than Settings other than c c STANDARD STANDARD are shown by an icon in the ...

Страница 76: ...F Capture motion in a series of pictures Option Option Description Description J J CONTINUOUS CONTINUOUS The camera takes up to 8 pictures while the shutter button is pressed The frame rate is high in the order of J K and O K K CONTINUOUS CONTINUOUS O O CONTINUOUS CONTINUOUS OFF OFF One photograph is taken each time the shutter button is pressed R R Focus and exposure are determined by the first f...

Страница 77: ...e shutter button is pressed their face may not be in the area indi If the subject moves as the shutter button is pressed their face may not be in the area indi cated by the green border when the picture is taken cated by the green border when the picture is taken F FAF MODE AF MODE This option controls how the camera selects the focus area Regardless of the option selected the camera will focus on...

Страница 78: ...e the camera focuses continuously increasing the drain on the battery mode the camera focuses continuously increasing the drain on the battery and that the sound of the camera focusing may be audible and that the sound of the camera focusing may be audible W W MOVIE MODE MOVIE MODE defaults to defaults to i i Choose a frame size for movies Option Option Description Description i1920 1080 30fps Ful...

Страница 79: ...k Mode UsingthePlaybackMenu UsingthePlaybackMenu To display the playback menu press MENU OK in play back mode Highlight items and press the selector right to view options then highlight an option and press MENU OK Press DISP BACK to exit when settings are complete ...

Страница 80: ...elector down Press MENU OK to exit when the book is complete R R The first picture selected becomes the cover image Press the selector down to select a The first picture selected becomes the cover image Press the selector down to select a different image for the cover different image for the cover 4Select COMPLETE PHOTOBOOK to select all photos or all photos matching the specified search condition...

Страница 81: ...MyFinePix Studio software b bIMAGE SEARCH IMAGE SEARCH Search for pictures 1Choose from the following options BY DATE Search by date BY FACE Search for faces from the face recognition database BY IFAVORITES Search by rating BY SCENE Search by scene BYTYPE OF DATA Find all still pictures or all movies BY UPLOAD MARK Find all pictures selected for upload to a specified destination 2Select a search c...

Страница 82: ...he selector down to begin playback and press it down again when the new closing frame is reached 6Press MENU OK to save the copy MOVIE JOIN Add existing footage to the end of the current movie to create an edited copy 1Display the desired movie 2Select i MOVIE EDIT in the playback menu then select MOVIE JOIN 3Press the selector left or right to highlight a movie 4Press MENU OK to add the highlight...

Страница 83: ...y photos can be selected for upload to MyFinePix com Only photos can be selected for upload to MyFinePix com R R During playback selected pictures are indicated by During playback selected pictures are indicated by j j YouTube YouTube j j FACEBOOK or FACEBOOK or j j My My FinePix com icons FinePix com icons RESET ALL Deselecting All Pictures Choose RESET ALL to deselect all pictures If the number ...

Страница 84: ...ntelligent Face Detection this option can be used to remove red eye The camera will analyze the image if red eye is detected the image will be processed to create a copy with reduced red eye 1Display the desired picture 2Select BRED EYE REMOVAL in the playback menu 3Press MENU OK R R Red eye may not be removed if the camera is unable to detect a face or the face is in profile Red eye may not be re...

Страница 85: ...rotected pictures will be deleted when the memory card is formatted Protected pictures will be deleted when the memory card is formatted P76 76 G GCROP CROP Create a cropped copy of the current picture 1Display the desired picture 2Select GCROP in the playback menu 3Use the zoom control to zoom in and out and use the selector to scroll the picture until the desired portion is displayed 4Press MENU...

Страница 86: ... the LCD monitor 1Display the desired picture 2Select CIMAGE ROTATE in the playback menu 3Press the selector down to rotate the picture 90 clockwise up to rotate it 90 counterclock wise 4Press MENU OK The picture automatically be displayed in the selected orientation whenever it is played back on the camera R R Protected pictures can not be rotated Remove protection before rotating pictures Protec...

Страница 87: ...16 9 to display the image so that it fills the screen with its top and bottom cropped out 4 3 to display the entire image with black bands at either side 4 3 16 9 16 9 16 9 4 3 4 3 R R Photographs with an aspect ratio of 16 9 are displayed full screen those with an aspect ratio Photographs with an aspect ratio of 16 9 are displayed full screen those with an aspect ratio of 3 2 in a black frame of ...

Страница 88: ...s the selector left to highlight the tab for the current menu 1 3 Press the selector down to highlight X EXIT SET SET UP SET Tab 1 4 Press the selector right to place the cursor in the setup menu 2 Adjust settings Highlight items and press the selector right to view options then high light an option and press MENU OK Press DISP BACK to exit when settings are complete ...

Страница 89: ...me zone 3Press MENU OK To switch between local time and your home time zone highlight g LOCAL or h HOME and press MENU OK Option Option Description Description h hHOME HOME Switch to the time currently selected for FDATE TIME see above g gLOCAL LOCAL Switch to local time If this option is selected g and the time and date will be displayed in yellow for three seconds each time the camera is turned ...

Страница 90: ... portant files have been copied to a computer or other storage device Q Q Do not open the battery chamber cover during formatting Do not open the battery chamber cover during formatting A A IMAGE DISP IMAGE DISP defaults to defaults to 1 5 SEC 1 5 SEC Choose how long pictures are displayed in the LCD monitor after shooting Option Option Description Description 3 SEC 3 SEC Pictures are displayed fo...

Страница 91: ...NEW RENEW Numbering is reset to 0001 after formatting or when a new memory card is inserted R R If the frame number reaches 999 9999 the shutter release will be disabled If the frame number reaches 999 9999 the shutter release will be disabled P93 93 R R Selecting Selecting R R RESET RESET P76 sets 76 sets B B FRAME NO FRAME NO to to CONTINUOUS CONTINUOUS but does not reset the file but does not r...

Страница 92: ...esponse to ambient lighting conditions E ELCD MODE LCD MODE defaults to defaults to U UON ON Choose whether the display automatically dims to save power M MAUTO POWER OFF AUTO POWER OFF defaults to defaults to 2MIN 2MIN Choose the length of time before the camera turns off automatically when no operations are performed Shorter times increase battery life if OFF is selected the camera must be turne...

Страница 93: ...ate blink detection If an option other than OFF is selected for A AIMAGE IMAGE DISP DISP P76 76 a warning will be displayed if the camera detects subjects who may have blinked when the picture was taken If ZOOM CONTINUOUS is selected you can press the f button to zoom in on these subjects Option ON OFF STORE ERASE BLINK DETECTION FACE ZOOM STORE ERASE BLINK DETECTION NEXT R R Blink detection is no...

Страница 94: ...al zoom and restore maximum optical zoom zoom R R Intelligent digital zoom may sometimes produce lower quality images than optical zoom Intelligent digital zoom may sometimes produce lower quality images than optical zoom R R The time needed to record images increases The time needed to record images increases R R The effects are not visible in the display during shooting The effects are not visib...

Страница 95: ...se a color scheme c cGUIDANCE DISPLAY GUIDANCE DISPLAY defaults to defaults to ON ON Choose whether to display tool tips S SDATE STAMP DATE STAMP defaults to defaults to OFF OFF To add shooting date and time choose T U To add only shooting date choose T When OFF is selected no information will be added to the pictures Q Q Added shooting date and time can not be deleted from the pictures To take pi...

Страница 96: ...USB cable supplied DIGITAL CAMERA FINEPIX JZ700 Series HDTV 1 Printing Computer Related Audio Visual Supports 3D display of Supports 3D display of pictures taken using pictures taken using INDIVD INDIVD SHUTTER 3D SHUTTER 3D FINEPIX REAL 3D V3 2 sold separately Digital viewer Photos taken in Photos taken in INDIVD SHUTTER 3D INDIVD SHUTTER 3D http fujifilm com 3d print 3D print SD SDHC SDXC memory...

Страница 97: ... www fujifilm com products digital_ cameras index html Rechargeable Rechargeable Li ion batteries Li ion batteries NP 45A Additional large capacity NP 45A rechargeable batteries can be purchased as required Battery Battery chargers chargers BC 45W Replacement battery chargers can be purchased as required The BC 45W charges an NP 45A NP 45B battery in about 120 minutes at 20 C 68 F Digital viewer D...

Страница 98: ...ds such as near a broadcasting anten na power line radar emitter motor transformer or magnet in contact with volatile chemicals such as pesticides next to rubber or vinyl products Water and Sand Exposure to water and sand can also damage the camera and its internal circuitry and mechanisms When using the camera at the beach or seaside avoid exposing the camera to water or sand Do not place the cam...

Страница 99: ...ith a piece of FUJIFILM lens cleaning paper to which a small amount of lens cleaning fluid has been applied Care should be taken to avoid scratching the lens or LCD monitor The camera body can be cleaned with a soft dry cloth Do not use alcohol thinner or other volatile chemicals Traveling Traveling Keep the camera in your carry on baggage Checked baggage may suffer violent shocks that could damag...

Страница 100: ...rent AF mode Select a different AF mode P P63 63 The The battery has been charged many times battery has been charged many times The battery has reached the end of its charging The battery has reached the end of its charging life Purchase a new battery life Purchase a new battery The camera turns off The camera turns off suddenly suddenly Charge the battery Charge the battery P P11 or insert a ful...

Страница 101: ...a on Turn the camera on P P13 13 The shutter button is pressed right after shooting a panorama The shutter button is pressed right after shooting a panorama Wait for a little while Wait for a little while then press the shutter button then press the shutter button P P26 26 The LCD monitor goes The LCD monitor goes dark after shooting dark after shooting The LCD monitor may darken while the flash c...

Страница 102: ...tery is exhausted Charge the battery Charge the battery P P11 or insert a fully charged spare battery 11 or insert a fully charged spare battery P P6 6 The camera is in continuous mode The camera is in continuous mode Select Select OFF OFF for for R R CONTINUOUS CONTINUOUS P P62 62 The camera is in silent mode The camera is in silent mode Turn silent mode off Turn silent mode off P P75 75 The flas...

Страница 103: ...del of camera or with a different make or model of camera No sound in movie No sound in movie playback playback Playback volume is too low Playback volume is too low Adjust playback volume Adjust playback volume P P78 78 The microphone was obstructed The microphone was obstructed Hold the camera correctly during recording Hold the camera correctly during recording P P17 44 17 44 The speaker is obs...

Страница 104: ...atible The camera is unre The camera is unre sponsive sponsive Temporary camera malfunction Temporary camera malfunction Remove and reinsert the battery Remove and reinsert the battery P P6 6 Thebatteryisexhausted Thebatteryisexhausted Chargethebattery Chargethebattery P P11 orinsertafully chargedsparebattery 11 orinsertafully chargedsparebattery P P6 6 The camera does not The camera does not func...

Страница 105: ...OR Camera malfunction or moving parts of lens obstructed Turn the camera off and then on again Camera malfunction or moving parts of lens obstructed Turn the camera off and then on again taking care not to touch the lens If the message persists contact a FUJIFILM dealer taking care not to touch the lens If the message persists contact a FUJIFILM dealer TURN OFFTHE CAMERA TURN OFFTHE CAMERA ANDTURN...

Страница 106: ...free space WRITE ERROR WRITE ERROR Memory card error or connection error Memory card error or connection error Reinsert the card or turn the camera off and then Reinsert the card or turn the camera off and then on again If the message persists contact a FUJIFILM dealer on again If the message persists contact a FUJIFILM dealer Not enough memory remaining to record additional pictures Not enough me...

Страница 107: ...arch has returned more 5 000 results or more than 999 frames were selected for deletion A search has returned more 5 000 results or more than 999 frames were selected for deletion Perform a different search or select fewer pictures Perform a different search or select fewer pictures PROTECTED FRAME PROTECTED FRAME An attempt was made to delete or rotate to a protected picture Remove protection and...

Страница 108: ...ls Printer out of paper or ink or other printer error Check printer see printer manual for details To resume printing turn the printer off and then turn it back on To resume printing turn the printer off and then turn it back on PRINTER ERROR PRINTER ERROR RESUME RESUME Printeroutofpaperorink orotherprintererror Printeroutofpaperorink orotherprintererror Checkprinter seeprintermanualfordetails If ...

Страница 109: ... 320 320 630 630 620 620 1 230 1 230 1 270 1 270 2 500 2 500 O O16 9 16 9 370 370 740 740 730 730 1 440 1 440 1 500 1 500 2 940 2 940 P P4 3 4 3 550 550 1 070 1 070 1 070 1 070 2 080 2 080 2 190 2 190 4 250 4 250 P P16 9 16 9 720 720 1 390 1 390 1 420 1 420 2 720 2 720 2 900 2 900 5 550 5 550 Q Q4 3 4 3 1 190 1 190 2 220 2 220 2 330 2 330 4 340 4 340 4 750 4 750 8 860 8 860 Q Q16 9 16 9 1 740 1 74...

Страница 110: ...PO MPO Image size Image size pixels pixels O O 4 3 4 3 4 288 3 216 4 288 3 216 O O 3 2 3 2 4 288 2 864 4 288 2 864 O O 16 9 16 9 4 288 2 416 4 288 2 416 P P 4 3 4 3 3 072 2 304 3 072 2 304 P P 16 9 16 9 3 072 1 728 3 072 1 728 Q Q 4 3 4 3 2 048 1 536 2 048 1 536 Q Q 16 9 16 9 1 920 1 080 1 920 1 080 r r MOTION PANORAMA MOTION PANORAMA v v 1 632 11 520 1 632 11 520 tall tall 11 520 1 088 11 520 1 0...

Страница 111: ...ments of 2EV 2EV in increments of 1 1 3 3EV EV Picture stabilization Picture stabilization Optical stabilization lens shift type Optical stabilization lens shift type Shutter speed Shutter speed combined mechanical and combined mechanical and electronic shutter electronic shutter AUTO mode AUTO mode 1 1 4 4s s 1 1 2 000 2 000s s Other modes Other modes 8s 8s 1 1 2 000 2 000s s Continuous Continuou...

Страница 112: ...ame coverage approx 96 230k dot color LCD monitor frame coverage approx 96 Movie frame rate Movie frame rate i i1920 1080 1920 1080 1080p 1080p 30fps 30fps f f640 480 640 480 VGA VGA 30fps 30fps k k640 480 640 480 100 fps 100 fps h h1280 720 1280 720 720p 720p 30fps 30fps k k1280 720 1280 720 60 fps 60 fps k k320 320 128 128 200 fps 200 fps Languages Languages Arabic Bulgarian Simplified Chinese T...

Страница 113: ...mperatures decline at low temperatures Charging time Charging time Approx 120 minutes Approx 120 minutes 20 C 68 F 20 C 68 F Dimensions Dimensions W H D W H D 99 4mm 57 0mm 22 6mm 3 9in 2 2in 0 8in 99 4mm 57 0mm 22 6mm 3 9in 2 2in 0 8in excluding projections excluding projections minimum depth 18 6mm 0 7in minimum depth 18 6mm 0 7in Shooting weight Shooting weight FinePix JZ750 JZ795 FinePix JZ750...

Страница 114: ...0 C 40 C 32 F 104 F 0 C 40 C 32 F 104 F Weight Weight Approx 42g 1 5oz excluding battery Approx 42g 1 5oz excluding battery Weight and dimensions may vary with the country or region of sale Notices Notices Specifications subject to change without notice FUJIFILM shall not be held liable for damages resulting from errors in this manual Although the LCD monitor is manufactured using advanced high pr...

Страница 115: ...101 Memo Memo ...

Страница 116: ... AKASAKA 9 CHOME MINATO KU TOKYO 107 0052 JAPAN http www fujifilm com products digital_cameras index html Please contact your local distributor for repairs and technical support see Worldwide Network list ...

Страница 117: ...W Wa a i i F F N N B B OFF OFF AUTO AUTO 1 1 N N 1 1 O O P P 1 1 1 1 1 1 1 1 1 1 1 1 1 1 1 1 1 1 B B ON ON K K 1 1 L L 1 1 M M P P 1 1 1 1 1 1 1 1 h h F F F F 2 2 1 1 1 1 H H 2 2 1 1 1 1 1 1 1 1 1 1 1 1 1 1 1 1 1 1 1 1 1 1 1 1 1 1 d d c c N N AUTO AUTO 1 1 1 1 1 1 1 1 1 1 1 1 1 1 1 1 1 1 1 1 1 1 1 1 1 1 1 1 1 1 1 1 1 1 1 1 1 1 1 1 1 1 1 1 1 1 3200 3200 1600 1600 800 800 400 400 200 200 100 100 O O...

Страница 118: ...FF OFF 1 1 1 1 1 1 1 1 1 1 1 1 1 1 F F r r 1 1 1 1 1 1 1 1 1 1 1 1 1 1 1 1 1 1 1 1 1 1 1 1 1 1 1 1 1 1 1 1 1 1 1 1 1 1 1 1 x x F F F F mode mode W W i i1920 1080 1920 1080 h h1280 720 1280 720 f f640 480 640 480 k k1280 720 1280 720 k k640 480 640 480 k k320 128 320 128 E E M M L L B B m m R R 1 Automatically optimized for selected shooting mode 2 The camera automatically analyzes and selects macr...

Отзывы: