background image

56

[SHOOTING MENU]

Setting the menu (

p.53)

Changing the sensitivity setting 
([

 ISO])

Use this menu to specify required sensitivity setting of the 
ambient light around the subject.
The larger value of the sensitivity, the higher sensitivity is 
obtained. The higher sensitivity settings will allow you to 
take pictures in darker locations.

CHECK

Settings

[AUTO]/[1600]/[800]/[400]/[200]/[100]/[64]
Selecting [AUTO] as the sensitivity setting, the camera 
selects the best sensitivity setting for the subject’s 
brightness.

MEMO

When anything other than [

s

 MANUAL] in the Shooting 

mode is selected, only [AUTO] can be selected for the 
[ISO] (sensitivity) setting.

CAUTION

Although higher sensitivity settings will allow you to take 
pictures in darker locations, they will also increase the 
amount of speckling in your images. Choose the 
sensitivity setting that best suits the conditions.

Changing the quality setting 
([

 QUALITY])

Use this menu to specify the image size (number of 
recorded pixels). 
Select the quality setting for the scene being shot.

Z

Quality settings in Shooting mode 

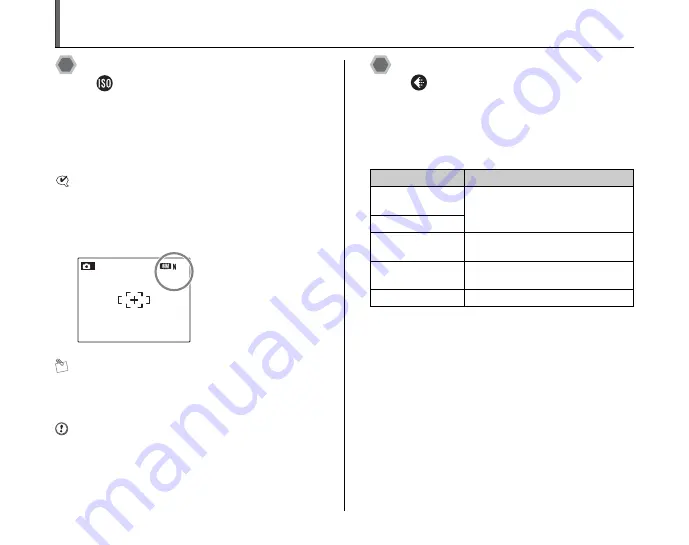
The selected sensitivity 
setting appears on the 
LCD monitor when the 
sensitivity setting is set to 
another setting excluding 
[AUTO].

12

12

4

ISO  100

ISO  100

M

Quality mode

Sample uses

i

 F (3264 × 2448)

i

 N (3264 × 2448)

Printing at up to 10R (25.4 × 30.5 cm/
10 × 12 in.) / A4 size / A3 size
For better quality, select 

i

 F

%

 (3264 × 2176)

4

 (2304 × 1728)

Printing at up to 6R (15.2 × 20.3 cm/
6 × 8 in.) / A5 size

2

 (1600 × 1200)

Printing at up to 4R (10.2 × 15.2 cm/
4 × 6 in.) / A6 size

`

 (640 × 480)

To use for e-mail or web site

Содержание FinePix BL00710-201(1)

Страница 1: ...FILM DIGITAL CAMERA FinePix J10 FinePix J12 correctly Please follow the instructions carefully BL00710 201 1 Getting Ready Using the Camera Advanced Features Photography Settings Camera Connection Sof...

Страница 2: ...a particular installation If this equipment does cause harmful interference to radio or television reception which can be determined by turning the equipment off and on the user is encouraged to try...

Страница 3: ...le or disassemble Software 4 Ownership All copyrights and other proprietary rights to Software and Documentation are owned and retained by FUJIFILM or the third party suppliers as indicated on or in S...

Страница 4: ...KA 9 CHOME MINATO KU TOKYO 107 0052 JAPAN conforms to the following Standards Safety EN60950 1 2001 EMC EN55022 2006 Class B EN55024 1998 A1 2001 A2 2003 EN61000 3 3 1995 A1 2001 A2 2005 following the...

Страница 5: ...osed of correctly you will help prevent potential negative consequences to the environment and human health which could otherwise be caused by inappropriate waste handling of this product If your equi...

Страница 6: ...wing the Images 32 Erasing the Images Movies 36 Using the erase button n 36 Erasing the images using PLAYBACK MENU 36 Advanced Features Photography Using the Photography Functions Procedure of Setting...

Страница 7: ...8 Software Installation Installation on a Windows PC 92 Installation on a Mac OS X 94 Connecting to a PC 97 Using FinePixViewer 100 Appendices System Expansion Option 102 Accessories Guide 103 Using Y...

Страница 8: ...s Manual these cards are expressed as Memory Card Z About illustration Up down left and right are indicated by black triangles in the Owner s Manual Up or down is shown as n or o and left or right is...

Страница 9: ...45 1 Strap 1 Battery Charger BC 45A 1 set A V cable 1 USB cable 1 CD ROM 1 Software for FinePix Owner s Manual this manual 1 Notes and Cautions 1 Attaching the strap Attach the strap as shown in 1 and...

Страница 10: ...48 G Indicator lamp p 28 H DISP Display BACK button p 31 32 I LCD monitor J MENU OK button K p e Macro button p 47 L Speaker M Tripod mount N o Self timer button p 50 O Battery compartment P Memory C...

Страница 11: ...p 48 D s Shooting mode p 41 E Battery level indicator p 22 F AF frame p 26 G Date Time p 20 H 9 White balance p 59 I f Continuous shooting p 60 J iN Quality mode p 56 K Number of available frames p 1...

Страница 12: ...ween the battery terminals could cause the battery to short circuit and overheat See Notes and Cautions for information on the battery Always use the Rechargeable Battery NP 45 included The use of oth...

Страница 13: ...ean the battery terminals and battery charger terminals with a clean dry cloth Charging times increase at low temperatures The NP 45 gradually loses its charge even when not used Charge a NP 45 just b...

Страница 14: ...or ruin the image files on the Memory Card Do not apply force to the battery cover 2 Load the battery While pushing the battery release catch aside load the battery by aligning the indicator A orange...

Страница 15: ...aged Use the battery carefully to avoid overheating igniting or exploding If the battery is loaded incorrectly contact a FUJIFILM dealer Do not use excessive force to remove the battery from the camer...

Страница 16: ...ed as Memory Card SD Memory Cards SDHC Memory Cards They are operation checked at FUJIFILM Corporation Maker SanDisk MEMO Compatible Memory Cards will be updated in our website http www fujifilm com p...

Страница 17: ...the camera before use Do not use a miniSD adaptor or a microSD adaptor which have exposed contact areas on the back Use of these adaptors may cause a malfunction or damage due to the improper contact...

Страница 18: ...t For this reason the number recorded may not represent the actual number of frames See p 122 for information on the standard number of available frames Z About internal memory When a Memory Card sold...

Страница 19: ...N The lens moves and the lens cover opens when turning the camera on in Shooting mode Take care not to obstruct the lens Take care not to get fingerprints on the camera lens as this will result in imp...

Страница 20: ...down n or o changes the numbers continuously When the time displayed passes 12 the AM PM setting changes APress n o p or q to select the language BPress MENU OK to confirm the setting SET SET NO NO S...

Страница 21: ...2 hours even if a source of power is removed When the Auto power off function is active if the camera is left unused for 2 or 5 minutes this function turns the camera off p 85 To turn the camera back...

Страница 22: ...The display will shortly go blank and the camera will stop working Replace the battery Blinking red CAUTION Due to the nature of the battery the battery level indicator or V may appear early when the...

Страница 23: ...CPress q N N SHOOTING MENU SHOOTING MENU ISO ISO QUALITY QUALITY AUTO AUTO SET UP SET UP APress p or q to select BPress o to move to menu item CPress n or o to select DATE TIME DPress q See 2 Set the...

Страница 24: ...OTING MENU AUTO AUTO SET UP SET UP ISO ISO QUALITY QUALITY APress p or q to select BPress o to move to menu item CPress n or o to select DPress q See 1 screen appears when turning the camera on p 20 A...

Страница 25: ...e camera while shooting gives a blurred picture camera shake Hold the camera steadily with both hands If the lens or flash is obscured by your fingers or the strap subjects may be out of focus or the...

Страница 26: ...d Indicator lamp lit green Not focus on the subject No sound indicated Indicator lamp blinking green MEMO The shutter button has a halfway point at which focus and exposure are automatically optimized...

Страница 27: ...Flash Change the flash mode when you want to take pictures without flash See p 48 for information on flash CAUTION The image shown on the LCD monitor before the picture is taken may differ in brightne...

Страница 28: ...r p 107 110 Indicator lamp Display Status Lit green Locking the focus Blinking green Camera shake warning AF warning or AE warning ready to shoot Lit orange Recording to Memory Card or internal memory...

Страница 29: ...t will result in the subjects being out of focus AF AE lock is useful Use AF AE lock to guarantee best result when shooting a subject that is not suited to autofocusing p 30 1 Move the camera slightly...

Страница 30: ...ever it may have difficulty focusing on the following Subjects photographed through glass Subjects that do not reflect well such as hair or fur Subjects with no substance such as smoke or flames Dark...

Страница 31: ...nes in this frame or align one of the horizontal lines with the horizon Use this frame as a guide to the subject s size and the balance of the shot while composing a shot MEMO Always use AF AE lock wh...

Страница 32: ...camera will display still images recorded on FinePix J10 FinePix J12 or still images excluding some uncompressed images recorded on any FUJIFILM digital camera that supports xD Picture Cards or SD Me...

Страница 33: ...age during single frame playback Continued Q To select the required image Press p last image Press q next image Selecting images F4 2 F4 2 250 250 1 1 2 2 3 3 250 250 F4 2 F4 2 ISO 100 ISO 100 ISO 100...

Страница 34: ...me from the 9 frames Press n o p or q to display another part of the image Quality mode Max zoom scale i 3264 2448 pixels Approx 5 1 3264 2176 pixels Approx 5 1 4 2304 1728 pixels Approx 3 6 2 1600 12...

Страница 35: ...OK to enlarge the image 2050 2050 1 12 12 12 12 30 30 12 12 29 29 12 12 31 31 Selecting the date APress n o p or q to move the cursor colored frame to on the upper left frame BPress p to display the...

Страница 36: ...n Pressing n erases images easily Erasing the images using PLAYBACK MENU APress p or q to select the erasing image BPress n CPress p or q to select OK DPress MENU OK to erase the displayed image ERASE...

Страница 37: ...or o to select FRAME or ALL FRAMES EPress MENU OK to confirm the setting PLAYBACK MENU PLAYBACK MENU ERASE ERASE SLIDE SHOW SLIDE SHOW PRINT ORDER DPOF PRINT ORDER DPOF PROTECT PROTECT COPY COPY BACK...

Страница 38: ...ECIFIED ERASE OK or DPOF SPECIFIED ERASE ALL OK appears press MENU OK again to erase the frames files CAUTION Erased frames files cannot be recovered Back up important frames files onto your PC or ano...

Страница 39: ...ode for the scene being shot p 42 46 s This mode provides detailed settings that are impossible to set in AUTO mode p 46 MANUAL MANUAL ANTI BLUR ANTI BLUR SET SET CANCEL CANCEL AUTO AUTO BABY MODE BAB...

Страница 40: ...ting p 56 QUALITY Use to specify required image size p 56 EXP COMPENSATION Use this setting to obtain the correct exposure only s p 58 WHITE BALANCE Use to adjust the color tone only s p 59 SHOOTING M...

Страница 41: ...s in the SHOOTING MODE is selected only AUTO can be selected for the ISO sensitivity setting APress MENU OK to open the menu BPress n or o to select SHOOTING MODE CPress q DPress n or o to select the...

Страница 42: ...ir picture with a natural ambience CHECK Flash cannot be used in the Baby mode This function is suitable for taking a pictures of moving subjects such as children or pets Use this mode to select a fas...

Страница 43: ...al ambience when shots are taken in low light conditions This mode is also ideal for shooting indoor or situations where the flash cannot be used Camera sets the high sensitivity setting when selectin...

Страница 44: ...or taking more vivid shots of fireworks with a slow shutter CHECK Flash cannot be used in the Fireworks mode Shutter speed setting 1 2 sec to 8 sec Use a tripod to prevent camera shake in the Firework...

Страница 45: ...ing at indoor wedding and party This mode produces beautiful images that retain the natural ambience when shots are taken in low light conditions Use this mode for taking pictures in places such as mu...

Страница 46: ...er shots of letters CHECK Focal range Wide angle Approx 15 cm 5 9 in to infinity Telephoto Approx 40 cm 1 3 ft to infinity Set the Photography functions to manual to easily control yourself Photograph...

Страница 47: ...15 cm 5 9 in to infinity Telephoto Approx 40 cm 1 3 ft to infinity Effective flash range Approx 30 cm to 80 cm 11 8 in to 2 6 ft MEMO When setting or mode the camera sets to e Macro mode automaticall...

Страница 48: ...ed in the picture This is caused by the light of the flash reflecting off the inside of the eye Use this mode in backlit scenes or to get the correct colors when taking a picture under bright lighting...

Страница 49: ...e effective flash range the image may appear dark even if the flash is used CAUTION Notes on using flash If pressing the shutter button while the flash is charging indicator lamp blinking orange the p...

Страница 50: ...pictures using self timer 1 Press the shutter button down halfway to focus on the subject and press the shutter button fully Pressing the shutter button down halfway that focuses on the subject Withou...

Страница 51: ...mer setting Completing the shooting Changing the Shooting mode setting Setting the camera to Playback mode Turning the camera off Take care not to stand in front of the lens when pressing the shutter...

Страница 52: ...This function is automatically canceled after each shot When this function is active it will increase the amount of speckling in images on the LCD monitor This is normal and does not affect the photog...

Страница 53: ...NU BPress n or o to select the menu N ISO ISO QUALITY QUALITY EXP COMPENSATION EXP COMPENSATION WHITE BALANCE WHITE BALANCE AUTO AUTO AUTO AUTO SHOOTING MENU SHOOTING MENU M SHOOTING MODE SHOOTING MOD...

Страница 54: ...TO 1600 800 400 200 100 64 AUTO QUALITY p 56 Specifies the image size The larger image size the better image quality is obtained The smaller image size the larger number of images are recorded iF iN 4...

Страница 55: ...o AUTO m 8 SHOOTING MENU SHOOTING MENU SET UP SET UP SHOOTING MODE SHOOTING MODE ISO ISO AUTO AUTO QUALITY QUALITY N OFF OFF CONTINUOUS CONTINUOUS ISO ISO AUTO AUTO QUALITY QUALITY N WHITE BALANCE WHI...

Страница 56: ...ity settings will allow you to take pictures in darker locations they will also increase the amount of speckling in your images Choose the sensitivity setting that best suits the conditions Changing t...

Страница 57: ...ge quality becomes As the number of recorded pixels becomes smaller you will be able to record more frames to a Memory Card The quality setting is retained even when the camera is turned off or the mo...

Страница 58: ...when the camera is turned off S icon appears Set the exposure compensation to 0 EV unless compensation is required Any of the following disables exposure compensation Using the flash in AUTO or b mode...

Страница 59: ...scent light MEMO In AUTO mode the correct white balance may not be achieved for subjects such as close ups of people s faces and pictures taken under a special light source Select the correct white ba...

Страница 60: ...the shutter speed The flash cannot be used as the flash mode is set to C SUPPRESSED FLASH p 48 However when the mode is changed back to normal photography the flash setting specified before continuous...
Страница 61: ...r o to select the menu DPress q PLAYBACK MENU PLAYBACK MENU ERASE ERASE SLIDE SHOW SLIDE SHOW PRINT ORDER DPOF PRINT ORDER DPOF PROTECT PROTECT COPY COPY EPress n or o to change the setting FPress MEN...

Страница 62: ...to display on screen help DPOF set frame PRINT ORDER DPOF You can specify the image number of prints with or without date of printing with a DPOF compatible printer PLAYBACK MENU PLAYBACK MENU ERASE...

Страница 63: ...frame file repeat steps D and E Always press MENU OK to complete the settings RESET ALL p 64 Continued Q WITH DATE WITHOUT DATE APress p or q to display the frame file for specifying DPOF setting BPr...

Страница 64: ...anceled When selecting the WITH DATE E setting the date is imprinted on your shots using the Print Service or a DPOF compatible printer depending on the printer specifications the date may not be prin...

Страница 65: ...inePix J12 Some printers do not support date and time imprinting or specification of the number of prints The warnings shown below may appear while specifying the prints DPOF SPECIFIED ERASE OK DPOF S...

Страница 66: ...tecting frame file Protected reset frame file To protect another frame file repeat steps A and B When protecting frames files is completed press DISP BACK PROTECT OK PROTECT OK YES YES CANCEL CANCEL U...

Страница 67: ...erases all the frames files including protected frames files p 84 Copying the images COPY It is possible to transfer saved images between the internal memory and a Memory Card Your camera calls images...

Страница 68: ...select FRAME BPress MENU OK COPY COPY INTERNALMEMORY INTERNALMEMORY CARD CARD INTERNALMEMORY INTERNALMEMORY CARD CARD YES YES CANCEL CANCEL FRAME FRAME ALL FRAMES ALL FRAMES CPress p or q to select t...

Страница 69: ...Copying all frames ALL FRAMES APress n or o to select ALL FRAMES BPress MENU OK COPY COPY INTERNALMEMORY INTERNALMEMORY CARD CARD INTERNALMEMORY INTERNALMEMORY CARD CARD YES YES CANCEL CANCEL COPY COP...

Страница 70: ...ot be able to rotate images that were shot with a camera other than FinePix J10 FinePix J12 APress p or q to select the rotating frame file BPress MENU OK to open the PLAYBACK MENU CPress n or o to se...

Страница 71: ...r q to select the trimming frame file CPress MENU OK to open the PLAYBACK MENU DPress n or o to select TRIMMING EPress q BPress n o p or q to display another part of the image TRIMMING TRIMMING YES CA...

Страница 72: ...4 3 aspect ratio CAUTION You may not be able to trim images that were shot with a camera other than FinePix J10 FinePix J12 CPress MENU OK Check the saved image size and press MENU OK The trimmed ima...

Страница 73: ...mm to 113 mm 35 mm camera equivalent Max zoom scale 3 Focal range Approx 40 cm 1 3 ft to infinity APress MENU OK to open the menu BPress n or o to select q SHOOTING MODE CPress q DPress n or o to sele...

Страница 74: ...rmation on recording times per Memory Card or internal memory CAUTION Because a movie is recorded onto the Memory Card or internal memory as it is saved it cannot be recorded correctly if the camera s...

Страница 75: ...r movies MEMO The quality setting is retained even when the camera is turned off or the mode setting is changed In r Movie mode you cannot set the ISO sensitivity setting APress n or o to select QUALI...

Страница 76: ...or along with a progress bar Progress bar Control Description Playback Playback begins Playback stops when the end of the movie is reached Pause Resume Pauses the movie during playback Press o again t...

Страница 77: ...r internal memory to the PC s hard disk and then play back the saved file When using FinePix J10 FinePix J12 make sure not to cover the speaker The sound is difficult to hear You can adjust the volume...

Страница 78: ...2 MIN TIME DIFFERENCE TIME DIFFERENCE VIDEO SYSTEM VIDEO SYSTEM NTSC NTSC ENGLISH ENGLISH SET SET UP UP FORMAT FORMAT LANG LANG APress n or o to select the menu BPress q Different type of screen appea...

Страница 79: ...pecifies whether frame numbers are assigned consecutively from previous numbers or begin again 81 DIGITAL ZOOM ON OFF OFF Specifies whether digital zoom is used together 82 LCD POWER SAVE ON OFF ON Da...

Страница 80: ...E DIFFERENCE N I N Specifies the time difference settings 85 VIDEO SYSTEM NTSC PAL Specifies whether video output is set to NTSC or PAL RESET Resets all the camera settings other than the DATE TIME TI...

Страница 81: ...ile number on the last Memory Card The displayed frame number may differ for images photographed on other cameras FRAME NO Formatted Memory Card or internal memory used for both A and B CONT Pictures...

Страница 82: ...ng it CHECK Optical zoom focal length Approx 38 mm to 113 mm Digital zoom focal length Approx 113 mm to 576 mm Max zoom scale approx 5 1 35 mm camera equivalents MEMO When zooming changes between opti...

Страница 83: ...he camera up CAUTION The LCD power save function is disabled during Playback mode and Movie mode Use this function to adjust volume while playing back movie LCD POWER SAVE PLAYBACK VOLUME APress n or...

Страница 84: ...ormatting will be interrupted LCD BRIGHTNESS APress n or o to adjust the LCD monitor brightness The indicator moves to the to display the LCD monitor brightly or to the to darken the LCD monitor BPres...

Страница 85: ...n traveling to destinations in different time zones This function sets a time difference relative to the date and time currently set When this setting is enabled the specified time difference is appli...

Страница 86: ...Always press MENU OK after the settings are completed SET SET UP UP FORMAT FORMAT AUTO POWER OFF AUTO POWER OFF TIME DIFFERENCE TIME DIFFERENCE VIDEO SYSTEM VIDEO SYSTEM HOME HOME LOCAL LOCAL SET SET...

Страница 87: ...for still images When connecting to a TV even if you adjust the volume from the PLAYBACK VOLUME the TV volume cannot be changed Refer to the instructions provided with your TV for more information on...

Страница 88: ...lly charged battery when FinePix J10 FinePix J12 is connected to a printer 2 Connect the camera to a printer and turn the printer on Press w for about 1 second to turn the camera on 3 The following sc...

Страница 89: ...ting BPress n or o to set a value Up to 99 sheets are printed To specify more PRINT settings repeat steps A and B CPress MENU OK to display the confirm setting PICTBRIDGE PICTBRIDGE TOTAL 00002 TOTAL...

Страница 90: ...is not inserted on printers that do not support date printing APress DISP BACK to open the menu BPress n or o to select u PRINT DPOF CPress MENU OK to display the confirm setting PRINTWITH DATE PRINTW...

Страница 91: ...onitor BTurn the camera off Unplug the USB cable MEMO DPOF setting can be specified for images on internal memory CAUTION In PictBridge function images photographed on other than a camera may not be p...

Страница 92: ...NT and Windows 98 cannot be used Operation is not guaranteed on home built PCs or on PCs running updated operating system software Requirement Recommendation Operating System 1 Windows 98 SE Windows...

Страница 93: ...etter suffixes indicating the file type may be shown or hidden e g Setup exe or Setup Text may be shown normally or all in uppercase e g Setup or SETUP 2 Install DirectX as directed by the on screen i...

Страница 94: ...connector fully into the socket to ensure that it is securely connected The software may not operate correctly if the connection is faulty Additional USB interface board is not guaranteed Compatible...

Страница 95: ...me and password for the administrator account and then click the OK button The administrator account is the user account used for Mac OS X installation and you can confirm the user account in the Acco...

Страница 96: ...ings Select Preferences from the Image Capture menu 10Select Other from When a camera is connected open 11Select FPVBridge from FinePixViewer folder in the Applications folder and click the Open butto...

Страница 97: ...e Memory Card with images taken by a FUJIFILM Digital camera MEMO In Windows if FinePixViewer is already installed the driver will be set automatically No action is required Continued Q AInsert the Me...

Страница 98: ...voice memos to a PC The cost of an Internet provider for connecting to the internet is the user s responsibility When using FinePixViewer to save images on a data server network FinePixViewer may not...

Страница 99: ...clicking the Cancel button press ON OFF to turn off the camera and then disconnect it from the PC When the camera is connected to your PC FinePixViewer automatically starts up by the function of Exif...

Страница 100: ...the key to view the previous page or the key to view the next page Only perform this operation when you no longer require the installed software or when the software was not installed correctly Window...

Страница 101: ...rs click the OK button Check your selection carefully since the process cannot be canceled once you click the OK button Macintosh Quit FinePixViewer Then drag the installed FinePixViewer folder to the...

Страница 102: ...SH DPC C F TM for xD P icture Card CARD ADAPTER Z Audio Visual output TV monitor commercially available Audio Visual output Z Printing USB PictBridge compatible Printer commercially available Printer...

Страница 103: ...is compatible with Type M however they may not be compatible depending on the device used Image Memory Card Reader etc Battery Charger BC 45 Quickly charges the rechargeable battery The BC 45 reduces...

Страница 104: ...ash Card Adapter DPC CF Loading an xD Picture Card into this adapter allows you to use the card as a CompactFlash card Type s This is not compatible with the SD Memory Card CO MPACTFLASH DPC CF TM for...

Страница 105: ...ensation If the camera is carried from a cold location into a warm place water droplets condensation may form on the inside of the camera or on the lens When this occurs turn the camera off and wait a...

Страница 106: ...the same compatibility Usable USB drive Type H cannot be used with xD Picture Card USB drive DPC UD1 while Type M can Z Internal Memory Images held in the camera s internal memory may be corrupted or...

Страница 107: ...tness due to too bright or dark shooting condition The picture can be taken but the correct brightness exposure will not be obtained FOCUS ERROR ZOOM ERROR Camera malfunction or fault Turn the camera...

Страница 108: ...ce on the Memory Card The Memory Card or internal memory is not formatted Re insert the Memory Card or turn the camera off and then on again If the message still appears contact your FUJIFILM dealer U...

Страница 109: ...Contact your FUJIFILM dealer The movie and image cannot be played back NO IMAGE Y NO IMAGE An attempt was made to transfer images from the Memory Card or internal memory that memory was empty It is im...

Страница 110: ...on Refer to the user manual supplied with your printer PRINTER ERROR RESUME Displayed for PictBridge Check that the printer is not out of paper or out of ink Printing automatically restarts when the e...

Страница 111: ...e batterieshave been used for a long period The batteries can no longer be recharged Load new batteries 12 22 Power cuts out during operation The batteries have run out Load fully charged batteries 12...

Страница 112: ...y Card 16 The batteries have run out Load fully charged batteries 12 22 The Auto power off function has turned the camera off Turn the camera on 19 85 The LCD monitor darkens after taking a picture Yo...

Страница 113: ...scene being shot Change the Shooting mode for a wider range of flash settings 41 49 The playback image is dark even though the flash was used The subject is too far away Move to within the effective f...

Страница 114: ...hat the speaker is uncovered 10 77 Erasing Erasing FRAME does not erase the frame Some frames may be protected Unprotect frames using the camera on which the protection was first applied 66 Erasing AL...

Страница 115: ...t to VIDEO The video output setting is incorrect Change the setting to NTSC or PAL 78 80 The TV volume is turned down Adjust the volume The TV image is black and white The video output setting is inco...

Страница 116: ...ay be caused temporarily Briefly remove the battery Then reload the battery and try again 12 22 The batteries have run out Load fully charged battery 12 22 The camera no longer works correctly Camera...

Страница 117: ...t Still image DCF compliant Compressed Exif ver 2 2 JPEG DPOF compatible Design rule for Camera File System compliant DPOF compatible Movie AVI format Motion JPEG Audio Monaural sound Number of record...

Страница 118: ...400 800 1600 Standard output sensitivity Photometry TTL 256 zones metering Exposure control Program AE Scene position BABY MODE ANTI BLUR m PORTRAIT LANDSCAPE SPORT 8 NIGHT NATURAL LIGHT BEACH SNOW FI...

Страница 119: ...30 frames per second with monaural sound A movie recording will stop automatically when a movie file becomes approx 2GB If you want to continue recording press the shutter button again The available...

Страница 120: ...ond shot and the camera turned off and then on again once every 10 shots Note Because the number of available shots varies depending on the level of charge in the battery the figures shown here for th...

Страница 121: ...a molded on parallel blade non polarized attachment plug with a 7A 125V NEMA 1 15P configuration The battery and battery charger themselves will become warm due to the power stored inside them This is...

Страница 122: ...ber of recorded pixels 3264 2448 3264 2176 2304 1728 1600 1200 640 480 640 480 320 240 Image data size 4 2 MB 2 3 MB 2 1 MB 1 0 MB 720 KB 215 KB Internal memory approx 8 MB 1 2 3 6 10 35 4 sec 9 sec 1...

Страница 123: ...damages resulting from errors in this Owner s Manual The LCD monitor on your digital camera is manufactured using advanced high precision technology Even so small bright points and anomalous colors p...

Страница 124: ...erts Group A file format used for compressing and saving color images The higher the compression rate the greater the loss of quality in the decompressed restored image Motion JPEG A type of AVI Audio...

Страница 125: ...NJ 08837 TEL 732 857 3000 FAX 732 857 3471 njcamerarepair fujifilm com CENTRAL SOUTH AMERICA Argentina Imagen e informacion S A Technical support Repair service Fondo de la Legua 936 San Isidro Pcia d...

Страница 126: ...Repair service Cuareim 1439 montevideo Uruguay TEL 598 2 9002004 FAX 598 2 9008430 fotocam adinet com uy Uruguay Kiel S A Technical support Repair service Maldonado 1787 Montevideo Uruguay TEL 05982 4...

Страница 127: ...Repair service Benzstrasse 2 47533 Kleve Germany International call TEL 49 211 50890 FAX 49 211 5089668 service fujifilm de National call TEL 0180 5898980 FAX 0180 5898982 12 Cent Min aus dem deutsche...

Страница 128: ...226194200 FAX 351 225194662 cameras fujifilm pt Romania CTS Cardinal Top Systems Ltd Technical support Repair service 112 Calea Dorobanti street 4 flat 1sector Bucharest Romania TEL 4021 230 09 82 FAX...

Страница 129: ...jitec fuji co uk Repair service St Martins Way St Martins Business Centre Bedford MK42 0LF TEL 44 0 123 421 8388 FAX 44 0 123 424 5285 fujitec fuji co uk Ukraine Image Ukraine CJSC Technical support R...

Страница 130: ...romo Road Nairobi Kenya TEL 254 20 4446265 8 FAX 254 20 4448515 7 info fujifilm co ke OCEANIA Australia FUJIFILM Australia Pty Ltd Technical support Repair service Locked Bag 5100 Brookvale NSW 2100 T...

Страница 131: ...Ltd Technical support 30 1 Mukjeung dong Jung gu Seoul Korea TEL 82 2 3282 7363 FAX 82 2 2269 7435 photo fujifilm co kr South Korea Yonsan AS Center Fujidigital Repair service 301 3F Jeonjaland 16 9 H...

Страница 132: ...7 3 AKASAKA 9 CHOME MINATO KU TOKYO 107 0052 JAPAN http www fujifilm com products digital_cameras index html Printed in China...

Отзывы: