FujiFilm CX-550 Скачать руководство пользователя страница 8

11

Try to print!

1

Try

to

p

rint!

10

Try to print!

1

1

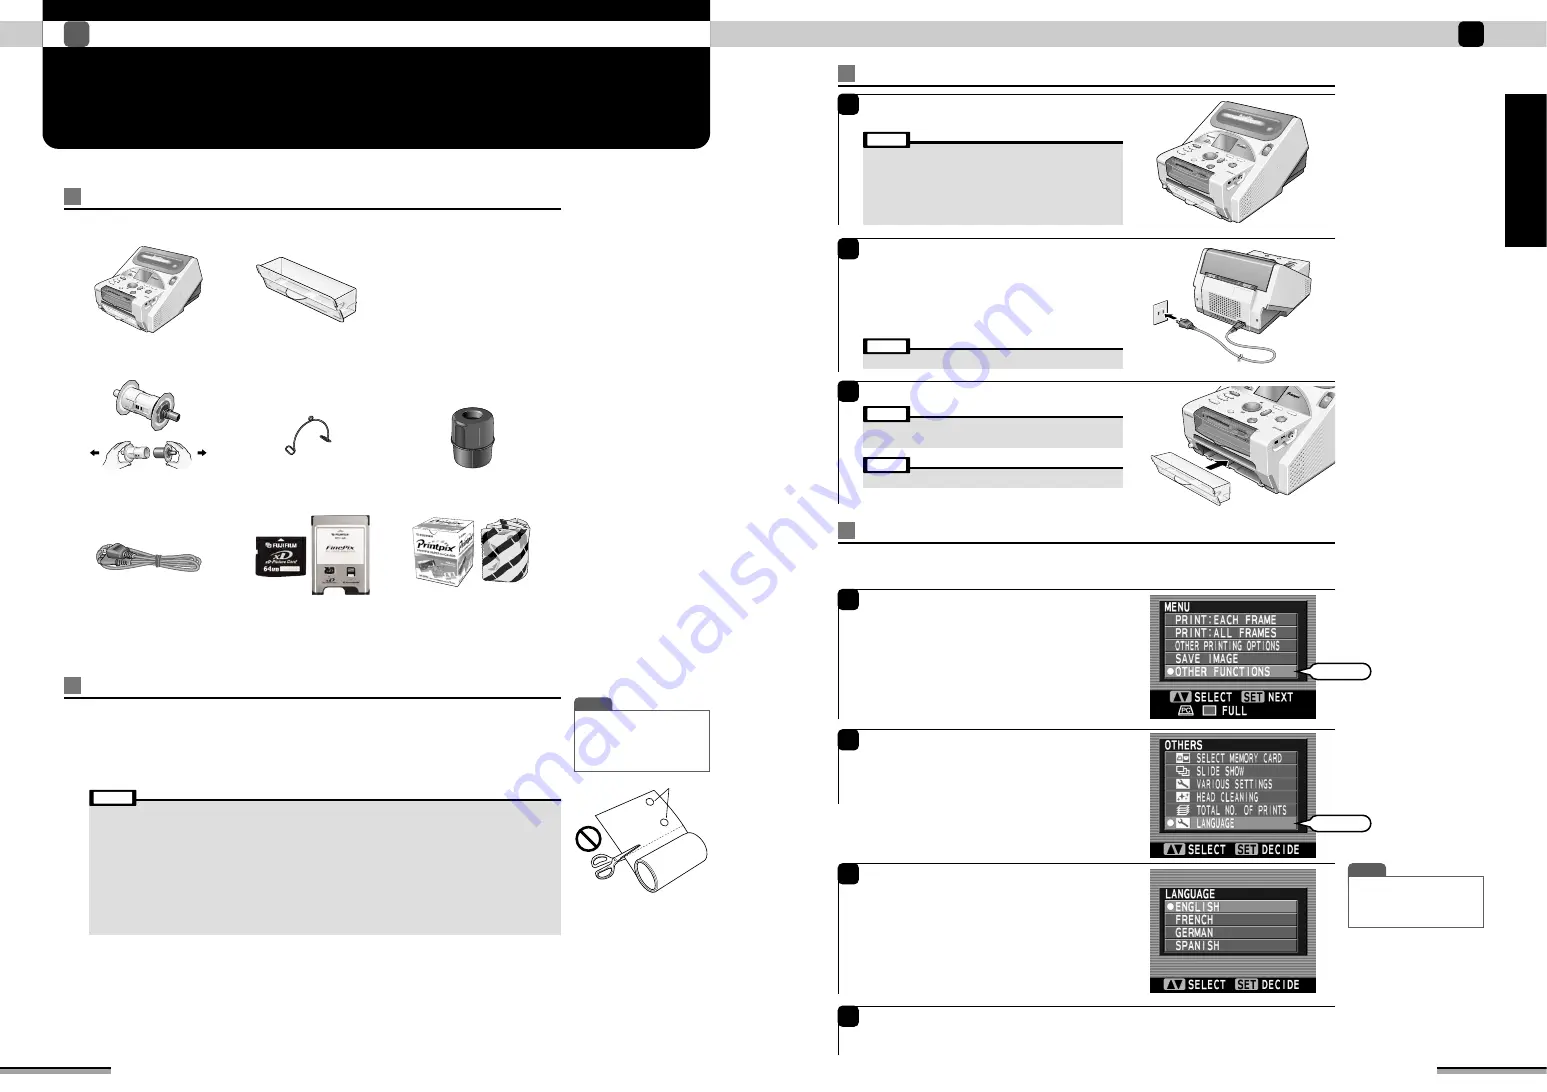
Install the printer.
Set the printer on a flat, wide surface.

2

Connect the power cord to the printer.
Connect one end of the accessory power cord to
the power input terminal on the back of the
printer.
Plug the other end of the power cord into a
power outlet.

3

Install the trash box to the printer.

• Place the printer far enough from a wall so that the

ventilation holes are not blocked.

• When the paper is loaded, the paper compartment cover

opens upward. Therefore, provide a free space of far enough
above the printer.

• The first time you use a memory card, peel the protection

sticker off the cover.

Note

• Do not turn on the printer power yet.

Note

• Always install the trash box.
• Do not turn on the printer power yet.

Note

• Do not obstruct the paper outlet or grab the paper.

Note

PREPARING THE PRINTER FOR USE

Use the printer after checking the accessories (

P.7).

Procuring the necessary materials

Before starting to print, always procure the following items:

Usable paper

Printpix Paper (Sold separately)

This printer uses roll type paper.

Printer

Trash box

Power cord

Paper holder

Retaining ring

Paper 

(Sold separately)

Paper case

Memory card

(Sold separately)

(

xD-Picture Card™, PC card)

Photo Type (100 mm/4 in. wide): RK-SD40

This is normal photo type paper.

Installing the printer

• Be sure that the paper retaining ring is installed.
• After use, always place the paper into the paper case.
• After using the printer, always place the paper into the paper case and store it avoiding the following locations:

- Where it is dry, where the humidity is high, or where it is dusty.
- In a vehicle in the summer, near heating equipment, and other places where the temperature is high.
- Near a window or other places where the paper will be exposed to direct sunlight or strong light.

• Paper with the protective bag unsealed cannot be stored for a long time. Use it as quickly as possible.
• Do not use paper whose effective date is expired.
• When the paper curls immediately after printing, it will flatten naturally if left alone.
• Do not drop the paper and damage the corners. It will cause the paper to jam.
• When there are water droplets on the print surface after printing, immediately wipe the droplets off by patting the

surface with a soft cloth or tissue.

Note

h

Paper

When the printer detects
the paper end holes, it
judges that there is no
more paper and does not
print any farther. Do not cut
off and use this part. It will
cause paper jamming and
printer trouble.

Language

The language displayed on the LCD monitor can be switched among “ENGLISH”,  “FRENCH”,
“GERMAN” and “SPANISH”. The language display setting is saved even when the printer power is
turned off (

P.46).

1

Press the [MENU] button on the top of the
printer.
Use 

f

to select “OTHER FUNCTIONS” and

press the [SET] button.

3

Use 

f

to select the desired language.

ENGLISH:

English language display

FRENCH:

French language display

GERMAN:

German language display

SPANISH:

Spanish language display

4

When the [SET] button is pressed at the end of
setting, the monitor returns to the “OTHERS”
window.

T I P

• Initial setting is “ENGLISH”.
• The language display setting

is saved even when the
printer power is turned off.

Paper end hole

The type of power cord and
plug depends on the country.

Select

2

Use 

f

to select “LANGUAGE” and press the

[SET] button.

Select

T I P

• For the best possible print

quality, print at temperatures
between 18°C and 28°C with
a relative humidity of 40% to
60%.

Содержание CX-550

Страница 1: ......

Страница 2: ......

Страница 3: ...cur in a particular installation If this equipment does cause harmful interference to radio or television reception which can be determined by turning the equipment off and on the user is encouraged t...

Страница 4: ...on the power by pressing the POWER button and leave the printer for approximately 2 hours The inside of the printer will warm up and dry out These specifications are subject to change without notice F...

Страница 5: ...e 37 Rotation 38 Preferable quality 38 Cancel edit 39 Print quality 39 Preferable quality Mode 40 Preferable quality Pinpoint color conv 40 Preferable quality Effect 41 Preferable quality Cancel Effec...

Страница 6: ...o the printer System Configuration Easily print digital camera picture data Memory card picture data can be directly printed When full size prints are printed borderless printing is possible When prin...

Страница 7: ...ted PC card slot A PC card inserts into this slot Insert the PC card until it clicks xD Picture Card slot Insert xD PictureCards into this slot See P 13 and P 16 for information on loading and removin...

Страница 8: ...icle in the summer near heating equipment and other places where the temperature is high Near a window or other places where the paper will be exposed to direct sunlight or strong light Paper with the...

Страница 9: ...the printer Insert the paper holder into the printer from the top and pull it gently to the front 1 Press the POWER button at the bottom front left hand corner of the printer The printer power comes o...

Страница 10: ...there is DPOF information pictures are printed in accordance with the DPOF information P 36 TIP To halt printing during multi picture printing press the BACK button Setting the print quantity 1 Use t...

Страница 11: ...tached 3 Grasp the paper holder knobs with both hands and remove the holder from the printer Remove the paper holder after gently pushing it to the back 4 Remove the printing paper from the paper hold...

Страница 12: ...inter Enjoy various printing 2 Switching the display of picture When the DISPLAY button is pressed the Display of picture is switched to 1 frame or 9 4 frames Setting print size by printer button 1 Th...

Страница 13: ...IONS and then press the SET button 2 The MODE window is displayed FULL P 22 MULTIPLE P 24 INDEX P 29 ID PRINT P 32 ID SETTINGS P 34 Select 20 Enjoy various printing 2 ALL FRAMES PRINT Print setting Ot...

Страница 14: ...ous printing 2 Print settings 1 Use f to select the preferred print mode and press the SET button 2 The SETTINGS FOR FULL window is displayed Use f to select the item you want to set and press the SET...

Страница 15: ...image is quick scrolled However for files other than Exif JPEG TIFF YC RGB only image type characters are displayed Do not touch the moving paper while printing Do not remove the memory card while pri...

Страница 16: ...IFF YC RGB only image type characters are displayed TIP A preview screen can be displayed if the DISPLAY button is pushed for checking a print image 26 Enjoy various printing 2 Multiple print random p...

Страница 17: ...he sets quantity press the SET button e e e MULTIPLE PRINT P 24 continued 8 TIP To halt printing while printing multiple prints press the BACK button Press the PRINT button The Printing window is disp...

Страница 18: ...nued 8 TIP To halt printing while printing multiple prints press the BACK button Press the PRINT button The Printing window is displayed and printing is started At the end of printing the paper ejects...

Страница 19: ...alt printing while printing plural prints press the BACK button 32 ID PRINT Prints up to 24 frames of the picture of the chosen size on one sheet of paper Enjoy various printing 2 Setting ID print 1 U...

Страница 20: ...int frame size and number of frames can be freely selected and registered The registered settings are saved even when the printer power is turned off Enjoy various printing 2 ID settings 1 Use f to se...

Страница 21: ...o its state before finishing press the BACK button When you want to return the picture to its state before finishing press the BACK button TIP The zoom specifications are as follows Max zoom magnifica...

Страница 22: ...d Preferable quality 1 The PREFERABLE QUALITY window appears Use f to select the desired photo finishing and then press the SET button MODE Six kinds of modes can be chosen according to a photography...

Страница 23: ...s in colored sections Brighter colors Darker colors BRIGHTNESS Varies the intensity of primarily bright sections Brighter colors Darker colors DARKNESS Varies the intensity of primarily dark sections...

Страница 24: ...42 SAVE IMAGE ERASE PICTURES Provides a simple way to back up images on one memory card to another memory card Enjoy various printing 2 Save Image Erase Pictures 1 Press the MENU button Use f to selec...

Страница 25: ...eck that the frame to be erased is displayed in the check frame erase window Press the SET button to begin erasing the image data The BUSY lamp blinks during erasing Press the BACK button to cancel er...

Страница 26: ...set Refer page 11 regarding how to set LANGUAGE Various settings such as AUTO QUALITY ADJUSTMENT and SLIDE SHOW can be made Make these settings before printing Other functions 1 Press the MENU button...

Страница 27: ...displayed becomes long FAST The time the picture is displayed becomes short 2 Set if repeat reproduction is to be performed Use c to select the LOOP tab Use f to select the desired setting YES The pic...

Страница 28: ...itor returns to the OTHERS window When printing is not clean even when head cleaning is executed contact your FUJIFILM dealer Note Executing head cleaning 1 If printing paper is loaded in the printer...

Страница 29: ...er outlet and press the POWER button to switch the printer on If there is unejected paper left in the printer wait until it is fed out Error state Check the message on the LCD monitor and refer to pag...

Страница 30: ...of the black paper holder Paper is not loaded Edge of paper is not aligned The paper holding sticker is not peeled off Load the paper correctly P 12 Peel off the paper holding sticker P 12 Special pa...

Страница 31: ...card Open the memory card cover and remove the currently displayed memory card Then insert the correct memory card Initialization error in the save origin memory card Display changes according to the...

Страница 32: ...ect YES and press the SET button When you do not want to format the zoom setting select NO and press the SET button When ROTATION is performed after ZOOM MOVE the ZOOM MOVE settings are canceled When...

Страница 33: ...ting The memory card cover was removed during printing Close the memory card cover If the memory card cover is removed re attach the cover P 52 60 When trouble occurs 4 Symptom Cause Remedy Edit ZOOM...

Страница 34: ...iation It is interchangeable with TIFF and JPEG and can be handled by general picture processing software It also sets forth a thumbnail and camera information recording method DCF which includes fold...

Страница 35: ...mera end of the USB cable used for PictBridge into the USB port on the digital camera 2 Connect the USB cable to the port on the side of the printer The middle port on the side of the printer is speci...

Страница 36: ...6 Connecting to a Digital Camera and Printing 5 Procedures for FUJIFILM digital cameras and printers 2 Connect a digital camera Press the PRINT button on the printer DPOF CHECK window is displayed In...

Страница 37: ...ome Edition CPU Pentium 300MHz or better RAM 64MB minimum for Windows 98 98 Second Edition Me 2000 Professional 128MB Windows XP Hard disk space Amount required for installation 140MB minimum Amount r...

Страница 38: ...ing driver installation The printer is connected to the PC but is not recognized Check Solution Turn the printer power on Check if one end of the USB cable is connected to the printer and the other en...

Страница 39: ...turned on Check if one end of the USB cable is connected to the printer and the other end is connected to the PC Are the printer and PC connected by a USB cable If the printer is connected as a printe...

Страница 40: ...e Double click DXSetup exe in the DirectX8 folder on the CD ROM and then proceed with the installation as directed by the on screen instructions Refer to the Installation Manual on the enclosed CD RO...

Страница 41: ...gain When I tried to launch FinePixVeiwer the Quick Time Lib could not be found message appeared 76 Using the printer connected to a PC 6 TROUBLESHOOTING TABLE Macintosh If the software does not opera...

Страница 42: ...ucick Time Installer exe icon Then follow the on screen instructions 78 Using the printer connected to a PC 6 MEMORY CARD PROBLEMS Macintosh The printer is connected to the Macintosh but the Removable...

Страница 43: ...nfirming switch to printer window appears Press the SET button to change the connection method If the connection method is switched to printer mode the Connected as printer window reappears If the con...

Страница 44: ...g Software and Documentation collectively 2 Use of Software FUJIFILM grants to you a nontransferable nonexclusive license a to install one copy of Software onto one computer in binary machine executab...

Страница 45: ...hoto Film Co Ltd Manufacturer s Address 26 30 Nishiazabu 2 chome Minato ku Tokyo 106 8620 Japan is in conformity with the following Standards Safety EN60065 EMC EN55022 1988 Classe B EN55024 1988 EN61...

Страница 46: ......

Страница 47: ......

Отзывы: