background image

57

Advanced

Features

3

3

1

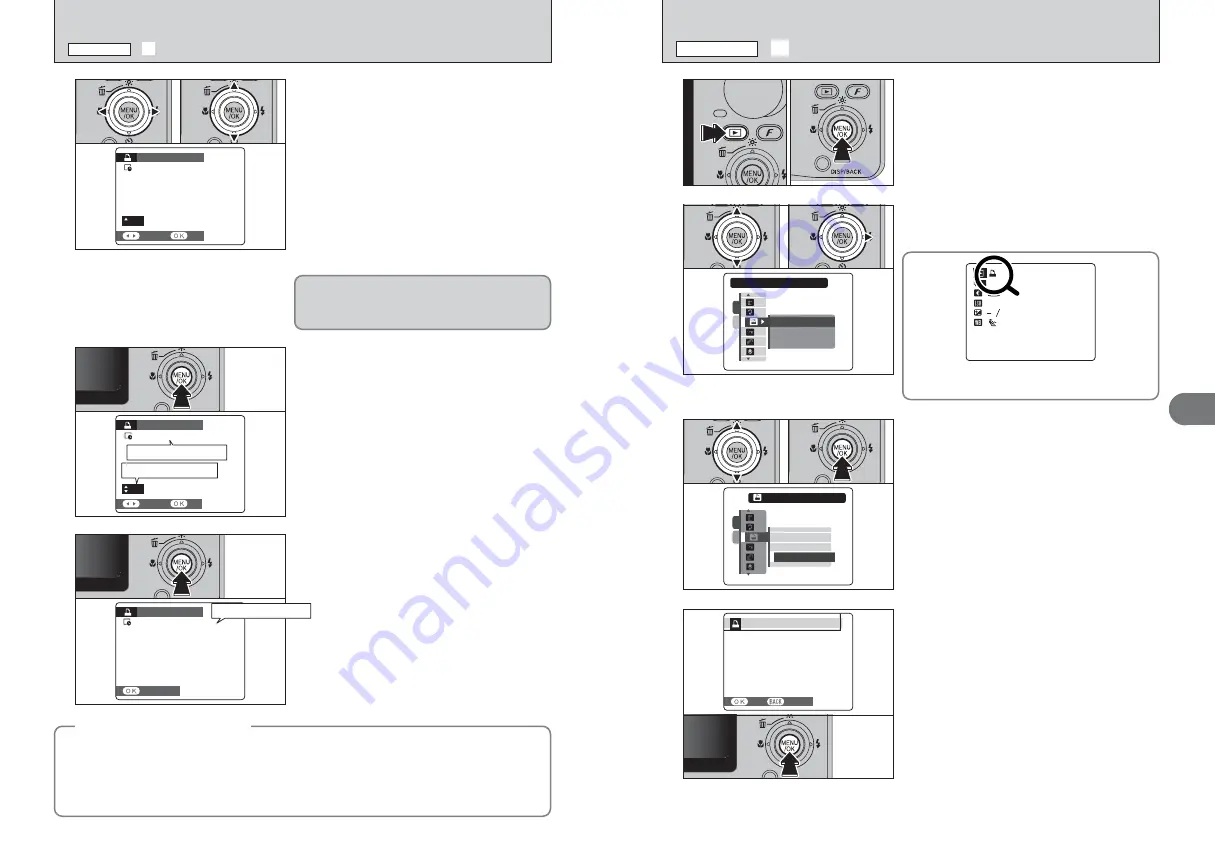
Press “

a

” or “

b

” to select “RESET ALL”.

2

Press the “MENU/OK” button.

RESET ALL

RESET ALL

WITHOUT DATE

WITHOUT DATE

RESET ALL

RESET ALL

WITH DATE

WITH DATE

1

2

0

1

0

2

PRINT ORDER (DPOF)

PRINT ORDER (DPOF)

WITHOUT DATE

WITHOUT DATE
RESET ALL

RESET ALL

WITH DATE

WITH DATE

1

2

0

1

0

2

2

1

Press “

a

” or “

b

” to select “

¸

”  PRINT ORDER

(DPOF).

2

Press “

c

”.

1

Press the “

w

” button to turn the camera on in

Playback mode.

2

Press the “MENU/OK” button to display the
menu on the LCD monitor.

4

A message appears on the LCD monitor.
To reset all the DPOF settings, press the
“MENU/OK” button.

1

u

” appears on the LCD monitor during playback

when the image has specified DPOF settings.

 2/24/2006  10:00 AM

100-0009

200

200

:
:
:
:

1

2

3

N

¸

DPOF ALL RESET

PLAYBACK MENU

0

1

0

2

RESET DPOF OK?

RESET DPOF OK?

YES 

YES 

CANCEL

CANCEL

56

¸

DPOF SET FRAME

PLAYBACK MENU

Total number of prints

Setting for that frame

SHEETS

SHEETS

PRINT ORDER (DPOF)

PRINT ORDER (DPOF)

DPOF

DPOF :

00009

00009

FRAME

FRAME

SET

SET

01

01

SHEETS

SHEETS

PRINT ORDER (DPOF)

PRINT ORDER (DPOF)

DPOF

DPOF :

00000

00000

FRAME

FRAME

SET

SET

00

00

4

1

Press “

d

” or “

c

” to display the frame (file) for

specifying DPOF settings.

2

Press “

a

” or “

b

” to set a value up to 99 as the

number of copies of the frame (file) to be printed.
For frames (files) that you do not want printed,
set the number of prints to 0 (zero).

To specify more DPOF settings, repeat steps 

1

and 

2

.

!

Prints of up to 999 frames (files) can be ordered on the same

xD-Picture Card

.

!

T

” appears on the LCD monitor when selecting “WITH

DATE”.

!

DPOF settings cannot be specified for movie.

!

Images photographed with a camera other than FinePix F470
may not be specified DPOF settings.

5

Always press the “MENU/OK” button after the
settings are completed.

Pressing the “DISP/BACK” button cancels those
settings.

TOTAL:

TOTAL:


9

SHEETS

SHEETS

COMPLETED

COMPLETED

PRINT ORDER (DPOF)

PRINT ORDER (DPOF)

6

Total number of prints appears on the LCD monitor.
Press the “MENU/OK” button.

Pressing the “DISP/BACK” button while choosing
settings will cancel all current settings. If there were
previous DPOF settings, only the modifications are
canceled.

0

1

0

2

Canceling DPOF setting 

To cancel the DPOF setting for a specified frame (file):

1

Press “

d

” or “

c

” to select the frame (file) with the DPOF setting you want to cancel.

2

Set the number of prints to 0 (zero).

To cancel the DPOF setting for another frame (file), repeat steps 

1

and 

2

.

Press the “MENU/OK” button to complete the settings.

h

DPOF ALL RESET (

P.57)

Total number of prints

Содержание A470

Страница 1: ...ow you how to use your FUJIFILM DIGITAL CAMERA FinePix F470 correctly Please follow the instructions carefully OWNER S MANUAL 1 2 3 4 5 6 Getting Ready Settings Using the Camera Advanced Features Soft...

Страница 2: ...engineer decompile or disassemble Software 4 Ownership All copyrights and other proprietary rights to Software and Documentation are owned and retained by FUJIFILM or the third party suppliers as indi...

Страница 3: ...ENU p PHOTO MODE PHOTOGRAPHY PHOTOGRAPHY FUNCTIONS 3 Advanced Features IMAGE ROTATE 51 HOW TO SPECIFY PRINT OPTIONS DPOF 52 SPECIFYING DPOF SETTINGS EASILY 53 DPOF SET FRAME 55 DPOF ALL RESET 57 PROTE...

Страница 4: ...aircrafts please note that this camera may cause interference to other equipment in the hospital or aircraft For details please check with the applicable regulations Handling Your Digital Camera This...

Страница 5: ...ures Example of LCD Monitor text display Photography mode 2006 1 1 12 00 AM N N N ISO 200 ISO 200 ISO 200 ISO 200 10 100 0001 200 1 2 3 AF frame Battery level indicator Photography mode Exposure compe...

Страница 6: ...2 Charging lamp N P 4 0 N Load the battery into the Battery Charger BC 40 correctly as indicated by the polarity icon to start charging Charging ends after about 90 minutes and the charging lamp turns...

Страница 7: ...e LCD monitor Battery with no remaining charge V blinking red may cause camera faults such as the camera turning itself off without retracting the lens Always load a new or fully charged battery Z E o...

Страница 8: ...Take care also not to get fingerprints on the camera lens as this will result in impaired image quality in your shots Turn the camera on in Photography mode SET SET CANCEL CANCEL 2008 2007 2005 2004...

Страница 9: ...DISP 1 3 2 SET SET CONT CONT OFF OFF 3 SEC SEC 1 5 SEC SEC 2 Press a or b to select SET SET OFF OFF SET UP SET UP Correcting the date and time Changing the date format 1Press d or c to select the date...

Страница 10: ...e language DEUTSCH DEUTSCH ITALIANO ITALIANO FRANCAIS FRANCAIS NTSC NTSC OK OK ENGLISH ENGLISH ENGLISH ENGLISH 1 3 2 ENGLISH ENGLISH ESPANOL ESPANOL This section describes the camera s functions Auto...

Страница 11: ...memory cannot be used at the same time Photographed images are always recorded to xD Picture Card when inserting xD Picture Card into the camera ON ON OFF OFF CONT CONT SET SET OFF OFF ERASE OK ERASE...

Страница 12: ...h Subjects photographed through glass h Subjects that do not reflect well such as hair or fur h Subjects with no substance such as smoke or flames h Dark subjects h Fast moving subjects h Subjects wit...

Страница 13: ...70 pressing the shutter button down halfway locks the focus and exposure settings AF AE lock To focus on a subject that is off to one side or to set the exposure before composing the final shot lock t...

Страница 14: ...Press the w button during shooting to change to Playback mode Press the w button again to return to Photography mode Photography b a Playback Power ON Auto power off function When the Auto power off f...

Страница 15: ...changes to the next page 2Press c to return to b 200 2006 4 2 22 22 2 23 2 24 24 0 1 0 2 5 4 VIEWING THE IMAGES w PLAYBACK PLAYBACK MODE Playback zoom Press the T or W button during single frame playb...

Страница 16: ...he camera on in Playback mode Press the MENU OK button to erase the displayed frame file When erasing frame file is completed camera returns to single frame playback 4 Memo ERASING IMAGE ERASE FRAME P...

Страница 17: ...ECTING THE CAMERA SETTINGS PHOTOGRAPHY FUNCTIONS 3 Advanced Features s MANUAL TEXT FLOWER CLOSE UP PARTY MUSEUM SUNSET BEACH SNOW m PORTRAIT LANDSCAPE SPORT NIGHT d Flash AUTO Auto flash b Red eye red...

Страница 18: ...o prevent camera shake always use a tripod For slow shutter speeds of 1 2 sec or longer recording takes longer because noise reduction processing is performed after you take the shot PROCESSING appear...

Страница 19: ...when the battery is low on charge When taking a picture using the flash the image may disappear and go dark briefly due to flash charging The indicator lamp blinks orange during charging The flash fi...

Страница 20: ...Photography mode P 35 A countdown appears on the LCD monitor indicating the time remaining until the picture is taken Self timer mode is canceled after each shot 9 9 4 1Position the AF frame over the...

Страница 21: ...ow light conditions you cannot check the subject The color tones may vary depending on the subjects 2 UP UP 10 10 N N N F N QUALITY QUALITY AUTO AUTO STD STD 1 1Set the Mode switch to Photography mode...

Страница 22: ...ible in shots of scenes such as the night sky Choose the sensitivity setting that best suits the conditions When selecting AUTO as the sensitivity setting the camera selects the best sensitivity setti...

Страница 23: ...with some subjects such as close up shots of people portraits Because the effects on the image differ depending on the scene being shot in p CHROME mode take pictures in p STANDARD mode as well as thi...

Страница 24: ...bright scenes such as snowfields and highly reflective subjects 3 steps 1 EV i Shots made up predominantly of sky 3 steps 1 EV i Spotlit subjects particularly against dark backgrounds 2 steps DW EV i...

Страница 25: ...s per second When taking the pictures the last photographed image appears and all of the images are recorded STORING STORING Number of available frames in Continuous shooting mode Number of available...

Страница 26: ...ALL OK IT MAY TAKE A WHILE IT MAY TAKE A WHILE YES YES CANCEL CANCEL ERASE OK ERASE OK YES YES CANCEL CANCEL 1Press d or c to select the erasing frame file 2Press the MENU OK button to erase the curr...

Страница 27: ...settings only the modifications are canceled 0 1 0 2 When DPOF settings were specified on another camera When the data includes a frame file with DPOF settings that were specified on another camera RE...

Страница 28: ...ngs 2 24 2006 10 00 AM 100 0009 200 200 12 3 N 0 1 0 2 DPOF SET FRAME PLAYBACK MENU Continued 54 DPOF SETTING HAS BEEN COMPLETED DPOF SETTING HAS BEEN DPOF SETTING HAS BEEN COMPLETED COMPLETED DPOF SE...

Страница 29: ...DPOF settings 2Press a or b to set a value up to 99 as the number of copies of the frame file to be printed For frames files that you do not want printed set the number of prints to 0 zero To specify...

Страница 30: ...only the selected frame file SET ALL Protects all the frames files RESET ALL Removes the protection from all the frames files Protection is a setting that prevents frames files from being accidentally...

Страница 31: ...0 2 RECORDING VOICE MEMOS PLAYBACK MENU Continued VOICE MEMO VOICE MEMO ON ON 1 2 60 FADE IN FADE IN FADE IN FADE IN NORMAL NORMAL FADE IN FADE IN MULTIPLE MULTIPLE CLOCK CLOCK NORMAL NORMAL 1 2 3 1Pr...

Страница 32: ...pears on the LCD monitor when an image file with a voice memo is selected Voice memos cannot be played back using multi frame playback Press the DISP BACK button to select single frame playback Playin...

Страница 33: ...es depending on the zoom scale For 0 3M the YES option appears in yellow 2 3 TRIMMING TRIMMING SET SET 1 2 Continued TRIMMING PLAYBACK MENU 64 SET SET CANCEL CANCEL 1 0 2 3 4 6 5 8 9 10 10 7 1 Press t...

Страница 34: ...OPY COPY CANCEL CANCEL ALL FRAMES ALL FRAMES FRAME FRAME 0 1 0 2 EXCHANGING INTERNAL MEMORY DATA PLAYBACK MENU Continued 66 YES YES CANCEL CANCEL TRIMMING TRIMMING Press the DISP BACK button to return...

Страница 35: ...ed See P 71 for information on changing the quality mode Because a movie is recorded onto the xD Picture Card or internal memory as it is saved it cannot be recorded correctly if the camera suddenly l...

Страница 36: ...al memory 6 Press the shutter button down halfway during recording the recording ends 4 Press the shutter button down fully to start recording The brightness and color of the LCD monitor shown during...

Страница 37: ...Skip playback Press d or c when the movie is paused the movie advances or goes back one frame Hold down d or c to move through the frames quickly 6s s STOP STOP PAUSE PAUSE Bar PLAY PLAY PLAYING BACK...

Страница 38: ...the MENU OK button to confirm the changes ENGLISH ENGLISH OK OK NTSC NTSC 1 3 2 USB MODE USB MODE 4 Press a or b to select the menu item SET UP 4 Settings USING THE SET UP SCREEN 1 Press the MENU OK b...

Страница 39: ...0 2 SET UP SET UP menu options Settings Display Factory default Explanation page BEEP VOLUME OFF 1 2 3 2 Sets the volume of the tone emitted when the camera controls are used IMAGE DISP 3 SEC 1 5 SEC...

Страница 40: ...anges between optical and digital the position of the indicator stops Press the same Zoom button again to start the indicator moving again If the shot goes out of focus during zooming hold the shutter...

Страница 41: ...rotected frames files Back up important frames files onto your PC or another media 1Press d or c to select OK 2Pressing the MENU OK button erases all the frames files and initializes the xD Picture Ca...

Страница 42: ...FinePix Internet Service The software can still be installed even if you do not have an Internet connection Operating System 1 CPU Windows 98 including the Second Edition Windows Millennium Edition W...

Страница 43: ...ware requirements Compatible Mac Power Macintosh G3 1 PowerBook G3 1 Power Macintosh G4 iMac iBook Power Macintosh G4 Cube or PowerBook G4 Power Macintosh G5 Operating System Mac OS X compatible with...

Страница 44: ...e AC Power Adapter AC 5VX sold separately 2 Video yellow Audio white To terminals Plug the other end of the cable into the audio video input socket on the TV Then turn the camera and TV on and take pi...

Страница 45: ...PRINT DPOF OK appears on the LCD monitor Press the MENU OK button to begin printing PRINT DPOF OK PRINT DPOF OK TOTAL TOTAL 9SHEETS SHEETS YES YES CANCEL CANCEL 1Press the w button for about 1 second...

Страница 46: ...CEL TOTAL TOTAL 00009 00009 SHEETS SHEETS FRAME FRAME 01 01 0 1 0 3 0 2 7 PRINTING PRINTING SHEETS SHEETS CANCEL CANCEL 1 9 1 9 Disconnecting the printer 6 2 CONNECTING THE CAMERA DIRECTLY TO THE PRIN...

Страница 47: ...e first Do not connect the camera to the PC before installing all the software This mode provides a simple way to read images from an xD Picture Card or internal memory and store images onto an xD Pic...

Страница 48: ...ew removable disk icon appears in the My Computer window FinePixViewer automatically starts up and the Save Image Wizard window Save Image dialog box appears Follow the instructions provided on screen...

Страница 49: ...ow in the menu that appears 3The Slide Show information appears Press the key to view the previous page or the key to view the next page 6 4 1 Mastering FinePixViewer Only perform this operation when...

Страница 50: ...ure Card of 16 MB to 512 MB and SmartMedia of 3 3 V 4 MB to 128 MB h PC Card Adapter DPC AD The PC Card Adapter allows the xD Picture Card and SmartMedia to be used as a PC Card Standard ATA compliant...

Страница 51: ...Take particular care to read the Safety Notes to make sure that you use the battery correctly When shipped the NP 40N is not fully charged Always charge the NP 40N before using it h When carrying the...

Страница 52: ...he camera off during data recording or erasing xD Picture Card formatting as this could be damaged to the xD Picture Card h The use of xD Picture Cards is recommended with FinePix F470 The recording q...

Страница 53: ...arnings that are displayed on the LCD monitor Lit red Blinking red The battery is low or completely out of charge Load a new or fully charged battery There is a strong likelihood of camera shake becau...

Страница 54: ...otected The internal memory or xD Picture Card is full 107 106 Troubleshooting Possible causes Solutions Screens are not displayed in English There is no image or sound on the TV The TV image is black...

Страница 55: ...ilable shots using battery is not guaranteed The number of available shots will also decline at low temperatures NP 40N Approx 200 Battery Type Number of frames Model Digital camera FinePix F470 Effec...

Страница 56: ...e color of the ambient light around the subject This adjustment is called matching the white balance Exif Print Format is a newly revised digital camera file format that contains a variety of shooting...

Страница 57: ...4662 cameras fujifilm pt If you have technical questions or if you need repair service ask the following local distributor Please present the warranty card and your purchase receipt when you ask for r...

Страница 58: ...EL 662 2730029 ext 761 762 FAX 662 2730239 warin fujifilm co th FUJIFILM Digital Camera Worldwide Network Romania CTS Cardinal Top Systems Ltd Technical support 112 Calea Dorobanti street 4 flat 1sect...

Страница 59: ...When discarding cover the battery terminals with insulation tape h Contact with other metallic objects or battery could cause the battery to ignite or burst Keep xD Picture Cards out of the reach of...

Страница 60: ...118 Memo...

Страница 61: ...26 30 Nishiazabu 2 chome Minato ku Tokyo 106 8620 Japan http home fujifilm com products digital Printed in Japan 1AG6P1P2952 FPT 507111...

Отзывы: