background image

Operating the Client (Personal Computer)

35

3

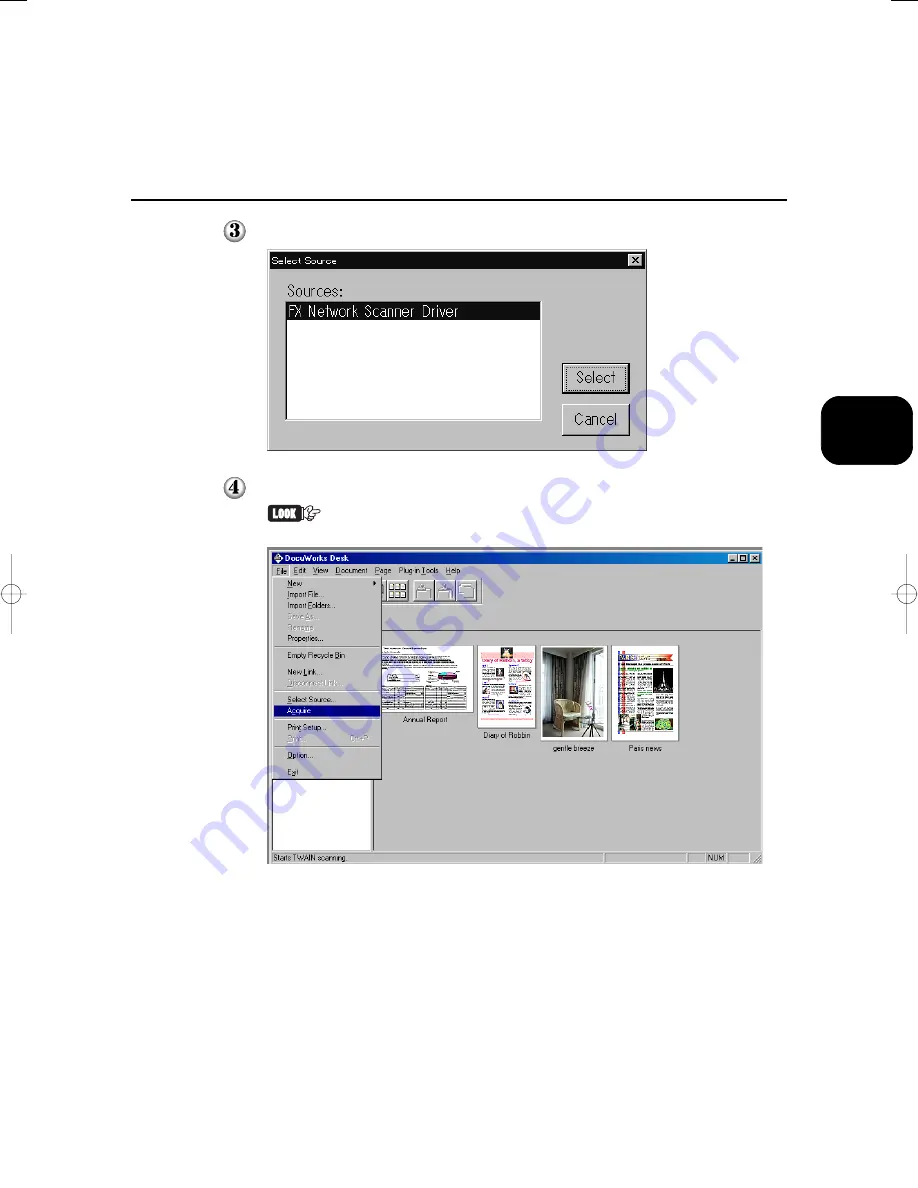
Click 

FX Network Scanner Driver

, then 

Select

.

Click the command to import the scanned data.

The screen example as shown below is DocuWorks V3.0E. The command name
for importing the data differs depending on the software.

3.1  Using the Network Scanner Driver

Содержание Document Centre 505

Страница 1: ...Document Centre 706 705 606 605 506 505 Series UserGuide Scanner...

Страница 2: ...rtant This manual is copyrighted with all rights reserved Under the copyright laws this manual may not be copied or modified in whole or part without the written consent of the publisher Parts of this...

Страница 3: ...features To get the most out of the machine please read this guide carefully in its entirety This guide is written with the assumption that you are familiar with the basic knowledge and way of operati...

Страница 4: ...ork Scanner Utility 13 1 4 1 Required Environment 13 1 4 2 Installation 14 1 4 3 Uninstallation 16 Chapter 2 Operating the Scanner 2 1 Scanning Documents Scan to Mailbox 18 2 2 Specifying Various Feat...

Страница 5: ...4 3 1 2 Changing Display of the Scanner Name 41 3 1 3 Changing Import Settings 43 3 2 Using the Mailbox Viewer 44 3 2 1 Confirm Delete Import the Stored Document in a Mailbox 44 3 2 2 Setting up the P...

Страница 6: ...with the Printer Scanner Kit or Printer Model User Guide Printer Explains the printer functions installation configuration of the printer drivers as well as the setting up and operations when using th...

Страница 7: ...ou may skip sections on the options you did not purchase Organisation The following is a summary of each chapter Chapter 1 Before Using the Scanner This chapter provides a summary of the scan function...

Страница 8: ...ble quotes are used to indicate names of files windows dialog boxes and input contents E g MailboxViewer dialogboxappears Bold face Bold face characters refer to window menu items dialog box items and...

Страница 9: ...Before Using the Scanner 1 1 Overview 2 1 2 Required Environment 3 1 3 Setting Up the Document Centre for Using Mailbox Feature 4 1 4 Installing the Network Scanner Utility 13...

Страница 10: ...1 Scanning With the Mailbox You can store a document in the mailbox by scanning it with the Document Centre The stored data can be imported to the personal computer client connected to a network The...

Страница 11: ...following operatingsystems Microsoft Windows 95 Windows 98 Windows Me Microsoft WindowsNT Version4 0 Windows 2000 Windows NT 4 0 Server TSE Terminal Server Edition and Windows 2000 Server Advanced Se...

Страница 12: ...ows 1 3 1 Starting up the Salutation On the control panel of the Document Centre start up the Salutation and define the IP address following the procedure shown below You do not need to define the IP...

Страница 13: ...system administrator using the keypad then select Confirm The access number is displayed as If you made an error while entering the access number press Clear C to clear and re enter Select Close to re...

Страница 14: ...ttings Select Enable then Save The Port Settings Salutation Port screen is displayed with the new setting The IP address is automatically obtained via DHCP or BOOTP depending on your setting To specif...

Страница 15: ...mbers are entered the cursor moves to the next bit automatically If you want to move it manually select the Enter Next button 1 3 2 Setting up the Subnet Mask Gateway Address On the control panel of t...

Страница 16: ...the keypad then select Confirm The access number will be displayed as If you made an error while entering the access number press the Clear C button to clear and re enter Select the Close button to re...

Страница 17: ...keypad then select Save When three numbers are entered the cursor moves to the next bit automatically If you want to move it manually select Enter Next Select TCP IP Gateway Address in Step to specif...

Страница 18: ...re 1 3 3 Creating a Mailbox Create a mailbox to store the scanned document You can create the mailbox using the control panel of the main unit You can create up to 200 mailboxes Procedure Press Settin...

Страница 19: ...re Select an unused mailbox number then Create Delete Enter a four digit password using the keypad then select Confirm The password will be displayed as The password must be unique Select Enter Change...

Страница 20: ...ilbox Feature Enter the name of the mailbox using the keypad on the screen then select Save User Guide Copier for entering text Confirm the name of the mailbox then select Save Select Close a few time...

Страница 21: ...Server Advanced Server Terminal Service are not compatible with this utility Personal Computer The target computer must meet all the following requirements Running i486DX4 100 MHz processor or above...

Страница 22: ...me following the installation procedure below Procedure Start Windows 95 Windows 98 Windows Me Windows NT 4 0 or Windows 2000 Click the Start menu and select Run The Run dialog box appears Insert the...

Страница 23: ...nue with the installation When the installation is completed the following dialog box appears ClickYes I want to restart my computer now then Finish TheinstallationiscompletedandWindowsrestartsautomat...

Страница 24: ...ed in MicrosoftWindows Procedure Start Windows 95 Windows 98 Windows Me Windows NT 4 0 or Windows 2000 Double click My Computer Control Panel then Add Remove Programs Click Fuji Xerox Network Scanner...

Страница 25: ...er 2 1 Scanning Documents Scan to Mailbox 18 2 2 Specifying Various Features 20 2 3 Scanning With the Job Memory 25 2 4 Checking Job Status 26 2 5 Deleting Stored Documents 28 2 6 Custom Presets for S...

Страница 26: ...re the scanned document into the mailbox Procedure Load the documents Select Scan Mode on the Menu screen If the screen below is not displayed press the Menu button on the control panel to display it...

Страница 27: ...the necessary scanning features 2 2 Specifying Various Features for details of scanning features Press Start The following screen is displayed Press the Next Original button to scan other documents co...

Страница 28: ...ollowing the procedure below 2 2 1 Selecting the Resolution Level You can select the resolution level for the documents to be scanned The resolution levels are 200 dpi factory default 300 dpi 400 dpi...

Страница 29: ...Select Text or Text Photo to remove the background colour of texts When scanning A4 or larger documents with the selection of 600 dpi resolution and Text Photo or Photo Halftone the memory will overf...

Страница 30: ...u specified instead of the actual size of the document The scan sizes are Auto Detect factory default B5 B5 B4 A5 A5 A4 A4 A3 8 5 11 8 5 11 8 5 14 If the original size is smaller than the specified sc...

Страница 31: ...5 Scanning Documents at the Specified Ratio You can reduce or enlarge the image of the document You can select a ratio of 100 factory default or 70 81 86 115 122 141 Procedure Select Reduce Enlarge o...

Страница 32: ...sing the Duplex Automatic Document Feeder DADF Select the binding location to determine the Head to Toe orientation of the image on both sides of the documents Procedure Select 2 Sided Original on the...

Страница 33: ...ures only or the mailbox to be stored and the scanning features to the job memory Procedure Select Retrieve Stored Jobs on the Menu screen If the screen below is not displayed press the Menu button on...

Страница 34: ...or delete the jobs stored in the memory by pressing Job Status Stop Procedure Press Job Status Stop Select Scan Job Select the job that you want to check Select the Job Results button to check the co...

Страница 35: ...finished checking select Exit You can temporarily stop a job which is running or in waiting status by selecting the Stop button Refer to 3 3 Cancelling Printing from Printer of User Guide Printer for...

Страница 36: ...w Procedure Select Scan Mode on the Menu screen If the screen below is not displayed press the Menu button on the control panel to display it Select Scan to Mailbox 1 3 3 Creating a Mailbox to create...

Страница 37: ...s displayed in the Mailbox Status If there are no documents in the mailbox you cannot select the Delete Document button Enter the password of the mailbox then select Confirm Select the document to be...

Страница 38: ...actory default items that can be changed are as follows Screen Layout You can set the screen to appear first when you select the Scan button or the feature buttons to be displayed on the Customised Fe...

Страница 39: ...onfirm The access number will be displayed as If you made an error while entering the access number press the Clear C button to clear and re enter Select the Close button to restart the machine The fa...

Страница 40: ...the required item then Change Settings In the example shown here Scan Resolution is selected Select the required resolution then select Save Select Close then Exit Tools The machine will restart auto...

Страница 41: ...Operating the Client Personal Computer 3 1 Using the Network Scanner Driver 34 3 2 Using the Mailbox Viewer 44...

Страница 42: ...ed documents from the mailbox to the application software Procedure Activate Windows 95 Windows 98 Windows Me Windows NT 4 0 or Windows 2000 then start up the application software The application soft...

Страница 43: ...k FX Network Scanner Driver then Select Click the command to import the scanned data The screen example as shown below is DocuWorks V3 0E The command name for importing the data differs depending on t...

Страница 44: ...g scanner names by clicking the Change Display button When the Document Centre is connected to the same network as your computer the scanner names are displayed automatically If you want to change to...

Страница 45: ...37 3 Enter the required mailbox number 1 to 200 Enter the password for the mailbox four digits then click Open Mailbox Check the Save a Password button to skip the procedure from Steps to the next tim...

Страница 46: ...of the network scanner which you are accessing now File No Number assigned to identify the documents This number will also be displayed in the touch panel display when the network scanner is used to...

Страница 47: ...e mode MH MR and MMR are coding schemes for fax feature The compressed format for scanned image is defined according to the setting of the Original Type you specified Import Import the selected file f...

Страница 48: ...nging Import Settings for details When the Import button is pressed the dialog box as shown below appears and the data will be transferred The data is imported to the activated software and the docume...

Страница 49: ...HOSTS file in WINDOWS HOSTS file for Windows 95 Windows 98 Windows Me and in WINNT SYSTEM32 DRIVERS ETC HOSTSfileforWindowsNT4 0 Windows2000 If the network scanner is not registered for each of the HO...

Страница 50: ...her networks However if communication is not succcessful with the added scanners when using TCP IP they cannot be used You should set up the scanner so that it can be used in TCP IP environment when c...

Страница 51: ...be imported first File List Mode Select the way of displaying files File Display the total number of pages for each multiple page file Page Display separately each page of the multiple page file To b...

Страница 52: ...ains how to use the mailbox viewer 1 4 Installing the Network Scanner Utility 3 2 1 Confirm Delete Import the Stored Document in a Mailbox This section describes how to confirm delete and import and s...

Страница 53: ...to the same network as your computer the scanner names are displayed automatically If you want to select a scanner from another network click the Change Display button then enter the IP address and s...

Страница 54: ...eration of the features The detailed explanation of each feature is as explained below Scanner Name Name of the network scanner which you are accessing now Mailbox No Displaysthemailboxnumber File No...

Страница 55: ...paper size of the file For faxes the paper size of the first page will be displayed When the following paper size abbreviations are displayed it indicates that a document of one of the following inch...

Страница 56: ...licked the Import all existing documents checkbox on the Setting dialog box the Update button is changed to the Import button 3 2 2 Setting up the Properties of Mailbox Viewer for the setting up of im...

Страница 57: ...ox to automatically import all existing files from the Mailbox Viewer The Import Properties button will only be active when this checkbox is checked Also the Update button on the Mailbox Viewer dialog...

Страница 58: ...to display the dialog box then specify the required compression type and drive and or folder Import Order Select the order of importing image files When New Old is selected the sequence will be rever...

Страница 59: ...Precautions and Limitations 4 1 Precautions and Limitations 52...

Страница 60: ...he Network Scanner Driver and the Mailbox Viewer at the Same Time You cannot access the Document Centre by using the mailbox viewer and the network scanner driver at the same time Importing from Sever...

Страница 61: ...Appendix A Compatible Software 54...

Страница 62: ...op Ver 6 0 WANG Laboratories Inc ImagingforWindow95 V1 0 V1 01 WANG Laboratories Inc Imaging for Windows Release1 1 WANG Laboratories Inc Imaging for Windows Eastman Software Inc Imaging for Windows M...

Страница 63: ...ilbox 34 48 Installation Procedure 14 Required environment 13 IP address 4 L Lighter Darker 21 Limitations 52 LocalFile 41 M MailboxViewer How to use 44 Installation 14 N Negative Image 43 Network 41...

Страница 64: ...56 Index U Uninstallation 16 Using the Network Scanner Driver 34...

Страница 65: ...Name Occupation Company or organisation Address z z z z z About the Manual Strongly Neutral Strongly agree disagree 1 It is handy 1 2 3 4 5 2 It is easy to read 1 2 3 4 5 3 Titles of chapters and sec...

Страница 66: ......

Страница 67: ...y or organisation Address About the Manual Strongly Neutral Strongly agree disagree 1 It is handy 1 2 3 4 5 2 It is easy to read 1 2 3 4 5 3 Titles of chapters and sections make sense 1 2 3 4 5 4 Info...

Страница 68: ......

Страница 69: ...Centre 706 705 606 605 506 505 Series User Guide Scanner Human Interface Design Development Document Products Company Fuji Xerox Co Ltd DE 1389E2 Edition 1 Copyright 2002 by Fuji Xerox Co Ltd Printed...

Отзывы: