


10
HD Color Video Camera User Manual
3. Application Instructions
4. Network Connection
3.1 Video Output
3.1.1 Power-On Initial Configuration
When connecting the power, the camera will have will enter a self diagnostic mode upon power up, as indicated by a flashing
light. The camera head will return to the HOME position (forward facing, level horizontally). The light will turn solid when the
self diagnostic is complete. If the preset 0 is set, camera will rotate to the 0 preset position after initial configuration.
3.1.2 Video Output
Connect to the USB 2.0 port for standard video output, including use with applications.
1) Network output: Connect this product and your computer through a network cable, then open the browser. Enter
the camera IP address (factory default
192.168.5.163
) in the address bar. Upon login, input a user name and password
(both are "admin” by default). Finally, enter the preview page, and the image will appear.
NOTE:
If you forget your user name, password, or IP address, you can manually restore the default by the remote
controller key combination * #).
4.1 Connecting mode
Direct connection: Connect the camera and computer using a network cable.
Internet connection mode: Connect the camera to the Internet using router or switch, and user can log in to the device
via the browser.
NOTE:
Please do not put the power and network cable in places where can be easily touched. This prevents
lower-quality video due to poor cable contact.
The computer must have the network segment where the camera IP address belongs. The device will not be accessible
without the segment. The camera default IP address is 192.168.5.163, then segment 5 must be added into the computer.
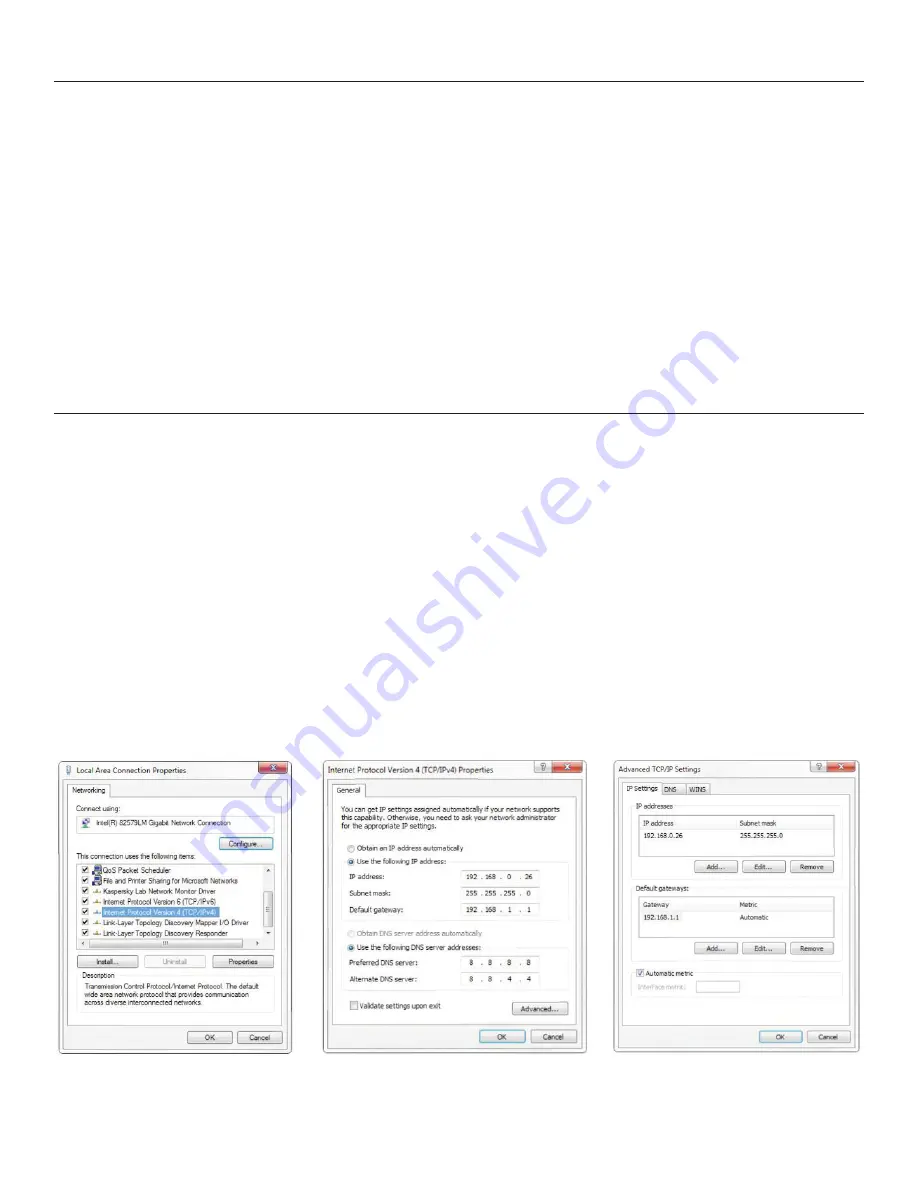
Here are the specific steps:
First, open the window of Local Area Connection Properties on a computer. Select the “Internet protocol version 4 (TCP/
IPv4)” as shown by picture on the left. Double click or click the property “Internet” protocol version 4 (TCP/IPv4) to enter
into the Internet Protocol Version 4 (TCP/IPv4) Properties window. Select “Advanced” and add IP and subnet mask in the
IP browser as shown below. Click “Confirm” to finish adding the IP segment. The user can add the corresponding network
segment according to the revised IP address of the camera.
NOTE:
The IP address to be added cannot be same as that of other computers or devices. The existence of this IP
address needs to be verified before adding.
Содержание LessonCam 12X
Страница 1: ...LessonCam Configuration Guide ...


